8.5.2 Install fixes

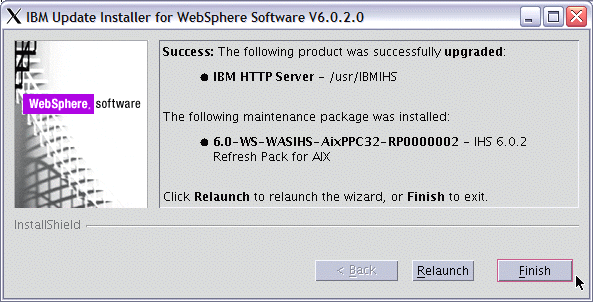
You should upgrade all products to the latest fix levels. We describe how to upgrade both IBM HTTP Server and IBM HTTP Server Plug-in to version 6.0.2.19. In order to do this, you need the following packages:

Attention: The requirement to use a single Update Installer for V6.0.2 release and V6.1 releases was introduced with Fix Pack 21 (6.0.2.21). Starting with Fix Pack 6.0.2.21, the Update Installer is no longer packaged with the Fix Pack itself. You must use Updated Installer V6.1.0.9 (or later) to install Fix Pack 21(6.0.2.21) and later releases. The Update Installer can be downloaded from:

http://www-1.ibm.com/support/docview.wss?rs=180&uid=swg24012718

The latest refresh pack and fix pack are available from:

http://www-1.ibm.com/support/docview.wss?uid=swg27004980#ver60

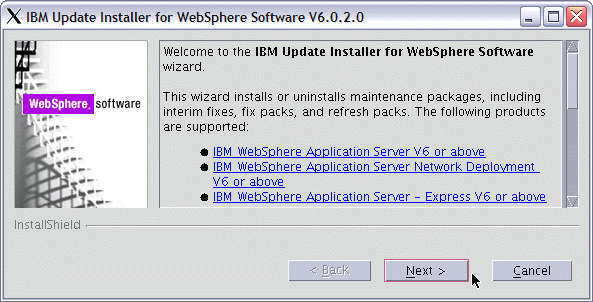
We need to apply the refresh pack first and then the fix pack to all applicable components. While we show how to use the graphical update installer, you may also use the console or silent versions according to the installation instructions included in each package, for example, in case you do not have an X-Windows environment.

Again, the installation is the same on all Web server nodes:

1.xxxx

Log on as root.

2.xxxx

Make sure that IBM HTTP Server is not running.

The following steps need to be performed for all the packages listed above, in the same order as above. As the Java SDK fix needs to be applied to both IBM HTTP Server and IBM HTTP Server Plug-in, the sequence of steps needs to be gone through six times altogether. The examples and graphics are for refresh pack 6.0.2 for IBM HTTP Server.

3.xxxx

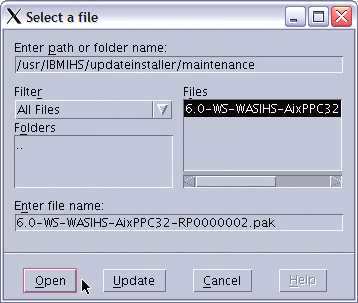
Change to the product installation directory (AIX: IHS_Install_Dir for IBM HTTP Server, Plugin_Install_Dir for IBM HTTP Server Plug-in) and unpack the package into that directory. For example, for IBM HTTP Server:

cd IHS_Install_Dir
tar -xf /tmp/6.0-WS-WASIHS-AixPPC32-RP0000002.tar

4.xxxx

Start the update installer GUI from the updateinstaller directory under the product installation directory:

# cd updateinstaller
# ./update

Note: Run update -console to run the update installer in console mode. You will see the same screens and be given the same options as in the GUI.

Note: For a silent install, perform the following steps:

1.xxxx

Edit the response file (updateinstaller/responsefiles/install.txt). Follow the instructions in the file. You can find the package to be installed in the updateinstaller/maintenance directory. In the response file, this package needs to be specified using -W maintenance.package="..." using an absolute path and file name in double quotation marks, for example:

-W maintenance.package="IHS_Install_Dir/updateinstaller/maintenance /6.0-WS-WASIHS-AixPPC32-RP0000002.pak"

2.xxxx

Run:

./update -options responsefiles/install.txt -silent

3.xxxx

When using the GUI installer, the installer window is displayed, as shown in Figure 8-37.

Figure 8-37 Update installer window

4.xxxx

Click Next. On the next panel, the installation location of the product to be fixed can be entered. When started from the updateinstaller directory inside the product directory, the correct directory is already displayed as the default value (for example, IHS_Install_Dir for IBM HTTP Server and Plugin_Install_Dir for IBM HTTP Server Plug-in), as shown in Figure 8-38.

Figure 8-38 Product installation directory

5.xxxx

Click Next. In the next window, you are asked whether you would like to install or uninstall a maintenance package. Choose Install maintenance package (this is the default).

6.xxxx

Click Next. In the next window, you need to select the package to install. Although the correct package should be preselected by default, IBM recommends checking the filename.

7.xxxx

Click Browse and select the correct package file (ending in .pak) from the maintenance directory, which is opened by default. The package has the same name as the .tar archive. Figure 8-39 shows the file selection window.

Figure 8-39 Maintenance package file selection window

8.xxxx

Select the correct package and click Open. This will take you back to the installation package window, as shown in Figure 8-40.

Figure 8-40 Installation package window showing the correct installation package

9.xxxx

Click Next. The upgrade summary window is displayed. See Figure 8-41.

Figure 8-41 Upgrade summary window

10.xxxx

Click Next to begin the installation. Upon successful installation, a success message is displayed, as shown in Figure 8-42.

Figure 8-42 Upgrade summary window

11.xxxx

Repeat steps 3 to 10 for all packages. Make sure to use the correct installation directories and package names for IBM HTTP Server and IBM HTTP Server Plug-in in step 3.

The installation of IBM HTTP Server is now complete. Make sure that you install all your Web server nodes identically.

Note: In some cases, the Java Runtime Environment (JRE ), which is used by update installer itself, needs to be updated as part of the refresh pack or fix pack installation. In this case, update installer displays a message saying that it will copy the JRE and then relaunch itself, as shown in Figure 8-43, to update the IBM HTTP Server Plug-in with refresh pack 6.0.2. After the relaunch you need to select the .pak file again to apply the fix.

Figure 8-43 Update installer information about updating the currently used JDK

Note: The update installer of the latest fix pack can be used to install interim fixes, too. These come as .pak files, which can be copied into the updateinstaller/maintenance directory in the installation directory of the product to be updated. When running update installer, specify a .pak file, as described in step 7 above, to install an interim fix.

xxxx