Creating the VIO Server LPAR
The VIO Server is installed into an LPAR that can be created using the Partition wizard. Select VIO Server as the partition environment, not AIX.
When creating the LPAR that should run the VIO Server, keep the following considerations in mind:
| When selecting memory values for the Virtual I/O Server LPAR, select the maximum value with care. |
If you select a large number, such as 128 GB, you will pin a significant amount of memory. The hypervisor firmware will reserve 1/64 of the value entered as the maximum value in the hypervisor firmware system memory. Therefore, if you select 128 GB, you will reserve 2 GB of memory in the hypervisor system memory for a value you may never need. The hypervisor memory used can be obtained in the IBM System Planning Tool (SPT).
| When you select the number of CPUs, use a realistic estimate for CPUs. |
If you have a two-CPU workload that may expand up to four CPUs, do not enter 12 CPUs. Unless your production workload validates a smaller value, start with an allocation of at least a whole CPU for the Virtual I/O Server if you plan on having high network traffic. In general, network traffic increases CPU utilization. Disk traffic does not, in general, require the same amount of CPU because the I/Os are queued to slower devices.
| If you want to create a dual Virtual I/O Server scenario with Shared Ethernet Adapter failover, then on the primary Virtual I/O Server select the value 1 in the Trunk priority panel, and use the value 2 on the standby Virtual I/O. Then create the control path between the two Virtual I/O Servers that is used by the Shared Ethernet Adapter failover. |
| Choose a self-explanatory name for the VIO Server and the LPAR. (In our case we added the suffix vio, as in wasp5l_vio.) |
In Example 3-7, we used the command lshwres on the HMC command line interface to display the default settings for memory and processors that we used for the VIO Server.
Example 3-7 Initial memory and processor settings for the VIO Server

#lshwres -r mem \
         -m p5+-9133-55A-SN10D1FAG
         --level lpar
         --filter "lpar_names=wasp5l_vio"

lpar_name=wasp5l_vio,
        lpar_id=1,
        curr_min_mem=128,
        curr_mem=512,
        curr_max_mem=768,
        pend_min_mem=128,
        pend_mem=512,
        pend_max_mem=768,
        run_min_mem=128,
        run_mem=512

#lshwres -r proc -m p5+-9133-55A-SN10D1FAG --level lpar  --filter "lpar_names=wasp5l_vio"

lpar_name=wasp5l_vio,
     lpar_id=1,
     curr_shared_proc_pool_id=0,
     curr_proc_mode=shared,
     curr_min_proc_units=0.1,
     curr_proc_units=0.1,
     curr_max_proc_units=1.0,
     curr_min_procs=1,
     curr_procs=1,
     curr_max_procs=2,
     curr_sharing_mode=uncap,
     curr_uncap_weight=128,
     pend_shared_proc_pool_id=0,
     pend_proc_mode=shared,
     pend_min_proc_units=0.1,
     pend_proc_units=0.1,
     pend_max_proc_units=1.0,
     pend_min_procs=1,
     pend_procs=1,
     pend_max_procs=2,
     pend_sharing_mode=uncap,
     pend_uncap_weight=128,
     run_proc_units=0.1,
     run_procs=1,
     run_uncap_weight=128<
#

The same information can be retrieved using the HMC GUI; see Figure 3-15.

Figure 3-15 Initial memory settings for the VIO Server
When creating a partition, the default values are predefined to only 128 MB, which is insufficient for installing the VIO Server. Therefore, in our case we used 512 MB as the desired value. Set the Minimum memory value to at least equal the desired value, in order to ensure VIO Server operation.
Having a guaranteed 0.1 of a CPU can sustain daily network usage. But by using the uncapped CPU resources, we can allow the VIO Server to grow to 1.0 CPUs, if required, using spare CPU cycles from the CPU pool. The values used during our setup are shown in Figure 3-16.
For more detailed information about how to determine the proper amount of memory and CPU for your VIO Server, see Chapter 5 of IBM System p Advanced POWER Virtualization (PowerVM) Best Practices, REDP-4194.
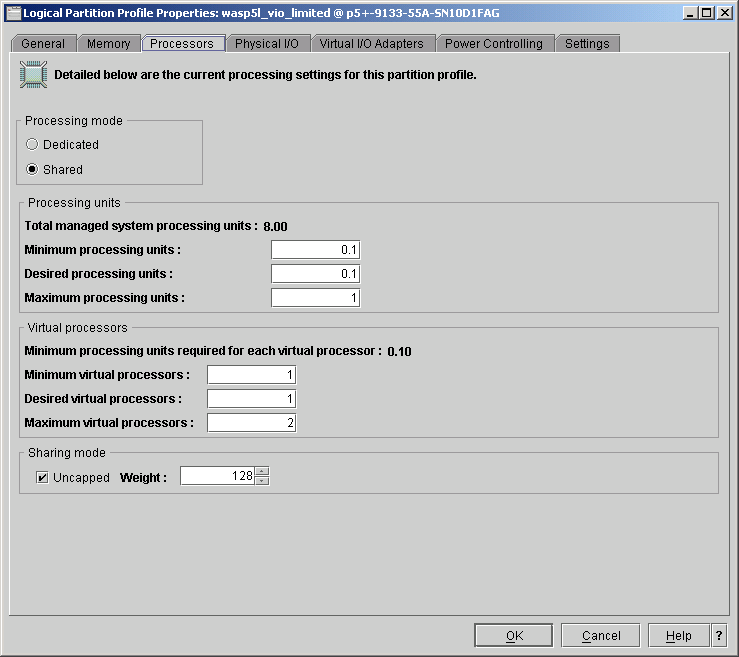
Figure 3-16 VIO initial PROCS values used
The information can be retrieved from the HMC command line login by using the lshwres command, as shown in Example 3-8.
Example 3-8 lshwres output for VIO Server processor settings

wasp5l@riogrande:~> lshwres -r proc
         -m p5+-9133-55A-SN10D1FAG
         --level lpar
         --filter "lpar_names=wasp5l_vio"

lpar_name=wasp5l_vio,
          lpar_id=1,
          curr_shared_proc_pool_id=0,
          curr_proc_mode=shared,
          curr_min_proc_units=0.1,
          curr_proc_units=0.1,
          curr_max_proc_units=1.0,
          curr_min_procs=1,
          curr_procs=1,
          curr_max_procs=2,
          curr_sharing_mode=uncap,
          curr_uncap_weight=128,
          pend_shared_proc_pool_id=0,
          pend_proc_mode=shared,
          pend_min_proc_units=0.1,
          pend_proc_units=0.1,
          pend_max_proc_units=1.0,
          pend_min_procs=1,
          pend_procs=1,
          pend_max_procs=2,
          pend_sharing_mode=uncap,
          pend_uncap_weight=128,
          run_proc_units=0.1,
          run_procs=1,
          run_uncap_weight=128

At this point, we were able to install the VIO Server.