Install ND
Overview
Knowing what component to install and in what order to install the component is an important consideration. Before starting this installation, see...
Plan to install ND
The diagrams show typical topologies for the product. The solutions are also in the Installation solution diagrams in the launchpad. See...
Use the launchpad to start the installation
Select available features and characteristics for WAS ND and the profile that you can create.
Procedure
- Log on to the operating system.
On *nix systems, select a umask that would allow the owner to read/write to the files, and allow others to access them according to the prevailing system policy. For root, a umask of 022 is recommended. For non-root users a umask of 002 or 022 could be used, depending on whether or not the users share the group.
To verify the umask setting,...
umask
To set the umask setting to 022,...
umask 022
![[Windows]](../../windows.gif) When installing on a Windows system, a Windows service is automatically created to autostart the appserver if your installer user account has the following advanced user rights:
When installing on a Windows system, a Windows service is automatically created to autostart the appserver if your installer user account has the following advanced user rights:
- Act as part of the operating system
- Log on as a service
For example, on some Windows systems, click...
Administrative Tools | Local Security Policy | User Rights Assignments
...to set the advanced options.
If you plan to run the appserver as a Windows service, do not install from a user ID that contains spaces. A user ID with spaces cannot be validated. Such a user ID is not allowed to continue the installation. To work around this problem, install with a user ID that does not contain spaces.
- Insert the disc labeled...
WAS ND
...into the disc drive.
Mount the drive if necessary as described in Mounting disc drives on operating systems such as AIX or Linux.
- Start the installation using launchpad.sh|bat or install.exe|sh.
If a problem occurs with the JRE, use the WAS JRE in the directory...
/java/jre/bin
If you have a problem starting the launchpad, use the troubleshooting information in Use the launchpad to start the installation to correct the problem.
When using the launchpad, launch the Installation wizard for WAS ND.
After launching the Installation wizard from the launchpad or from the command line, the installer wizard initializes and then displays the Welcome panel.
- Click Next to continue.
The license agreement displays.
- Read the license agreement and accept its terms.
Click the radio button beside the message I accept both the IBM and the non-IBM terms to agree to the license agreement and click Next to continue.
After you accept the licensing terms, the installation wizard checks for a supported operating system and prerequisite patches. If you encounter a problem such as not having the right prerequisite updates on your system, cancel the installation, make the required changes, and restart the installation.
Although the installation wizard checks for prerequisite operating system patches with the prereqChecker application, review the prerequisites on the Supported hardware and software Web site if you have not already done so.
The Web site lists all supported operating systems and the operating system fixes and patches that install to have a compliant operating system.
Refer to the documentation for non-IBM prerequisite and corequisite products to learn how to migrate to their supported versions.
- After confirming that your operating system is supported and that you have installed all necessary patches, click Next to continue.
The Installation wizard checks for a previous installation at the same product level.
Specifically, the wizard looks for an existing V6.1 installation. If the wizard detects a previous installation, it displays the Existing installation panel, where you can:
- Add features to the existing installation
- Perform a new installation to another directory
See Installing additional features on an existing ND product for more information about the scenario that adds features.
This procedure assumes that you do not have an existing installation that you intend to update.
- Add features to the existing installation
- Select features to install and click Next.
In V6.1, just one feature is available, which installs the Samples Gallery.
Table 1. Features for the WAS Network Deployment product Feature Description Application Server Samples Installs the Samples Gallery applications. Performance considerations
For better performance in either a development or production environment, do not install the Samples. By omitting the Samples, you can improve appserver startup time by 60 percent and save 15 percent of disk space. You can save up to 30 percent of process footprint (based on a maximum heap size of 256 MB).
The Installation wizard displays a confirmation panel.
- Specify the destination of the installation root directory and click Next.
Specify the location of the installation root directory for the product binaries, which are also known as the core product files or system files. The core product files do not change unless you:
- Add a feature
- Install service, such as refresh packs, fix packs, or interim fixes
- Install another product that extends the ND product.
The system-owned default app_server_root directories for installing as a root user or an administrator user are different than the user-owned default app_server_root directories when installing as a non-root installer.
- Deleting the default target location and leaving an installation directory field empty prevents you from continuing.
-
![[AIX]](../../aixlogo.gif)
![[HP-UX]](../../hpux.gif)
![[Linux]](../../linux.gif)
![[Solaris]](../../solaris.gif) Do not use symbolic links as the destination directory. Symbolic links are not supported.
Do not use symbolic links as the destination directory. Symbolic links are not supported.
-
Spaces are not supported in the name of the installation directory on systems such as AIX or Linux.
-
Do not use a semicolon in the directory name on Windows systems. WAS cannot install properly on a Windows platform if the target directory includes a semicolon. A semicolon is the character used to construct the class path on Windows systems.
The installer program checks for required space before calling the Installation wizard. If you do not have enough space, stop the installation program, free space by deleting unused files and emptying the recycle bin, and restart the installation.
- Add a feature
- Select an initial profile on the WAS environments panel.
Valid values include:
Application Server Create a stand-alone appserver profile. Deployment Manager Create a deployment manager profile. Cell Create a cell with two profiles: - deployment manager
- appserver node that is already federated into the deployment manager cell
Custom Create a profile with an empty node. You must federate this node to use it.
None Do not create a profile. 
- deployment manager
- Enable administrative security.
The default setting is to enable administrative security. Clear the check box to disable security or supply an administrative ID and password.

In environments where you plan to have multiple standalone appservers, the security policy of each appserver profile is independent of the others. Changes to the security policies in one appserver profile are not synchronized with the other profiles.
Write down the user name and password. You cannot log onto the console without it. You cannot use WAS at all unless you know the ID and password.
- Review the summary information, then click Next to install the product code or Back to change your specifications.
The installation wizard creates the uninstaller program and then displays a progress panel that shows which components are being installed. At the end of the installation, the wizard displays the Installation completion panel.
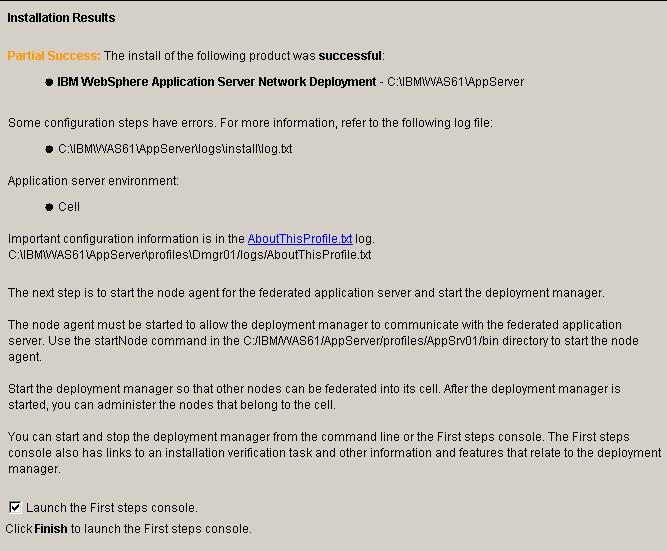
- Verify the success of the installer program by examining the completion panel and the log.txt file for installation status.
Examine...
app_server_root/logs/install/log.txt
...to verify that there were no file system or other unusual errors while installing. If there are problems, correct them, and reinstall the product.
If problems occur, consult the following applicable logs:
- app_server_root/logs/install/log.txt
Logs all installation events
Return code Meaning 0 Success 1 Failure 2 Partial Success - app_server_root/logs/manageprofiles/profile_name_create.log
Traces all events that occur during the creation of the named profile
Created when using the Profile Management tool or the manageprofiles command
INSTCONFFAIL Total profile creation failure. INSTCONFSUCCESS Successful profile creation. INSTCONFPARTIALSUCCESS Profile creation errors occurred but the profile is still functional. Additional information identifies the errors. - app_server_root/logs/manageprofiles/profile_name_delete.log
Traces all events that occur during the creation of the named profile
Created when using the Profile Management tool or the manageprofiles command
INSTCONFFAIL Total profile deletion failure. INSTCONFSUCCESS Successful profile deletion. INSTCONFPARTIALSUCCESS Profile deletion errors occurred but the profile is still deleted. Additional information identifies the errors. - app_server_root/logs/install/installconfig.log.gz
Logs the activities of ANT configuration scripts that run at the end of the installation procedure
Configuration action failed: Unsuccessful ANT script configuration. Configuration action succeeded: Successful ANT script configuration.
If the installation of the core product files fails, fix the error and reinstall.
If the creation of a profile fails, fix the error and run the Profile Management tool to recreate the profile.
If...
app_server_root/logs/install/log.txt
...or...
app_server_root/logs/manageprofiles/profile_name_create.log
...do not contain a record of any problems, but problems exist, see...
-
Troubleshooting installation
Installation component troubleshooting tips
For Windows server, examine the Start menu entry. The menu is an indication of a successful installation:
-
All Programs | IBM WebSphere | Application Server ND v6.1
If you did not create a profile during the installation, the option to launch the Profile Management tool is displayed, which you can use to create an operational environment that includes a profile.
If you did create a profile, select the check box to open the First Steps console.
Results
The installation wizard installs the product files into the installation root directory.
What to do next
Create profiles through the graphical user interface.
Deploy an application.
Install the product and additional software
Install silently