Publishing rules
- Overview
- Publishing status
- Scripted publishing
- Authoring versus run-time systems
- Scenario 1 - Using a separate authoring server
- Scenario 2 - Using a staging server
- Publishing securely
- Publishing to a cluster
- Publishing to an IPv6 host
- Using resource collection classes
Overview
Portal administrators see alternative server topologies which can help us to plan the deployment of the company's personalized portals. Through example publishing scenarios, you learn how to use the publishing features provided by the Personalization component of WebSphere Portal.
WebSphere Portal Personalization sends published objects across HTTP to a servlet which resides on each personalization server. This servlet can receive publishing data or initiate new publishing jobs. When a user begins a publishing job from the personalization authoring environment, the local servlet is provided with the set of information necessary to complete the job. The local servlet contacts the destination endpoint servlet (which could be the same servlet) and sends its data to it. The destination servlet reports success or failure.
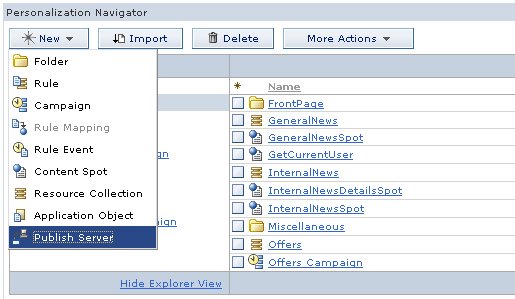
To begin publishing personalization objects, you create an object in the authoring environment which describes the target endpoint. This endpoint definition is referred to as a publish server and is created and managed in a manner similar to creating and managing rules and campaigns.
The server requires one field, which is the URL associated with the publish servlet for that endpoint. The publish server may also define which workspace will receive publishing data. Personalization and Document Manager both operate in the default IBM Content Manager (CM) run-time edition workspace after installation. If the target workspace field is empty, then the publish server uses the default workspace. (You need to set the workspace field if you are configuring scenario three described above.)
The last option is whether or not to delete remote objects that have been deleted on the local system. The default is Smart Delete, which simply removes items that are no longer present. If you do not have delete permission on the remote server you could select the Leave deleted resources on server option.
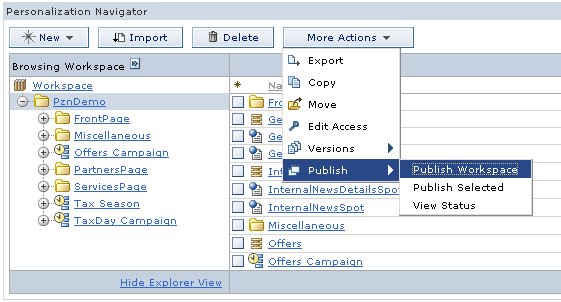
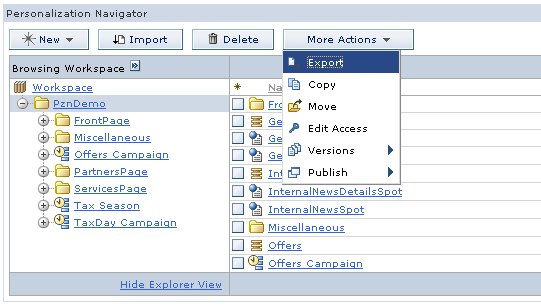
After you create a publish server, we can publish either the entire workspace or a set of objects within it. You specify either of these options by selecting the submenu...
More Actions | PublishThe Publish Selected option is only enabled if you have a single item selected.
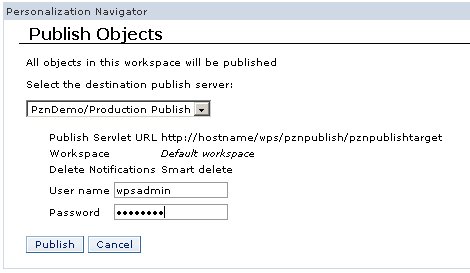
The Publish page displays what will be published. This page requires the user to choose a destination publish server and any necessary authentication information. If the remote system is secured and is not a member of the current server's Single Sign-On domain enter a user name and password in the provided fields. The values for user and password are stored in the WebSphere Portal credential vault and are not accessible to any other user.
Finally, click Publish to launch the publish job.
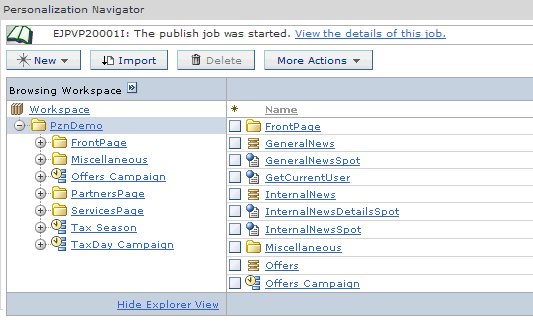
If the local system is able to locate and authenticate with the remote publish server, you are returned to the main navigator view, and you see the Personalization message EJPVP20001I at the top of the portlet. Then, the publish job runs as a background process on the local server. Click the View the details of this job link to open the publish status window to see information about the progress and success or failure of the publish job.
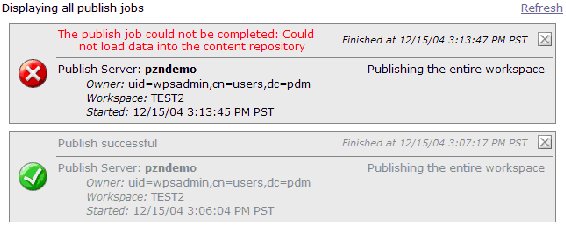
Examining the publish status
To see the status of all current publish jobs, select...
More Actions | Publish | View Status...or click the link provided when a publish job has successfully started. All publish jobs that are currently running or have been completed are displayed. After a job has completed (successfully or otherwise) a close icon displays in the upper right corner that we can click to remove the job from the list of monitored jobs. (If you click this icon, we can no longer view the status of that job.)
Scripted or command-line publishing
We can script the delivery of rules and campaigns from staging to production, or the offline publishing between disconnected systems (such as when production servers are secured behind a firewall).
Scripting can also be used to revert production servers to an earlier state.
Publishing via the command-line is a two step process.
- Export the personalization objects. Select...
More Actions | Export...in the Personalization Navigator portlet. You are prompted for a location to save a nodes file. This file contains an XML representation of all the currently selected personalization objects. We can export entire folders.
- To send the exported data to the desired server use...
WPS_HOME/pzn/v6.0/publish/pznload.[sh|bat]Arguments to pznload include...
serverUrl URL of the remote publish servlet. If a value is not specified the program will attempt to connect to a WebSphere Portal server running on the local machine.
targetWorkspace Name of the workspace to publish to. The default workspace name on all IBM DB2 CM run-time edition installations is ROOTWORKSPACE
targetPath Location in the target workspace which will be the parent for the published nodes. The target path must exist prior to publishing. For example, if the Export function was used on the folder...
/Projects/HR_Website...then the target path should be specified as...
/Projects...so that the published resources are once again located in...
/Projects/HR_Websiteusername A valid user on the target system with sufficient access rights. password Password for the user Once a publish is started, you see status messages in the command console. If an error occurs, to get more information, turn on the Java Run time Environment tracing for WebSphere on the client system or examine the error and trace logs on the server system.
Authoring versus run-time systems
WebSphere Portal Personalization supports the ability to author rules and campaigns on one system and publish them to other systems.
Systems on which rules are authored are referred to as authoring systems and include tools for creating rules in the IBM CM runtime edition repository
Systems on which rules are executed are called run-time systems and include...
- Set of Java libraries to execute rules
- IBM CM runtime edition repository to store the rules
The distinction between the authoring and run-time servers is now merely how the servers have been purposed within the organization, rather than which components are installed on which server or where rules are stored.
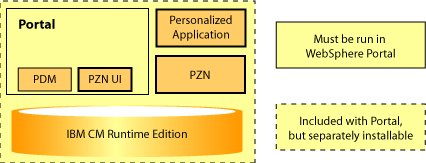
Figure 1 shows the relationships among...
- Document Manager (PDM)
- Personalization authoring portlets (PZN UI)
- Personalization run-time (PZN)
- Personalized application
The Personalization user interface and run-time both use the same repository.
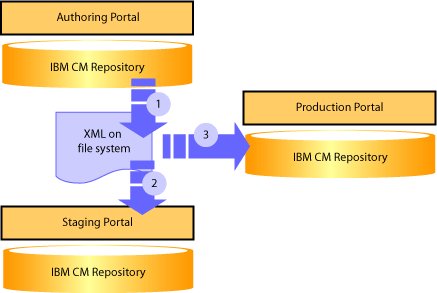
Scenario 1 - Using a separate authoring server
In the simplest publishing scenario, there are two servers between which you want to move rules. Typically, business users create and test rules on one server, and then either the business user or portal administrator publishes them to a production server.
In the figure below the blue arrow indicates the typical publishing step for moving a rule from a business user's authoring environment to production.
The other arrows represent publishing steps that are possible, but are not encountered during every day use.

Occasionally, customers have requested the ability to publish from a production portal back into their authoring environment. This is useful if some problems have arisen in the production portal which cannot be reproduced in the authoring or staging environments. In this case, we can "back-publish" to insure that the authoring or staging environment contains the same artifacts as the production environment. Although, ideally, all the artifacts are backed up sufficiently outside the production environment, you might need to back-publish for disaster recovery of the authoring system.
Scenario 2 - Using a staging server
You might decide to keep a full replica of the production system so we can perform the final verification tests before you make any changes to the production system. For this purpose, you could introduce a staging server. Switching the staging and production environment when the staging is certified is one way to move between staging and production. Our network can reroute traffic from the production system to the staging system at a desired point, turning the old production environment into the staging environment and the old staging environment into the production environment.
When rules change very infrequently and the very highest level of control over rules is required, rerouting the production traffic to the staging machine is a good option. When rules change frequently, when different rules change on different schedules, or when rules change on a different schedule than the binaries, this approach might be cumbersome because it requires frequent coordination with the network administrators.
Another typical configuration of...
- development
- authoring
- staging
- production
...is shown below.
In this scenario, you introduce two more servers. Developers might use one or more of their own sandbox portals or portal unit test environments. The test environments could also run locally on developer machines. A staging portal fully isolates quality assurance testing from developers and business users. All four installations are full WebSphere Portal installations, with both authoring and run-time capabilities. The development portal could be a Rational Unit Test Environment.
Many organizations will be fully satisfied with a two server setup outlined in scenario one and do not need to consider introducing a staging server. On the other hand, if the organization has already planned to use a staging server for the other portal applications, then this configuration will support using that environment for personalization.
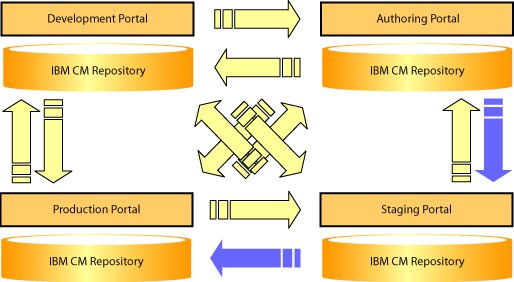
The blue arrows in the figures represent publishing steps required to move an artifact from authoring to production. By publishing directly from the staging portal to production, we can be sure that what is in production has always gone through staging. We can use servlets secured with different credentials and firewalls to prevent publication directly from authoring to production.
These publishing steps could be initiated from the user interface or scripted from the command line. An XML file may be exported and then published from the command line. A user first exports the folders, rules, and anything else that needs to be published. The exported XML is handed off to a deployment team who publishes to a staging server for final verification and quality assurance testing. After final verification, the same XML file is published to the production portal. Using an intermediate XML file and having a controlled deployment process assures what is on the production portal has gone through staging, and lets us keep a backup of the exported XML to re-publish later. We can include calls to the Personalization publish in the deployment scripts by calling the command line publish tool called PznLoad on exported XML files. Using the command line tools in deployment scripts can coordinate the publishes with other changes to the Portal.
Publish securely
WebSphere Portal Personalization uses the built-in SSL capabilities of WebSphere Application Server to provide secure publishing across unprotected networks. Our personalized portal can benefit from the full range of authentication repositories supported by WebSphere Application Server security.
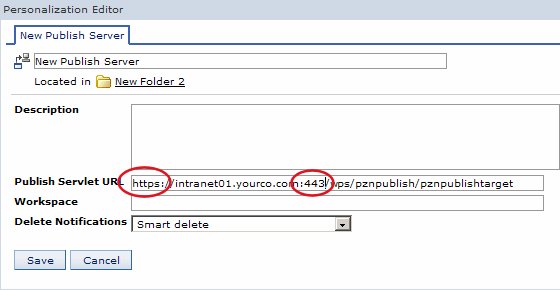
To enable Personalization publishing over SSL, see the Personalization Navigator's inline help: click the question mark in the upper right corner of the portlet, and scroll down to the bottom of the page to locate the link to the help topic on publishing. After you enable SSL between two Personalization servers, we can enable its use for a specific publish server by adjusting the URL of the publish servlet to use the HTTPS protocol. If the remote server is not using the default HTTPS port of 443, modify the URL by adding a colon and the port number immediately after the host name.
To initiate a publishing job the portlet makes a request to the publish servlet on the local server, which then communicates with its counterpart on the destination publish server.
If a Personalization server is configured to use a non-standard HTTPS port or context root, or if you see messages such as...
EJPVP20002E: The local publish service was not available...when publishing from the authoring environment, the local publish servlet URL might be incorrect.
To specify the correct URL for the local publish server, from the Portal Administration page, select...
Portlet Management | Portlets Personalization Navigator portlet | Configure...then add a new portlet parameter...
pzn.publishServlet.url
To determine whether a particular URL is valid, point the browser to that location and enter the username and password for the system. If you see the message Publish servlet available and all SSL certificates have been properly imported, you should be able to publish. We can change this URL to redirect all publish jobs through a specific cluster member.

In some environments even SSL publishing may not be secure enough. The pznload command-line program lets us fully control the transportation of the rules and campaigns during publish. We can encrypt the exported.nodes file and send it using e-mail, or we can use another secure channel such as physical media transported between the staging and production servers.
Publish to a cluster
Publishing to or from a clustered environment requires no special configuration. The specific cluster member that will perform the publishing task is chosen by the same rules that apply to incoming Web requests (because the publishing mechanism uses HTTP messages). At the end of a successful publishing job, Personalization flushes its caches for that workspace to ensure that any subsequent personalized content will be as current as possible.
When you first used the Personalization authoring portlets on a cluster to publish objects, the Publish Status dialog...
More Actions | Publish | View Status...only shows information about the publish jobs initiated on that cluster member. To make all publishing jobs visible, set...
pzn.publishServlet.url...as described above to be a specific cluster member. Set the URL to point to a single machine at the WebSphere internal HTTP port. The default for HTTP is 9081, and for HTTPS it is 9043.
For example, suppose the cluster head is visible at...
http://intranet.yourco.com...and the cluster members are accessible at...
http://intranet01.yourco.com...and...
http://intranet02.yourco.comSetting the publish servlet URL parameter to...
http://intranet01.yourco.com:9081/wps/pznpublish/pznpublishservlet...forces all publishing requests to run on this single machine.
IBM recommends publishing to a single node in the cluster as opposed to the cluster head.
Publishing to an IPv6 host
The server which initiates the publish command must have the IPv6 protocol stack installed and available. When publishing from the command line using pznload to an IPv6 host, you may need to set the system environment variable IBM _JAVA_OPTIONS to a value of...
-Djava.net.preferIPv4Stack=false -Djava.net.preferIPv6Addresses=true...on the system where pznload is run.
Use resource collection classes
Use resource collections in Personalization to access resources such as...
- SQL
- LDAP
- IBM Content Manager
- Portal user objects
The IBM CM run-time edition and the WebSphere Portal user resource collection classes are installed in the Personalization shared library. Therefore, you do not need to move these classes between systems because they are already installed with Personalization.
For SQL and LDAP resources, Rational Application Developer provides a wizard to generate classes which implement the resource collection interfaces.
To use the authoring portlet, all resource collection classes must be in the class path of the Personalization authoring portlet. The rule editor uses these classes to display the list of attributes belonging to the collection. If the resource collection classes are not found by the rule editor, you could see the following message in a JavaScript alert.

The resource collection classes must also exist on the class path of the application invoking the Personalization rules. The Personalization rules engine finds the resource collection classes using the class path of the application which invokes the rules. If you use the Personalized List portlet to display rule results, this application is the Personalized List application pznruleportlet.war in the Personalization Lists.ear.
So, the classes should be accessible to both the rule editor and the personalized application. An application server shared library is the easiest way to accomplish this. We can configure the shared library using the Application Server Administrative Console.
You handle updates and additions to the resource collection classes just as you would handle updates to any application binary or JSP. These classes are not affected by Personalization publishing. The definition of the resource collection which Personalization uses to associate a resource collection with its classes is stored in the CM repository. Initially represented by the.hrf file, this definition is published along with the rules and campaigns.