Create the Personalization content resource classes and content spot
Ensure you have properly followed the steps in Create the jsp file in Rational Application Developer.
- In the Project Explorer tab in RAD, right click on the Pers_Offers project and choose New > Other
- From the New window, select Portal > Personalization > Content or User Resource.

- Click Next
- Select the following options by clicking the appropriate radio button:

- SQL
- Connect to an SQL database for a database model
- Web Content
- Enter the following values:
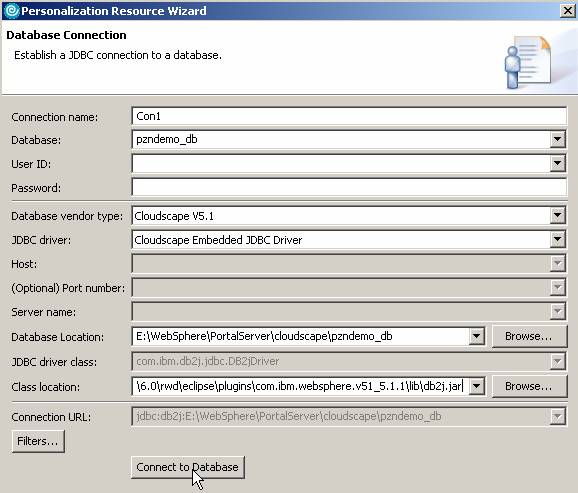
- In the Database field, type pzndemo_db
- From the Database vendor type drop-down list, select Cloudscape V5.1
- From the JDBC driver drop-down list, select Cloudscape Embedded JDBC Driver
- From the Database location field, click Browse. Navigate to and select...
portal_server_root/cloudscape/pzndemo_db/
- From the Class location field, click Browse. Navigate to and select...
portal_server_root/shared/app/cloudscape/db2j.jar
- Click Connect to Database. The personalization resource wizard opens.
- Expand APP > Tables
- On the Tables tab, highlight PZN_OFFERS by single clicking on it. Click the arrow button pointing to the right to select the table.

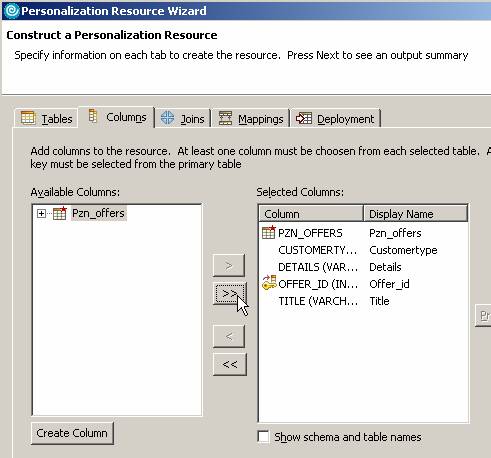
- Select the Columns tab
- On the Columns tab, move all columns to the right by clicking the double arrow button. Notice the primary key is the column OFFER_ID.
- Click the Mappings tab.
- On the Mappings tab, select Customertype and click Populate.

- Click the Select buttons and expand APP > Tables > APP.PZN_OFFERS to select CUSTOMERTYPE:VARCHAR for the Description and Value fields. Click OK.

- Click the Deployment tab.
- On the Deployment tab, change the datasource to jdbc/pzndemo. This datasource is defined in WAS by the Personalization demo program installation.

- Click Next.
- Set the package name as pers_offers. Select Generate a Content Spot for this resource.

- Click Finish.
- The wizard asks to make pers_offers a Personalization project. Click Yes.

We can now see the new java classes in the project:

We can now create the Personalization user resource classes and content spot.