Mixed Server Environment
If our environment contains some WebSphere Extended Deployment (XD) servers as well as non-WebSphere XD servers, then we can take advantage of WebSphere XD's capabilities to perform in a mixed server environment (MSE). We can build a single workload routing layer to handle all HTTP traffic flowing into that set of servers. The operational policies and visualization features of IBM WebSphere XD V6.0 support this workload routing layer.
These capabilities are enabled by placing the On Demand Router (ODR) in front of any HTTP endpoint (older versions of or standalone WASs, BEA, Tomcat, JBoss,.NET, Web servers, and so on). The ODR is considered a proxy, a specific type of application server, that routes HTTP requests to application servers that then perform the work.
This chapter consists of a scenario designed to show we how to configure our environment so that we can attain the benefit of autonomic workload management even when our backend servers are not WebSphere XD servers. The results demonstrate the quality of service that WebSphere XD delivers in a MSE.
In this scenario, the DayTrader application runs on two Apache Geronimo servers. The DayTrader workload consists of buy and sell requests randomly generated by the DayTrader scenario servlet.
Generic server clusters
A generic server cluster is a collection of transport end points that can be used as a target for an ODR routing rule. In the generic server cluster, we configure the servers and nodes, including their connection protocol (HTTP or HTTPS), end points (host name, the listening port, and weight) and perhaps custom properties. Servers in a generic server cluster can be any server type, that is, WASs, foreign, or generic servers.
Generic servers can be stopped and started by a WAS Node Agent while foreign servers are usually not stopped and started by a Node Agent. All server types can run the remote agent provided by WebSphere XD for Mixed Server Environments to allow for dynamic workload management based on CPU utilization.
Normally, the ODR supports automatic routing to nodes in target cells that have a Deployment Manager with WebSphere XD installed. To route to nodes that do not have WebSphere XD installed, a generic server cluster must be configured.
Service policies
A service policy is a user defined categorization that is assigned to potential work as an attribute that is read by the autonomic request flow manager (ARFM). We can use a service policy to classify requests based on request attributes, including the URI, the client name and address, and the user ID or group. By configuring service policies, we apply varying levels of importance to the actual work. Defining generic server cluster service policies for each ODR allows WebSphere XD to manage requests from the non-XD servers to meet performance goals.
Using the DayTrader application, we will see how WebSphere XD manages a mixed priority workload when service policies for the application are defined.
Through the runtime topology function of WebSphere XD we will see how WebSphere XD monitors workloads for these nodes. The charting of average response times and concurrent requests for each non-WebSphere XD server is demonstrated.
We route work to two foreign Apache Geronimo servers that are running in a MSE. This includes the remote agent that was installed during WebSphere XD for Mixed Server Environments installation. The remote agent monitors CPU information, then sends that information to the On Demand Router, which then makes better use of resources. The CPU information, at the time of writing this book, is not available for viewing in the visualization function of IBM WebSphere XD V6.0. However, we include a debugging option in this chapter that allows us to see the CPU metrics occurring for our systems.
The remote agent and dynamic workload management (DWLM)
Because the remote agent is available in the MSE, dynamic workload management is now possible through the dynamic workload manager (DWLM). The DWLM is a feature that applies the same principles as workload management (WLM) itself, such as routing based on system weights, which establishes a prioritized routing system. DWLM however adds an autonomic setting of the routing weights to WLM. With WLM, we manually set static weights in the Administrative Console. With DWLM, the system can dynamically modify the weights to stay current with business goals.
For example, if CPU utilization is high on the system, then the remote agent sends that information to the ODR. The ODR then sends less requests to that server. Conversely, when CPU utilization decreases, then the remote agent informs the ODR, which can then send more requests to the server. Hence, manual intervention is not needed.
Scenario topology
To demonstrate the scale-out functions of WebSphere XD, we include two systems with different capacities running Apache Geronimo. scaleout2 is a small Windows system and scaleout1 is a larger Linux machine. These two nodes are pure external, foreign nodes. We configured unmanaged nodes for them in the xdcell to make sure we can add custom properties to the nodes if needed. Also used for this scenario are two On Demand Routers. We have the DayTrader application (including a Cloudscape database for this application) deployed on the Apache Geronimo servers.
Here is the topology for this scenario in more detail:
WebSphere XD environment
We assume the following components are installed and running:
- The Deployment Manager.
- Two ODR nodes (odr1 and odr2).
- IBM WebSphere XD V6.0 on the above listed systems.
- Two Apache Geronimo servers (scaleout1 and scaleout2).
- WebSphere XD for Mixed Server Environments on the Apache Geronimo systems.
- Application installed on the Apache Geronimo servers.
- Optionally we can use Web servers in front of the ODRs. We use two Web servers (web1 and web2) in our topology.
Application used in the redbook scenario
To show the working of IBM WebSphere XD V6.0. service policies on non-WebSphere XD nodes, we use the DayTrader sample application.
We have installed DayTrader on the two Apache Geronimo servers, named scaleout1 and scaleout2.
Starting and testing the servers and application
Start our Apache Geronimo servers and test our application by opening a browser and specifying the URL where our applications are installed, for example:
http://scaleout1:8080/daytrader
Starting the remote agent on the scale-out servers
From a command prompt, start the remote agent using the startagent.bat or startagent.sh command. For example, on Windows,
C:\Program Files\MixedServer\bin>startAgent.batWe can start the remote agent on another port by adding the desired port number to the start command. For example:
C:\Program Files\MixedServer\bin>startAgent.bat 9999If the remote agent listens for incoming requests from a port other than the default port, 9980, specify the stats.collector.remote.agent.port custom property on the unmanaged node. From the Administrative Console:
- Click System administration | Nodes | node | Custom properties | New.
- For the Name, enter stats.collector.remote.agent.port.
- For the Value, enter the port number where the remote agent listens for requests.
- Save our configuration.
Configuring the scale-out environment
To categorize workload for each application we are using in our environment, the following must be defined in our environment:
- Generic server cluster
- ODR configured for the generic server cluster
- Work classes and routing rules
- Optionally service policies and transaction classes
The following sections take we through the steps needed to accomplish these tasks.
Creating a generic server cluster
To define a generic server cluster, follow these steps:
- Log on to the Administrative Console.
- In the Administrative Console go to...
Servers | Generic Server Clusters- Click New.
Enter a name for our generic server cluster and allow the Protocol to default to HTTP. In our example, we name the generic server cluster GeronimoSC.
- Click Apply. This enables the Custom Properties and Ports links on the right hand side.
Alternatively we can click OK, but then we need to come back to this panel later to define the ports and any necessary custom properties.
Defining generic server cluster endpoints
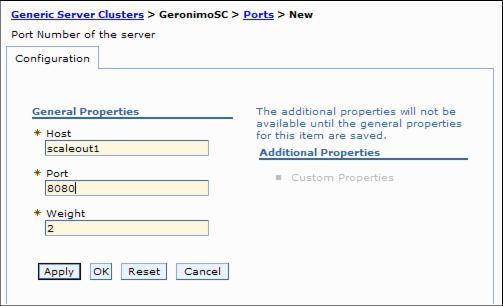
In our scenario, our generic server cluster endpoints are two Geronimo servers called scaleout1 and scaleout2. Endpoints are added to the generic server cluster by defining the application serving ports of the endpoint hosts. Therefore, we now add those host names and ports to GeronimoSC.
- Click GeronimoSC first if we clicked OK in the previous step or simply click Ports right away if we clicked Apply before. Click New.
- Enter the following values:
Host scaleout1 (replace with our fully qualified host name) Port 8080 (replace with our appropriate port number) Weight 2 Enter the port number which the Apache Geronimo server uses to serve the installed application. By default this is 8080.
We only need to enter a correct weight value if we are not using the remote agent to provide CPU information to the ODR. If we intend to use the remote agent, then we can use any value as this will be overwritten by dynamic workload management.
If we configured the remote agent to listen on a non-default port, if we are using a custom statistics collector plug-in, or if our nodes are multi-homed, we must define a custom property called node on the generic server cluster endpoints. This custom property links the endpoint to the unmanaged node previously defined.
In this case, rather than now clicking OK, do the following:
- Click Apply to enable the Custom Properties link.
- Click Custom Properties.
- On the upcoming panel click New to add a new custom property. Enter the name of the unmanaged node that is associated with the generic server cluster port, such as scaleout1 in our example.
- Click OK.
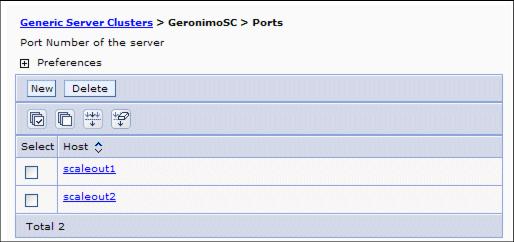
- Click the Ports link at the top of the Custom Properties panel to see our newly configured ports and add more endpoints if needed.
- Click OK.
- Repeat the same steps for our other servers if applicable. We have configured the same port and weight values for scaleout2.
- Save and make sure that we synchronize with nodes.
Now, we should see our hosts listed.
Configuring the ODR for the generic server cluster
We do not need not have a remote agent installed on the non-WebSphere XD servers to route requests from the ODR to such a server. However, installing the remote agent (which equals to installing WebSphere XD for Mixed Server Environments) allows us to take advantage of the dynamic workload management. In this case, the remote agent sends CPU utilization information back to the ODR which can in turn adjust the workload being sent to a node.
We assume that we have installed the remote agent on each of our non-WebSphere XD nodes.
We also assume that our ODR is fully configured to route requests to our WebSphere XD environment and to update the plugin-cfg.xml file on the Web servers if used in our environment. In our scenario we have two ODR nodes named odr1 and odr2.
The first configuration step described here is to add a work class then adding associated routing rules within each ODR.
Adding a work class
A work classes is logically a grouping of work requests that determines how the request should be classified. Work classes are described in more detail in Chapter 3., Setting up WebSphere XD for dynamic operations.
Use the following instructions for each ODR. From the Administrative Console:
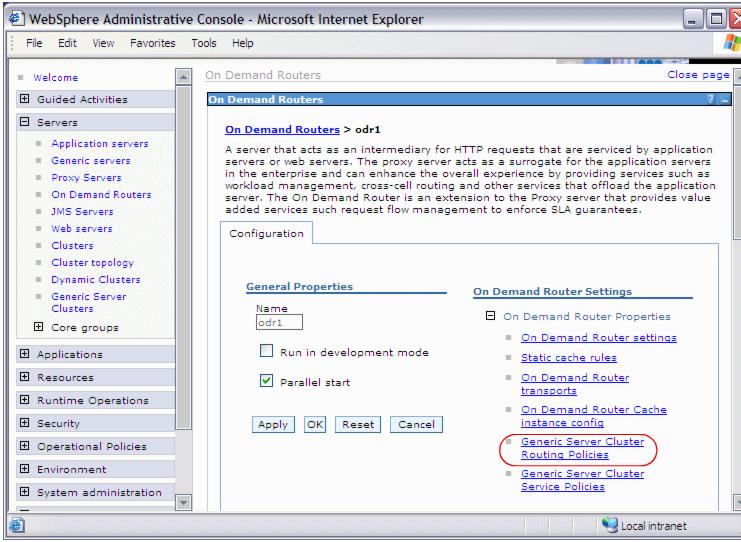
- Go to Servers | On Demand Routers.
- Click odr1.
- Open the On Demand Router Properties menu, located under On Demand Router Settings.
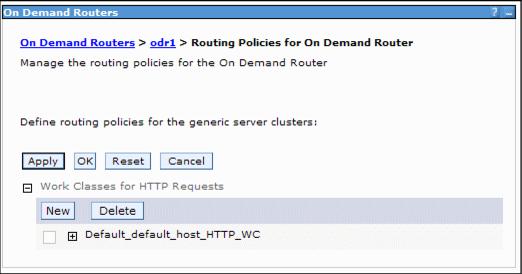
- Click Generic Server Cluster Routing Policies.
- Expand Work Classes for HTTP Requests.
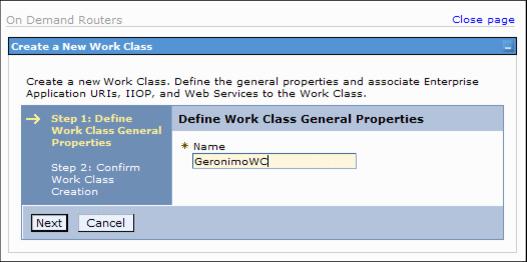
- Click New.
- Type a name for our new work classes. For example, GeronimoWC.
- Click Next.
- Click Finish. The new work class is now listed.
Defining the associated routing rule for the work class
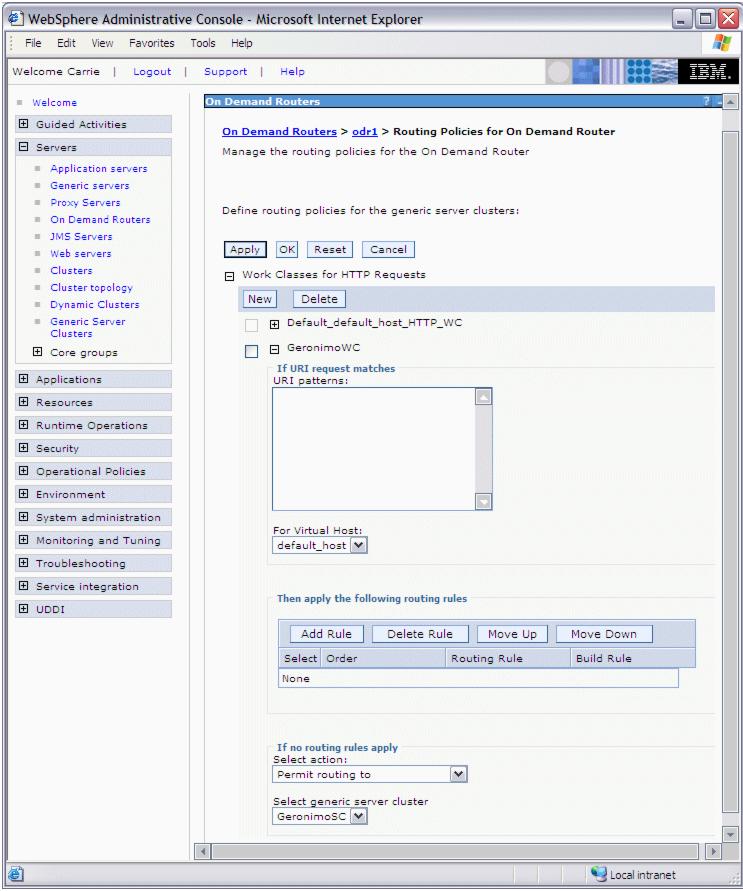
Define the associated routing rule for the work class we have just created:
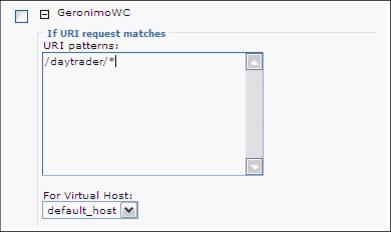
- Expand our new work class.
- Enter the URI of our application into the If URI request matches URI patterns frame. For example, /daytrader/*.
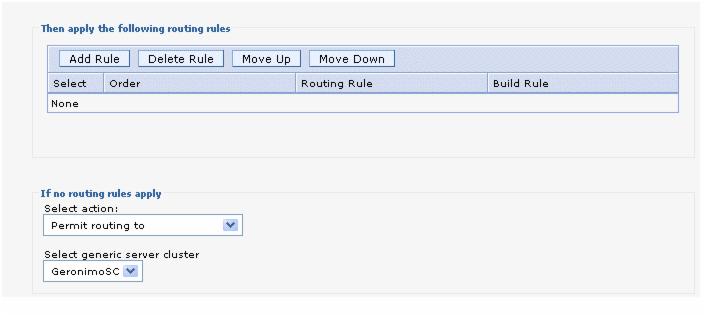
- We do not define any specific routing rules for this work class.
- In the If no routing rules apply frame, first select the Permit routing to action, then select our generic server cluster. For example, GeronimoSC.
Select Permit routing with affinity to if our application needs to maintain state.
- Click OK.
- Save and synchronize with nodes.
Follow these steps for every ODR we are using in our environment.
Verify the configuration
A first step in reviewing the new configuration is to verify that the plugin-cfg.xml file on the ODR contains the configured work class and URI. The plugin-cfg.xml file is found on the ODR in...
install_root /profiles/ODR_Node/etcIf we see these entries, we should then verify that this configuration is indeed working by trying to access the application through the ODR(s) instead of the Geronimo servers directly. For example, use:
http://odr1/daytrader
http://odr2/daytrader
If there are Web servers in our environment, as the next step, try to access the application via the Web servers. In our case:
http://web1/daytrader
http://web2/daytrader
If our configuration was successful, our application is now served with the ODRs and Web servers.
The remote agent must be started on the Apache Geronimo servers. Starting the remote agent on the scale-out servers, to take advantage of the dynamic workload management functions in WebSphere XD.
While this configuration together with the remote agent already take care of distributing the workload dynamically via the ODR, we are however not yet using additional functions such as service policies.
Operational policies
Operational policies consist of health policies and service policies. Health policies monitor and control application and server vitality, while service policies define and help meeting performance goals. The service policies defined for GeronimoSC are discussed in the following sections.
Defining service policies
A service policy in WebSphere XD is a user-defined business goal, and correlates to transaction and work class components. The service goal creates the goal, while the transaction and work classes are used to connect Universal Resource Identifiers (URIs) to that goal. Before we can assign service policies to a generic server cluster, we must define service policies through the Operational Policies panel in the Administrative Console.
Test machine workload capacities before defining service policies.
Defining generic server cluster policies
For generic server clusters, service policies and transaction classes can be defined within each On Demand Router (ODR) we are using. We define a platinum service policy for DayTrader through odr1, and a gold service policy for the same application on odr2. The intention is to give a client accessing the application through odr1 better average response times and thus higher priority than clients accessing the application through odr2.
The average response time goals for the platinum and gold service policies have been set to show a comparison of results.
Create two service policies named Platinum_SP and Gold_SP. Assign an average response time goal of 1200 milliseconds to the platinum service policy and an average response time goal of 1500 milliseconds to the gold service policy. The resulting average response times for both policies will show how the ODRs handle requests to meet the performance goals.
To assign the two service policies to the ODRs, follow these steps in the Administrative Console:
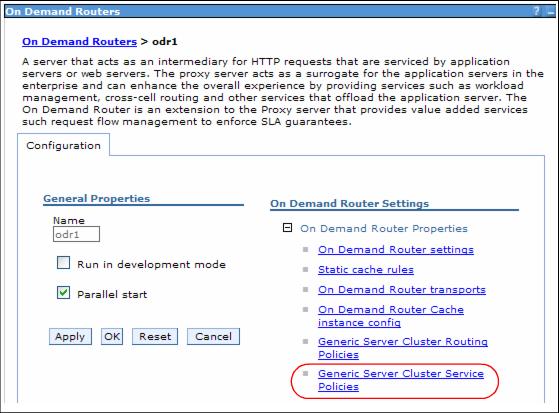
- Select Servers | On Demand Routers.
- Select our first ODR, in our case odr1.
- Expand On Demand Router Properties.
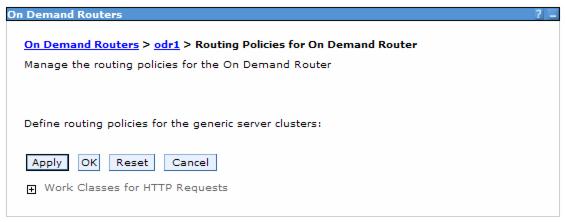
- Select the last option, Generic Server Cluster Service Policies.
The panel shown below opens
- Expand Work Classes for HTTP Requests.
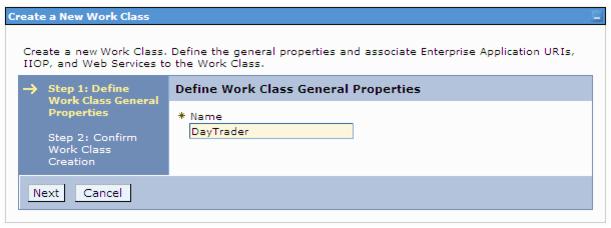
- Click New.
- In the next panel, type the name of our new work class definition. For example, DayTrader.
- Click Next, then Finish.
- Expand Work Classes for HTTP Requests again.
- Now that we have defined our work class, we must specify a URI pattern. Therefore expand our newly defined workclass which opens the panel.
- Enter a URI pattern, for example /daytrader/*, within the URI patterns frame.
- In the If no classification rules apply... frame select the platinum service policy's transaction class name:
Default_TC_Platinum_SP (Platinum_SP)- Click OK at the top of the panel then save and synchronize our new configuration.
- Follow steps 1 to 13 for each ODR we are configuring. For our sample topology, we created another new work class for odr2 and assigned the same URI pattern but the Default_TC_Gold_SP (Gold_SP) transaction class to it.
This is just one example for how to use service policies. Other possible examples include:
Defining service policies for parts of our application. For example, in the case of the DayTrader application, we have buy and sell requests. We could use service policies to give buy requests a higher priority than sell requests. Using service policies to better serve some of our clients. For example, assume we have an intranet application for our human resources department. Employees of the HR department need permanent access with low response times while "normal" employees use the application mainly for information purposes and do not need the same quick response times. Based on IP addresses or any other possible operands we could create rules to ensure the HR department has the best possible access to the application.
Observing the results in the runtime topology
We can use the visualization features of WebSphere XD to show that our configuration was successful.
From the Administrative Console, expand Runtime Operations | Runtime Topology. Select the Service policy perspective for All service policies.
Then, select the following values for metrics to view the requests:
- Data Scope: Generic Server Cluster
- Data Set Type: Node
- Data Name: Select our generic server cluster. For example, GeronimoSC.
- Data Set: Select our nodes, for example, scaleout1 and scaleout2 and click Add.
- Data Metric: Select Concurrent Requests and Average Response Time and click Add.
The platinum and gold service policies are depicted by straight, horizontal lines. No workload has been evoked yet. Hovering over the line reveals the details defined for each goal. For example, the platinum service policy goal shows the average response time of 1200 milliseconds that we defined earlier.
Figure 11-18 Platinum service policy goal
Next, we used a load testing tool to invoke requests to our application via the ODRs.
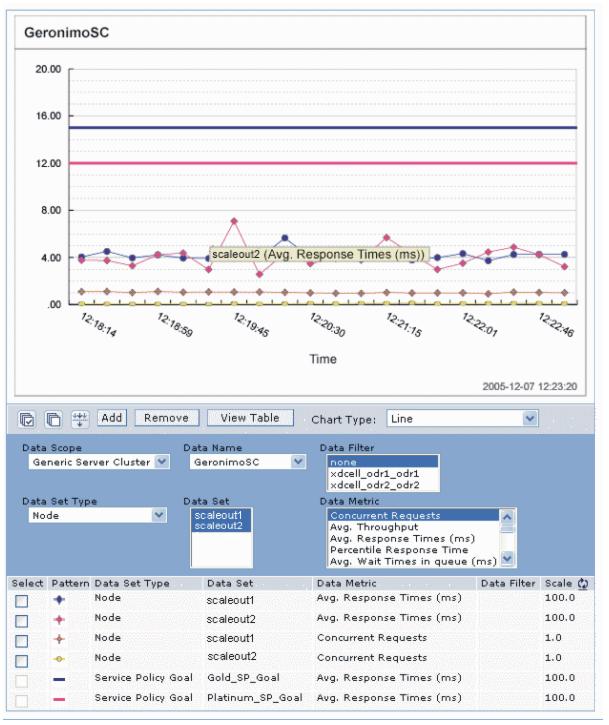
Figure 11-19 and Figure 11-20 are a real-time assessment of the DayTrader application running. It depicts the service policy goals defined for GeronimoSC, with the mapping of the actual workload response times against the goals. The charts demonstrate average response times, concurrent requests, and service policy goals for scaleout1 and scaleout2.
Figure 11-19 scaleout1 average response times
The straight, horizontal lines represent the service policy goals, while each of the dotted lines represent the metrics selected for the data set. In this case, average response times and concurrent requests for each node. To view other data metrics, highlight our choices, then click Add.
Figure 11-20 scaleout2 average response times
Note that the workload in this example is low enough that the average response time goals of 1200 and 1500 milliseconds are well met for both scaleout1 and scaleout2. The ODRs and DWLM distribute the workload between the two Apache Geronimo servers. As we can see, scaleout2, which is our smaller Windows machine, serves less concurrent requests as scaleout1 which is a bigger Linux machine - which results in similar response times for both servers.
Debugging the remote agent
At the time of writing this redbook, the runtime topology did not yet show the CPU Utilization metrics for generic server clusters. However, the remote agent has a debugging option that we can use to see CPU Utilization, nodeSpeed, and numberofCPUs. Follow these instructions to see these metrics.
Edit the startAgent.bat or startAgent.sh (depending on our platform) command script. There is a property called ws.ext.debug, which the command script sets by default to false.
- Go to directory install_root\bin\ where startagent.bat/sh is located.
- Edit the startAgent.bat/sh file in a text editor.
@echo off
@REM Usage: startAgent.bat  [port]
setlocal
call "%~dp0setupCmdLine.bat" %*
"%JAVA_HOME%\bin\java" -Dws.ext.debug=false  -classpath "%INSTALL_ROOT%\lib\extnode.agent.jar" com.ibm.ws.externalnode.agent.RemoteAgent %*
endlocal
- Change the property value from false to true, that is, -Dws.ext.debug=true.
- Save the changed command script.
- From a command prompt, start the remote agent by using the startAgent.bat/sh command.
The remote agent will then print debug lines showing the requests it receives and the responses as a result of the request.
C:\Program Files\MixedServer\bin>startAgent.bat
[Debug]: java.class.path = C:\Program Files\MixedServer\lib\extnode.agent.jar
[Debug]: java.library.path = C:\Program Files\MixedServer\_uninstXD\_jvm\jre\bin;.;C:\WINDOWS\System32;C:\WINDOWS;C:\WINDOWS\system32;C:\WINDOWS;C:\WINDOWS\System32\Wbem;C:\Program Files\IBM \InfoprintSelect; C:\Utilities;C:\Notes;C:\Program Files\XLView\;C:\lotus\compnent\;C:\Program Files\IBM \Personal Communications\;
C:\Program Files\IBM \Trace Facility\;C:\WINDOWS\Downloaded Program Files;C:\Program Files\ObjREXX;C:\Program Files\ObjREXX\OODIALOG;C:\Infoprint;
AgentServer running. Enter "quit" to terminate.
[Debug]: Remote Agent waiting for incoming Request on port 9980
The resulting lines that are sent back by the remote agent are shown below. Lines 3-10 show the request received by the remote agent. In this case, it is an HTTP request. The last line (highlighted in this example) is the response sent back by the remote agent.
[Debug]: Remote Agent waiting for incoming Request on port 9980
[Debug]: Connection received from odr1.ibmredbooks.com/9.42.171.40:51311 HostName of client odr1.ibmredbooks.com
[Debug]: GET /getSystemInfo HTTP/1.1
[Debug]: Cache-Control: no-cache
[Debug]: Pragma: no-cache
[Debug]: User-Agent: Java/1.4.2
[Debug]: Host: kll6598:9980
[Debug]: Accept: text.html, image/gif, image/jpeg, *; q=.2, */*; q=.2
[Debug]: Connection: keep-alive
[Debug]:
[Debug]: Response sent: XDPerf: avg=45.98516159948551, min=18, max=95, total=317
1347172, count=68964576, st=1131648105168, lst=1131717069744, speed=3056, cpus=1
Where:
total sum of the values (CPUUtilization) of all samples collected since the start of the remote agent. count number of samples involved in this statistic. avg average CPUUtilization obtained by dividing the current total by count. min minimum sample value max maximum sample value. st start time of the remote agent in milliseconds since midnight, January 1, 1970 UTC. lst last sample time in milliseconds since midnight, January 1, 1970 UTC. speed CPU clock speed in MHz. cpus number of CPUs running in the external node.
References
The following online articles and Web sites are helpful resources to learn about Apache Geronimo, Gluecode, and the IBM WAS Community Edition:
- Apache Geronimo home page:
- Get started with Geronimo
- Building a better J2EE server, the open source way:
- Geronimo! Part 1: The J2EE 1.4 engine that could:
- Geronimo! Part 2: Tame this J2EE 1.4 bronco:
- Build a secure enterprise infrastructure with Geronimo:
- IBM WAS Community Edition, Apache Geronimo, and Gluecode:
- What is Gluecode? And why?:
- IBM developerWorks "Discussions with the XD Senior Architecture Team" blog: