Service policies, work classes, and routing policies
- Service policies
- Service goal types
- Importance
- Create service policies
- Manage service policies with scripting
- Transaction classes
- Work classes
- Create a work class for a service policy
- Assign a transaction class to a work class
- Work class request classification rules
- Manage work classes with scripting
- Routing policies
- Create a work class and routing rule for a routing policy
- Verify service policies and routing policies
- Manage transaction classes
- Operators
- Request variables
- Rule builder
- Logging and tracing of routing rules
Service policies
A service policy is used by WebSphere Extended Deployment (XD) to categorize and prioritize work requests. Through service policies, WebSphere XD introduces the capability to designate the performance goal and business importance of different request types. This allows an enterprise's performance to degrade in a controlled manner in periods of over-utilization. Service policies are assigned response time targets that are valid for specified throughput conditions. The performance management done by the autonomic request flow manager, the dynamic workload manager and the application placement controller achieves a defined balance of the performance results.
Service policy definitions are made up of two key items:
Goal The goal portion of the service policy defines how incoming work is evaluated and managed in order to ensure that and detect if work is meeting its assigned service policy levels. Service policies can have four different kinds of goals: discretionary, average response time, response time percentile, or queue time. Importance Importance is used in times of resource contention to identify the most important work in the system and give it higher priority. The options for importance vary from lowest to highest.
Service goal types
There are four performance goal types in IBM WebSphere XD V6.0:
Discretionary Work that does not have significant value. Requests are processed when no higher request is waiting. As a result, work of this type can see a degradation in performance when resources are constrained. This is the default service goal. Average response time Work with a higher priority than discretionary work. We can specify the average response time in milliseconds or seconds. The average response time has a target percentage of 90%. If we need to change this percentage then we need to select percentile response time. Percentile response time Higher priority than discretionary work. We can specify both the percentage and the average response time. For example, 95% of all requests should be answered below 1000 milliseconds. Queue wait time Service goal for long-running applications. When the goal reaches this limit, more servers are needed.
Importance
Creating levels of importance guarantees that in the event the performance goals for all service policies cannot be satisfied because of prolonged intense overload, WebSphere XD can use importance to decide which service policy takes priority. We can select from seven importance levels: Lowest, Lower, Low, Medium, High, Higher, Highest.
Negative results can occur if all work is rated as highest. Such a rating can create a bottleneck within the environment. A better approach might be to leave all our applications with a discretionary goal, to assign a higher goal to the important applications, and to use importance levels only if we need further differentiation between the higher goal applications.
Creating service policies
The best practice is to run performance tests for our applications and determine their performance profiles on the production environment before defining service policies. After we have analyzed our applications and we know which applications or parts of applications we want to have a higher priority, we can then create the service policies.
Create, modify, and delete service policies in the Administrative Console under...
Operational Policies | Service PoliciesTo create a service policy, follow these steps:
- Click New.

- Enter a Name, for example Platinum and optionally a Description.
The name field cannot contain special characters and cannot begin with a period (.) or a space. Leading and trailing spaces are automatically deleted.
- Select the Goal Type, for example Average Response Time
- Click Next.
- Enter the Goal value, for example 1500 Milliseconds.
- Select the Importance, for example Highest.
- Click Next.
Select the default transaction class or create a new one.

- Click Next.
- Verify the summary and click Finish.
- Save and synchronize our new configuration.
Managing service policies with scripting
A python script is provided to manage service policies. The script is located in install_root/bin/ and is called servicepolicy.py.
The syntax of the script is:
./wsadmin.sh -lang jython -f servicepolicy.py operation [options]
We can perform the following operations with this script:
Create a service policy createServicePolicy Remove a service policy removeServicePolicy Create a transaction class createTransactionClass Remove a transaction class removeTransactionClass Add URIs to a transaction class addUrisToTransactionClass Remove URIs from a transaction class removeUrisFromTransactionClass
The last two operations are for user of WebSphere XD V5.1 only.
For a detailed description of the script, its operations and options as well as examples see the InfoCenter article:
Managing service policies with scripts
Transaction classes
Service policies contain one or more transaction class definitions. The service policy creates the goal, while the transaction and work classes are used to connect URIs to that goal.
Transaction classes are a subcontainer of the service policy for work being classified into the service policy that can be used for finer grained monitoring. They can also be used as a mechanism of grouping cross application work together for common monitoring.
The relationship between service policies and transaction classes is one to many: A single service policy can have multiple transaction class definitions but each transaction class belongs to exactly one service policy.
Every service policy has a default transaction class, which in most scenarios is sufficient. Additional transaction classes are created when finer grained monitoring is necessary for the environment. Each transaction class name must be unique within the cell.
Work classes
Work classes are a mechanism for grouping specific work together that must be associated with a common service policy or routing policy. Work classes group URIs or Web services from an application together.
Thus it is not necessary to associate the whole J2EE Web application to a service policy in WebSphere XD, but we can define a finer and more granular mapping by using work classes.
Work classes combined with classification rules allow the autonomic request flow manager to prioritize a request. For example the /shop/checkout URI should get more resources than the /shop/info URI. This could be necessary because the checkout takes more time or because we think the checkout is more important.
There are two possible types of work classes based on the supported protocols in the application:
- HTTP work classes
- SOAP work classes
For generic server clusters with the On Demand Router only the HTTP protocol is supported.
Work classes can have classification rules. The rules classify the requests by a number of variables:
- Virtual host or Uniform Resource Identifier (URI)
- HTTP headers, query parameters, and cookies
- Web service and operation name
- Client or server IP address, port, and host names
We can define work classes for service policies and for routing rules.
Creating a work class for a service policy
We can either change the default work class Default_HTTP_WC or create a new work class. If more than one work class is defined to handle a request, the request is assigned to the higher service policy.
Modify the default work class if we want to change the service policy for the whole J2EE application. However, we cannot change the URIs or Web services associated with the default workclass, only the transaction class and service policy it maps to.
We must create a work class for each group of URIs or Web services if we want to assign our application to different service policies.
To create a work class for a service policy, follow these steps:
- Go to...
Applications | Enterprise Applications appname | Service Policies tab- Expand the work class type that we wish to create (HTTP or SOAP). For our example, expand Work Classes for HTTP Requests.
- Click New.
- Enter a work class name, for example trade_scenario_wc.
- Click Next.
- Select the Module, for example tradeWeb.war
- Select one or more URIs, for example scenario and click Add. Note that we can also define custom URIs here.
Attention: At the time of writing this redbook is was not possible to remove a URI from the member list. If we have added a wrong member, we must cancel and start over again. The same is true when we want to change an existing work class. In this case, we must delete and recreate the work class. This problem is fixed in IBM WebSphere XD V6.0.1.
- Click Next.
- Click Finish.
Assigning a transaction class to a work class
After we have finished creating the work class, we can assign a service policy and transaction class to it. It is necessary that we have previously created a service policy and a transaction class.
To assign a transaction class to a work class, go to...
Applications | Enterprise Applications | appname | Service Policies tabFollow these steps:
- Expand Work Classes for HTTP Requests.
- Expand the work class we have just created.
- Scroll down and select our transaction class from the Select Transaction class drop-down box.
- Click OK at the top.
- Save with Synchronize to nodes selected.
The information of this work class is stored at this location:
install_root/profiles/dmgr_profile/config/cells/cell/applications/app/deployments/appname-editionname/workclasses/wc_name/workclass.xmlWork classes cannot only be qualified by a URI or Web service but also by specific rules.
Work class request classification rules
Work classes can be classified by rules. The syntax and semantics of a boolean expression for a rule are similar to the WHERE clause of a structured query language (SQL) expression. We can combine the expressions with operators.
Expressions are formed from operators and operands. Operators act on the operands. Operands can be variables, strings or constants. For example:
a = b and c > bThe operands are a, b, c, and d. The operators are `=', `and' and `>'.
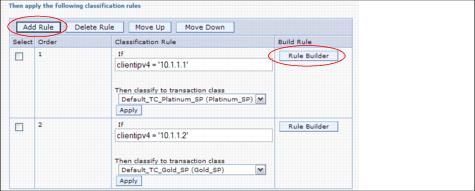
To add a classification rule expand our work class and click Add Rule. Optionally we can use the Rule Builder if we are not familiar with the syntax.
Here are some classification rule examples
- clientipv4 = '10.1.1.1'
- clienthost like `%.ibm.com'
- clientipv4 = '10.1.1.1' and protocol = 'HTTPS'
- port in (9080, 9090, 9091)
At the time of writing this redbook, some of the classification rules did not work properly. For example, it was not possible to enter a rule with the `IN' or `LIKE' operators. This problem will be fixed in IBM WebSphere XD V6.0.1.
Figure 4-7 Classification rules example for service policies
Remember that the clienthost and client IP address that the ODR receives are from the Web servers, if we use Web servers in our topology. Therefore, we cannot create a rule based on client IP ranges when using Web servers.
Managing work classes with scripting
It is also possible to edit work classes using a python script called workclassoperations.py. The script can be found in the install_root/bin directory.
The script usage can be obtained using this command:
wsadmin.sh -lang jython -f workclassoperations.pyWe can find detailed information and examples about the use of this script in the output of this command or in the InfoCenter article Managing work classes with scripts. Example 4-1 shows the available options for this script:
Usage: wsadmin
    [-lang jython]
    [-f workclassoperations.py]
    [-odrname odrName]
    [-odrnode odrNode]
    [-wcname workClassName]
    [-appname appName]
    [-webmodule webModule]
    [-adduri ["uri1?uri2?..."]]
    [-type HTTP|SOAP]
    [-vhost virtualHost]
    [-wctype APP|GSC|ARP|ASP|GRP|GSP]
    [-addrule ["priority?expr?actiontype?action"]]
    [-deleterule [priority]]
    [-deleteuri ["uri1?uri2?..."]]
    [-deletewc]
    [-listrule]
    [-listuri]
    [-setdefaultaction ["actiontype?action"]]
    [-modifydefaultaction ["actiontype?action"]]
    [-getdefaultaction]
    [-both]
Routing policies
Routing policies define how work should be routed to either an application edition, including the base edition, or a generic server cluster. A generic server cluster is a group of non-WebSphere HTTP endpoints that can accept traffic from the ODR. Routing rules are defined at the ODR for generic server clusters or at the application level for an application edition.
With routing policies we have the ability to route requests to different editions of the same application, depending on specific rules (work classes) that we can define, or to restrict access to an application. For example, it is possible to install the same application into two dynamic clusters and depending on which IP address we have, we are routed to either one of them. Routing policies can be configured for each application including all of its editions.
Routing policies are comprised of work classes and routing rules.
Creating a work class and routing rule for a routing policy
Creating a work class for a routing policy is similar to creating one for a service policy.
To define a work class for a routing policy open the Administrative Console and select...
Applications | Enterprise Applications | application | Routing Policies
Verify service policies and routing policies
When we create service and routing policies it is difficult to see if they work or not. For our tests we generated load on our application using Apache JMeter. This way we could verify whether the policies worked in two ways: In the WebSphere XD runtime topology and in the JMeter results.
As an example, we created a routing rule that allowed HTTP POST requests to be forwarded to the application, while HTTP GET requests were rejected with an HTTP error message.
Here are the JMeter results. We can see that all HTTP GET requests failed.
URL
Count
Average
Min
Max
Error%
GET 54 69 0 550 100.00% POST 49 1355 100 3615 0.00% TOTAL 103 681 0 3615 52.53
Managing transaction classes
Transaction classes can be created, modified, and removed in the Administrative Console under Operational Policies | Service Policies. Select the appropriate service policy and scroll down. We can also move a transaction class from one service policy to another.
Figure 4-2 Transaction classes
We can create one or more transaction classes for our application and map the service policy to these transaction classes. It is possible to move the transaction classes from one service policy to another, when we find that some transactions need a higher prioritization.
The figure below shows the relationship between service policies and transaction classes. The URIs are grouped together in work classes. When a request for a specific URI arrives, this URI is checked against the classification rules. Based on these rules different transaction classes are addressed. These transaction classes are uniquely assigned to a service policy. Based on the service policy the request is processed. These calculations are done by the autonomic request flow manager.
Classification terms overview
Tip: Name the transaction classes according to their application and their prioritization within this application to make the transaction class to service policy mapping easier.
Imagine that we have more than one transaction class per application and the applications have different priorities within our company. Let's assume that:
- Application 1 has two transaction classes: tc_app1_high and tc_app1_mid.
- Application 2 has three transaction classes: tc_app2_high, tc_app2_mid, and tc_app2_low.
- It is most important that Application 2 has a good quality of service.
Based on these assumptions, the mapping could look as follows:
- tc_app2_high is mapped to sp_platinum
- tc_app2_mid and tc_app1_high are mapped to sp_silver
- tc_app2_low and tc_app1_mid are mapped to sp_bronze
Operators
Operators are not case-sensitive. IBM WebSphere XD V6.0 supports these operators in rules expressions:
OR The logical OR operator. AND The logical AND operator. NOT The negation operator. IN The IN operator is used to express an operand with multiple values in a single expression. For example, port in (9080, 9081) or serverhost in (`Web1', `Web2'). LIKE The LIKE operator is used to express pattern matching for string operand values and its meaning and use is consistent with that defined by the SQL language. The value must contain the wildcard character (%) in the position where the pattern matching is expected to commence. For example, the expression serverhost LIKE %blanca will match the word blanca or any other word that ends in blanca. BETWEEN This operator is used in conjunction with the AND operator to select a range of values inclusive of the first (low) value and the last (high) value. EXISTS A boolean operator for checking for the presence of an operand or the result of a compound sub-expression. For example, while checking for the presence of certain HTTP header element attributes. For a complete list see the InfoCenter article ODR rule-based request classification.
Request variables
Request variables are case-sensitive and are defined in lowercase letters.
Here is an overview of some of the available request variables. For the complete list see the InfoCenter article Routing policies for work classes.
Request variable Valid protocols Description clienthost HTTP, SOAP The fully qualified client host name. clientipv4 HTTP, SOAP The IP address of the client machine using the Internet Protocol version 4 (IPv4) dotted quad address type n.n.n.n. clientipv6 HTTP, SOAP The Internet Protocol version 6 (IPv6) 128-bit address type of x:x:x:x:x:x:x:x following Request for Comments 1924 (RFC 1924) of the client machine. cookie$<name> HTTP, SOAP A cookie name. For example, the expression cookie$Cookie_Name='Cookie_Value' tests a request to see if it contains a cookie named Cookie_Name with a value of Cookie_Value. To test for the presence or absence of a particular cookie, use one of the following expressions:
- cookie$MyCookieName IS NOT NULL
- cookie$MyCookieName IS NULL
HTTPMethod HTTP, SOAP The HTTP method for the request. Possible values are POST, GET, PUT, and DELETE. header $<name> HTTP, SOAP A header name and value. For example, the expression header$Host='localhost' tests a request to see if it contains an HTTP host header with a value of localhost. To test for presence or absence of the Host header, use one of the following expressions:
- cookie$Host IS NOT NULL
- cookie$Host IS NULL
queryparm$<name> HTTP, SOAP A header name and value. For example, the expression queryparm$timezone='EST' tests a request to see if the request contains an HTTP query parameter named timezone with a value of EST. To test for presence or absence of a query parameter, use one of the following forms:
- queryparm$timezone IS NOT NULL
- queryparm$timezone IS NULL
serverhost HTTP, SOAP The fully-qualified host name of the server. serveripv4 HTTP, SOAP The IP address of the server machine using the IPv4 dotted quad address type n.n.n.n. service SOAP The name of a Web service. operation SOAP The name of a Web service operation.
Rule builder
If we are not familiar with the rule syntax, then we can use the rule builder. The rule builder allows us to create rules using a wizard.
There is a button Rule Builder. When we click this button a panel is displayed:
To create a new rule we first need to select the appropriate request variable from the drop-down box, for example Client IPV4 (clientipv4), then click Add.
On the next panel we can enter the IP addresses and the operator, for example clientipv4 <> 10.1.1.1. Click OK.
We can add as many conditions as we like. After we have entered all necessary conditions for our rule, click OK again, bringing we back to the work class definition panel.
Restriction: The rule builder creates AND conditions only. We can however change our rule to an OR condition later in the work class definition panel by simply overwriting the AND operator.
Logging and tracing of routing rules
Logging and tracing information can be obtained by activating logging for this component:
com.ibm.ws.clasify.*=allWe can either change the trace level through the Administrative Console or using a wsadmin script.
For further information about how to activate logging and tracing in IBM WebSphere XD V6.0 see section 9.4, "Traces" in WAS V6 System Management and Configuration Handbook, SG24-6451.