Plan for virtual portals
Contents
- Overview
- Separate and share resources
- Manage the user population
- Plan considerations
- User experience
- Alternative concepts
Overview
Separate and share resources
Separation between virtual portals is achieved by scoping the portal resources of the virtual portals. Scoping means making portal resources available uniquely and separately to individual virtual portals and their users:
- A portal resource that is scoped for virtual portals exists individually for each virtual portal. It has an identification that is unique within the entire portal installation. The resource is available only in one particular virtual portal. Consequently, you can customize such resources for each virtual portal independently.
Example: The resource resource_A is scoped for the virtual portals VP_1, VP_2, and VP_3 as resource_A_VP_1, resource_A_VP_2, and resource_A_VP_3. Customizing resource_A_VP_1 does not affect resource_A_VP_2 and resource_A_VP_3.
- A portal resource that is not scoped for virtual portals is shared between all virtual portals. Consequently, if you customize this resource, this will affect that resource in all virtual portals equally.
Scoping works for some portal resources, but not for others:
- WebSphere Portal scopes some portal resources for virtual portals. This means that these resources exist separately for each virtual portal.
- Other resources are common for all virtual portals in a portal installation. However, you can scope some of these resources:
- You can scope some resources by using portal administration and Portal Access Control.
- There are some portal resources that cannot be scoped at all.
- The user population can be scoped to one or more specific virtual portals.
The differences in scoping portal resources are described in the following sections.
Portal resources that are scoped for virtual portals
WebSphere Portal has the following portal resources scoped internally for virtual portals:
- Portal pages
- Portlet instances
- Portal Search Engine content sources.
Scoping of these resources is managed by internal portal mechanisms. Scoped resources are only available for the virtual portal for which they are defined. They are well isolated from other virtual portals. Scoped resources cannot be shared with other virtual portals. They are not visible or accessible outside of the virtual portal for which they have been created. This behaviour cannot be changed by any portal access control settings.
The following rules apply:
- Within each virtual portal you or a subadministrator can use Portal Access Control to grant individual users of that virtual portal specific access rights to the scoped portal resources. This works just like under a single portal installation.
- An administrator can give access rights to users who are members of the user population of a virtual portal only on the scoped resources of that same virtual portal. This implies that, vice versa, you can give access rights on the resources of a virtual portal only to those users who are members of the user population of that virtual portal.
- Users can only use these access rights when they access the specific virtual portal under which they have the access rights on the scoped resources. The same users cannot access the resources when logging in to a different virtual portal.
Portal resources that you can scope for virtual portals by using Portal Access Control
There are some portal resources that are not scoped internally for a particular virtual portal. These resources are shared among all virtual portals of the entire installation. However, as a master administrator you can scope such portal resources for the virtual portals yourself. You do this by specifying in which virtual portal you want these resources to be visible and accessible. To do this, you use Portal Access Control and the access rights portlets to set up the appropriate access rights.
You can scope the following portal resources by using Portal Access Control to give users of an individual virtual portal access right to the resources:
- Portlets
- Portlet applications
- Web modules
- URL Mapping Contexts
- Users and groups.
For details about how to scope these resources for individual virtual portals by using Portal Access Control refer to Enable security.
Portal resources that cannot be scoped for virtual portals
There are some types of portal resources that cannot be scoped to a particular virtual portal. These are not scoped internally by the portal, and you cannot scope them yourself by using Portal Access Control. For example, themes and skins can be accessed by all subadministrators who have the access right to apply themes and skins to the pages that they can administer, regardless of which virtual portal the subadministrators are responsible for. The following list shows portal resources that you cannot scope for virtual portals:
- Themes and skins. If you do not want subadministrators to be able to manage themes and skins, restrict their access rights on them.
- Vault segments and vault slots. To avoid security problems, use private credentials only. They can used by only one specific user.
- Supported clients and markups. The settings for these are configured in the corresponding portlets; therefore they apply to the entire portal installation.
Scoping portlets and portlet applications
Scoping portlet applications
Portlet applications are not scoped for virtual portals. Therefore, the configuration settings that you set for a portlet application by using the Manage Applications portlet apply to that portlet application in all virtual portals. If you need different configurations for a portlet application between virtual portals, create a copy of the portlet application, and configure the copied portlet application as required.
Scoping portlets
Portlets are separate portal resources, but they are not scoped for each separate virtual portal. However, each portlet in a virtual portal shares its portlet application on the initial portal installation with its siblings on the other virtual portals. Therefore the following configuration settings set for a portlet apply to that portlet in all virtual portals:
- The configuration settings that you set for a portlet by using the Manage Portlets portlet
- The configuration settings that you set for a portlet by using the Configure mode of the portlet.
If you need different configurations for a portlet between virtual portals, create a copy of the portlet, and configure the copied portlet as required.
Scoping portlet instances
Portlet instances are scoped to the virtual portals. The configuration settings that you set for a portlet by using the Edit mode of the portlet apply only to that individual portlet instance on that individual page.
Special case: Scoping unique names
Unique names that you apply to portal resources represent a special case with regards to scoping. Unique names are attributes to portal resources. Therefore, whether a unique name is scoped to a virtual portal or not is determined by whether the portal resource to which the unique name applies is scoped or not:
- Unique names for scoped portal resources are themselves also scoped.
- Unique names for resources that are not scoped are themselves not scoped.
Example for a scoped unique name: Each virtual portal has its own separate login page. Therefore you can assign the same identical unique name to all login pages for all virtual portals. The unique name that you give to the login page of a specific virtual portal applies only within that portal. It cannot be administered in a different virtual portal that has the same unique name for its login page.
Example for a unique name that is not scoped: Portlet applications are not scoped but shared between all virtual portals. You can assign a unique name to the portlet application. You can reference that portlet application by that unique name throughout the portal installation with all virtual portals.
Managing the user population for virtual portals
There are two basic options for the management of user populations for your virtual portals:
- Using the Member Manager Custom User Registry.
Use the Member Manager Custom User Registry to set up both types of configuration:
- Configure separate user populations for each of your virtual portals. This option offers a high flexibility for the user management of your virtual portals. With this configuration you can define an individual user population for each virtual portal.
- Using a common user population with Member Manager for all your virtual portals. In this case all users of that user population can access all virtual portals, unless their access rights are explicitly restricted by portal access control settings. To achieve this restriction, define the access rights manually by using the Portal Access Control portlets.
For more information about configuring your virtual portals with Member Manager and the different configuration options refer to the following sections.
- Using the LDAP or database user registry of WebSphere Application Server.
If a single common user repository is sufficient for all virtual portals within your installation,
you can continue to use an LDAP or database user registry in your virtual portal setup.
This is the simpler one of the two options. This option does not use Member Manager.
With this configuration the entire portal installation and all virtual portals share a common user population, which is defined in a single user repository. In this case all users of that user population can access all virtual portals, unless their access rights are explicitly restricted by portal access control settings. In order to achieve access restrictions for specific virtual portals, you can use the Portal Access Control portlets. You define user groups and assign to them the access rights to the resources of each virtual portal.
For WebSphere Portal V5.1 installations, the Member Manager custom user registry (CUR) is the advanced option. It offers you more flexibility for the user management of virtual portals. By using the Member Manager you can limit the usage of a particular virtual portal to a specific user population. This is achieved by introducing the concept of realms.
The following sections give overview information of how to use Member Manager and realms in the context of virtual portals. For a wider overview of portal security refer to Enable security and Security Concepts. For more details about how to configure Member Manager and realms refer to Using multiple realms and user registries.
A virtual portal can only be accessed by members of its associated user population. By using Portal Access Control you can assign and restrict access rights within the user population of a virtual portal to the resources of that virtual portal. However, Portal Access Control cannot overwrite the predefined assignment of a particular user population to their virtual portal. Consequently, you cannot use Portal Access Control to assign access rights that cross the separation between virtual portals. For example, you cannot use the Portal Access Control of a virtual portal VP_A to give a user User_A_1 of that portal access to resources of another virtual portal VP_B. The following conditions apply:
- A realm contains the entire user population of one virtual portal.
- Each virtual portal can have its own realm of users associated, but it is also possible that multiple virtual portals can share their user population by using the same realm in parallel.
- In order to be able to log in to a particular virtual portal, a user must be a member of the realm that is associated with that virtual portal.
For more details about how to prepare Member Manager and realms for your virtual portals, refer to the next section.
Preparing the user populations for your virtual portals
If you plan to use realms for your virtual portals, configure Member Manager and the realms prior to creating your virtual portals. Each realm must specify the Member Manager nodes that belong to the user population represented by this realm.
In addition to the realms that you create to define the user populations of the individual virtual portals, create a super realm. This super realm spans all other realms and contains all the users of those other realms.
You configure the Member Manager Custom User Registry after the portal installation when you enable the Custom User Registry. WebSphere Portal does not provide a configuration task for doing this. You configure the realms manually in the configuration file wmmur.xml. This file is located under the following directory paths:
- For standard portal installations: wp_root/wmm
- For portal cluster installations: was_root/config/wmm
After you configure or reconfigure Member Manager, restart WebSphere Application Server.
The following sections give an overview example configurations of Member Manager for virtual portals.
For more details about how to configure Member Manager and realms for your virtual portals refer to Using multiple realms and user registries. Review the sections about the Configuration and Sample Configuration. These sections list samples of the required xml files.
Configure a common user population for all virtual portals
In a simple setup you can use Member Manager together with a common user repository. This user repository is represented by a single realm, and used by all virtual portals. In this case, all virtual portals use a common realm and a common user repository. This configuration provides no separation between the users of the different virtual portals.
WebSphere Portal V5.1 still supports the WebSphere Application Server LDAP custom user registry that previous versions of WebSphere Portal used. You can configure it as alternative. Again, this configuration uses a common user repository for all virtual portals without separation between the users of the different virtual portals.
Configure separate user populations for the individual virtual portals
If you want to have the users of your virtual portals separated, you have to apply the more advanced setup by using Member Manager and configuring separate realms for your virtual portals. When users access a virtual portal, the portal installation selects the appropriate realm based on the current virtual portal context. Within a virtual portal, only users of that corresponding realm are "visible". The administrator of a particular virtual portal can only give access rights to users and groups in the population of that virtual portal. Therefore, when you create a virtual portal, the realm that represents the population of the new virtual portal must be a subset of the realm used by your portal installation.
Note: This separation of user populations between virtual portals works only with Member Manager. WebSphere Portal supports separate realms and user repositories for virtual portals only when you use the Member Manager custom user registry.
When you use Member Manager, you can separate user groups and administrative users by configuring your virtual portals according to your business requirements. You do this based on the following relationships between user repositories, realms, and virtual portals:
- You can aggregate users and groups from one user registry in one realm, and thereby expose them as one coherent user population to the portal installation. You can separate the user population of each VP by assigning different LDAP suffixes to the different realms. The LDAP suffixes are called WMM nodes. This way the concept of realms allow you various flexible configuration options.
- A realm can aggregate one or more nodes in a user registry.
- A realm can combine multiple suffixes of one user repository. A suffix of a user repository can belong to one or more realms. Consequently, the LDAP suffixes of the individual users must match the suffixes of the groups to which they belong.
- A virtual portal is associated with one realm. Each virtual portal uses exactly one realm, but a realm can be used by multiple virtual portals.
- When you use Member Manager, the initial portal installation has no realm associated by default. The user population of the initial portal installation spans the entire user registry that you configured in Member Manager.
- The individual user IDs must be unique across all realms.
- In order to log in to a virtual portal, the virtual portal administrator and all users must be a member of the realm for that virtual portal.
To allow a user access to more than one virtual portal, that user (and thereby the Member Manager node to which the user belongs in the hierarchy of the user directory) must be a member of all the realms associated with these virtual portals. For example, this applies to a super administrator who is responsible for all virtual portals within an entire Portal installation.
- In order to administer the virtual portals, the master administrator must be a member of the realms of these virtual portals.
- User populations of realms can overlap. In other words, users can be members of multiple realms. If realms overlap, that is if some users are in different realms for different virtual portals, then these users can work in all the virtual portals which are associated with these realms.
For example, you can set up the following configurations:
- You can configure one LDAP suffix with all administrative users, for example dc=administrators,dc=ibm,dc=com and a separate LDAP suffix with the end users, for example dc=users,dc=ibm,dc=com.
- You can configure separate LDAP suffixes that contain different user populations, for example dc=bank1,dc=com for Bank_1 and dc=bank2,dc=com for Bank_2.
Plan considerations for administering virtual portals
The following sections describe the planning considerations required for virtual portals with regards to the following:
- Portal Access Control
- The master administrator
- Subadministrators of a virtual portal and their access roles and rights
- Users of a virtual portal and their access roles and rights
- The content of a virtual portal.
Plan considerations for Portal Access Control with virtual portals
As mentioned before, you can scope some portal resources for your virtual portals by using portal administration and Portal Access Control. For example, this applies to portlet applications. These resources are available to all virtual portals. You can scope these resources to specific virtual portals by limiting their accessibility to the user populations of the required virtual portals. To do this, you use Portal Access Control. Resources that you scoped this way for one virtual portal cannot be accessed from other virtual portals.
Portal Access Control provides a flexible concept to grant certain users or user groups access privileges to specific pages and other resources of a portal. A super administrator can delegate a subset of the administration privileges to other administrative users. Use this flexibility to enable separation between different virtual portals in the following ways:
- Use the delegated administration model to set up individual partitions in your portal for the virtual portals.
- Define separate subadministrator users who administer the individual virtual portals and give each of the subadministrators the access rights for their virtual portals.
- Define separate end user populations who can access the individual virtual portals. For more detail about how this is supported, refer to Managing the user population for virtual portals.
The inheritance concept of Portal Access Control allows this setup. The combination of access rights that a subadministrator has on portal resources and on users and groups defines the scope of the virtual portal of that subadministrator:
- By inheritance, subadministrators of virtual portals implicitly have the administrative access rights for all the child pages of their respective root content nodes, and thereby of the content of their virtual portals. The subadministrator of a virtual portal cannot assign any access right on resources that are scoped for other virtual portals.
- Depending on the access rights to users and groups that the master administrator gives the subadministrators, they can grant access to users who belong to the user population of their virtual portals. The subadministrator of a virtual portal cannot assign any access rights to users or groups of other virtual portals.
This way, each virtual portal represents a certain sub area of the main portal and can be managed individually.
The master administrator
A key role for the administration of virtual portals is the master administrator. This user ID is created during the initial installation of WebSphere Portal with the role administrator to the portal ( admin@portal ). This administrator is also the master administrator of the initial portal installation and all virtual portals that are created. This master administrator is created with all necessary access rights for administering tasks related to the initial portal and the virtual portals.
The master administrator has the necessary privileges to perform the tasks related to managing virtual portals. These tasks can be performed by using either the Manage Virtual Portal portlet or the provided configuration tasks. For more details about both of these tools refer to Administering virtual portals.
The administration portlet Manage Virtual Portals is installed as part of the initial portal installation. Use this portlet to create, modify and delete virtual portals.
The master administrator defines the user population of each virtual portal. To separate the user populations of the individual virtual portals, the master administrator can either use the User and Group Permissions portlet of Portal Access Control or can define realms in the Member Manager configuration files. For more detail about this refer to Managing the user population for virtual portals and Enable security.
Before you create a virtual portal, you define a group of subadministrators. When you create the virtual portal, a default set of roles and access rights is assigned to this group. As the master administrator you can change these default assignments and delegate administration of individual virtual portals to subadministrators by using the Resource Permissions portlet that is part of the Portal Access Control.
When you create a virtual portal, it is filled with a default set of portal pages and resources. Content of a virtual portal can be further enhanced by either of the following ways:
- By the master administrator of the portal installation. For example, this can be by done using the XML configuration interface.
- By the subadministrators or other users of the virtual portal. They can do this only by using the Manage Pages portlet.
Typically, only the master administrator should have the access rights for performing the following tasks:
- Using the Manage Virtual Portals portlet
- Using the XML configuration interface to perform tasks related to one of the virtual portals
- Install portlets, themes, and skins.
Note: Do not grant the subadministrators of virtual portals the access rights to perform any installation related tasks, such as installation of portlets or themes.
All virtual portals share a common Java Virtual Machine (JVM). Therefore it is important to restrict the administration privileges of the virtual portal subadministrators and prevent them from installing their own code artefacts, such as themes or portlets. Unstable or malicious code that is introduced on one virtual portal can destabilize the entire portal installation and thereby all other virtual portals.
A flexible way to introduce virtual portal specific portlets without impacting any other virtual portal is to use Web services for remote portlets (WSRP). By using WSRP you can provide portlets on a remote machine and then have the virtual portals consume those portlets so that users can access them remotely. For more information about WebSphere Portal WSRP refer to Using WSRP services.
For more detail about Portal Access Control refer to Enable security. For more detail about virtual portal security refer to Plan considerations for Portal Access Control with virtual portals.
Subadministrators of a virtual portal and their access roles and rights
When you create the virtual portal by using the Manage Virtual Portals portlet, you select a user group of subadministrators that you want to be responsible for the administration of the new virtual portal. During creation of the new virtual portal the Manage Virtual Portals portlet assigns the following default set of necessary access rights on the virtual portal to the subadministrator group that you specified:
- Administrator on the root label of the virtual portal. You cannot change this access right.
- Administrator on the virtual portal URL context. You cannot change this access right.
- Editor on the administration portlets that are part of the virtual portal. You can change this access right.
As the subadministrators have the Editor role access rights on the administration portlets of their virtual portal, they can use these administration portlets to perform administrative tasks on the virtual portal. If you want to change the default Editor access right for the subadministrators on the administrative portlets or the list of portlets globally and before you create virtual portals, configure the Manage Virtual Portals portlet accordingly. For details about how to do this refer to Preconfiguring the subadministrators for virtual portals.
You can also assign additional access rights on portal resources to the virtual portal subadministrators. For example, you might want to add the following access rights:
- Access rights to perform portal user and group management tasks related to the user population of the virtual portal.
- Access rights to grant permissions to users and groups of the virtual portal.
- Access rights to manage WSRP, URL Mappings, or Portal Search Engine content sources.
- All other access rights that are available by the Portal Access Control. For more details about these refer to Security concepts and Access rights.
If you want to assign additional access rights to the subadministrators after creating a virtual portal, use the master administrator user ID of your portal installation and modify those access rights for them manually in Portal Access Control. To do this, you can use the User and Group Permissions portlet, the Resource Permissions portlet, the XML configuration interface, or the Portal Scripting Interface. The consequences differ, depending on where you make the updates:
- If you do this in the initial portal installation, you can change the access rights for the subadministrators on the virtual portal as a whole.
- If you do this in the virtual portal itself, you can change the access rights for the subadministrators on the individual resources of the virtual portal.
End users of a virtual portal and their access roles and rights
When you create a virtual portal, be aware of the following implications:
- The All Authenticated Users group is common across all virtual portals that share the same realm. When you create virtual portals, this group is given the Privileged User role on resources of all those virtual portals, independent of the role assignments that its users have on the initial portal installation. Restrict role assignments and thereby access rights for the All Authenticated Users group, and assign access to user groups or users as required.
- The All Authenticated Users group is valid over all virtual portals that share the same realm. This means that users who are in a realm that belongs to more than one virtual portal, these users have the assigned roles on all virtual portals to which they have access by membership to that realm.
If you want to change these default roles and the access rights for the users, you can do this by one of the following ways:
- To configure the scope of access rights for users before creating a virtual portal, configure your realms and user groups accordingly.
- To change the access rights of users of a virtual portal after creating a virtual portal, use the Portal Access Control portlets in that virtual portal. You can have the subadministrators of the virtual portal perform this task.
Content of a virtual portal
When you create the virtual portal by using the Manage Virtual Portals portlet, the portlet invokes an XML configuration interface script that creates the initial content of the new virtual portal.
By default, the initial content of a new virtual portal includes the pages and portlets listed in the following. The list also includes in parentheses the unique names that are used for the pages and portlets in WebSphere Portal V5.1.
Content Root (wps.content.root). This includes the following pages and portlets:
- My Portal (wps.My Portal). This includes the Welcome and My Page pages.
- Welcome (wps.My Portal.Welcome). This includes the following portlet:
- Welcome (wps.p.Welcome)
- My Page (wps.My Portal.Welcome.My Page)
- Page Customizer
- Page Properties (wps.PageProperties)
- Organize Favorites (wps.Organize Favorites)
- My Favorites (wps.My Favorites)
- Search Center (wps.Search Center)
- Login (wps.Login). this contains the following portlet:
- Login (wps.p.login)
- Enrollment/Selfcare (wps.Selfcare)
- My Tasks (wps.My Tasks)
- Administration (wps.Administration). This includes the following portlets:
- Manage Pages (wps.p.Manage Pages)
- Users and Groups (wps.p.Manage Users and Groups)
- Resource Permissions (wps.p.Resource View)
- User and Group Permissions (wps.p.User Group Permissions)
- URL Mapping (wps.p.Url Mapping)
- Custom Unique names (wps.p.Unique Names)
- Manage Search Collections (wps.p.Manage Search Collections)
- Portal Document Manager (PDM) (wps.p.Manage Doc Libraries, wps.p.Doc Picker, wps.p.Documents)
- Enable tracing (wps.p.Enable Tracing)
Note: By default the administration portlet Manage Virtual Portals is installed as part of the initial portal installation only. It is not part of the default content of virtual portals that you create. You can only use it in the initial portal installation.
Once the content has been created, the Manage Virtual Portals portlet grants the following set of default roles and access rights to the subadministrators of the virtual portal:
- Administrator to the content root (Administrator@content root) of the virtual portal
- Editor to portlet instances (Editor@portlet entities) that are created for the new virtual portal.
You can modify the roles and access rights for the subadministrators of a virtual portal manually according to your business needs:
- To change the roles and access rights for subadministrators on the portlets globally and before you create a virtual portal, configure the Manage Virtual Portals portlet accordingly. For details about how to do this refer to Preconfiguring the subadministrators for virtual portals.
- To change the roles and access rights specifically and after creating a virtual portal, use the Portal Access Control portlets. If you do this in the initial portal installation, you can change the access rights on the virtual portal as a whole. If you do this in the virtual portal itself, you can change the access rights on the individual resources of the virtual portal.
For the following two portlets assign additional roles and access rights on them to the virtual portal administrators so that they can use the full functionality of the portlet:
- For the Manage Search Collections portlet: Editor@Virtual Resource PSE_SOURCES
- For the PDM portlet: Editor@Virtual Resource ICM_CONTENT or ICM_CONTENT_REPOSITORY
If you want to change the content of virtual portals, you can do this by one of the following ways:
- To change the content globally and before creating a virtual portal, reconfigure the XML script that specifies the initial content for virtual portals. For details about how to do this refer to Preconfiguring the default content for virtual portals.
- To change the content specifically and after creating a virtual portal, use either of the following portal tools:
- Use the Manage Pages portlet of the virtual portal. You can have the subadministrator of the virtual portal do this.
- Use the XML configuration interface to import content into the virtual portal. This can only be done from the initial portal installation.
If you use the configuration task create-virtual-portal, the new virtual portal that you create is empty. You need to create the content for the virtual portal. For example, you can do this by using the XML configuration interface. For more information about the XML configuration interface and how to use it refer to The XML configuration interface.
Shaping the user experience
The following sections describe how you can shape the user experience that users have with your virtual portals.
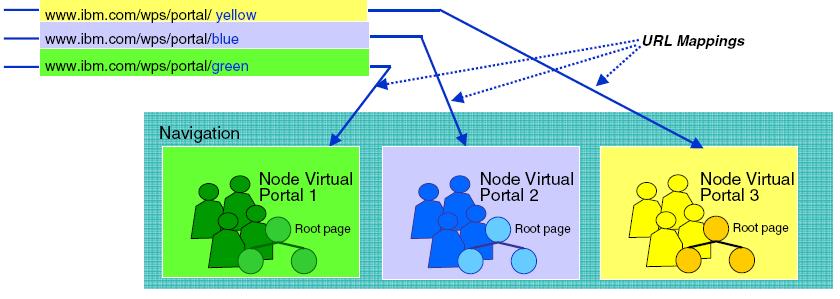
User friendly URL mappings for virtual portals
You can provide user friendly URLs for your users to access their virtual portals. Users can remember the friendly URLs easier.
Users access the content root of each virtual portal through an individual URL for that virtual portal. The URL for a virtual portal must contain a virtual portal identifier. This identifier is an internal ID, which is assigned to the virtual portal. For example, this can be the number 18_0_352 at the end of the following URL: http://www.ibm.com:9081/wp/portal/!ut/p/virtual_portal/vp/18_0_352 .
In order to allow user friendly URLs for the virtual portals, the portal applies a friendly URL mapping during the creation of a virtual portal. When you create a virtual portal, you specify the friendly URL. The portal applies your URL mapping to the content root of the new virtual portal. (It does this by using the mechanism of the URL Mapping portlet.) Internally, this URL Mapping corresponds to a unique name wps.vp.internal_ID_of_the_virtual_portal. The portal installation uses this unique name to identify and access the virtual portal unambiguously.
Note: Do not delete this URL virtual mapping for a virtual portal. Deleting this URL Mapping makes the virtual portal unusable.
You can also specify your own additional URL mappings for a virtual portal. This way you can give each virtual portal a friendly URL, such as http://www.ibm.com:9081/wps/portal/tivoli. You can pass the friendly URL of a virtual portal to its users. They can then use it to access their virtual portal.
The following conditions apply to the URL mappings of virtual portals:
- There is a 1:1 mapping between a virtual portal and its URL mapping. Each mapped URL points to the root content node of one virtual portal. You cannot use the same URL mapping for two different virtual portals.
- All URL mappings use the same context root and servlet name in the URL.
- Use individual domain names for the virtual portals.
Individual themes and skins for each virtual portal
If you expose multiple virtual portals on a single portal installation, you can give each virtual portal its own look and feel for the user experience. When you create virtual portals, the portal creates parallel root content nodes for each virtual portal. You can apply separate themes and skins for each content root and its child pages without impacting the representation of other content in the parallel trees for the other virtual portals. Each virtual portal will look like its own portal to its users. Users will not be aware that there are two or more different content nodes on the same physical portal installation.
You can apply the specific look and feel of each virtual portal to both the (unauthenticated) Welcome page and the authenticated pages of the virtual portal. This means that each virtual portal can have its own look and feel even before the user logs in to the portal. Users can switch between the unauthenticated pages of different virtual portals by simply entering the different URL to get to the other portal. You can also provide specific login, and self-enrolment pages for each virtual portal. Once users log out, they are redirected to the specific unauthenticated page of the virtual portal that they had accessed.
Alternative concepts for virtual portals on WebSphere Portal
Besides virtual portals, another possible configuration may be an alternative for you, depending on your business needs. This setup is referred to as true portals. This setup allows re-use of a single hardware, with multiple full portal installations, that is, one dedicated software instance for each portal. Each portal installation requires its own full WebSphere Application Server installation. These are the main advantages of true portals:
- The strong isolation of the configuration data due to separate configuration databases
- The full isolation of applications, due to a separate JVM for each true portal. This allows better quality of service.
If you want to implement this solution, be aware of the following limitations:
- You can run only a limited number of true portals on a single hardware machine. This is due to the memory volume required by the JVM.
- You cannot share applications or data between true portals.
For more detail about how to implement this solution refer to Install coexisting WebSphere Portal products on the same machine
See also
- About multiple virtual portals
- Usage scenarios for virtual portals
- Administering virtual portals
- Virtual portals reference
- Portal configuration
- The XML configuration interface
- Administering your portal
WebSphere is a trademark of the IBM Corporation in the United States, other countries, or both.
IBM is a trademark of the IBM Corporation in the United States, other countries, or both.