Component panels
When you open a component in the AssemblyLine you will get a quick editor panel in the lower part of the AssemblyLine window. You will get this for the following components:
- IF/ELSE/ELSE-IF Branch
- Switch/Case Branch
- For-Each Attribute Value
- Conditional Loop
- Connector Loop
- Attribute Map
IF/ELSE/ELSE-IF BranchQuick Editor for IF/ELSE/ELSE-IF Branch
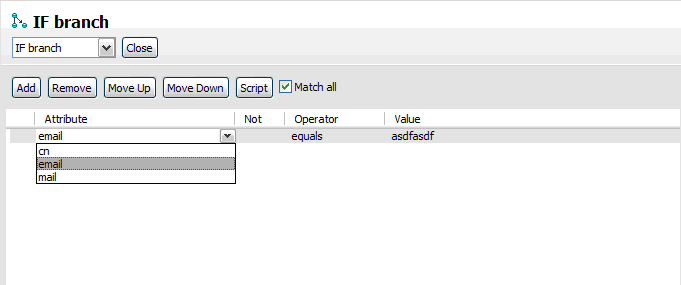
The IF and ELSE-IF branch lets you specify simple expressions and a custom script that returns true or false. Use the Match all checkbox to return true only if all conditions evaluate to true (AND mode). If unchecked only one of the conditions must match (OR mode).
The ELSE branch has no parameters.
Use the Add button to add new rows of Attribute/Operator/Value controls. We can remove these rows using the Delete button. The value can be a constant or an expression. Use the expression editor to configure the expression by clicking the button following the value text field. The move buttons are used to reorder the expressions. The expressions are evaluated from top to bottom. We can also change the branch type (that is, IF, ELSE and so forth) using the drop down below the title.
Switch/Case Branch
The Switch configuration has a number of options to select a value. This value is used to match the values in the contained Case branches. When they are equal the Case branch is executed. The switch branch is always executedSwitch/Case Branch
 Selection options we can choose for your Switch/Case branch
are:
Selection options we can choose for your Switch/Case branch
are:
- Work Attribute
- Select from the list of known work attributes
- AssemblyLine Operations
- Select from the list of know AssemblyLine operation names.
- Work Entry Operations
- Uses the operation value from the work entry (for example, work.getOperation() method).
- User Defined
- Here we can specify our own value.
Use the Add Default Case button to add a default case. The default case will execute in the event that none of the other case branches matched the value from the Switch component.
For-Each Attribute ValueAttribute Value loop
 This component loops over values in an attribute. Specify the
work entry attribute name to loop over (work attribute name) and the
loop attribute name. The loop attribute name is set to the current
loop value from the work entry attribute (for example, foreach
f in work.attr.values; set loopattr = f).
This component loops over values in an attribute. Specify the
work entry attribute name to loop over (work attribute name) and the
loop attribute name. The loop attribute name is set to the current
loop value from the work entry attribute (for example, foreach
f in work.attr.values; set loopattr = f).
Conditional LoopConditional loop
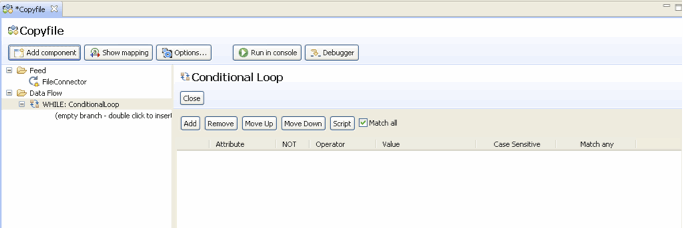 The conditional loop lets you specify simple expressions and
a custom script that return true/false.
The conditional loop lets you specify simple expressions and
a custom script that return true/false.
Use the Addbutton to add new rows of Attribute/Operator/Value controls. We can remove these rows using the Delete button. The value can be a constant or an expression. Use the expression editor to configure the expression by clicking the button following the value text field.
The Match All checkbox determines whether all lines must match (Match all checked) or if only one needs to be true for the branch to execute.
Connector LoopConnector loop
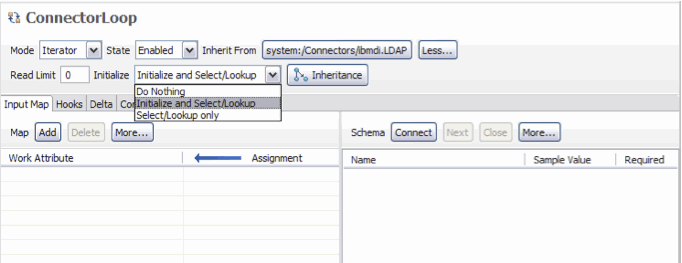 The Connector loop uses the Connector editor to configure a
connector. There are a few differences though as shown in the above
picture. The initialize option now shows those options relevant for
a connector loop instead of the normal initialize options. Also, only
Iterator and Lookup can be selected from the Mode dropdown.
The Connector loop uses the Connector editor to configure a
connector. There are a few differences though as shown in the above
picture. The initialize option now shows those options relevant for
a connector loop instead of the normal initialize options. Also, only
Iterator and Lookup can be selected from the Mode dropdown.
Apart
from the usual tabs you see for a connector, there is also an output
attribute map that lets you configure dynamic assignments of connector
parameters in the Connector Parameters tab.
This is slightly different from the ordinary output map in that it
shows a fixed schema, which is the list of parameters for the chosen
connector. The schema part also has no Connect/Next buttons to affect
the schema.

Attribute MapIndependent
Attribute Map Component
 The attribute map component shows a single panel where we can
map attributes to the work entry, independent from attribute mapping
inside other components like a connector. The component also offers
to reuse attribute maps from other components such as connectors,
functions and other attribute map components in your library. For
more information, see Attribute Mapping and Schema.
The attribute map component shows a single panel where we can
map attributes to the work entry, independent from attribute mapping
inside other components like a connector. The component also offers
to reuse attribute maps from other components such as connectors,
functions and other attribute map components in your library. For
more information, see Attribute Mapping and Schema.
Parent topic:
The AssemblyLine Editor