Attribute Mapping and Schema
Attribute mapping is done using either the attribute map panel in the AssemblyLine or in the component editor.
In the AssemblyLine editor we can add attributes either by right
clicking in the attribute maps section and choosing add attribute,
or use the Add button in the toolbar as shown
below.
In this window you don't see the schema for the components
in the AssemblyLine. To work with the schema you open the editor for
the component by selecting it in the left tree.
The typical scenario for attribute mapping is to first discover
the schema for the component. When you do a discover schema, the CE
will run a background job that executes the query schema method of
the component. If no schema is returned the CE will ask if you would
like to read an entry to attempt to derive the schema from that. The result is then populated back into the schema for the component you
are editing.
The picture below shows the contents of the input schema for a
component after discovering attributes. If a component for some reason
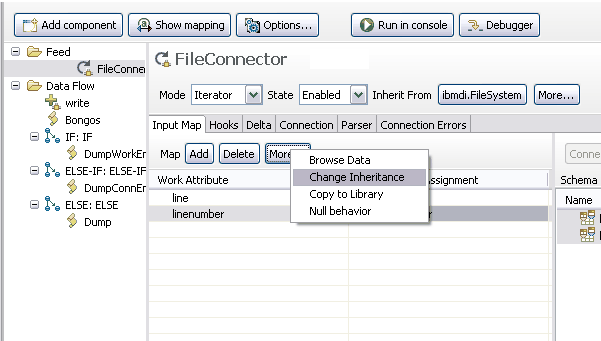
doesn't provide you with a schema we can add schema items manually
using the Add… button on the toolbar or reuse
a schema from another component configuration with the Change
Inheritance option.
We can also use the drop down menu on the title bar to change
the inheritance for the schema configuration.
Having a schema, we can drag and drop individual items into to
the attribute map or use the Map Attribute function
from the context menu and modify the mapping if necessary. Changing
Attribute Map inheritance
Note: Drag and drop functionality depends to a certain extent on your
windowing environment. In particular, on UNIX systems,
the Common Desktop Environment (CDE) does not provide this, so in
order to set up mapping you will need to use the Map Attribute function
from the context menu.
If you have no schema or want to add attributes independent of
the schema we can of course do so. Use the Add button
to add a new attribute to the map. You name the attribute, and an
expression of either "conn.attribute-name" or "work.attribute-name"
is assigned to the new attribute. This can be done in both the AssemblyLine
editor and in the Connector editor windows.
A dialog appears with an editable text field where we can type
the name of the new attribute. The list above contains all known attribute
names from the schema; we can select those you want added to the
attribute map.
As you add more components to the AssemblyLine we can drag attributes
between them where it makes sense. Dragging a component onto another
component will map all mapped attributes to the target component.
We can also drag attributes from the attribute map onto components
in the left panel showing all components in the AssemblyLine. This
will perform a simple map of all those items you drag over. This is
similar to dropping them onto the component in the attribute map panel.
The concept of Attribute Mapping is treated fairly extensively,
replete with examples, in SDI v7.2 Getting
Started Guide.
Depending on the Connector, and the mode it is configured in, there
will be different tabs in the Connector configuration window.
Attribute map: inheritance
dialog

 JavaScript editing window for individual Attribute" />

External attribute maps
Attribute maps can
inherit from external attribute map files. An external attribute map
file is a text file that contains attribute map items just like you
have it in the actual mapping screen. The difference is that the external
file uses a different format than the internal XML structure. This
makes it easier for you to configure the attribute map for any connector
without even going into the CE. The CE provides this option in the
inheritance dialog for attribute maps inheritance dialog" />
Click the External attribute map... button
to choose an existing file, or type "file:" followed
by the full path to the attribute map file. If you want to use relative
path names, prefix the filename with a dot+slash (./).
inheritance dialog" />
Click the External attribute map... button
to choose an existing file, or type "file:" followed
by the full path to the attribute map file. If you want to use relative
path names, prefix the filename with a dot+slash (./).
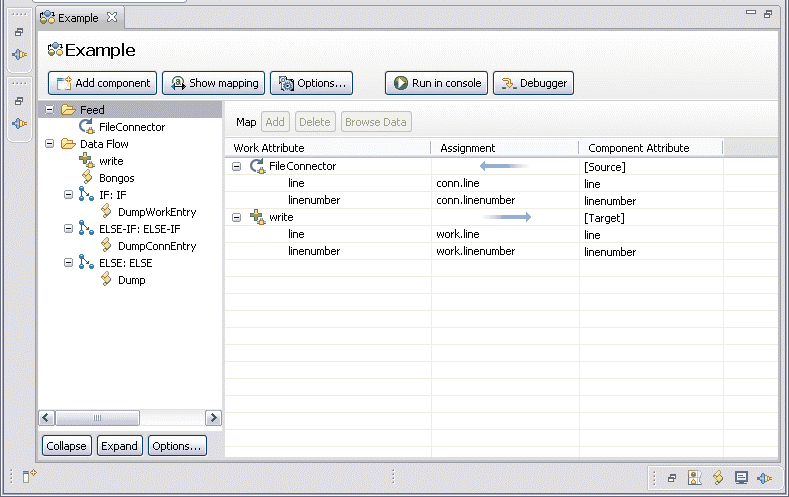
Input Attribute mapping is the process that accomplishes
the moving of data from the input source to the Work entry in the
AssemblyLine. Input Attribute maps are shown in the Attribute Maps
window of the Connector, when brought up in the Connector Editor,
with an arrow pointing to the Connector from an entity referred to
as "[Source]". They are also shown in the Schema window, under Input
Attribute map.
Output Attribute mapping is the process that accomplishes
the moving of data from the Work entry in the AssemblyLine to the
output destination in the connected system. Output Attribute maps
are shown in the Attribute Maps window of the Connector, when brought
up in the Connector Editor, with an arrow pointing from the Connector
to an entity referred to as "[Target]". They are also shown in the
Schema window, under Output Attribute map.
Parent topic:
The AssemblyLine Editor