Set pod priority
With pod priority and preemption, we can configure priority classes to indicate the relative priority of the pods that make up the OpenShift cluster's workload. The OpenShift controller takes into consideration the priority of a pod and can even preempt (remove) pods with lower priority to make room on a worker node for higher priority pods. For more information, see the OpenShift documentation.
Why do I set pod priority?
As a cluster administrator, we want to control which pods are more critical to the cluster workload. Priority classes can help you control the OpenShift controller decisions to favor higher priority
pods over lower priority pods. The OpenShift controller can even preempt (remove) lower priority pods that are running so that pending higher priority pods can be scheduled.
By setting pod priority, we can help prevent lower priority workloads from impacting critical workloads in the cluster, especially in cases where the cluster starts to reach its resource capacity.
Make sure that we have set up proper user access to the cluster, and if applicable, security context constraints (SCCs). Access policies and SCCs can help prevent untrusted users from deploying high priority pods that prevent other pods from scheduling.
How does priority scheduling and preemption work?
In general, pending pods that have a higher priority are scheduled before lower prioritized pods. If you do not have enough resources left in your worker nodes, the OpenShift
controller can preempt (remove) pods to free up enough resources for the higher prioritized pods to be scheduled. Preemption is also affected by graceful termination periods, pod disruption budgets, and worker node affinity.
If you do not specify a priority for the pod deployment, the default is set to the priority class that is set as the globalDefault . If you do not have a globalDefault priority class, the default priority for all pods is zero (0). By default, Red Hat OpenShift on IBM Cloud does not set a globalDefault, so the pod default priority is zero.
To understand how pod priority and OpenShift controller work together, consider the scenarios in the following figure. You must place prioritized pods on worker nodes with available resources. Otherwise, high priority pods in the cluster can remain in pending at the same time that existing pods are removed, such as in Scenario 3.
Figure: Pod priority scenarios
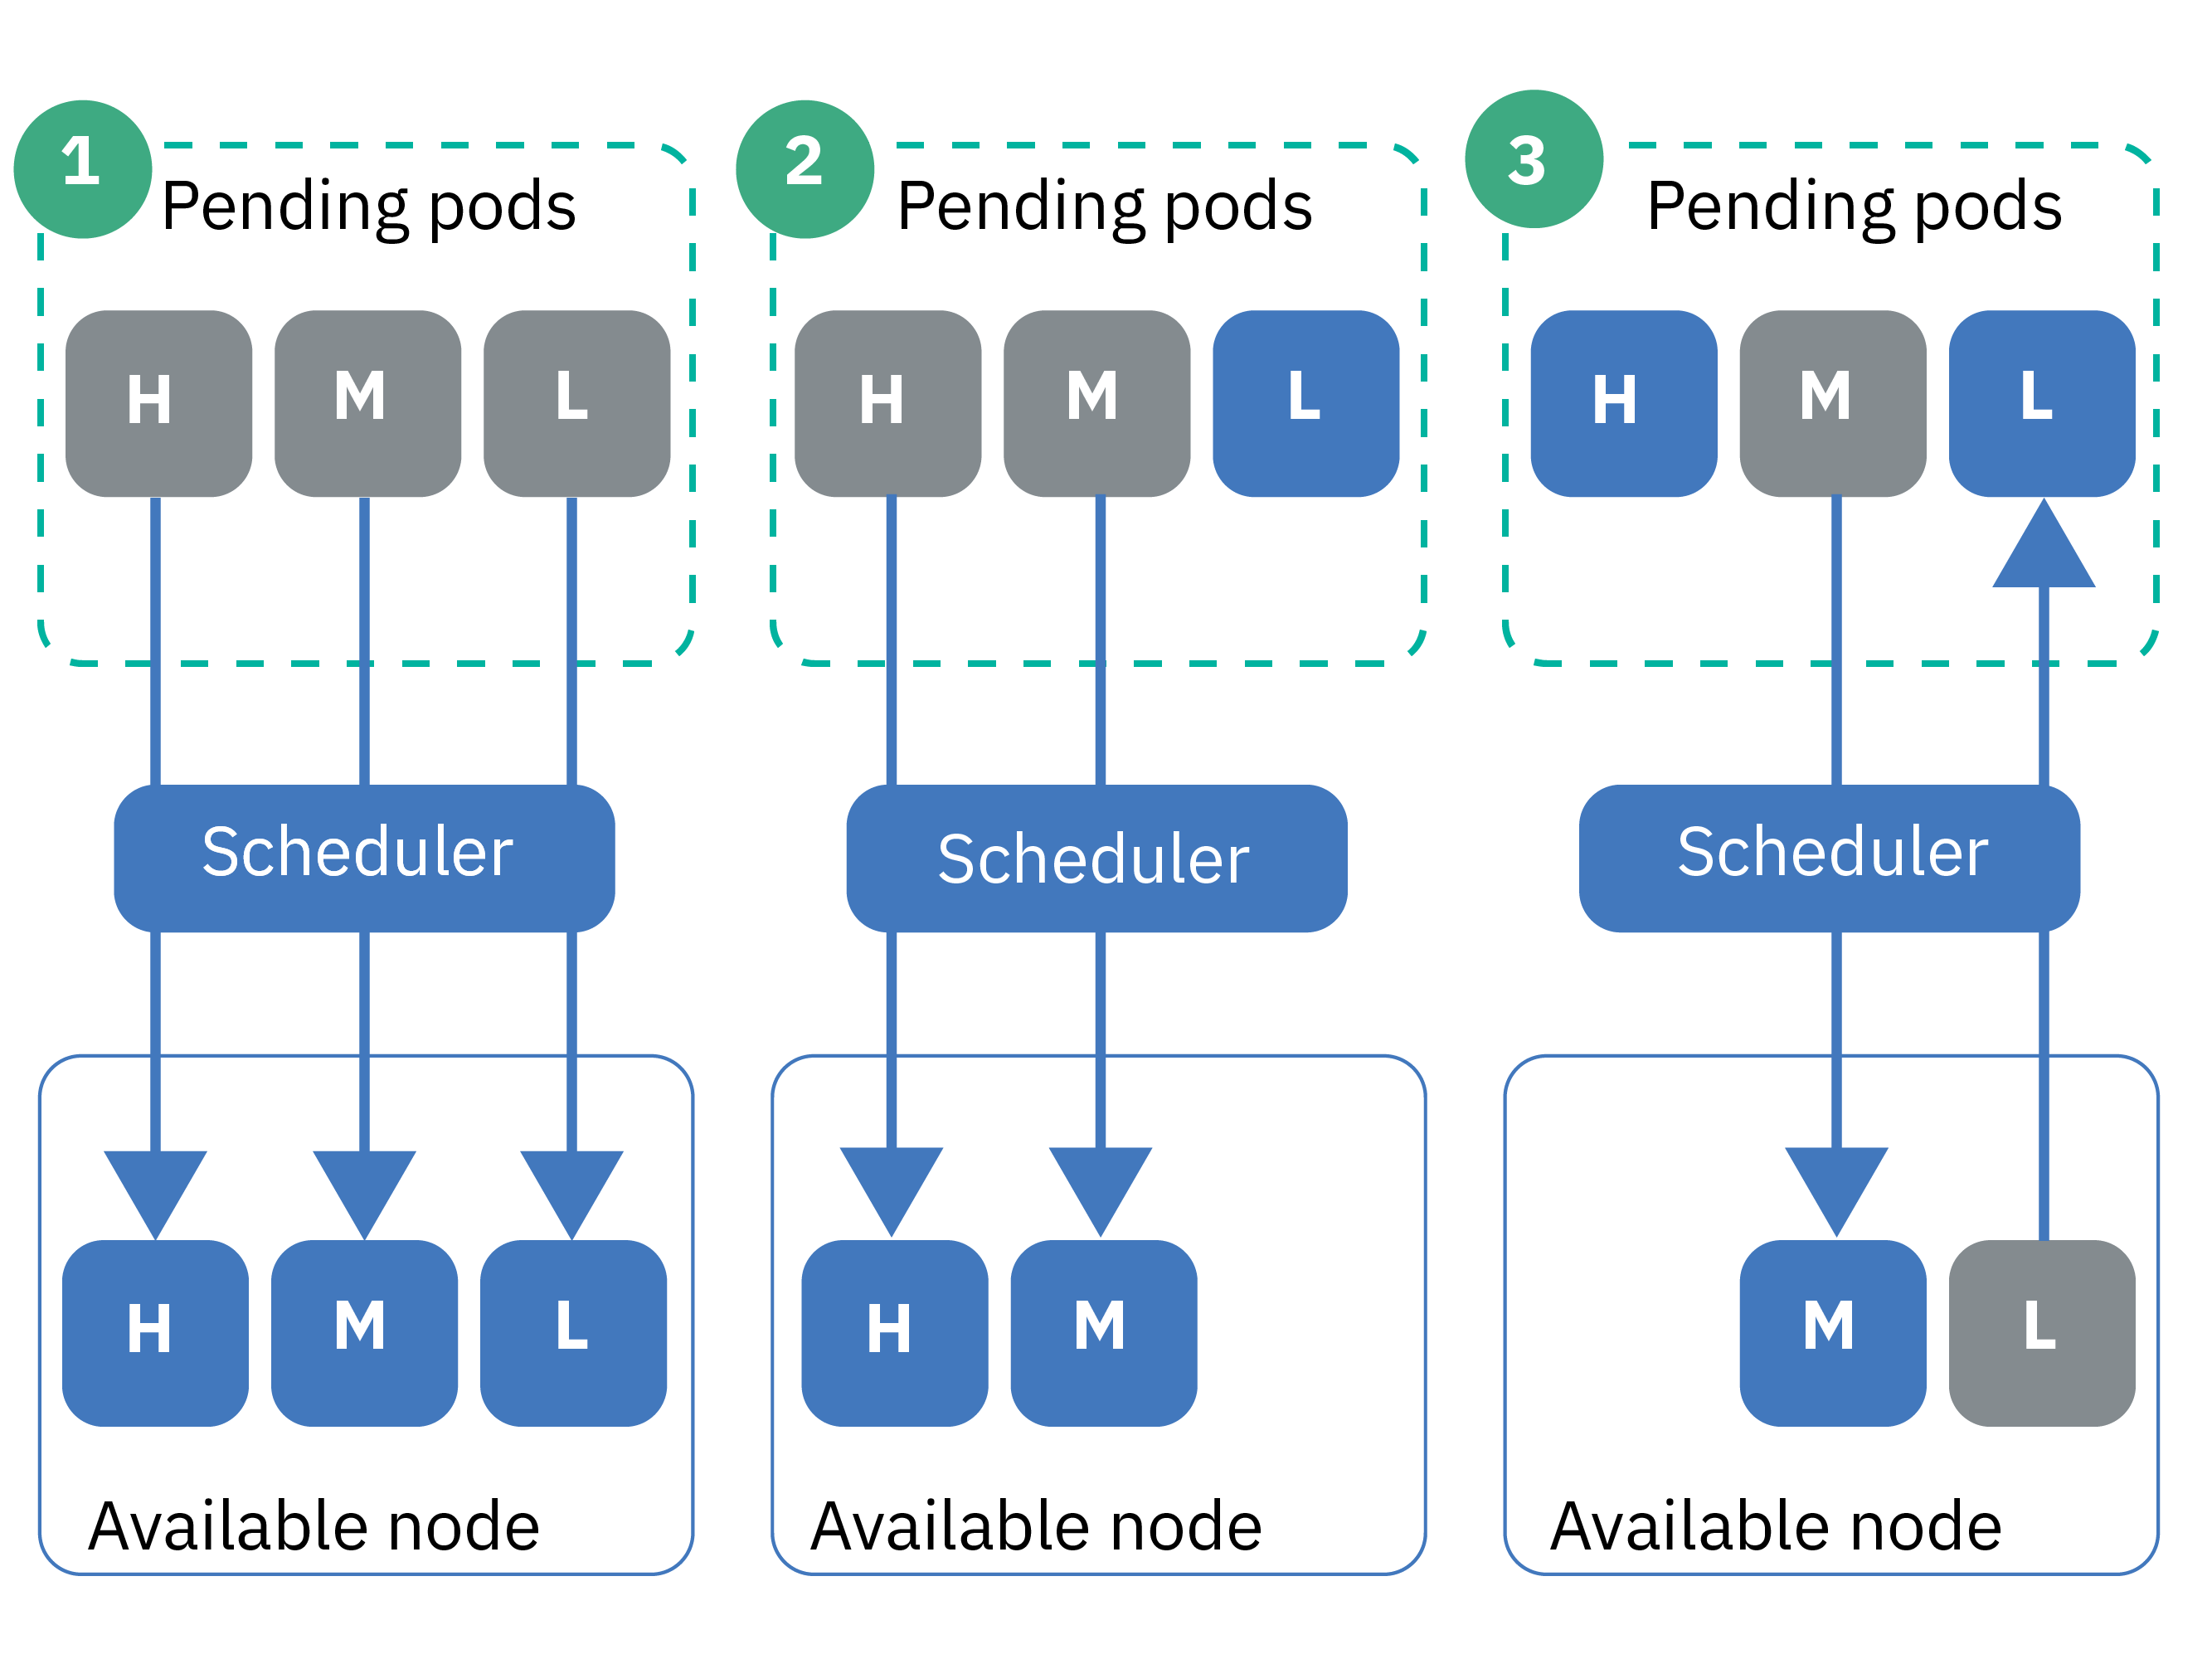
- Three pods with high, medium, and low priority are pending scheduling. The OpenShift controller finds an available worker node with room for all three pods, and schedules them in order of priority, with the highest priority pod scheduled first.
- Three pods with high, medium, and low priority are pending scheduling. The OpenShift controller finds an available worker node, but the worker node has only enough resources to support the high and medium priority pods. The low-priority pod is not scheduled and it remains in pending.
- Two pods with high and medium priority are pending scheduling. A third pod with low priority exists on an available worker node. However, the worker node does not have enough resources to schedule any of the pending pods. The OpenShift controller preempts, or removes, the low-priority pod, which returns the pod to a pending state. Then, the OpenShift controller tries to schedule the high priority pod. However, the worker node does not have enough resources to schedule the high priority pod, and instead, the OpenShift controller schedules the medium priority pod.
For more information: See the Kubernetes documentation on pod priority and preemption.
Can I disable the pod priority admission controller?
No. If you don't want to use pod priority, don't set a globalDefault or include a priority class in the pod deployments. Every pod defaults to zero,
except the cluster-critical pods that IBM deploys with the default priority classes. Because pod priority is relative, this basic setup ensures that the cluster-critical pods are prioritized for resources,
and schedules any other pods by following the existing scheduling policies that we have in place.
Understand default priority classes
Your Red Hat OpenShift on IBM Cloud clusters come with some priority classes by default.Do not modify the default classes, which are used to properly manage the cluster. We can use these classes in the app deployments, or create your own priority classes.
The following table describes the priority classes that are in the cluster by default and why they are used.
| Name | Set by | Priority Value | Purpose |
|---|---|---|---|
| system-node-critical | Kubernetes | 2000001000 | Select pods that are deployed into the kube-system namespace when you create the cluster use this priority class to protect critical functionality for worker nodes, such as for networking, storage, logging, monitoring, and metrics pods. |
| system-cluster-critical | Kubernetes | 2000000000 | Select pods that are deployed into the kube-system namespace when you create the cluster use this priority class to protect critical functionality for clusters, such as for networking, storage, logging, monitoring, and metrics pods. |
| ibm-app-cluster-critical | IBM | 900000000 | Select pods that are deployed into the ibm-system namespace when you create the cluster use this priority class to protect critical functionality for apps, such as the load balancer pods. |
We can check which pods use the priority classes by running the following command.
oc get pods --all-namespaces -o custom-columns=NAME:.metadata.name,PRIORITY:.spec.priorityClassName
Creating a priority class
To set pod priority, we need to use a priority class.Before beginning:
- Access the OpenShift cluster.
- Ensure that we have the Writer or Manager IBM Cloud IAM service role for the default namespace.
To use a priority class:
-
Optional: Use an existing priority class as a template for the new class.
-
List existing priority classes.
oc get priorityclasses
-
Choose the priority class that we want to copy and create a local YAML file.
oc get priorityclass <priority_class> -o yaml > Downloads/priorityclass.yaml
-
-
Make your priority class YAML file.
apiVersion: scheduling.k8s.io/v1alpha1
kind: PriorityClass
metadata:
  name: <priority_class_name>
value: <1000000>
globalDefault: <false>
description: "Use this class for XYZ service pods only."
Component Description name Required: The name of the priority class that we want to create. value Required: Enter an integer less than or equal to 1 billion (1000000000). The higher the value, the higher the priority. Values are relative to the values of other priority classes in the cluster. Reserve very high numbers for system critical pods that you do not want to be preempted (removed).
For example, the default cluster-critical priority classes range in value from 900000000-2000001000, so enter a value less than these numbers for new priority classes so that nothing is prioritized higher than these pods.globalDefault Optional: Set the field to true to make this priority class the global default that is applied to every pod that is scheduled without a priorityClassName value. Only one priority class in the cluster can be set as the global default. If there is no global default, pods with no priorityClassName specified have a priority of zero (0).
The default priority classes do not set a globalDefault. If you created other priority classes in the cluster, we can check to make sure that they do not set a globalDefault by running oc describe priorityclass <name>.description Optional: Tell users why to use this priority class. Enclose the string in quotations (""). -
Create the priority class in the cluster.
oc apply -f filepath/priorityclass.yaml
-
Verify that the priority class is created.
oc get priorityclasses
Great! You created a priority class. Let your team know about the priority class and which priority class, if any, that they must use for their pod deployments.
Assigning priority to the pods
Assign a priority class to the pod spec to set the pod's priority within your Red Hat OpenShift on IBM Cloud cluster.Before beginning:
- Access the OpenShift cluster.
- Ensure that we have the Writer or Manager IBM Cloud IAM service role in the namespace that we want to deploy the pods to.
- Understand how priority scheduling works, as priority can preempt existing pods and affect how the cluster's resources are consumed.
To assign priority to the pods:
-
Check the importance of other deployed pods so that we can choose the right priority class for the pods in relation to what already is deployed.
-
View the priority classes that other pods in the namespace use.
oc get pods -n <namespace> -o custom-columns=NAME:.metadata.name,PRIORITY:.spec.priorityClassName
-
Get the details of the priority class and note the value number. Pods with higher numbers are prioritized before pods with lower numbers. Repeat this step for each priority class that we want to review.
oc describe priorityclass <priorityclass_name>
-
-
Get the priority class that we want to use, or create your own priority class.
oc get priorityclasses
-
In the pod spec, add the priorityClassName field with the name of the priority class that you retrieved in the previous step.
apiVersion: apps/v1 kind: Deployment metadata: name: ibmliberty spec: replicas: 1 selector: matchLabels: app: ibmliberty template: metadata: labels: app: ibmliberty spec: containers: - name: ibmliberty image: icr.io/ibm/liberty:latest ports: - containerPort: 9080 priorityClassName: <priorityclass_name> -
Create your prioritized pods in the namespace that we want to deploy them to.
oc apply -f filepath/pod-deployment.yaml