Security - WebSphere MQ v7.5
- Identification and authentication
- Authorization
- Auditing
- Confidentiality
- Data integrity
- Cryptographic concepts
- Cryptography
- Message digests and digital signatures
- Digital certificates
- Public Key Infrastructure (PKI)
- Cryptographic security protocols: SSL and TLS
- Secure Sockets Layer (SSL) and Transport Layer Security (TLS) concepts
- An overview of the SSL or TLS handshake
- How SSL and TLS provide identification, authentication, confidentiality,
- CipherSpecs and CipherSuites
- Digital signatures in SSL and TLS
- Federal Information Processing Standards
- National Security Agency (NSA) Suite B Cryptography
- WebSphere MQ security mechanisms
- Security protocols in WebSphere MQ
- WebSphere MQ support for SSL and TLS
- Federal Information Processing Standards (FIPS)
- SSL and TLS on the WebSphere MQ MQI client
- Certificate validation policies in WebSphere MQ
- Planning for your security requirements
- Planning identification and authentication
- Planning authentication for a client application
- User IDs
- Planning authorization
- Authority to administer WebSphere MQ
- Authority to administer WebSphere MQ
- Authorization for applications to use WebSphere MQ
- When authority checks are performed
- Alternate user authority
- Message context
- Authority to work with WebSphere MQ objects
- Use PCF to access OAM commands
- Security for remote messaging
- Security of objects on UNIX and Linux systems
- Security of objects on Windows systems
- User IDs across systems
- Use a custom authorization service
- Access control for clients
- Planning confidentiality
- Application level security
- WebSphere MQ Advanced
- Providing your own application level security
- Channel exit programs
- Security exit overview
- Message exit
- Send and receive exits
- Planning data integrity
- Planning auditing
- Planning security by topology
- Channel security
- Protecting channel initiator definitions
- Transmission queues
- Channel exits
- Protecting channels with SSL
- SNA LU 6.2 security services
- Session level cryptography
- Session level authentication
- Conversation level authentication
- Security for queue manager clusters
- Security for WebSphere MQ Publish/Subscribe
- Multicast security
- Firewalls and Internet pass-thru
- Security for WebSphere MQ internet pass-thru
- Set up security
- How authorizations work
- Special considerations for security on Windows
- The SSPI channel exit program
- When you get a 'group not found' error on Windows
- When you have problems with WebSphere MQ and domain controllers on Windows
- Windows 2000 domain with non-default, or Windows 2003 and Windows Server
- Configure WebSphere MQ Services
- Applying security template files to Windows
- Nested groups
- Configure additional authority for Windows applications connecting to WebSphere MQ
- Set up security on HP Integrity NonStop Server
- Set up WebSphere MQ MQI client security
- Working with SSL or TLS
- Working with SSL or TLS on HP Integrity NonStop Server
- Certificate management
- Personal certificate store
- Certificate trust store
- Pass phrase stash file
- Certificate revocation list file
- Working with SSL or TLS on UNIX, Linux and Windows systems
- Use iKeyman, iKeycmd, runmqakm, and runmqckm
- Set up a key repository on UNIX, Linux, and Windows systems
- Accessing and securing your key database files on Windows
- Accessing and securing your key database files on UNIX and Linux systems
- Adding default CA certificates into an empty key repository,
- Locating the key repository for a queue manager
- Changing the key repository location for a queue manager
- Locating the key repository for a WebSphere MQ MQI client .
- Specifying the key repository location for a WebSphere MQ MQI client
- When changes to certificates or the certificate store become
- Create a self-signed personal certificate
- Requesting a personal certificate
- Renewing an existing personal certificate
- Receiving personal certificates into a key repository
- Extracting a CA certificate from a key repository
- Extracting the public part of a self-signed certificate from a key repository
- Adding a CA certificate (or the public part of a self-signed
- Exporting a personal certificate from a key repository
- Importing a personal certificate into a key repository
- Importing from a Microsoft .pfx
- Importing from a PKCS #7 file
- Deleting a certificate from a key repository
- Generating strong passwords for key repository protection
- Configure for cryptographic hardware
- Identifying and authenticating users
- Privileged users
- Identifying and authenticating users using the MQCSP structure
- Implementing identification and authentication in security exits
- Identity mapping in message exits
- Identity mapping in the API exit and API-crossing exit
- Working with revoked certificates
- Revoked certificates and OCSP
- Working with Certificate Revocation Lists and Authority Revocation
- Set up LDAP servers
- Accessing CRLs and ARLs with a queue manager
- Accessing CRLs and ARLs using WebSphere MQ Explorer
- Accessing CRLs and ARLs with a WebSphere MQ MQI client
- Location of an OCSP responder, and of LDAP servers that hold CRLs
- Accessing CRLs and ARLs with WebSphere MQ classes for Java and WebSphere MQ classes for JMS
- Manipulating authentication information objects
- Authorizing access to objects
- Preventing security access checks
- Granting required access to resources
- Granting partial administrative access on a subset of queue manager resources
- Granting limited administrative access to some queues
- Granting limited administrative access to some topics
- Granting limited administrative access to some channels
- Granting limited administrative access to a queue manager
- Granting limited administrative access to some processes
- Granting limited administrative access to some namelists
- Granting limited administrative access to some services
- Granting full administrative access on a subset of queue manager resources
- Granting full administrative access to some queues
- Granting full administrative access to some topics
- Granting full administrative access to some channels
- Granting full administrative access to a queue manager
- Granting full administrative access to some processes
- Granting full administrative access to some namelists
- Granting full administrative access to some services
- Granting read-only access to all resources on a queue manager
- Granting full administrative access to all resources on a queue manager
- Removing connectivity to the queue manager
- Allowing user applications to connect to your queue manager
- Securing remote connectivity to the queue manager
- Blocking specific IP addresses
- Temporarily blocking specific IP addresses if the queue manager is not running
- Blocking specific user IDs
- Mapping a remote queue manager to an MCAUSER user ID
- Mapping a client asserted user ID to an MCAUSER user ID
- Mapping an SSL or TLS Distinguished Name to an MCAUSER user
- Blocking access from a remote queue manager
- Blocking access for a client asserted user ID
- Blocking access for an SSL Distinguished Name
- Mapping an IP address to an MCAUSER user ID
- Disabling remote access to the queue manager
- Set up connection security
- Controlling user access to queues
- Granting authority to get messages from queues
- Granting authority to set context
- Granting authority to pass context
- Granting authority to put messages to a local queue
- Granting authority to put messages to a model queue
- Granting authority to put messages to a remote cluster queue
- Controlling user access to topics
- Granting authority to publish messages to a topic
- Granting authority to subscribe to topics
- Granting authority to inquire on a queue manager
- Granting authority to access processes
- Granting authority to access namelists
- Authority to administer WebSphere MQ on UNIX, Linux, and Windows systems
- Managing the mqm group
- Authority to work with WebSphere MQ objects on UNIX, Linux and Windows systems
- When security checks are made on UNIX, Linux and Windows systems
- How access control is implemented by WebSphere MQ on UNIX, Linux and Windows systems
- Identifying the user ID on Windows, UNIX and Linux systems
- Principals and groups
- Windows security identifiers (SIDs)
- Alternate-user authority on UNIX, Linux and Windows systems
- Context authority on UNIX, Linux and Windows systems
- Implementing access control in security exits
- Implementing access control in message exits
- Implementing access control in the API exit and API-crossing
- Confidentiality of messages
- Connecting two queue managers using SSL or TLS
- Use self-signed certificates for mutual authentication of two queue managers
- Use CA-signed certificates for mutual authentication of two
- Connecting two queue managers using one-way authentication
- Connecting a client to a queue manager securely
- Use self-signed certificates for mutual authentication of a client and queue manager
- Use CA-signed certificates for mutual authentication of a client and queue manager
- Connecting a client to a queue manager anonymously
- Specifying CipherSpecs
- Obtaining information about CipherSpecs using WebSphere MQ Explorer
- Resetting SSL and TLS secret keys
- Implementing confidentiality in user exit programs
- Data integrity of messages
- Connecting two queue managers using SSL or TLS
- Digital certificate labels, understanding the requirements
- Use self-signed certificates for mutual authentication of two queue managers
- Use CA-signed certificates for mutual authentication of two
- Connecting two queue managers using one-way authentication
- Connecting a client to a queue manager securely
- Use self-signed certificates for mutual authentication of a client and queue manager
- Use CA-signed certificates for mutual authentication of a client and queue manager
- Connecting a client to a queue manager anonymously
- Specifying CipherSpecs
- Obtaining information about CipherSpecs using WebSphere MQ Explorer
- Alternatives for specifying CipherSpecs
- Specifying a CipherSpec for a WebSphere MQ MQI client
- Specifying a CipherSuite with WebSphere MQ classes for Java and WebSphere MQ classes for JMS
- Auditing
- Keeping clusters secure
- Stopping unauthorized queue managers sending messages
- Stopping unauthorized queue managers putting messages on your queues
- Authorizing putting messages on remote cluster queues
- Preventing queue managers joining a cluster
- Security exits on cluster channels
- Forcing unwanted queue managers to leave a cluster
- Preventing queue managers receiving messages
- SSL and clusters
- Upgrading clustered queue managers and channels to SSL
- Disabling SSL on clustered queue managers and channels
- Publish/subscribe security
- Example publish/subscribe security setup
- Grant access to a user to subscribe to a topic
- Grant access to a user to subscribe to a topic deeper within the tree
- Grant another user access to subscribe to only the topic deeper
- Change access control to avoid additional messages
- Grant access to a user to publish to a topic
- Grant access to a user to publish to a topic deeper within the tree
- Grant access for publish and subscribe
- Subscription security
- MQSO_ANY_USERID subscription option
- WebSphere MQ Advanced
- WebSphere MQ AMS
- Behavior that has changed between version 7.0.1 and version
- Features and functions of WebSphere MQ Advanced Message Security V7.5
- Key concepts
- Public key infrastructure
- Digital certificates
- Object authority manager
- Supported technology
- Known limitations
- User scenarios
- Quick Start Guide for Windows platforms
- Quick Start Guide for UNIX platforms
- Quick Start Guide for Java clients
- Protecting remote queues
- Routing protected messages using WebSphere Message Broker
- Use WebSphere MQ AMS with WebSphere MQ Managed File Transfer
- Install WebSphere MQ Advanced Message Security
- Use keystores and certificates
- Structure of the configuration file
- Message Channel Agent (MCA) interception
- Key usage extensions
- Certificate validation methods in WebSphere MQ AMS
- Online Certificate Status Protocol (OCSP)
- Enabling OCSP checking in native interceptors
- Enabling OCSP checking in Java
- Certificate revocation lists (CRLs)
- Enabling certificate validation and certificate revocation
- Enabling certificate revocation list support in Java
- Protecting passwords in Java
- Security policies
- Security policies overview
- Policy name
- Signature algorithm
- Encryption algorithm
- Toleration
- Sender distinguished names
- Recipient distinguished names
- Security policy attributes
- Quality of protection
- Managing security policies
- Create security policies
- Changing security policies
- Display and dumping security policies
- Removing security policies
- System queue protection
Identification and authentication
Identification is the ability to identify uniquely a user of a system or an application that is running in the system. Authentication is the ability to prove that a user or application is genuinely who that person or what that application claims to be.
For example, consider a user who logs on to a system by entering a user ID and password. The system uses the user ID to identify the user. The system authenticates the user at the time of logon by checking that the supplied password is correct.
Non-repudiation
The non-repudiation service can be viewed as an extension to the identification and authentication service. In general, non-repudiation applies when data is transmitted electronically; for example, an order to a stock broker to buy or sell stock, or an order to a bank to transfer funds from one account to another.
The overall goal of the non-repudiation service is to be able to prove that a particular message is associated with a particular individual.
The non-repudiation service can contain more than one component, where each component provides a different function. If the sender of a message ever denies sending it, the non-repudiation service with proof of origin can provide the receiver with undeniable evidence that the message was sent by that particular individual. If the receiver of a message ever denies receiving it, the non-repudiation service with proof of delivery can provide the sender with undeniable evidence that the message was received by that particular individual.
In practice, proof with virtually 100% certainty, or undeniable evidence, is a difficult goal. In the real world, nothing is fully secure. Managing security is more concerned with managing risk to a level that is acceptable to the business. In such an environment, a more realistic expectation of the non-repudiation service is to be able to provide evidence that is admissible, and supports your case, in a court of law.
Non-repudiation is a relevant security service in a WebSphere MQ environment because WebSphere MQ is a means of transmitting data electronically. For example, you might require contemporaneous evidence that a particular message was sent or received by an application associated with a particular individual.
WebSphere MQ with WebSphere MQ Advanced Message Security does not provide a non-repudiation service as part of its base function. However, this information center does contain suggestions on how you might provide your own non-repudiation service within a WebSphere MQ environment by writing your own exit programs.
Authorization
Authorization protects critical resources in a system by limiting access only to authorized users and their applications. It prevents the unauthorized use of a resource or the use of a resource in an unauthorized manner.
Auditing
Auditing is the process of recording and checking events to detect whether any unexpected or unauthorized activity has taken place, or whether any attempt has been made to perform such activity.
Confidentiality
The confidentiality service protects sensitive information from unauthorized disclosure.
When sensitive data is stored locally, access control mechanisms might be sufficient to protect it on the assumption that the data cannot be read if it cannot be accessed. If a greater level of security is required, the data can be encrypted.
Encrypt sensitive data when it is transmitted over a communications network, especially over an insecure network such as the Internet. In a networking environment, access control mechanisms are not effective against attempts to intercept the data, such as wiretapping.
Data integrity
The data integrity service detects whether there has been unauthorized modification of data.
There are two ways in which data might be altered: accidentally, through hardware and transmission errors, or because of a deliberate attack. Many hardware products and transmission protocols have mechanisms to detect and correct hardware and transmission errors. The purpose of the data integrity service is to detect a deliberate attack.
The data integrity service aims only to detect whether data has been modified. It does not aim to restore data to its original state if it has been modified.
Access control mechanisms can contribute to data integrity insofar as data cannot be modified if access is denied. But, as with confidentiality, access control mechanisms are not effective in a networking environment.
Cryptographic concepts
This collection of topics describes the concepts of cryptography applicable to WebSphere MQ.
The term entity is used to refer to a queue manager, a WebSphere MQ MQI client, an individual user, or any other system capable of exchanging messages.
Cryptography
Cryptography is the process of converting between readable text, called plaintext, and an unreadable form, called ciphertext.
This occurs as follows:
- The sender converts the plaintext message to ciphertext. This part of the process is called encryption (sometimes encipherment).
- The ciphertext is transmitted to the receiver.
- The receiver converts the ciphertext message back to its plaintext form. This part of the process is called decryption (sometimes decipherment).
See the Glossary for a definition of cryptography.
The conversion involves a sequence of mathematical operations that change the appearance of the message during transmission but do not affect the content. Cryptographic techniques can ensure confidentiality and protect messages against unauthorized viewing (eavesdropping), because an encrypted message is not understandable. Digital signatures, which provide an assurance of message integrity, use encryption techniques.
Cryptographic techniques involve a general algorithm, made specific by the use of keys. There are two classes of algorithm:
- Those that require both parties to use the same secret key. Algorithms that use a shared key are known as symmetric algorithms. Figure 1 illustrates symmetric key cryptography.
- Those that use one key for encryption and a different key for decryption. One of these must be kept secret but the other can be public. Algorithms that use public and private key pairs are known as asymmetric algorithms. Figure 2 illustrates asymmetric key cryptography, which is also known as public key cryptography.
The encryption and decryption algorithms used can be public but the shared secret key and the private key must be kept secret.
Figure 1. Symmetric key cryptography
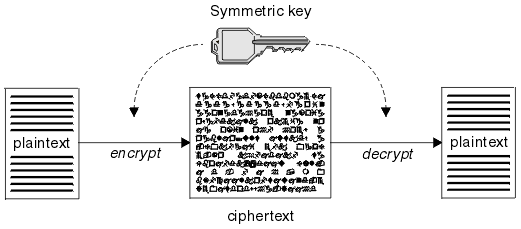
Figure 2. Asymmetric key cryptography
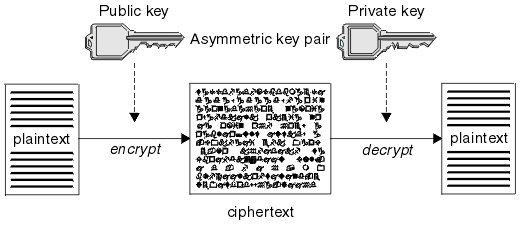
Figure 2 shows plaintext encrypted with the receiver's public key and decrypted with the receiver's private key. Only the intended receiver holds the private key for decrypting the ciphertext. Note that the sender can also encrypt messages with a private key, which allows anyone that holds the sender's public key to decrypt the message, with the assurance that the message must have come from the sender.
With asymmetric algorithms, messages are encrypted with either the public or the private key but can be decrypted only with the other key. Only the private key is secret, the public key can be known by anyone. With symmetric algorithms, the shared key must be known only to the two parties. This is called the key distribution problem . Asymmetric algorithms are slower but have the advantage that there is no key distribution problem.
Other terminology associated with cryptography is:
- Strength
- The strength of encryption is determined by the key size. Asymmetric
algorithms require large keys, for example:
Symmetric keys are smaller: 256 bit keys give you strong encryption.1024 bits Low-strength asymmetric key 2048 bits Medium-strength asymmetric key 4096 bits High-strength asymmetric key - Block cipher algorithm
- These algorithms encrypt data by blocks. For example, the RC2 algorithm from RSA Data Security Inc. uses blocks 8 bytes long. Block algorithms are typically slower than stream algorithms.
- Stream cipher algorithm
- These algorithms operate on each byte of data. Stream algorithms are typically faster than block algorithms.
Message digests and digital signatures
A message digest is a fixed size numeric representation of the contents of a message, computed by a hash function. A message digest can be encrypted, forming a digital signature.
Messages are inherently variable in size. A message digest is a fixed size numeric representation of the contents of a message. A message digest is computed by a hash function, which is a transformation that meets two criteria:
- The hash function must be one way. It must not be possible to reverse the function to find the message corresponding to a particular message digest, other than by testing all possible messages.
- It must be computationally infeasible to find two messages that hash to the same digest.
The message digest is sent with the message itself. The receiver can generate a digest for the message and compare it with the digest of the sender. The integrity of the message is verified when the two message digests are the same. Any tampering with the message during transmission almost certainly results in a different message digest.
A message digest created using a secret symmetric key is known as a Message Authentication Code (MAC), because it can provide assurance that the message has not been modified.
The sender can also generate a message digest and then encrypt the digest using the private key of an asymmetric key pair, forming a digital signature. The signature must then be decrypted by the receiver, before comparing it with a locally generated digest.
Digital certificates
Digital certificates protect against impersonation, certifying that a public key belongs to a specified entity. They are issued by a Certificate Authority.
Digital certificates provide protection against impersonation, because a digital certificate binds a public key to its owner, whether that owner is an individual, a queue manager, or some other entity. Digital certificates are also known as public key certificates, because they give you assurances about the ownership of a public key when you use an asymmetric key scheme. A digital certificate contains the public key for an entity and is a statement that the public key belongs to that entity:
- When the certificate is for an individual entity, the certificate is called a personal certificate or user certificate.
- When the certificate is for a Certificate Authority, the certificate is called a CA certificate or signer certificate.
If public keys are sent directly by their owner to another entity, there is a risk that the message could be intercepted and the public key substituted by another. This is known as a man in the middle attack. The solution to this problem is to exchange public keys through a trusted third party, giving you a strong assurance that the public key really belongs to the entity with which you are communicating. Instead of sending your public key directly, you ask the trusted third party to incorporate it into a digital certificate. The trusted third party that issues digital certificates is called a Certificate Authority (CA), as described in Certificate Authorities .
What is in a digital certificate
Digital certificates contain specific pieces of information, as determined by the X.509 standard.
Digital certificates used by WebSphere MQ comply with the X.509 standard, which specifies the information that is required and the format for sending it. X.509 is the Authentication framework part of the X.500 series of standards.
Digital certificates contain at least the following information about the entity being certified:
- The owner's public key
- The owner's Distinguished Name
- The Distinguished Name of the CA that issued the certificate
- The date from which the certificate is valid
- The expiry date of the certificate
- The version number of the certificate data format as defined in X.509. The current version of the X.509 standard is Version 3, and most certificates conform to that version.
- A serial number. This is a unique identifier assigned by the CA which issued the certificate. The serial number is unique within the CA which issued the certificate: no two certificates signed by the same CA certificate have the same serial number.
An X.509 Version 2 certificate also contains an Issuer Identifier and a Subject Identifier, and an X.509 Version 3 certificate can contain a number of extensions. Some certificate extensions, such as the Basic Constraint extension, are standard, but others are implementation-specific. An extension can be critical, in which case a system must be able to recognize the field; if it does not recognize the field, it must reject the certificate. If an extension is not critical, the system can ignore it if does not recognize it.
The digital signature in a personal certificate is generated using the private key of the CA which signed that certificate. Anyone who needs to verify the personal certificate can use the CA's public key to do so. The CA's certificate contains its public key.
Digital certificates do not contain your private key. You must keep your private key secret.
Requirements for personal certificates
WebSphere MQ supports digital certificates that comply with the X.509 standard. It requires the client authentication option.
Because WebSphere MQ is a peer to peer system, it is viewed as client authentication in SSL terminology. Therefore, any personal certificate used for SSL authentication needs to allow a key usage of client authentication. Not all server certificates have this option enabled, so the certificate provider might need to enable client authentication on the root CA for the secure certificate.
In addition to the standards which specify the data format for a digital certificate, there are also standards for determining whether a certificate is valid. These standards have been updated over time in order to prevent certain types of security breach. For example, older X.509 version 1 and 2 certificates did not indicate whether the certificate could be legitimately used to sign other certificates. It was therefore possible for a malicious user to obtain a personal certificate from a legitimate source and create new certificates designed to impersonate other users.
When using X.509 version 3 certificates, the BasicConstraints and KeyUsage certificate extensions are used to specify which certificates can legitimately sign other certificates. The IETF RFC 5280 standard specifies a series of certificate validation rules which compliant application software must implement in order to prevent impersonation attacks. A set of certificate rules is known as a certificate validation policy.
Certificate Authorities
A Certificate Authority (CA) is a trusted third party that issues digital certificates to provide you with an assurance that the public key of an entity truly belongs to that entity.
The roles of a CA are:
- On receiving a request for a digital certificate, to verify the identity of the requestor before building, signing and returning the personal certificate
- To provide the CA's own public key in its CA certificate
- To publish lists of certificates that are no longer trusted in a Certificate Revocation List (CRL). For more information, see Working with revoked certificates
- To provide access to certificate revocation status by operating an OCSP responder server
Distinguished Names
The Distinguished Name (DN) uniquely identifies an entity in an X.509 certificate.
The following attribute types are commonly found in the DN:
| SERIALNUMBER | Certificate serial number |
| Email address | |
| E | Email address (Deprecated in preference to MAIL) |
| UID or USERID | User identifier |
| CN | Common Name |
| T | Title |
| OU | Organizational Unit name |
| DC | Domain component |
| O | Organization name |
| STREET | Street / First line of address |
| L | Locality name |
| ST (or SP or S) | State or Province name |
| PC | Postal code / zip code |
| C | Country |
| UNSTRUCTUREDNAME | Host name |
| UNSTRUCTUREDADDRESS | IP address |
| DNQ | Distinguished name qualifier |
The X.509 standard provides for a DN to be specified in a string format. For example:
CN=John Smith, OU=Test, O=IBM, C=GB
The Common Name (CN) can describe an individual user or any other entity, for example a web server.
The DN can contain multiple OU and DC attributes. Only one instance of each of the other attributes is permitted. The order of the OU entries is significant: the order specifies a hierarchy of Organizational Unit names, with the highest-level unit first. The order of the DC entries is also significant.
WebSphere MQ tolerates certain malformed DNs. For more information, see WebSphere MQ rules for SSLPEER values .
Obtaining personal certificates from a certificate authority
You can obtain a certificate from a trusted external certificate authority (CA).
You obtain a digital certificate by sending information to a CA, in the form of a certificate request. The X.509 standard defines a format for this information, but some CAs have their own format. Certificate requests are typically generated by the certificate management tool your system uses, for example the iKeyman tool on UNIX, Linux, and Windows systems and RACF on z/OS. The information contains your Distinguished Name and your public key. When your certificate management tool generates your certificate request, it also generates your private key, which you must keep secure. Never distribute your private key.
When the CA receives your request, the authority verifies your identity before building the certificate and returning it to you as a personal certificate.
Figure 1 illustrates the process of obtaining a digital certificate from a CA.
Figure 1. Obtaining a digital certificate
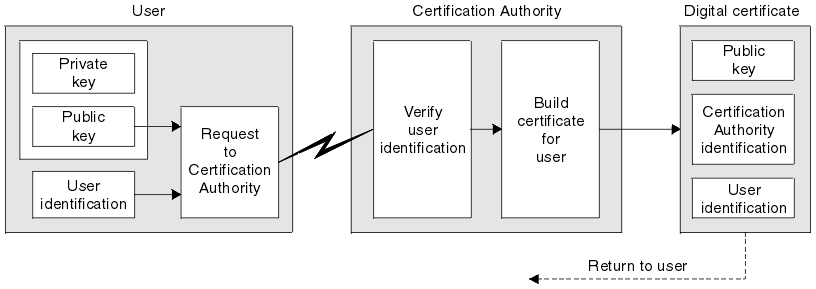
In the diagram:
- "User identification" includes your Subject Distinguished Name.
- "Certification Authority identification" includes the Distinguished Name of the CA that is issuing the certificate.
Digital certificates contain additional fields other than those shown in the diagram. For more information about the other fields in a digital certificate, see What is in a digital certificate .
How certificate chains work
When you receive the certificate for another entity, you might need to use a certificate chain to obtain the root CA certificate.
The certificate chain, also known as the certification path , is a list of certificates used to authenticate an entity. The chain, or path, begins with the certificate of that entity, and each certificate in the chain is signed by the entity identified by the next certificate in the chain. The chain terminates with a root CA certificate. The root CA certificate is always signed by the certificate authority (CA) itself. The signatures of all certificates in the chain must be verified until the root CA certificate is reached.
Figure 1 illustrates a certification path from the certificate owner to the root CA, where the chain of trust begins.
Figure 1. Chain of trust
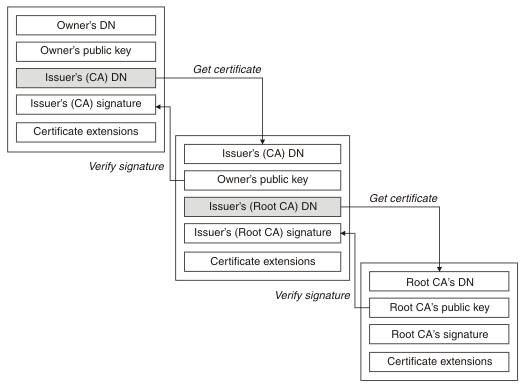
Each certificate can contain one or more extensions. A certificate belonging to a CA typically contains a BasicConstraints extension with the isCA flag set to indicate that it is allowed to sign other certificates.
When certificates are no longer valid
Digital certificates can expire or be revoked.
Digital certificates are issued for a fixed period and are not valid after their expiry date.
See the Glossary for a definition of certificate expiration.
Certificates can be revoked for various reasons, including:
- The owner has moved to a different organization.
- The private key is no longer secret.
WebSphere MQ can check whether a certificate is revoked by sending a request to an Online Certificate Status Protocol (OCSP) responder (on UNIX, Linux and Windows systems only). Alternatively, they can access a CRL on an LDAP server. The OCSP revocation and CRL information is published by a Certificate Authority. For more information, see Working with revoked certificates .
Public Key Infrastructure (PKI)
A Public Key Infrastructure (PKI) is a system of facilities, policies, and services that supports the use of public key cryptography for authenticating the parties involved in a transaction.
There is no single standard that defines the components of a Public Key Infrastructure, but a PKI typically comprises certificate authorities (CAs) and Registration Authorities (RAs). CAs provide the following services::
- Issuing digital certificates
- Validating digital certificates
- Revoking digital certificates
- Distributing public keys
The X.509 standards provide the basis for the industry standard Public Key Infrastructure.
Refer to Digital certificates for more information about digital certificates and certificate authorities (CAs). RAs verify that the information provided when digital certificates are requested. If the RA verifies that information, the CA can issue a digital certificate to the requester.
A PKI might also provide tools for managing digital certificates and public keys. A PKI is sometimes described as a trust hierarchy for managing digital certificates, but most definitions include additional services. Some definitions include encryption and digital signature services, but these services are not essential to the operation of a PKI.
Cryptographic security protocols: SSL and TLS
Cryptographic protocols provide secure connections, enabling two parties to communicate with privacy and data integrity. The Transport Layer Security (TLS) protocol evolved from that of the Secure Sockets Layer (SSL). WebSphere MQ supports both SSL and TLS.
The primary goals of both protocols is to provide confidentiality, (sometimes referred to as privacy), data integrity, identification, and authentication using digital certificates.
Although the two protocols are similar, the differences are sufficiently significant that SSL 3.0 and the various versions of TLS do not interoperate.
Secure Sockets Layer (SSL) and Transport Layer Security (TLS) concepts
The SSL and TLS protocols enable two parties to identify and authenticate each other and communicate with confidentiality and data integrity. The TLS protocol evolved from the Netscape SSL 3.0 protocol but TLS and SSL do not interoperate.
The SSL and TLS protocols provide communications security over the internet, and allow client/server applications to communicate in a way that is confidential and reliable. The protocols have two layers: a Record Protocol and a Handshake Protocol, and these are layered above a transport protocol such as TCP/IP. They both use asymmetric and symmetric cryptography techniques.
An SSL or TLS connection is initiated by an application, which becomes the SSL or TLS client. The application which receives the connection becomes the SSL or TLS server. Every new session begins with a handshake, as defined by the SSL or TLS protocols.
A full list of CipherSpecs supported by WebSphere MQ is provided at Specifying CipherSpecs .
For more information about the SSL protocol, see the information provided at http://www.mozilla.org/projects/security/pki/nss/ssl/draft302.txt . For more information about the TLS protocol, see the information provided by the TLS Working Group on the website of the Internet Engineering Task Force at http://www.ietf.org
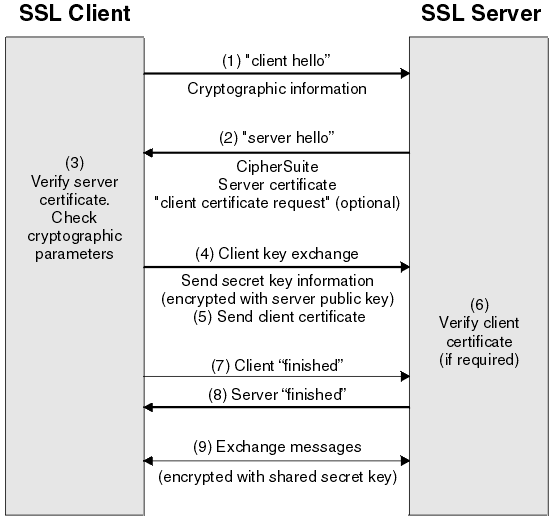
An overview of the SSL or TLS handshake
The SSL or TLS handshake enables the SSL or TLS client and server to establish the secret keys with which they communicate.
This section provides a summary of the steps that enable the SSL or TLS client and server to communicate with each other:
- Agree on the version of the protocol to use.
- Select cryptographic algorithms.
- Authenticate each other by exchanging and validating digital certificates.
- Use asymmetric encryption techniques to generate a shared secret key, which avoids the key distribution problem. SSL or TLS then uses the shared key for the symmetric encryption of messages, which is faster than asymmetric encryption.
For more information about cryptographic algorithms and digital certificates, refer to the related information.
This section does not attempt to provide full details of the messages exchanged during the SSL handshake. In overview, the steps involved in the SSL handshake are as follows:
- The SSL or TLS client sends a
client hello
message that lists cryptographic information such as the SSL or TLS version and, in the client's order of preference, the CipherSuites supported by the client. The message also contains a random byte string that is used in subsequent computations. The protocol allows for theclient hello
to include the data compression methods supported by the client. - The SSL or TLS server responds with a
server hello
message that contains the CipherSuite chosen by the server from the list provided by the client, the session ID, and another random byte string. The server also sends its digital certificate. If the server requires a digital certificate for client authentication, the server sends aclient certificate request
that includes a list of the types of certificates supported and the Distinguished Names of acceptable Certification Authorities (CAs). - The SSL or TLS client verifies the server's digital certificate. For more information, see How SSL and TLS provide identification, authentication, confidentiality, and integrity .
- The SSL or TLS client sends the random byte string that enables both the client and the server to compute the secret key to be used for encrypting subsequent message data. The random byte string itself is encrypted with the server's public key.
- If the SSL or TLS server sent a
client certificate request
, the client sends a random byte string encrypted with the client's private key, together with the client's digital certificate, or ano digital certificate alert
. This alert is only a warning, but with some implementations the handshake fails if client authentication is mandatory. - The SSL or TLS server verifies the client's certificate. For more information, see How SSL and TLS provide identification, authentication, confidentiality, and integrity .
- The SSL or TLS client sends the server a
finished
message, which is encrypted with the secret key, indicating that the client part of the handshake is complete. - The SSL or TLS server sends the client a
finished
message, which is encrypted with the secret key, indicating that the server part of the handshake is complete. - For the duration of the SSL or TLS session, the server and client can now exchange messages that are symmetrically encrypted with the shared secret key.
Figure 1 illustrates the SSL or TLS handshake.
Figure 1. Overview of the SSL or TLS handshake
How SSL and TLS provide identification, authentication, confidentiality, and integrity
During both client and server authentication there is a step that requires data to be encrypted with one of the keys in an asymmetric key pair and decrypted with the other key of the pair. A message digest is used to provide integrity.
How SSL and TLS provide authentication
For server authentication, the client uses the server's public key to encrypt the data that is used to compute the secret key. The server can generate the secret key only if it can decrypt that data with the correct private key.
For client authentication, the server uses the public key in the client certificate to decrypt the data the client sends during step 5 of the handshake. The exchange of finished messages that are encrypted with the secret key (steps 7 and 8 in the overview) confirms that authentication is complete.
If any of the authentication steps fail, the handshake fails and the session terminates.
The exchange of digital certificates during the SSLor TLS handshake is part of the authentication process. For more information about how certificates provide protection against impersonation, refer to the related information. The certificates required are as follows, where CA X issues the certificate to the SSL or TLS client, and CA Y issues the certificate to the SSL or TLS server:
For server authentication only, the SSL or TLS server needs:
- The personal certificate issued to the server by CA Y
- The server's private key
and the SSL or TLS client needs:
- The CA certificate for CA Y
If the SSL or TLS server requires client authentication, the server verifies the client's identity by verifying the client's digital certificate with the public key for the CA that issued the personal certificate to the client, in this case CA X . For both server and client authentication, the server needs:
- The personal certificate issued to the server by CA Y
- The server's private key
- The CA certificate for CA X
and the client needs:
- The personal certificate issued to the client by CA X
- The client's private key
- The CA certificate for CA Y
Both the SSL or TLS server and client might need other CA certificates to form a certificate chain to the root CA certificate. For more information about certificate chains, refer to the related information.
What happens during certificate verification
As noted in steps 3 and 6 of the overview, the SSL or TLS client verifies the server's certificate, and the SSL or TLS server verifies the client's certificate. There are four aspects to this verification:
- The digital signature is checked (see Digital signatures in SSL and TLS ).
- The certificate chain is checked; you should have intermediate CA certificates (see How certificate chains work ).
- The expiry and activation dates and the validity period are checked.
- The revocation status of the certificate is checked (see Working with revoked certificates ).
Secret key reset
During an SSL or TLS handshake a secret key is generated to encrypt data between the SSL or TLS client and server. The secret key is used in a mathematical formula that is applied to the data to transform plaintext into unreadable ciphertext, and ciphertext into plaintext.
The secret key is generated from the random text sent as part of the handshake and is used to encrypt plaintext into ciphertext. The secret key is also used in the MAC (Message Authentication Code) algorithm, which is used to determine whether a message has been altered.
If the secret key is discovered, the plaintext of a message could be deciphered from the ciphertext, or the message digest could be calculated, allowing messages to be altered without detection. Even for a complex algorithm, the plaintext can eventually be discovered by applying every possible mathematical transformation to the ciphertext. To minimize the amount of data that can be deciphered or altered if the secret key is broken, the secret key can be renegotiated periodically. When the secret key has been renegotiated, the previous secret key can no longer be used to decrypt data encrypted with the new secret key.
How SSL and TLS provide confidentiality
SSL and TLS use a combination of symmetric and asymmetric encryption to ensure message privacy. During the SSL or TLS handshake, the SSL or TLS client and server agree an encryption algorithm and a shared secret key to be used for one session only. All messages transmitted between the SSL or TLS client and server are encrypted using that algorithm and key, ensuring that the message remains private even if it is intercepted. SSL supports a wide range of cryptographic algorithms. Because SSL and TLS use asymmetric encryption when transporting the shared secret key, there is no key distribution problem. For more information about encryption techniques, refer to Cryptography .
How SSL and TLS provide integrity
SSL and TLS provide data integrity by calculating a message digest. For more information, refer to Data integrity of messages .
Use of SSL or TLS does ensure data integrity, provided that the CipherSpec in your channel definition uses a hash algorithm as described in the table in Specifying CipherSpecs .
In particular, if data integrity is a concern, you should avoid choosing a CipherSpec whose hash algorithm is listed as "None". Use of MD5 is also strongly discouraged as this is now very old and no longer secure for most practical purposes.
CipherSpecs and CipherSuites
Cryptographic security protocols must agree the algorithms used by a secure connection. CipherSpecs and CipherSuites define specific combinations of algorithms.
A CipherSpec identifies a combination of encryption algorithm and MAC algorithm. Both ends of an SSL or TLS connection must agree the same CipherSpec to be able to communicate.
For more information about CipherSpecs, see the related information.
A CipherSuite is a suite of cryptographic algorithms used by an SSL or TLS connection. A suite comprises three distinct algorithms:
- The key exchange and authentication algorithm, used during the handshake
- The encryption algorithm, used to encipher the data
- The MAC (Message Authentication Code) algorithm, used to generate the message digest
There are several options for each component of the suite, but only certain combinations are valid when specified for an SSL or TLS connection. The name of a valid CipherSuite defines the combination of algorithms used. For example, the CipherSuite SSL_RSA_WITH_RC4_128_MD5 specifies:
- The RSA key exchange and authentication algorithm
- The RC4 encryption algorithm, using a 128-bit key
- The MD5 MAC algorithm
Several algorithms are available for key exchange and authentication, but the RSA algorithm is currently the most widely used. There is more variety in the encryption algorithms and MAC algorithms that are used.
Digital signatures in SSL and TLS
A digital signature is formed by encrypting a representation of a message. The encryption uses the private key of the signatory and, for efficiency, usually operates on a message digest rather than the message itself.
Digital signatures vary with the data being signed, unlike handwritten signatures, which do not depend on the content of the document being signed. If two different messages are signed digitally by the same entity, the two signatures differ, but both signatures can be verified with the same public key, that is, the public key of the entity that signed the messages.
The steps of the digital signature process are as follows:
- The sender computes a message digest and then encrypts the digest using the sender's private key, forming the digital signature.
- The sender transmits the digital signature with the message.
- The receiver decrypts the digital signature using the sender's public key, regenerating the sender's message digest.
- The receiver computes a message digest from the message data received and verifies that the two digests are the same.
Figure 1 illustrates this process.
Figure 1. The digital signature process
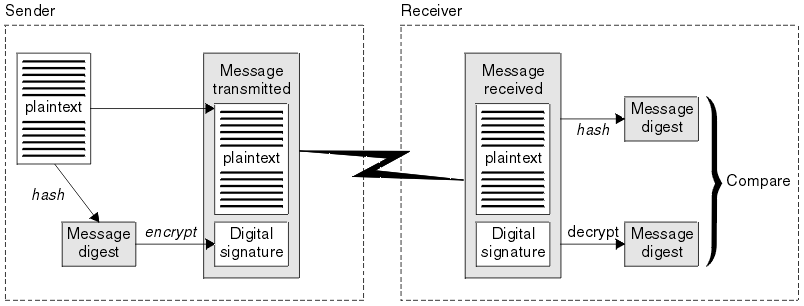
If the digital signature is verified, the receiver knows that:
- The message has not been modified during transmission.
- The message was sent by the entity that claims to have sent it.
Digital signatures are part of integrity and authentication services. Digital signatures also provide proof of origin. Only the sender knows the private key, which provides strong evidence that the sender is the originator of the message.
Note: You can also encrypt the message itself, which protects the confidentiality of the information in the message.
Federal Information Processing Standards
The US government produces technical advice on IT systems and security, including data encryption. The National Institute for Standards and Technology (NIST) is an important body concerned with IT systems and security. NIST produces recommendations and standards, including the Federal Information Processing Standards (FIPS).
A significant one of these standards is FIPS 140-2, which requires the use of strong cryptographic algorithms. FIPS 140-2 also specifies requirements for hashing algorithms to be used to protect packets against modification in transit.
WebSphere MQ provides FIPS 140-2 support when it has been configured to do so.
Over time, analysts develop attacks against existing encryption and hashing algorithms. New algorithms are adopted to resist those attacks. FIPS 140-2 is periodically updated to take account of these changes.
National Security Agency (NSA) Suite B Cryptography
The government of the Unites States of America produces technical advice on IT systems and security, including data encryption. The US National Security Agency (NSA) recommends a set of interoperable cryptographic algorithms in its Suite B standard.
The Suite B standard specifies a mode of operation in which only a specific set of secure cryptographic algorithms are used. The Suite B standard specifies:
- The encryption algorithm (AES)
- The key exchange algorithm (Elliptic Curve Diffie-Hellman, also known as ECDH)
- The digital signature algorithm (Elliptic Curve Digital Signature Algorithm, also known as ECDSA)
- The hashing algorithms (SHA-256 or SHA-384)
Additionally, the IETF RFC 6460 standard specifies Suite B compliant profiles which define the detailed application configuration and behavior necessary to comply with the Suite B standard. It defines two profiles:
- A Suite B compliant profile for use with TLS version 1.2. When configured for Suite B compliant operation, only the restricted set of cryptographic algorithms listed above will be used.
- A transitional profile for use with TLS version 1.0 or TLS version 1.1. This profile enables interoperability with non-Suite B compliant servers. When configured for Suite B transitional operation, additional encryption and hashing algorithms may be used.
The Suite B standard is conceptually similar to FIPS 140-2, because it restricts the set of enabled cryptographic algorithms in order to provide an assured level of security.
On Windows, UNIX and Linux systems, WebSphere MQ, can be configured to conform to the Suite B compliant TLS 1.2 profile, but does not support the Suite B transitional profile. For further information, see NSA Suite B Cryptography in WebSphere MQ .
WebSphere MQ security mechanisms
This collection of topics explains how you can implement the various security concepts in WebSphere MQ.
WebSphere MQ provides mechanisms to implement all the security concepts introduced in Security concepts and mechanisms . These are discussed in more detail in the following sections.
Identification and authentication in WebSphere MQ
In WebSphere MQ, you can implement identification and authentication using message context information and mutual authentication.
Here are some examples of the identification and authentication in a WebSphere MQ environment:
- Every message can contain message context information.
This information is held in the message descriptor. It can be generated
by the queue manager when a message is put on a queue by an application.
Alternatively, the application can supply the information if the user ID associated with the application is authorized to do so.
The context information in a message allows the receiving application to find out about the originator of the message. It contains, for example, the name of the application that put the message and the user ID associated with the application.
- When a message channel starts, it is possible for the message channel agent (MCA) at each end of the channel to authenticate its partner. This technique is known as mutual authentication. For the sending MCA, it provides assurance that the partner it is about to send messages to is genuine. For the receiving MCA, there is a similar assurance that it is about to receive messages from a genuine partner.
Authorization in WebSphere MQ
You can use authorization to limit what particular individuals or applications can do in your WebSphere MQ environment.
Here are some examples of authorization in a WebSphere MQ environment:
- Allowing only an authorized administrator to issue commands to manage WebSphere MQ resources.
- Allowing an application to connect to a queue manager only if the user ID associated with the application is authorized to do so.
- Allowing an application to open only those queues that are necessary for its function.
- Allowing an application to subscribe only to those topics that are necessary for its function.
- Allowing an application to perform only those operations on a queue that are necessary for its function. For example, an application might need only to browse messages on a particular queue, and not to put or get messages.
Auditing in WebSphere MQ
WebSphere MQ can issue event messages to record that unusual activity has taken place.
Here are some examples of auditing in a WebSphere MQ environment:
- An application attempts to open a queue that it is not authorized to open. An instrumentation event message is issued. By inspecting the event message, you discover that this attempt occurred and can decide what action is necessary.
- An application attempts to open a channel, but the attempt fails because SSL does not allow the connection. An instrumentation event message is issued. By inspecting the event message, you discover that this attempt occurred and can decide what action is necessary.
Confidentiality in WebSphere MQ
You can implement confidentiality in WebSphere MQ by encrypting messages.
Here are some examples of how confidentiality can be ensured in a WebSphere MQ environment:
- After a sending MCA gets a message from a transmission queue, WebSphere MQ uses SSL or TLS to encrypt the message before it is sent over the network to the receiving MCA. At the other end of the channel, the message is decrypted before the receiving MCA puts it on its destination queue.
- While messages are stored on a local queue, the access control mechanisms provided by WebSphere MQ might be considered sufficient to protect their contents against unauthorized disclosure. However, for a greater level of security, you can use WebSphere MQ Advanced Message Security to encrypt the messages stored in the queues.
Data integrity in WebSphere MQ
You can use a data integrity service to detect whether a message has been modified.
Here are some examples of how data integrity can be ensured in a WebSphere MQ environment:
- You can use SSL or TLS to detect whether the contents of a message have been deliberately modified while it was being transmitted over a network. In SSL and TLS, the message digest algorithm provides detection of modified messages in transit. All WebSphere MQ CipherSpecs provide a message digest algorithm, except for TLS_RSA_WITH_NULL_NULL which does not provide message data integrity.
- While messages are stored on a local queue, the access control mechanisms provided by WebSphere MQ might be considered sufficient to prevent deliberate modification of the contents of the messages. However, for a greater level of security, you can use WebSphere MQ Advanced Message Security to detect whether the contents of a message have been deliberately modified between the time the message was put on the queue and the time it was retrieved from the queue.
Cryptography in WebSphere MQ
WebSphere MQ provides cryptography by using the Secure sockets Layer (SSL) and Transport Security Layer (TLS) protocols.
For more information see Security protocols in WebSphere MQ .
Security protocols in WebSphere MQ
WebSphere MQ supports both the Transport Layer Security (TLS) and the Secure Sockets Layer (SSL) protocols to provide link level security for message channels and MQI channels.
Message channels and MQI channels can use the SSL or TLS protocol to provide link level security. A caller MCA is an SSL or TLS client and a responder MCA is an SSL or TLS server. WebSphere MQ supports Version 3.0 of the SSL protocol and Version 1.0 and Version 1.2 of the Transport Layer Security (TLS) protocol. You specify the cryptographic algorithms that are used by the SSL or protocol by supplying a CipherSpec as part of the channel definition.
At each end of a message channel, and at the server end of an MQI channel, the MCA acts on behalf of the queue manager to which it is connected. During the SSL or TLS handshake, the MCA sends the digital certificate of the queue manager to its partner MCA at the other end of the channel. The WebSphere MQ code at the client end of an MQI channel acts on behalf of the user of the WebSphere MQ client application. During the SSL or TLS handshake, the WebSphere MQ code sends the user's digital certificate to the MCA at the server end of the MQI channel.
Queue managers and WebSphere MQ client users are not required to have personal digital certificates associated with them when they are acting as SSL or TLS clients, unless SSLCAUTH(REQUIRED) is specified at the server side of the channel.
Digital certificates are stored in a key repository . The queue manager attribute SSLKeyRepository specifies the location of the key repository that holds the queue manager's digital certificate. On a WebSphere MQ client system, the MQSSLKEYR environment variable specifies the location of the key repository that holds the user's digital certificate. Alternatively, a WebSphere MQ client application can specify its location in the KeyRepository field of the SSL and TLS configuration options structure, MQSCO, on an MQCONNX call.
WebSphere MQ support for SSL and TLS
WebSphere MQ supports both the Secure Sockets Layer (SSL) protocol and the Transport Layer Security (TLS) protocol.
For more information about the SSL and TLS protocols, refer to the related information.
WebSphere MQ provides the following support for SSL Version 3.0 and TLS 1.0 and TLS 1.2:
- Java™ and JMS clients
- These clients use the JVM to provide SSL and TLS support.
-


 Windows, UNIX and Linux, and HP Integrity NonStop Server systems
 - For UNIX, Linux, HP Integrity NonStop Server, and Windows systems, the SSL and TLS support is installed with WebSphere MQ.
The SSL or TLS key repository
A mutually authenticated SSL or TLS connection requires a key repository (which can be known by different names on different platforms) at each end of the connection. The key repository includes digital certificates and private keys.
This information uses the general term key repository to describe the store for digital certificates and their associated private keys. The specific store names used on the platforms and environments that support SSL and TLS are:
| Java™ and JMS | keystore and trust store |
| Windows , UNIX and Linux systems | key database file
|
A mutually authenticated SSL or TLS connection requires a key repository at each end of the connection. The key repository may contain:
- A number of CA certificates from various Certification Authorities that allow the queue manager or client to verify certificates that it receives from its partner at the remote end of the connection. Individual certificates might be in a certificate chain.
- One or more personal certificates received from a Certification Authority. You associate a separate personal certificate with each queue manager or WebSphere MQ MQI client. Personal certificates are essential on an SSL or TLS client if mutual authentication is required. If mutual authentication is not required, personal certificates are not needed on the client. The key repository might also contain the private key corresponding to each personal certificate.
- Certificate requests which are waiting to be signed by a trusted CA certificate.
For more information about protecting your key repository, see Protecting WebSphere MQ key repositories .
The location of the key repository depends on the platform you are using:
- Windows, UNIX and Linux systems
- On Windows, UNIX and Linux systems the key repository is a key database file. The name of the key database
file must have a file extension of .kdb. For example, on UNIX and Linux, the default key database file for queue manager QM1 is /var/mqm/qmgrs/QM1/ssl/key.kdb .
If WebSphere MQ is installed in the default location, the equivalent path on Windows is C:\Program
Files\IBM\WebSphere MQ\Qmgrs\QM1\ssl\key.kdb.
On Windows , UNIX and Linux systems, each key database file has an associated password stash file. This file holds encoded passwords that allow programs to access the key database. The password stash file must be in the same directory and have the same file stem as the key database, and must end with the suffix .sth , for example /var/mqm/qmgrs/QM1/ssl/key.sth
Note: On Windows, UNIX and Linux systems, PKCS #11 cryptographic hardware cards can contain the certificates and keys that are otherwise held in a key database file. When certificates and keys are held on PKCS #11 cards, WebSphere MQ still requires access to both a key database file and a password stash file.
On Windows and UNIX systems, the key database also contains the private key for the personal certificate associated with the queue manager or WebSphere MQ MQI client.
Protecting WebSphere MQ key repositories
The key repository for WebSphere MQ is a file. Ensure that only the intended user can access the key repository file. This prevents an intruder or other unauthorized user copying the key repository file to another system, and then setting up an identical user ID on that system to impersonate the intended user.
The permissions on the files depend on the user's umask and which tool is used. On Windows, WebSphere MQ accounts require permission BypassTraverseChecking which means the permissions of the folders in the file path have no effect.
Check the file permissions of key repository files and make sure that the files and containing folder are not world readable, preferably not even group readable.
Making the keystore read-only is good practice, on whichever system you use, with only the administrator being permitted to enable write operations in order to perform maintenance.
In practice, you must protect all the keystores, whatever the location and whether they are password protected or not; protect the key repositories.
Refreshing the queue manager's key repository
When you change the contents of a key repository, the queue manager does not immediately pick up the new contents. For a queue manager to use the new key repository contents, you must issue the REFRESH SECURITY TYPE(SSL) command.
This process is intentional, and prevents the situation where multiple running channels could use different versions of a key repository. As a security control, only one version of a key repository can be loaded by the queue manager at any time.
For more information about the REFRESH SECURITY TYPE(SSL) command, see REFRESH SECURITY .
You can also refresh a key repository using PCF commands or the WebSphere MQ Explorer. For more information, see the MQCMD_REFRESH_SECURITY command and the topic Refreshing SSL or TLS Security in the WebSphere MQ Explorer section of this information center.
Refreshing a client's view of the SSL key repository contents and SSL settings
To update the client application with the refreshed contents of the key repository, you must stop and restart the client application.
You cannot refresh security on a WebSphere MQ client; there is no equivalent of the REFRESH SECURITY TYPE(SSL) command for clients (see REFRESH SECURITY ) for more information.
You must stop and restart the application, whenever you change the security certificate, to update the client application with the refreshed contents of the key repository.
If restarting the channel refreshes the configurations, and if your application has reconnection logic, it is possible for you to refresh security at the client by issuing the STOP CHL STATUS(INACTIVE) command.
Federal Information Processing Standards (FIPS)
This topic introduces the Federal Information Processing Standards (FIPS) Cryptomodule Validation Program of the US National Institute of Standards and Technology and the cryptographic functions which can be used on SSL or TLS channels, for Windows, UNIX and Linux, and z/OS systems.
The FIPS 140-2 compliance of a WebSphere MQ SSL or TLS connection on UNIX, Linux, and Windows systems is found here Federal Information Processing Standards (FIPS) for UNIX, Linux, and Windows .
If cryptographic hardware is present, the cryptographic modules used by WebSphere MQ can be configured to be those provided by the hardware manufacturer. If this is done, the configuration is only FIPS-compliant if those cryptographic modules are FIPS-certified.
Over time, the Federal Information Processing Standards are updated to reflect new attacks against encryption algorithms and protocols. For example, some CipherSpecs may cease to be FIPS certified. When such changes occur, WebSphere MQ is also updated to implement the latest standard. As a result, you might see changes in behavior after applying maintenance. The WebSphere MQ 7.1 readme lists the version of FIPS enforced by each product maintenance level. If you configure WebSphere MQ to enforce FIPS compliance, always consult the readme when planning to apply maintenance. The readme is located at http://www-01.ibm.com/support/docview.wss?rs=171&uid=swg27006097
Federal Information Processing Standards (FIPS) for UNIX, Linux, and Windows
When cryptography is required on an SSL or TLS channel on Windows, UNIX and Linux systems, WebSphere MQ uses a cryptography package called IBM Crypto for C (ICC). On the Windows, UNIX and Linux platforms, the ICC software has passed the Federal Information Processing Standards (FIPS) Cryptomodule Validation Program of the US National Institute of Standards and Technology, at level 140-2.
The FIPS 140-2 compliance of a WebSphere MQ SSL or TLS connection on Windows, UNIX and Linux systems is as follows:
- For all WebSphere MQ message channels (except CLNTCONN channel types), the connection is FIPS-compliant if the following conditions are met:
- The installed GSKit ICC version has been certified FIPS 140-2 compliant on the installed operating system version and hardware architecture.
- The queue manager's SSLFIPS attribute has been set to YES.
- All key repositories have been created and manipulated using only FIPS-compliant software, such as runmqakm with the -fips option.
- For all WebSphere MQ MQI client applications , the connection uses GSKit and is FIPS-compliant
if the following conditions are met:
- The installed GSKit ICC version has been certified FIPS 140-2 compliant on the installed operating system version and hardware architecture.
- You have specified that only FIPS-certified cryptography is to be used, as described in the related topic for the MQI client.
- All key repositories have been created and manipulated using only FIPS-compliant software, such as runmqakm with the -fips option.
- For WebSphere MQ classes for Java™ applications using client mode, the connection uses the JRE's SSL and TLS implementations
and is FIPS-compliant if the following conditions are met:
- The Java Runtime Environment used to run the application is FIPS-compliant on the installed operating system version and hardware architecture.
- You have specified that only FIPS-certified cryptography is to be used, as described in the related topic for the Java client.
- All key repositories have been created and manipulated using only FIPS-compliant software, such as runmqakm with the -fips option.
- For WebSphere MQ classes for JMS applications using client mode, the connection uses the JRE's
SSL and TLS implementations and is FIPS-compliant if the following conditions are met:
- The Java Runtime Environment used to run the application is FIPS-compliant on the installed operating system version and hardware architecture.
- You have specified that only FIPS-certified cryptography is to be used, as described in the related topic for the JMS client.
- All key repositories have been created and manipulated using only FIPS-compliant software, such as runmqakm with the -fips option.
- For unmanaged .NET client applications, the connection uses GSKit
and is FIPS-compliant if the following conditions are met:
- The installed GSKit ICC version has been certified FIPS 140-2 compliant on the installed operating system version and hardware architecture.
- You have specified that only FIPS-certified cryptography is to be used, as described in the related topic for the .NET client.
- All key repositories have been created and manipulated using only FIPS-compliant software, such as runmqakm with the -fips option.
- For unmanaged XMS .NET client applications, the connection uses
GSKit and is FIPS-compliant if the following conditions are met:
- The installed GSKit ICC version has been certified FIPS 140-2 compliant on the installed operating system version and hardware architecture.
- You have specified that only FIPS-certified cryptography is to be used, as described in the XMS .NET documentation.
- All key repositories have been created and manipulated using only FIPS-compliant software, such as runmqakm with the -fips option.
All supported AIX, Linux, HP-UX, Solaris, Windows, and z/OS platforms are FIPS 140-2 certified except as noted in the readme file included with each fix pack or refresh pack.
For SSL and TLS connections using GSKit, the component which is FIPS 140-2 certified is named ICC. It is the version of this component which determines GSKit FIPS compliance on any given platform. To determine the ICC version currently installed, run the dspmqver -p 64 -v command.
Here is an example extract of the dspmqver -p 64 -v output relating to ICC:
  ICC
 ============
@(#)CompanyName:      IBM Corporation
@(#)LegalTrademarks:  IBM
@(#)FileDescription:  IBM Crypto for C-language
@(#)FileVersion:      8.0.0.0
@(#)LegalCopyright:   Licensed Materials - Property of IBM
@(#)                  ICC
@(#)                  (C) Copyright IBM Corp. 2002,2010
@(#)                  All Rights Reserved. US Government Users
@(#)                  Restricted Rights - Use, duplication or disclosure
@(#)                  restricted by GSA ADP Schedule Contract with IBM Corp.
@(#)ProductName:      icc_8.0 (GoldCoast Build) 100415
@(#)ProductVersion:   8.0.0.0
@(#)ProductInfo:      10/04/15.03:32:19.10/04/15.18:41:51
@(#)CMVCInfo:
The NIST certification statement for GSKit ICC 8 (included in GSKit 8) can be found at the following address: http://csrc.nist.gov/groups/stm/cmvp/documents/140-1/1401val2010.htm#1433 .
If cryptographic hardware is present, the cryptographic modules used by WebSphere MQ can be configured to be those provided by the hardware manufacturer. If this is done, the configuration is only FIPS-compliant if those cryptographic modules are FIPS-certified.
Note: 32 bit Solaris x86 SSL and TLS clients configured for FIPS 140-2 compliant operation fail when running on Intel systems. This failure occurs because the FIPS 140-2 compliant GSKit-Crypto Solaris x86 32 bit library file does not load on the Intel chipset. On affected systems, error AMQ9655 is reported in the client error log. To resolve this issue, disable FIPS 140-2 compliance or recompile the client application 64 bit, because 64 bit code is not affected.
Triple DES restrictions enforced when operating in compliance with FIPS 140-2
When WebSphere MQ is configured to operate in compliance with FIPS 140-2, additional restrictions are enforced in relation to Triple DES (3DES) CipherSpecs. These restrictions enable compliance with the US NIST SP800-67 recommendation.
- All parts of the Triple DES key must be unique.
- No part of the Triple DES key can be a Weak, Semi-Weak, or Possibly-Weak key according to the definitions in NIST SP800-67.
- No more than 32 GB of data can be transmitted over the connection before a secret key reset must occur. By default, WebSphere MQ does not reset the secret session key so this reset must be configured. Failure to enable secret key reset when using a Triple DES CipherSpec and FIPS 140-2 compliance results in the connection closing with error AMQ9288 after the maximum byte count is exceeded. For information about how to configure secret key reset, see Resetting SSL and TLS secret keys .
WebSphere MQ generates Triple DES session keys which already comply with rules 1 and 2. However, to satisfy the third restriction you must enable secret key reset when using Triple DES CipherSpecs in a FIPS 140-2 configuration. Alternatively, you can avoid using Triple DES.
SSL and TLS on the WebSphere MQ MQI client
WebSphere MQ supports SSL and TLS on clients. You can tailor the use of SSL or TLS in various ways.
WebSphere MQ provides SSL and TLS support for WebSphere MQ MQI clients on Windows, UNIX and Linux systems. If you are using WebSphere MQ classes for Java™, see Using WebSphere MQ classes for Java and if you are using WebSphere MQ classes for JMS, see Using WebSphere MQ classes for JMS . The rest of this section does not apply to the Java or JMS environments.
You can specify the key repository for a WebSphere MQ MQI client either with the MQSSLKEYR value in your WebSphere MQ client configuration file, or when your application makes an MQCONNX call. You have three options for specifying that a channel uses SSL:
- Use a channel definition table
- Use the SSL configuration options structure, MQSCO, on an MQCONNX call
- Use the Active Directory (on Windows systems)
You cannot use the MQSERVER environment variable to specify that a channel uses SSL.
You can continue to run your existing WebSphere MQ MQI client applications without SSL, as long as SSL is not specified at the other end of the channel.
If changes are made on a client machine to the contents of the SSL Key Repository, the location of the SSL Key Repository, the Authentication Information, or the Cryptographic hardware parameters, you need to end all the SSL connections in order to reflect these changes in the client-connection channels that the application is using to connect to the queue manager. Once all the connections have ended, restart the SSL channels. All the new SSL settings are used. These settings are analogous to those refreshed by the REFRESH SECURITY TYPE(SSL) command on queue manager systems.
When your WebSphere MQ MQI client runs on a Windows, UNIX and Linux system with cryptographic hardware, you configure that hardware with the MQSSLCRYP environment variable. This variable is equivalent to the SSLCRYP parameter on the ALTER QMGR MQSC command. Refer to ALTER QMGR for a description of the SSLCRYP parameter on the ALTER QMGR MQSC command. If you use the GSK_PCS11 version of the SSLCRYP parameter, the PKCS #11 token label must be specified entirely in lower-case.
SSL secret key reset and FIPS are supported on WebSphere MQ MQI clients. For more information, see Resetting SSL and TLS secret keys and Federal Information Processing Standards (FIPS) for UNIX, Linux, and Windows .
Specifying that an MQI channel uses SSL
For an MQI channel to use SSL, the value of the SSLCipherSpec attribute of the client-connection channel must be the name of a CipherSpec that is supported by WebSphere MQ on the client platform.
You can define a client-connection channel with a value for this attribute in the following ways. They are listed in order of decreasing precedence.
- When a PreConnect exit provides a channel definition structure to use.
A PreConnect exit can provide the name of a CipherSpec in the SSLCipherSpec field of a channel definition structure, MQCD. This structure is returned in the ppMQCDArrayPtr field of the MQNXP exit parameter structure used by the PreConnect exit.
- When a WebSphere MQ MQI client application issues
an MQCONNX call.
The application can specify the name of a CipherSpec in the SSLCipherSpec field of a channel definition structure, MQCD. This structure is referenced by the connect options structure, MQCNO, which is a parameter on the MQCONNX call.
- Use a client channel definition table (CCDT).
One or more entries in a client channel definition table can specify the name of a CipherSpec. For example, if you create an entry by using the DEFINE CHANNEL MQSC command, you can use the SSLCIPH parameter on the command to specify the name of a CipherSpec.
- Use Active Directory on Windows.
On Windows systems, you can use the setmqscp control command to publish the client-connection channel definitions in Active Directory. One or more of these definitions can specify the name of a CipherSpec.
For example, if a client application provides a client-connection channel definition in an MQCD structure on an MQCONNX call, this definition is used in preference to any entries in a client channel definition table that can be accessed by the WebSphere MQ client.
You cannot use the MQSERVER environment variable to provide the channel definition at the client end of an MQI channel that uses SSL.
To check whether a client certificate has flowed, display the channel status at the server end of a channel for the presence of a peer name parameter value.
CipherSpecs and CipherSuites in WebSphere MQ
WebSphere MQ supports both SSL and TLS CipherSpecs, and RSA and Diffie-Hellman algorithms.
WebSphere MQ supports SSL V3 and TLS V1.0 and V1.2 CipherSpecs.
WebSphere MQ supports the RSA and Diffie-Hellman key exchange and authentication algorithms. The size of the key used during the SSL handshake can depend on the digital certificate you use, but some CipherSpecs include a specification of the handshake key size. Larger handshake key sizes provide stronger authentication. With smaller key sizes, the handshake is faster.
NSA Suite B Cryptography in WebSphere MQ
This topic provides information about how to configure WebSphere MQ on Windows, Linux, and UNIX systems to conform to the Suite B compliant TLS 1.2 profile.
Over time, the NSA Cryptography Suite B Standard is updated to reflect new attacks against encryption algorithms and protocols. For example, some CipherSpecs might cease to be Suite B certified. When such changes occur, WebSphere MQ is also updated to implement the latest standard. As a result, you might see changes in behavior after applying maintenance. The WebSphere MQ 7.5 readme file lists the version of Suite B enforced by each product maintenance level. If you configure WebSphere MQ to enforce Suite B compliance, always consult the readme file when planning to apply maintenance. The readme file is at http://www-01.ibm.com/support/docview.wss?rs=171&uid=swg27006097 .
On Windows, UNIX, and Linux systems, WebSphere MQ can be configured to conform to the Suite B compliant TLS 1.2 profile at the security levels shown in Table 1.
| Security level | Allowed CipherSpecs | Allowed digital signature algorithms |
|---|---|---|
| 128-bit |
ECDHE_ECDSA_AES_128_GCM_SHA256 |
ECDSA with SHA-256 |
| 192-bit | ECDHE_ECDSA_AES_256_GCM_SHA384 | ECDSA with SHA-384 |
| Both 1 |
ECDHE_ECDSA_AES_128_GCM_SHA256 |
ECDSA with SHA-256 |
- It is possible to configure both the 128-bit and 192-bit security levels concurrently. Since the Suite B configuration determines the minimum acceptable cryptographic algorithms, configuring both security levels is equivalent to configuring only the 128-bit security level. The cryptographic algorithms of the 192-bit security level are stronger than the minimum required for the 128-bit security level, so they are permitted for the 128-bit security level even if the 192-bit security level is not enabled.
Note: The naming conventions used for the Security level do not necessarily represent the elliptic curve size or the key size of the AES encryption algorithm.
CipherSpec conformation to Suite B
Although the default behavior of WebSphere MQ is not to comply with the Suite B standard, WebSphere MQ can be configured to conform to either, or both security levels on Windows, UNIX and Linux systems. Following the successful configuration of WebSphere MQ to use Suite B, any attempt to start an outbound channel using a CipherSpec not conforming to Suite B results in the error AMQ9282. This activity also results in the MQI client returning the reason code MQRC_CIPHER_SPEC_NOT_SUITE_B. Similarly, attempting to start an inbound channel using a CipherSpec not conforming to the Suite B configuration results in the error AMQ9616.
For more information about WebSphere MQ CipherSpecs, see Specifying CipherSpecs
Suite B and digital certificates
Suite B restricts the digital signature algorithms which can be used to sign digital certificates. Suite B also restricts the type of public key which certificates can contain. Therefore WebSphere MQ must be configured to use certificates whose digital signature algorithm and public key type are allowed by the configured Suite B security level of the remote partner. Digital certificates which do not comply with the security level requirements are rejected and the connection fails with error AMQ9633 or AMQ9285.
For the 128-bit Suite B security level, the public key of the certificate subject is required to use either the NIST P-256 elliptic curve or the NIST P-384 elliptic curve and to be signed with either the NIST P-256 elliptic curve or the NIST P-384 elliptic curve. At the 192-bit Suite B security level, the public key of the certificate subject is required to use the NIST P-384 elliptic curve and to be signed with the NIST P-384 elliptic curve.
To obtain a certificate suitable for Suite B compliant operation, use the runmqakm command and specify the -sig_alg parameter to request a suitable digital signature algorithm. The EC_ecdsa_with_SHA256 and EC_ecdsa_with_SHA384 -sig_alg parameter values correspond to elliptic curve keys signed by the allowed Suite B digital signature algorithms.
For more information about the runmqakm command, see runmqckm and runmqakm options .
Note: The iKeycmd and iKeyman tools do not support the creation of digital certificates for Suite B compliant operation.
Create and requesting digital certificates
To create a self-signed digital certificate for Suite B testing, see Creating a self-signed personal certificate on UNIX, Linux, and Windows systems
To request a CA-signed digital certificate for Suite B production use, see Requesting a personal certificate on UNIX, Linux, and Windows systems .
Note: The certificate authority being used must generate digital certificates which satisfy the requirements described in IETF RFC 6460.
FIPS 140-2 and Suite B
The Suite B standard is conceptually similar to FIPS 140-2, as it restricts the set of enabled cryptographic algorithms in order to provide an assured level of security. The Suite B CipherSpecs currently supported can be used when WebSphere MQ is configured for FIPS 140-2 compliant operation. It is therefore possible to configure WebSphere MQ for both FIPS and Suite B compliance simultaneously, in which case both sets of restrictions apply.
The following diagram illustrates the relationship
between these subsets: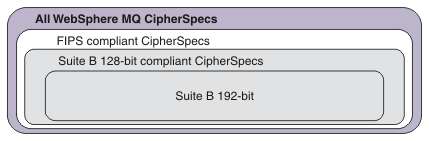
Configure WebSphere MQ for Suite B compliant operation
For information about how to configure WebSphere MQ on Windows, UNIX and Linux for Suite B compliant operation, see Configuring WebSphere MQ for Suite B .
WebSphere MQ does not support Suite B compliant operation on the IBM i and z/OS platforms. The WebSphere MQ Java and JMS clients also do not support Suite B compliant operation.
Configure WebSphere MQ for Suite B
WebSphere MQ can be configured to operate in compliance with the NSA Suite B standard on Windows, UNIX and Linux platforms.
Suite B restricts the set of enabled cryptographic algorithms in order to provide an assured level of security. WebSphere MQ can be configured to operate in compliance with Suite B to provide an enhanced level of security. For further information on Suite B, see National Security Agency (NSA) Suite B Cryptography . For more information about Suite B configuration and its effect on SSL and TLS channels, see NSA Suite B Cryptography in WebSphere MQ .
Queue manager
For a queue manager, use the command ALTER QMGR with the parameter SUITEB to set the values appropriate for your required level of security. For further information see ALTER QMGR .
You can also use the PCF MQCMD_CHANGE_Q_MGR command with the MQIA_SUITE_B_STRENGTH parameter to configure the queue manager for Suite B compliant operation
MQI client
By default, MQI clients do not enforce Suite B compliance. You can enable the MQI client for Suite B compliance by executing one of the options below:
- By setting the EncryptionPolicySuiteB field
in the MQSCO structure on an MQCONNX call to one or more of the values
below:
- MQ_SUITE_B_NONE
- MQ_SUITE_B_128_BIT
- MQ_SUITE_B_192_BIT
Use MQ_SUITE_B_NONE with any other value is invalid.
- By setting the MQSUITEB environment variable to one or more of the values below:
- NONE
- 128_BIT
- 192_BIT
You can specify multiple values using a comma separated list. Using the value NONE with any other value is invalid.
- By setting the EncryptionPolicySuiteB attribute
in the SSL stanza of the MQI client configuration file to one or more of the values below:
- NONE
- 128_BIT
- 192_BIT
You can specify multiple values using a comma separated list. Using NONE with any other value is invalid.
Note: The MQI client settings are listed in order of priority. The MSCO structure on the MQCONNX call overrides the setting on the MQSUITEB environment variable, which overrides the attribute in the SSL stanza.
For full details of the MQSCO structure, see MQSCO - SSL configuration options .
For more information about the use of Suite B in the client configuration file, see SSL stanza of the client configuration file .
For further information on the use of the MQSUITEB environment variable, see Environment Variables .
.NET
For .NET unmanaged clients, the property MQC.ENCRYPTION_POLICY_SUITE_B indicates the type of Suite B security required.
For information about the using Suite B in WebSphere MQ classes for .NET, see MQEnvironment .NET class .
Certificate validation policies in WebSphere MQ
The certificate validation policy determines how strictly the certificate chain validation conforms to industry security standards.
The certificate validation policy depends upon the platform and environment as follows:
- For Java and JMS applications on all platforms, the certificate validation policy depends on the JSSE component of the Java runtime environment. For more information about the certificate validation policy, see the documentation for your JRE.
- For IBM i systems, the certificate validation policy depends on the secure sockets library provided by the operating system. For more information about the certificate validation policy, see the documentation for the operating system.
- For z/OS systems, the certificate validation policy depends on the System SSL component provided by the operating system. For more information about the certificate validation policy, see the documentation for the operating system.
- For UNIX, Linux, and Windows systems, the certificate
validation policy is supplied by GSKit and can be configured. Two
different certificate validation policies are supported:
- A legacy certificate validation policy, used for maximum backwards compatibility and interoperability with old digital certificates that do not comply with the current IETF certificate validation standards. This policy is known as the Basic policy.
- A strict, standards-compliant certificate validation policy which enforces the RFC 5280 standard. This policy is known as the Standard policy.
For information about how to configure the certificate validation policy on UNIX, Linux, and Windows systems, see Configuring certificate validation policies in WebSphere MQ . For more information about the differences between the Basic and Standard certificate validation policies, see Certificate validation and trust policy design on UNIX, Linux and Windows systems .
Configure certificate validation policies in WebSphere MQ
You can specify which SSL/TLS certificate validation policy is used to validate digital certificates received from remote partner systems in four ways.
On the queue manager, the certificate validation policy can be set in the following ways:
- Use the queue manager attribute CERTVPOL. For more information about setting this attribute, see ALTER QMGR .
On the client, there are several methods that can be used to set the certificate validation policy. If more than one method is used to set the policy, the client uses the settings in the following priority order:
- Use the CertificateValPolicy field in the client MQSCO structure. For more information about using this field, see MQSCO - SSL configuration options .
- Use the client environment variable, MQCERTVPOL. For more information about using this variable, see MQCERTVPOL .
- Use the client SSL stanza tuning parameter setting, CertificateValPolicy. For more information about using this setting, see SSL stanza of the client configuration file .
Digital certificates and CipherSpec compatibility in WebSphere MQ
This topic provides information on how to choose appropriate CipherSpecs and digital certificates for your security policy, by outlining the relationship between CipherSpecs and digital certificates in WebSphere MQ.
In previous releases of WebSphere MQ, all supported SSL and TLS CipherSpecs used the RSA algorithm for digital signatures and key agreement. All of the supported types of digital certificate were compatible with all of the supported CipherSpecs, so it was possible to change the CipherSpec for any channel without needing to change digital certificates.
In WebSphere MQ v7.5 only a subset of the supported CipherSpecs can be used with all of the supported types of digital certificate. It is therefore necessary to choose an appropriate CipherSpec for your digital certificate. Similarly, if your organization's security policy requires that you use a particular CipherSpec then you must obtain an appropriate digital certificate for that CipherSpec.
The MD5 digital signature algorithm and TLS 1.2
Digital certificates signed using the MD5 algorithm are rejected when the TLS 1.2 protocol is used. This is because the MD5 algorithm is now considered weak by many cryptographic analysts and its use is generally discouraged. If you wish to use newer CipherSpecs based on the TLS 1.2 protocol, ensure that the digital certificates do not use the MD5 algorithm in their digital signatures. Older CipherSpecs which use the SSL 3.0 and TLS 1.0 protocols are not subject to this restriction and can continue to use certificates with MD5 digital signatures.
To view the digital signature algorithm for a particular certificate, you can use the runmqakm command:
runmqakm -cert -details -db key.kdb -pw password -label cert_labelwhere cert_label is the certificate label of the digital signature algorithm you need to display.
Note: Although the iKeycmd (runmqckm) tool and the iKeyman (strmqikm) GUI can be used to view a selection of digital signature algorithms, the runmqakm tool provides a wider range.
The execution of the runmqakm command will produce output displaying the use of the signature algorithm specified:
 Label : ibmwebspheremqexample
Key Size : 1024
Version : X509 V3
Serial : 4e4e93f1
Issuer : CN=Old Certificate Authority,OU=Test,O=Example,C=US
Subject : CN=Example Queue Manager,OU=Test,O=Example,C=US
Not Before : August 19, 2011 5:48:49 PM GMT+01:00
Not After : August 18, 2012 5:48:49 PM GMT+01:00
Public Key
    30 81 9F 30 0D 06 09 2A 86 48 86 F7 0D 01 01 01
    05 00 03 81 8D 00 30 81 89 02 81 81 00 98 5A 7A
    F0 18 21 EE E4 8A 6E DE C8 01 4B 3A 1E 41 90 3D
    CE 01 3F E6 32 30 6C 23 59 F0 FE 78 6D C2 80 EF
    BC 83 54 7A EB 60 80 62 6B F1 52 FE 51 9D C1 61
    80 A5 1C D4 F0 76 C7 15 6D 1F 0D 4D 31 3E DC C6
    A9 20 84 6E 14 A1 46 7D 4C F5 79 4D 37 54 0A 3B
    A9 74 ED E7 8B 0F 80 31 63 1A 0B 20 A5 99 EE 0A
    30 A6 B6 8F 03 97 F6 99 DB 6A 58 89 7F 27 34 DE
    55 08 29 D8 A9 6B 46 E6 02 17 C3 13 D3 02 03 01
    00 01
Public Key Type : RSA (1.2.840.113549.1.1.1)
Fingerprint : SHA1 :
    09 4E 4F F2 1B CB C1 F4 4F 15 C9 2A F7 32 0A 82
    DA 45 92 9F
Fingerprint : MD5 :
    44 54 81 7C 58 68 08 3A 5D 75 96 40 D5 8C 7A CB
Fingerprint : SHA256 :
    3B 47 C6 E7 7B B0 FF 85 34 E7 48 BE 11 F2 D4 35
    B7 9A 79 53 2B 07 F5 E7 65 E8 F7 84 E0 2E 82 55
Signature Algorithm : MD5WithRSASignature (1.2.840.113549.1.1.4)
Value
    3B B9 56 E6 F2 77 94 69 5B 3F 17 EA 7B 19 D0 A2
    D7 10 38 F1 88 A4 44 1B 92 35 6F 3B ED 99 9B 3A
    A5 A4 FC 72 25 5A A9 E3 B1 96 88 FC 1E 9F 9B F1
    C5 E8 8E CF C4 8F 48 7B 0E A6 BB 13 AE 2B BD D8
    63 2C 03 38 EF DC 01 E1 1F 7A 6F FB 2F 65 74 D0
    FD 99 94 BA B2 3A D5 B4 89 6C C1 2B 43 6D E2 39
    66 6A 65 CB C3 C4 E2 CC F5 49 39 A3 8B 93 5A DD
    B0 21 0B A8 B2 59 5B 24 59 50 44 89 DC 78 19 51
Trust Status : Enabled
The Signature Algorithm line
shows that the MD5WithRSASignature algorithm is used.
This algorithm is based upon MD5 and so this digital certificate cannot be used with the TLS 1.2 CipherSpecs.
Interoperability of Elliptic Curve and RSA CipherSpecs
Not all CipherSpecs can be used with all digital certificates. There are three types of CipherSpec, denoted by the CipherSpec name prefix. Each type of CipherSpec imposes different restrictions upon the type of digital certificate which may be used. These restrictions apply to all WebSphere MQ SSL and TLS connections, but are particularly relevant to users of Elliptic Curve cryptography.
The relationships between CipherSpecs and digital certificates are summarized in the following table:
| Type | CipherSpec Name Prefix | Description | Required public key type | Digital signature encryption algorithm | Secret key establishment method |
|---|---|---|---|---|---|
| 1 | ECDHE_ECDSA_ | CipherSpecs which use Elliptic Curve public keys, Elliptic Curve secret keys, and Elliptic Curve digital signature algorithms. | Elliptic Curve | ECDSA | ECDHE |
| 2 | ECDHE_RSA_ | CipherSpecs which use RSA public keys, Elliptic Curve secret keys, and Elliptic Curve digital signature algorithms. | RSA | RSA | ECDHE |
| 3 | (All others) | CipherSpecs which use RSA public keys and RSA digital signature algorithms. | RSA | RSA | RSA |
Note: Type 1 and 2 CipherSpecs are only supported by WebSphere MQ queue managers and MQI clients on the UNIX, Linux, and Windows platforms.
The required public key type column shows the type of public key which the personal certificate must have when using each type of CipherSpec. The personal certificate is the end-entity certificate which identifies the queue manager or client to its remote partner.
The digital signature encryption algorithm refers to the encryption algorithm used to validate the peer. The encryption algorithm is used along with a hash algorithm such as MD5, SHA-1 or SHA-256 to compute the digital signature. There are various digital signature algorithms which can be used, for example "RSA with MD5" or "ECDSA with SHA-256". In the table, ECDSA refers to the set of digital signature algorithms which use ECDSA; RSA refers to the set of digital signature algorithms which use RSA. Any supported digital signature algorithm in the set may be used, provided it is based upon the stated encryption algorithm.
Type 1 CipherSpecs require that the personal certificate must have an Elliptic Curve public key. When these CipherSpecs are used, Elliptic Curve Diffie Hellman Ephemeral key agreement is used to establish the secret key for the connection.
Type 2 CipherSpecs require that the personal certificate has an RSA public key. When these CipherSpecs are used, Elliptic Curve Diffie Hellman Ephemeral key agreement is used to establish the secret key for the connection.
Type 3 CipherSpecs require that the the personal certificate must have an RSA public key. When these CipherSpecs are used, RSA key exchange is used to establish the secret key for the connection.
This list of restrictions is not exhaustive: depending on the configuration, there might be additional restrictions which can further affect the ability to interoperate. For example, if WebSphere MQ is configured to comply with the FIPS 140-2 or NSA Suite B standards then this will also limit the range of allowable configurations. Refer to the following section for more information.
A WebSphere MQ queue manager can only use a single personal certificate to identify itself. This means all channels on the queue manager will use the same digital certificate and therefore each queue manager may only use one type of CipherSpec at a time. Similarly, a WebSphere MQ client application can only use a single personal certificate to identify itself. This means that all SSL and TLS connections within a single application process will use the same digital certificate and therefore each client application process may only use one type of CipherSpec at a time.
The three types of CipherSpec do not interoperate directly: this is a limitation of the current SSL and TLS standards. For example, suppose you have chosen to use the ECDHE_ECDSA_AES_128_CBC_SHA256 CipherSpec for a receiver channel named TO.QM1 on a queue manager named QM1. ECDHE_ECDSA_AES_128_CBC_SHA256 is a Type 1 CipherSpec, so QM1 must have a personal certificate with an Elliptic Curve key and an ECDSA-based digital signature. All clients and other queue managers which communicate directly with QM1 must therefore have digital certificates which satisfy the Type 1 CipherSpec requirements. Other channels connecting to queue manager QM1 may use other CipherSpecs (for example ECDHE_ECDSA_3DES_EDE_CBC_SHA256), but they may only use Type 1 CipherSpecs to communicate with QM1.
When planning your WebSphere MQ networks, consider carefully which channels require SSL or TLS and ensure that all of the clients and queue managers which need to interoperate use the same type of CipherSpecs and appropriate digital certificates. The IETF standards RFC 4492, RFC 5246 and RFC 6460 describe the detailed usage of Elliptic Curve CipherSpecs in TLS 1.2.
To view the digital signature algorithm and public key type for a digital certificate you can use the runmqakm command:
runmqakm -cert -details -db key.kdb -pw password -label cert_label
where cert_label is the label of the certificate whose digital signature algorithm you need to display.
The execution of the runmqakm command will produce output displaying the Public Key Type:
 Label : ibmwebspheremqexample
Key Size : 384
Version : X509 V3
Serial : 9ad5eeef5d756f41
Issuer : CN=Example Certificate Authority,OU=Test,O=Example,C=US
Subject : CN=Example Queue Manager,OU=Test,O=Example,C=US
Not Before : 21 August 2011 13:10:24 GMT+01:00
Not After : 21 August 2012 13:10:24 GMT+01:00
Public Key
    30 76 30 10 06 07 2A 86 48 CE 3D 02 01 06 05 2B
    81 04 00 22 03 62 00 04 3E 6F A9 06 B6 C3 A0 11
    F8 D6 22 78 FE EF 0A FE 34 52 C0 8E AB 5E 81 73
    D0 97 3B AB D6 80 08 E7 31 E9 18 3F 6B DE 06 A7
    15 D6 9D 5B 6F 56 3B 7F 72 BB 6F 1E C9 45 1C 46
    60 BE F2 DC 1B AD AC EC 64 4C 0E 06 65 6E ED 93
    B8 F5 95 E0 F9 2A 05 D6 21 02 BD FB 06 63 A1 CC
    66 C6 8A 0A 5C 3F F7 D3
Public Key Type : EC_ecPublicKey (1.2.840.10045.2.1)
Fingerprint : SHA1 :
    3C 34 58 04 5B 63 5F 5C C9 7A E7 67 08 2B 84 43
    3D 43 7A 79
Fingerprint : MD5 :
    49 13 13 E1 B2 AC 18 9A 31 41 DC 8C B4 D6 06 68
Fingerprint : SHA256 :
    6F 76 78 68 F3 70 F1 53 CE 39 31 D9 05 C5 C5 9F
    F2 B8 EE 21 49 16 1D 90 64 6D AC EB 0C A7 74 17
Signature Algorithm : EC_ecdsa_with_SHA384 (1.2.840.10045.4.3.3)
Value
    30 65 02 30 0A B0 2F 72 39 9E 24 5A 22 FE AC 95
    0D 0C 6D 6C 2F B3 E7 81 F6 C1 36 1B 9A B0 6F 07
    59 2A A1 4C 02 13 7E DD 06 D6 FE 4B E4 03 BC B1
    AC 49 54 1E 02 31 00 90 0E 46 2B 04 37 EE 2C 5F
    1B 9C 69 E5 99 60 84 84 10 71 1A DA 63 88 33 E2
    22 CC E6 1A 4E F4 61 CC 51 F9 EE A0 8E F4 DC B5
    0B B9 72 58 C3 C7 A4
Trust Status : Enabled
The Public Key Type line in this case shows that the certificate has an Elliptic Curve public key.
The Signature Algorithm line in this case shows that the EC_ecdsa_with_SHA384
algorithm is in use: this is based upon the ECDSA algorithm. This certificate is therefore only suitable for use with Type 1 CipherSpecs.
You can also use the iKeycmd (runmqckm) tool with the same parameters. Also the iKeyman (strmqikm) GUI can be used to view digital signature algorithms if you open the key repository and double-click the label of the certificate. However, you are advised to use the runmqakm tool to view digital certificates because it supports a wider range of algorithms.
Elliptic Curve CipherSpecs and NSA Suite B
When WebSphere MQ is configured to conform to the Suite B compliant TLS 1.2 profile, the permitted CipherSpecs and digital signature algorithms are restricted as described in NSA Suite B Cryptography in WebSphere MQ . Additionally, the range of acceptable Elliptic Curve keys is reduced according to the configured security levels.
At the 128-bit Suite B security level, the certificate subject's public key is required to use either the NIST P-256 or NIST P-384 elliptic curve and to be signed with either the NIST P-256 elliptic curve or the NIST P-384 elliptic curve. The runmqakm command can be used to request digital certificates for this security level using a -sig_alg parameter of EC_ecdsa_with_SHA256, or EC_ecdsa_with_SHA384.
At the 192-bit Suite B security level, the certificate subject's public key is required to use the NIST P-384 elliptic curve and to be signed with the NIST P-384 elliptic curve. The runmqakm command can be used to request digital certificates for this security level using a -sig_alg parameter of EC_ecdsa_with_SHA384.
The supported NIST elliptic curves are as follows:
| NIST FIPS 186-3 curve name | RFC 4492 curve name | Elliptic Curve key size (bits) |
|---|---|---|
| P-256 | secp256r1 | 256 |
| P-384 | secp384r1 | 384 |
| P-521 | secp521r1 | 521 |
Note: The NIST P-521 elliptic curve cannot be used for Suite B compliant operation.
Channel authentication records
To exercise more precise control over the access granted to connecting systems at a channel level, you can use channel authentication records.
You might find that clients attempt to connect to your queue manager using a blank user ID or a high-level user ID that would allow the client to perform undesirable actions. You can block access to these clients using channel authentication records. Alternatively, a client might assert a user ID that is valid on the client platform but is unknown or of an invalid format on the server platform. You can use a channel authentication record to map the asserted user ID to a valid user ID.
You might find a client application that connects to your queue manager and behaves badly in some way. To protect the server from the issues this application is causing, it needs to be temporarily blocked using the IP address the client application is on until such time as the firewall rules are updated or the client application is corrected. You can use a channel authentication record to block the IP address from which the client application connects.
If you have set up an administration tool such as the WebSphere MQ Explorer, and a channel for that specific use, you might want to ensure that only specific client computers can use it. You can use a channel authentication record to allow the channel to be used only from certain IP addresses.
If you are just getting started with some sample applications running as clients, see Preparing and running the sample programs for an example of setting up the queue manager securely using channel authentication records.
Use of channel authentication records to control inbound channels is enabled using the ALTER QMGR CHLAUTH(ENABLED) switch.
Channel authentication records can be created to perform the following functions:
- To block connections from specific IP addresses.
- To block connections from specific user IDs.
- To set an MCAUSER value to be used for any channel connecting from a specific IP address.
- To set an MCAUSER value to be used for any channel asserting a specific user ID.
- To set an MCAUSER value to be used for any channel having a specific SSL or TLS Distinguished Name (DN).
- To set an MCAUSER value to be used for any channel connecting from a specific queue manager.
- To block connections claiming to be from a certain queue manager unless the connection is from a specific IP address.
- To block connections presenting a certain SSL or TLS certificate unless the connection is from a specific IP address.
These uses are explained further in the following sections.
You create, modify, or remove channel authentication records using the MQSC command SET CHLAUTH or the PCF command Set Channel Authentication Record.
Blocking IP addresses
It is normally the role of a firewall to prevent access from certain IP addresses. However, there might be occasions where you experience connection attempts from an IP address that should not have access to your WebSphere MQ system and must temporarily block the address before the firewall can be updated. These connection attempts might not even be coming from WebSphere MQ channels, but from other socket applications that are misconfigured to target your WebSphere MQ listener. Block IP addresses by setting a channel authentication record of type BLOCKADDR. You can specify one or more single addresses, ranges of addresses, or patterns including wildcards.Whenever an inbound connection is refused because the IP address is blocked in this manner, an event message MQRC_CHANNEL_BLOCKED with reason qualifier MQRQ_CHANNEL_BLOCKED_ADDRESS is issued, provided that channel events are enabled and the queue manager is running. Additionally, the connection is held open for 30 seconds prior to returning the error to ensure the listener is not flooded with repeated attempts to connect that are blocked.
To block IP addresses only on specific channels, or to avoid the delay before the error is reported, set a channel authentication record of type ADDRESSMAP with the USERSRC(NOACCESS) parameter.
Whenever an inbound connection is refused for this reason, an event message MQRC_CHANNEL_BLOCKED with reason qualifier MQRQ_CHANNEL_BLOCKED_NOACCESS is issued, provided that channel events are enabled and the queue manager is running.
Blocking user IDs
To prevent certain user IDs from connecting over a client channel, set a channel authentication record of type BLOCKUSER. This type of channel authentication record applies only to client channels, not to message channels. You can specify one or more individual user IDs to be blocked, but you cannot use wildcards.Whenever an inbound connection is refused for this reason, an event message MQRC_CHANNEL_BLOCKED with reason qualifier MQRQ_CHANNEL_BLOCKED_USERID is issued, provided that channel events are enabled.
You can also block any access for specified user IDs on certain channels by setting a channel authentication record of type USERMAP with the USERSRC(NOACCESS) parameter.
Whenever an inbound connection is refused for this reason, an event message MQRC_CHANNEL_BLOCKED with reason qualifier MQRQ_CHANNEL_BLOCKED_NOACCESS is issued, provided that channel events are enabled and the queue manager is running.
Blocking queue manager names
To specify that any channel connecting from a specified queue manager is to have no access, set a channel authentication record of type QMGRMAP with the USERSRC(NOACCESS) parameter. You can specify a single queue manager name or a pattern including wildcards. There is no equivalent of the BLOCKUSER function to block access from queue managers.Whenever an inbound connection is refused for this reason, an event message MQRC_CHANNEL_BLOCKED with reason qualifier MQRQ_CHANNEL_BLOCKED_NOACCESS is issued, provided that channel events are enabled and the queue manager is running.
Blocking SSL or TLS DNs
To specify that any user presenting an SSL or TLS personal certificate containing a specified DN is to have no access, set a channel authentication record of type SSLPEERMAP with the USERSRC(NOACCESS) parameter. You can specify a single distinguished name or a pattern including wildcards. There is no equivalent of the BLOCKUSER function to block access for DNs.
Whenever an inbound connection is refused for this reason, an event message MQRC_CHANNEL_BLOCKED with reason qualifier MQRQ_CHANNEL_BLOCKED_NOACCESS is issued, provided that channel events are enabled and the queue manager is running.
Mapping IP addresses to user IDs to be used
To specify that any channel connecting from a specified IP address is to use a specific MCAUSER, set a channel authentication record of type ADDRESSMAP. You can specify a single address, a range of addresses, or a pattern including wildcards.If you use a port forwarder, DMZ session break, or any other setup which changes the IP address presented to the queue manager, then mapping IP addresses is not necessarily suitable for your use.
Mapping queue manager names to user IDs to be used
To specify that any channel connecting from a specified queue manager is to use a specific MCAUSER, set a channel authentication record of type QMGRMAP. You can specify a single queue manager name or a pattern including wildcards.
Mapping user IDs asserted by a client to user IDs to be used
To specify that if a certain user ID is used by a connection from a WebSphere MQ MQI client, a different, specified MCAUSER is to be used, set a channel authentication record of type USERMAP. User ID mapping does not use wildcards.
Mapping SSL or TLS DNs to user IDs to be used
To specify that any user presenting an SSL/TLS personal certificate containing a specified DN is to use a specific MCAUSER, set a channel authentication record of type SSLPEERMAP. You can specify a single distinguished name or a pattern including wildcards.
Mapping queue managers, clients, or SSL or TLS DNs according to IP address
In some circumstances it might be possible for a third party to spoof a queue manager name. An SSL or TLS certificate or key database file might also be stolen and reused. To protect against these threats, you can specify that a connection from a certain queue manager or client, or using a certain DN must be connecting from a specified IP address. Set a channel authentication record of type USERMAP, QMGRMAP or SSLPEERMAP and specify the permitted IP address, or pattern of IP addresses, using the ADDRESS parameter.
Interaction between channel authentication records
It is possible that a channel attempting to make a connection matches more than one channel authentication record, and that these have contradictory effects. For example, a channel might assert a user ID which is blocked by a BLOCKUSER channel authentication record, but with an SSL or TLS certificate that matches an SSLPEERMAP record that sets a different user ID. In addition, if channel authentication records use wildcards, a single IP address, queue manager name, or SSL or TLS DN might match several patterns. For example, the IP address 192.0.2.6 matches the patterns 192.0.2.0-24, 192.0.2.*, and 192.0.*.6. The action taken is determined as follows.
- The channel authentication record used is selected as follows:
- A channel authentication record explicitly matching the channel name takes priority over a channel authentication record matching the channel name by using a wildcard.
- A channel authentication record using an SSL or TLS DN takes priority over a record using a user ID, queue manager name, or IP address.
- A channel authentication record using a user ID or queue manager name takes priority over a record using an IP address.
- If a matching channel authentication record is found and it specifies an MCAUSER, this MCAUSER is assigned to the channel.
- If a matching channel authentication record is found and it specifies that the channel has no access, an MCAUSER value of *NOACCESS is assigned to the channel. This value can later be changed by a security exit program.
- If no matching channel authentication record is found, or a matching channel authentication record is found and it specifies that the user ID of the channel is to be used, the MCAUSER field is inspected.
- If the MCAUSER field is blank, the client user ID is assigned to the channel.
- If the MCAUSER field is not blank, it is assigned to the channel.
- Any security exit program is run. This exit program might set the channel user ID or determine that access is to be blocked.
- If the connection is blocked or the MCAUSER is set to *NOACCESS, the channel ends.
- If the connection is not blocked, for any channel except a client channel, the channel user ID determined in the previous steps is checked against the list of blocked users.
- If the user ID is in the list of blocked users, the channel ends.
- If the user ID is not in the list of blocked users, the channel runs.
Where a number of channel authentication records match a channel name, IP address, queue manager name, or SSL or TLS DN, the most specific match is used. The match considered to be most specific is determined as follows.
- For a channel name:
- The most specific match is a name without wildcards, for example A.B.C.
- The most generic match is a single asterisk (*), which matches all channel names.
- A pattern with an asterisk in the left-most position is more generic than a pattern with a defined value in the left-most position. Thus *.B.C is more generic than A.*.
- A pattern with an asterisk in the second position is more generic than a pattern with a defined value in the second position, and similarly for each subsequent position. Thus A.*.C is more generic than A.B.*
- Where two or more patterns have an asterisk in the same position, the one with fewer nodes following the asterisk is more generic. Thus A.* is more generic than A.*.C
- For an IP address:
- The most specific match is a name without wildcards, for example 192.0.2.6.
- The most generic match is a single asterisk (*), which matches all channel names.
- A pattern with an asterisk in the left-most position is more generic than a pattern with a defined value in the left-most position. Thus *.0.2.6 is more generic than 192.*.
- A pattern with an asterisk in the second position is more generic than a pattern with a defined value in the second position, and similarly for each subsequent position. Thus 192.*.2.6 is more generic than 192.0.*.
- Where two or more patterns have an asterisk in the same position, the one with fewer nodes following the asterisk is more generic. Thus 192.* is more generic than 192.*.2.*.
- A range indicated with a hyphen (-), is more specific than an asterisk. Thus 192.0.2.0-24 is more specific than 192.0.2.*.
- A range that is a subset of another is more specific than the larger range. Thus 192.0.2.5-15 is more specific than 192.0.2.0-24.
- Overlapping ranges are not permitted. For example, you cannot have channel authentication records for both 192.0.2.0-15 and 192.0.2.10-20.
- A pattern cannot have fewer than the required number of parts, unless the pattern ends with a single trailing asterisk. For example 192.0.2 is invalid, but 192.0.2.* is valid.
- A trailing asterisk must be separated from the rest of the address by the appropriate part separator (a dot (.) for IPv4, a colon (:) for IPv6). For example, 192.0* is not valid because the asterisk is not in a part of its own.
- A pattern may contain additional asterisks provided that no asterisk is adjacent to the trailing asterisk. For example, 192.*.2.* is valid, but 192.0.*.* is not valid.
- A IPv6 address pattern cannot contain a double colon and a trailing asterisk, because the resulting address would be ambiguous. For example, 2001::* could expand to 2001:0000:*, 2001:0000:0000:* and so on
- For a queue manager name:
- The most specific match is a name without wildcards, for example 192.0.2.6.
- The most generic match is a single asterisk (*), which matches all channel names.
- A pattern with an asterisk in the left-most position is more generic than a pattern with a defined value in the left-most position. Thus *QUEUEMANAGER is more generic than QUEUEMANAGER*.
- A pattern with an asterisk in the second position is more generic than a pattern with a defined value in the second position, and similarly for each subsequent position. Thus Q*MANAGER is more generic than QUEUE*.
- Where two or more patterns have an asterisk in the same position, the one with fewer characters following the asterisk is more generic. Thus Q* is more generic than Q*MGR.
- For an SSL or TLS Distinguished Name (DN), the precedence order
of substrings is as follows:
Precedence order of substrings
Order DN substring Name 1 SERIALNUMBER= Certificate serial number 2 MAIL= Email address 3 E= Email address (Deprecated in preference to MAIL) 4 UID=, USERID= User identifier 5 CN= Common name 6 T= Title 7 OU= Organizational unit 8 DC= Domain component 9 O= Organization 10 STREET= Street / First line of address 11 L= Locality 12 ST=, SP=, S= State or province name 13 PC= Postal code / zip code 14 C= Country 15 UNSTRUCTUREDNAME= Host name 16 UNSTRUCTUREDADDRESS= IP address 17 DNQ= Distinguished name qualifier Thus, if an SSL or TLS certificate is presented with a DN containing the substrings O=IBM and C=UK, WebSphere MQ uses a channel authentication record for O=IBM in preference to one for C=UK, if both are present.
A DN can contain multiple OUs, which must be specified in hierarchical order with the large organizational units specified first. If two DNs are equal in all respects except for their OU values, the more specific DN is determined as follows:
- If they have different numbers of OU attributes then the DN with the most OU values is more specific. This is because the DN with more Organizational Units fully qualifies the DN in more detail and provides more matching criteria. Even if its top-level OU is a wildcard (OU=*), the DN with more OUs is still regarded as more specific overall.
- If they have the same number of OU attributes then the corresponding pairs of OU values are compared in sequence left-to-right, where the left-most OU is the highest-level (least specific), according to the following rules.
- An OU with no wildcard values is the most specific because it can only match exactly one string.
- An OU with a single wildcard at either the beginning or end (for example, OU=ABC* or OU=*ABC) is next most specific.
- An OU with two wildcards for example, OU=*ABC*) is next most specific.
- An OU consisting only of an asterisk (OU=*) is the least specific.
- If the string comparison is tied between two attribute values of the same specificity then whichever attribute string is longer is more specific.
- If the string comparison is tied between two attribute values of the same specificity and length then the result is determined by a case-insensitive string comparison of the portion of the DN excluding any wildcards.
If two DNs are equal in all respects except for their DC values, the same matching rules apply as for OUs except that in DC values the left-most DC is the lowest-level (most specific) and the comparison ordering differs accordingly.
Display channel authentication records
To display channel authentication records, use the MQSC command DISPLAY CHLAUTH or the PCF command Inquire Channel Authentication Records. You can choose to return all records that match the supplied channel name, or you can choose an explicit match. The explicit match tells you which channel authentication record would be used if a channel attempted to make a connection from a specific IP address, from a specific queue manager or using a specific user ID, and, optionally, presenting an SSL/TLS personal certificate containing a specified DN.Message security in WebSphere MQ
Message security in IBM WebSphere MQ infrastructure is provided by a separately licensed component WebSphere MQ Advanced Message Security.
WebSphere MQ Advanced Message Security (WebSphere MQ AMS) expands WebSphere MQ security services to provide data signing and encryption at the message level. The expanded services guarantees that message data has not been modified between when it is originally placed on a queue and when it is retrieved. In addition, WebSphere MQ AMS verifies that a sender of message data is authorized to place signed messages on a target queue.
Planning for your security requirements
This collection of topics explains what you need to consider when planning security in a WebSphere MQ environment.
You can use WebSphere MQ for a wide variety of applications on a range of platforms. The security requirements are likely to be different for each application. For some, security will be a critical consideration.
WebSphere MQ provides a range of link-level security services, including support for the Secure Sockets Layer (SSL) and Transport Layer Security (TLS).
You must consider certain aspects of security when implementing WebSphere. On UNIX, Linux and Windows systems, if you ignore these aspects and do nothing, you cannot use WebSphere MQ.
Security considerations are described below.
Authority to administer WebSphere MQ
WebSphere MQ administrators need authority to:
- Issue commands to administer WebSphere MQ
- Use the WebSphere MQ Explorer
For more information, see:
- Authority to administer WebSphere MQ on UNIX, Linux, and Windows systems
Authority to work with WebSphere MQ objects
Applications can access the following WebSphere MQ objects by issuing MQI calls:
Applications can also use Programmable Command Format (PCF) commands to access these WebSphere MQ objects, and to access channels and authentication information objects as well. These objects can be protected by WebSphere MQ so that the user IDs associated with the applications need authority to access them.
For more information, see Authorization for applications to use WebSphere MQ .
Channel security
The user IDs associated with message channel agents (MCAs) need authority to access various WebSphere MQ resources. For example, an MCA must be able to connect to a queue manager. If it is a sending MCA, it must be able to open the transmission queue for the channel. If it is a receiving MCA, it must be able to open destination queues. The user IDs associated with applications which need to administer channels, channel initiators, and listeners need authority to use the relevant PCF commands. However, most applications do not need such access.
For more information, see Channel security .
Planning identification and authentication
Decide what user IDs to use, and how and at what levels you want to apply authentication controls.
You must decide how you will identify the users of your WebSphere MQ applications, bearing in mind that different operating systems support user IDs of different lengths. You can use channel authentication records to map from one user ID to another, or to specify a user ID based on some attribute of the connection. WebSphere MQ channels using SSL or TLS use digital certificates as a mechanism for identification and authentication. Each digital certificate has a subject distinguished name which can be mapped onto specific identities using channel authentication records. Additionally, CA certificates in the key repository determine which digital certificates may be used to authenticate to WebSphere MQ. For more information see:
- Mapping a remote queue manager to an MCAUSER user ID
- Mapping a client asserted user ID to an MCAUSER user ID
- Mapping an SSL or TLS Distinguished Name to an MCAUSER user ID
- Mapping an IP address to an MCAUSER user ID
Planning authentication for a client application
You can apply authentication controls at four levels: at the communications level, in security exits, with channel authentication records, and in terms of the identification that is passed to a security exit.
There are four levels of security to consider. The diagram shows a WebSphere MQ MQI client that is connected to a server. Security is applied at four levels, as described in the following text. MCA is a Message Channel Agent.
Figure 1. Security in a client/server connection

- Communications level
See arrow 1. To implement security at the communications level, use SSL or TLS. For more information, see Cryptographic security protocols: SSL and TLS
- Channel authentication records
See arrows 2 & 3. Authentication can be controlled by using the IP address or SSL/TLS distinguished names at the security level. A user ID can also be blocked or an asserted user ID can be mapped to a valid user ID. A full description is given in Channel authentication records .
- Channel security exits
See arrow 2. The channel security exits for client to server communication can work in the same way as for server to server communication. A protocol independent pair of exits can be written to provide mutual authentication of both the client and the server. A full description is given in Channel security exit programs .
- Identification that is passed to a channel security exit
See arrow 3. In client to server communication, the channel security exits do not have to operate as a pair. The exit on the WebSphere MQ client side can be omitted. In this case, the user ID is placed in the channel descriptor (MQCD) and the server-side security exit can alter it, if required.
Windows clients also send extra information to assist identification.
- The user ID that is passed to the server is the currently logged-on user ID on the client.
- The security ID of the currently logged-on user.
To assist identification on WebSphere MQ client for HP Integrity NonStop Server, the client passes the OSS Safeguard alias under which the client application is running. This ID is typically of the form <PRIMARYGROUP>.<ALIAS>. If required, you can map this user ID to an alternative user ID on the queue manager by using either channel authentication records or a security exit. For more information about message exits, see Identity mapping in message exits . For more information about defining channel authentication records, see Mapping a client asserted user ID to an MCAUSER user ID .
The values of the user ID and, if available, the security ID, can be used by the server security exit to establish the identity of the WebSphere MQ MQI client.
User IDs
If the WebSphere MQ MQI client is on Windows and the WebSphere MQ server is also on Windows and has access to the domain on which the client user ID is defined, WebSphere MQ supports user IDs of up to 20 characters. On UNIX and Linux platforms and configurations, the maximum length is 12 characters.
A WebSphere MQ for Windows server does not support the connection of a Windows client if the client is running under a user ID that contains the @ character, for example, abc@d. The return code to the MQCONN call at the client is MQRC_NOT_AUTHORIZED.
However, you can specify the user ID using two @ characters, for example, abc@@d. Using the id@domain format is the preferred practice, to ensure that the user ID is resolved in the correct domain consistently; thus abc@@d@domain.
Note that UNKNOWN is a reserved user ID and the NOBODY user ID also have special meanings to WebSphere MQ. Creating user IDs in the operating system called UNKNOWN or NOBODY could have unintended results.
Although user IDs are used to authenticate, groups are used for authorization, except for Windows.
If you create service accounts, without paying attention to groups, and authorize all the user IDs differently, every user can access the information of every other user.
Planning authorization
Plan the users who will have administrative authority and plan how to authorize users of applications to appropriately use WebSphere MQ objects, including those connecting from a WebSphere MQ MQI client.
Individuals or applications must be granted access in order to use WebSphere MQ. What access they require depend on the roles they undertake and the tasks which they need to perform. Authorization in WebSphere MQ can be subdivided into two main categories:
- Authorization to perform administrative operations
- Authorization for applications to use WebSphere MQ
Both classes of operation are controlled by the same component and an individual can be granted authority to perform both categories of operation.
The following topics give further information about specific areas of authorization that you must consider:
Authority to administer WebSphere MQ
WebSphere MQ administrators need authority to perform various functions. This authority is obtained in different ways on different platforms.
WebSphere MQ administrators need authority to:
- Issue commands to administer WebSphere MQ
- Use the WebSphere MQ Explorer
For more information, see the topic appropriate to your operating system.
Authority to administer WebSphere MQ on UNIX and Windows systems
A WebSphere MQ administrator is a member of the mqm group. This group has access to all WebSphere MQ resources and can issue WebSphere MQ control commands. An administrator can grant specific authorities to other users.
To be a WebSphere MQ administrator on UNIX and Windows systems, a user must be a member of the mqm group. This group is created automatically when you install WebSphere MQ. To allow users to issue control commands, you must add them to the mqm group. This includes the root user on UNIX systems.
Users who are not member of the mqm group can be granted administrative privileges, but they are not able to issue WebSphere MQ control commands, and they are authorized to execute only the commands for which they have been granted access.
Additionally, on Windows systems, the SYSTEM and Administrator accounts have full access to WebSphere MQ resources.
All members of the mqm group have access to all WebSphere MQ resources on the system, including being able to administer any queue manager running on the system. This access can be revoked only by removing a user from the mqm group. On Windows systems, members of the Administrators group also have access to all WebSphere MQ resources.
Administrators can use the control command runmqsc to issue WebSphere MQ Script (MQSC) commands. When runmqsc is used in indirect mode to send MQSC commands to a remote queue manager, each MQSC command is encapsulated within an Escape PCF command. Administrators must have the required authorities for the MQSC commands to be processed by the remote queue manager.
The WebSphere MQ Explorer issues PCF commands to perform administration tasks. Administrators require no additional authorities to use the WebSphere MQ Explorer to administer a queue manager on the local system. When the WebSphere MQ Explorer is used to administer a queue manager on another system, administrators must have the required authorities for the PCF commands to be processed by the remote queue manager.
Authorization for applications to use WebSphere MQ
When applications access objects, the user IDs associated with the applications need appropriate authority.
Applications can access the following WebSphere MQ objects by issuing MQI calls:
Applications can also use PCF commands to administer WebSphere MQ objects. When the PCF command is processed, it uses the authority context of the user ID that put the PCF message.
Applications, in this context, include those written by users and vendors, and those supplied with WebSphere MQ for z/OS. The applications supplied with WebSphere MQ for z/OS include:
- The operations and control panels
- The WebSphere MQ utility program, CSQUTIL
- The dead letter queue handler utility, CSQUDLQH
Applications that use WebSphere MQ classes for Java™, WebSphere MQ classes for JMS, WebSphere MQ classes for .NET, or the Message Service Clients for C/C++ and .NET use the MQI indirectly.
MCAs also issue MQI calls and the user IDs associated with the MCAs need authority to access these WebSphere MQ objects. For more information about these user IDs and the authorities they require, see Channel security .
On z/OS, applications can also use MQSC commands to access these WebSphere MQ objects but command security and command resource security provide the authority checks in these circumstances.
On IBM i, a user that issues a CL command in Group 2 might require authority to access a WebSphere MQ object associated with the command. For more information, see When authority checks are performed .
When authority checks are performed
Authority checks are performed when an application attempts to access a queue manager, queue, process, or namelist.
On IBM i, authority checks might also be performed when a user issues a CL command in Group 2 that accesses any of these WebSphere MQ objects. The checks are performed in the following circumstances:
- When an application connects to a queue manager using an MQCONN or MQCONNX call
- The queue manager asks the operating system for the user ID associated with the application. The queue manager then checks that the user ID is authorized to connect to it and retains the user ID for future
checks.
Users do not have to sign on to WebSphere MQ. WebSphere MQ assumes that users are signed on to the underlying operating system and are been authenticated by it.
- When an application opens a WebSphere MQ object using an MQOPEN or MQPUT1 call
- All authority checks are performed when an object is opened, not when it is accessed later. For example, authority checks are performed when an application opens a queue. They are not performed when the application puts messages on the queue or gets messages from the queue.
When an application opens an object, it specifies the types of operation it needs to perform on the object. For example, an application might open a queue to browse the messages on it, get messages from it, but not to put messages on it. For each type of operation, the queue manager checks that the user ID associated with the application has the authority to perform that operation.
When an application opens a queue, the authority checks are performed against the object named in the ObjectName field of the object descriptor. The ObjectName field is used on the MQOPEN or MQPUT1 calls. If the object is an alias queue or a remote queue definition, the authority checks are performed against the object itself. They are not performed on the queue to which the alias queue or the remote queue definition resolves. This means that the user does not need permission to access it. Limit the authority to create queues to privileged users. If you do not, users might bypass the normal access control simply by creating an alias.
An application can reference a remote queue explicitly. It sets the ObjectName and ObjectQMgrName fields in the object descriptor to the names of the remote queue and the remote queue manager. The authority checks are performed against the transmission queue with the same name as the remote queue manager. Onz/OS, a check is made on the RACF queue profile that matches the remote queue manager name. On platforms other than z/OS, a check is made against the RQMNAME profile that matches the remote queue manager name, if clustering is being used. An application can reference a cluster queue explicitly by setting the ObjectName field in the object descriptor to the name of the cluster queue. The authority checks are performed against the cluster transmission queue, SYSTEM.CLUSTER.TRANSMIT.QUEUE.
The authority to a dynamic queue is based on the model queue from which it is derived, but is not necessarily the same
The user ID that the queue manager uses for the authority checks is obtained from the operating system. The user ID is obtained when the application connects to the queue manager. A suitably authorized application can issue an MQOPEN call specifying an alternative user ID; access control checks are then made on the alternative user ID. Using an alternate user ID does not change the user ID associated with the application, only the one used for access control checks.
- When an application subscribes to a topic using an MQSUB call
- When an application subscribes to a topic, it specifies the type of operation that it needs to perform. It is either creating a subscription, altering an existing subscription, or resuming an existing subscription without changing it. For each type of operation, the queue manager checks that the user ID that is associated with the application has the authority to perform the operation.
When an application subscribes to a topic, the authority checks are performed against topic objects that are found in the topic tree. The topic objects are at, or above, the point in the topic tree at which the application subscribed. The authority checks might involve checks on more than one topic object. The user ID that the queue manager uses for the authority checks is obtained from the operating system. The user ID is obtained when the application connects to the queue manager.
The queue manager performs authority checks on subscriber queues but not on managed queues.
- When an application deletes a permanent dynamic queue using an MQCLOSE call
- The object handle specified on the MQCLOSE call is not necessarily the same one returned by the MQOPEN call that created the permanent dynamic queue. If it is different, the queue manager checks the user ID associated with the application that issued the MQCLOSE call. It checks that the user ID is authorized to delete the queue.
When an application that closes a subscription to remove it did not create it, the appropriate authority is required to remove it.
- When a PCF command that operates on a WebSphere MQ object is processed by the command server
- This rule includes the case where a PCF command operates on an
authentication information object.
The user ID that is used for the authority checks is the one found in the UserIdentifier field in the message descriptor of the PCF command. This user ID must have the required authorities on the queue manager where the command is processed. The equivalent MQSC command encapsulated within an Escape PCF command is treated in the same way. For more information about the UserIdentifier field, and how it is set, see Message context .
Alternate user authority
When an application opens an object or subscribes to a topic, the application can supply a user ID on the MQOPEN, MQPUT1, or MQSUB call. It can ask the queue manager to use this user ID for authority checks instead of the one associated with the application.
The application succeeds in opening the object only if both the following conditions are met:
- The user ID associated with the application has the authority to supply a different user ID for authority checks. The application is said to have alternate user authority.
- The user ID supplied by the application has the authority to open the object for the types of operation requested, or to subscribe to the topic.
Message context
Message context information allows the application that retrieves a message to find out about the originator of the message. The information is held in fields in the message descriptor and the fields are divided into three logical parts
These parts are as follows:
- identity context
- These fields contain information about the user of the application that put the message on the queue.
- origin context
- These fields contain information about the application itself and when the message was put on the queue.
- User context
- These fields contain message properties that applications can use to select messages that the queue manager should deliver.
When an application puts a message on a queue, the application can ask the queue manager to generate the context information in the message. This is the default action. Alternatively, it can specify that the context fields are to contain no information. The user ID associated with an application requires no special authority to do either of these.
An application can set the identity context fields in a message, allowing the queue manager to generate the origin context, or it can set all the context fields. An application can also pass the identity context fields from a message it has retrieved to a message it is putting on a queue, or it can pass all the context fields. However, the user ID associated with an application requires authority to set or pass context information. An application specifies that it intends to set or pass context information when it opens the queue on which it is about to put messages, and its authority is checked at this time.
Here is a brief description of each of the context fields:
- Identity context
-
- UserIdentifier
- The user ID associated with the application that put the message. If the queue manager sets this field, it is set to the user ID obtained from the operating system when the application connects to the queue manager.
- AccountingToken
- Information that can be used to charge for the work done as a result of the message.
- ApplIdentityData
- If the user ID associated with an application has authority to set the identity context fields, or to set all the context fields, the application can set this field to any value related to identity. If the queue manager sets this field, it is set to blank.
- Origin context
-
- PutApplType
- The type of the application that put the message; a CICS transaction, for example.
- PutApplName
- The name of the application that put the message.
- PutDate
- The date when the message was put.
- PutTime
- The time when the message was put.
- ApplOriginData
- If the user ID associated with an application has authority to set all the context fields, the application can set this field to any value related to origin. If the queue manager sets this field, it is set to blank.
- User context
-
The following values are supported for MQINQMP or MQSETMP:
- MQPD_USER _CONTEXT
-
The property is associated with the user context.
No special authorization is required to be able to set a property associated with the user context using the MQSETMP call.
On a V7.0 or subsequent queue manager, a property associated with the user context is saved as described for MQOO_SAVE_ALL_CONTEXT. An MQPUT with MQOO_PASS_ALL_CONTEXT specified causes the property to be copied from the saved context into the new message.
- MQPD_NO_CONTEXT
-
The property is not associated with a message context.
For a detailed description of each of the context fields, see MQMD - Message descriptor . For more information about how to use message context, see Message context .
Authority to work with WebSphere MQ objects on UNIX, Linux and Windows systems
The authorization service component provided with WebSphere MQ is called the object authority manager (OAM). It provides access control via authentication and authorization checks.
- Authentication.
The authentication check performed by the OAM provided with WebSphere MQ is basic, and is only performed in specific circumstances. It is not intended to meet the strict requirements expected in a highly secure environment.
The OAM performs its authentication check when an application connects to a queue manager, and the following conditions are true.
If an MQCSP structure has been supplied by the connecting application, and the AuthenticationType attribute in the MQCSP structure is given the value MQCSP_AUTH_USER_ID_AND_PWD, then the check is performed by the OAM in its MQZID_AUTHENTICATE_USER function. This is the check: the user ID in the MQCSP structure is compared against the user ID in the IdentityContext (MQZIC), to determine whether they match. If they do not match, the check fails.
This basic check is not intended to be a full authentication of the user. For example, there is no check of the authenticity of the user by checking the password supplied in the MQCSP structure. Also, if the application omits an MQCSP structure, then no check is performed.
If fuller authentication services are required in the queue manager via the authorization service component, then the OAM provided with WebSphere MQ does not offer this. You must write a new authorization service component, or obtain one from a vendor.
- Authorization.
The authorization checks are comprehensive, and are intended to meet most normal requirements.
Authorization checks are performed when an application issues an MQI call to access a queue manager, queue, process, topic, or namelist. They are also performed at other times, for example, when a command is being performed by the Command Server.
On UNIX, Linux and Windows systems, the authorization service provides the access control when an application issues an MQI call to access a WebSphere MQ object that is a queue manager, queue, process, topic, or namelist. This includes checks for alternative user authority and the authority to set or pass context information.
On Windows, the OAM gives members of the Administrators group the authority to access all WebSphere MQ objects, even when UAC is enabled.
Additionally, on Windows systems, the SYSTEM account has full access to WebSphere MQ resources.
The authorization service also provides authority checks when a PCF command operates on one of these WebSphere MQ objects or an authentication information object. The equivalent MQSC command encapsulated within an Escape PCF command is treated in the same way.
The authorization service is an installable service, which means that it is implemented by one or more installable service components. Each component is invoked using a documented interface. This enables users and vendors to provide components to augment or replace those provided by the WebSphere MQ products.
The authorization service component provided with WebSphere MQ is called the object authority manager (OAM). The OAM is automatically enabled for each queue manager you create.
The OAM maintains an access control list (ACL) for each WebSphere MQ object it is controlling access to. On UNIX and Linux systems, only group IDs can appear in an ACL. This means that all members of a group have the same authorities. On Windows systems, both user IDs and group IDs can appear in an ACL. This means that authorities can be granted to individual users and groups.
A 12 character limitation applies to both the group
and the user ID. UNIX platforms
generally restrict the length of a user ID to 12 characters. AIX and Linux have raised this limit but WebSphere MQ continues to observe a 12 character
restriction on all UNIX platforms.
If you use a user ID of greater than 12 characters, WebSphere MQ replaces it with the value UNKNOWN
.
Do not define a user ID with a value of UNKNOWN
.
The OAM can authenticate a user and change appropriate identity context fields. You enable this by specifying a connection security parameters structure (MQCSP) on an MQCONNX call. The structure is passed to the OAM Authenticate User function (MQZ_AUTHENTICATE_USER), which sets appropriate identity context fields. If an MQCONNX connection from a WebSphere MQ client, the information in the MQCSP is flowed to the queue manager to which the client is connecting over the client-connection and server-connection channel. If security exits are defined on that channel, the MQCSP is passed into each security exit and can be altered by the exit. Security exits can also create the MQCSP. For more details of the use of security exits in this context, see Channel security exit programs .
On UNIX, Linux and Windows systems, the control command setmqaut grants and revokes authorities and is used to maintain the ACLs. For example, the command:
setmqaut -m JUPITER -t queue -n MOON.EUROPA -g VOYAGER +browse +getallows the members of the group VOYAGER to browse messages on the queue MOON.EUROPA that is owned by the queue manager JUPITER. It allows the members to get messages from the queue as well. To revoke these authorities later, enter the following command:
setmqaut -m JUPITER -t queue -n MOON.EUROPA -g VOYAGER -browse -get
The command:
setmqaut -m JUPITER -t queue -n MOON.* -g VOYAGER +putallows the members of the group VOYAGER to put messages on any queue with a name that commences with the characters MOON. . MOON.* is the name of a generic profile. A generic profile allows you to grant authorities for a set of objects using a single setmqaut command.
The control command dspmqaut is available to display the current authorities that a user or group has for a specified object. The control command dmpmqaut is also available to display the current authorities associated with generic profiles.
If you do not want any authority checks, for example, in a test environment, you can disable the OAM.
Use PCF to access OAM commands
On UNIX, Linux and Windows systems, you can use PCF commands to access OAM administration commands.
The PCF commands and their equivalent OAM commands are as follows:
| PCF command | OAM command |
|---|---|
| Inquire Authority Records | dmpmqaut |
| Inquire Entity Authority | dspmqaut |
| Set Authority Record | setmqaut |
| Delete Authority Record | setmqaut with -remove option |
The setmqaut and dmpmqaut commands are restricted to members of the mqm group. The equivalent PCF commands can be executed by users in any group who have been granted dsp and chg authorities on the queue manager.
For more information about using these commands, see Introduction to Programmable Command Formats .
Security for remote messaging
This section deals with remote messaging aspects of security.
You must provide users with authority to use the WebSphere MQ facilities. This is organized according to actions to be taken with respect to objects and definitions. For example:
- Queue managers can be started and stopped by authorized users
- Applications must connect to the queue manager and have authority to use queues
- Message channels must be created and controlled by authorized users
- Objects are kept in libraries and access to these libraries can be restricted
The message channel agent at a remote site must check that the message being delivered originated from a user with authority to do so at this remote site. In addition, as MCAs can be started remotely, it might be necessary to verify that the remote processes trying to start your MCAs are authorized to do so. There are four possible ways for you to deal with this:
- Make appropriate use of the PutAuthority attribute of your RCVR, RQSTR, or CLUSRCVR channel definition to control which user is used for authorization checks at the time incoming messages are put to your queues. See the DEFINE CHANNEL command description in the MQSC Command Reference.
- Implement channel authentication records to reject unwanted connection attempts, or to set an MCAUSER value based on the following: the remote IP address, the remote user ID, the SSL or TLS Subject Distinguished Name (DN) provided, or the remote queue manager name.
- Implement user exit security checking to ensure that the corresponding message channel is authorized. The security of the installation hosting the corresponding channel ensures that all users are properly authorized, so that you do not need to check individual messages.
- Implement user exit message processing to ensure that individual messages are vetted for authorization.
Security of objects on UNIX and Linux systems
Administration users must be part of the mqm group on your system (including root) if this ID is going to use WebSphere MQ administration commands.
You should always run amqcrsta as the "mqm" user ID.
User IDs on UNIX and Linux systems
The queue manager converts all uppercase or mixed case user identifiers into lowercase. The queue manager then inserts the user identifiers into the context part of a message, or checks their authorization. Authorizations are therefore based only on lowercase identifiers.
Security of objects on Windows systems
Administration users must be part of both the mqm group and the administrators group on Windows systems if this ID is going to use WebSphere MQ administration commands.
User IDs on Windows systems
On Windows systems, if there is no message exit installed, the queue manager converts any uppercase or mixed case user identifiers into lowercase. The queue manager then inserts the user identifiers into the context part of a message, or checks their authorization. Authorizations are therefore based only on lowercase identifiers.
User IDs across systems
Platforms other than Windows , UNIX and Linux systems use uppercase characters for user IDs in messages.
To allow Windows, UNIX and Linux systems to use lowercase user IDs in messages, the following conversions are carried out by the message channel agent (MCA) on these platforms:
- At the sending end
- The alphabetic characters in all user IDs are converted to uppercase characters, if there is no message exit installed.
- At the receiving end
- The alphabetic characters in all user IDs are converted to lowercase characters, if there is no message exit installed.
The automatic conversions are not carried out if you provide a message exit on UNIX, Linux and Windows systems for any other reason.
Use a custom authorization service
WebSphere MQ supplies an installable authorization service. You can choose to install an alternative service.
The authorization service component supplied with WebSphere MQ is called the Object Authority Manager (OAM). If the OAM does not supply the authorization facilities you need, you can write your own authorization service component. The installable service functions that must be implemented by an authorization service component are described at Installable services interface reference information .
Access control for clients
Access control is based on user IDs. There can be many user IDs to administer, and user IDs can be in different formats. You can set the server-connection channel property MCAUSER to a special user ID value for use by clients.
Access control in WebSphere MQ is based on user IDs. The user ID of the process making MQI calls is normally used. For MQ MQI clients, the server-connection MCA makes MQI calls on behalf of MQ MQI clients. You can select an alternative user ID for the server-connection MCA to use for making MQI calls. The alternative user ID can be associated either with the client workstation, or with anything you choose to organize and control the access of clients. The user ID needs to have the necessary authorities allocated to it on the server to issue MQI calls. Choosing an alternative user ID is preferable to allowing clients to make MQI calls with the authority of the server-connection MCA.
| User ID | When used |
|---|---|
| The user ID that is set by a security exit | Used unless blocked by a CHLAUTH TYPE(BLOCKUSER) rule. See the following section, Setting the user ID in a security exit for more information. |
| The user ID that is set by a CHLAUTH rule | Used unless over-ridden by a security exit. |
| The user ID that is defined in the MCAUSER attribute in the SVRCONN channel definition | Used unless over-ridden by a security exit or a CHLAUTH rule. |
| The user ID that is flowed from the client machine | Used when no used ID is set by any other means. |
| The user ID that started the server-connection channel | Used when no user ID is set by any other means and no client user ID is flowed. See the following section, The user ID that runs the channel program for more information. |
Because the server-connection MCA makes MQI calls on behalf of remote users, it is important to consider the security implications of the server-connection MCA issuing MQI calls on behalf of remote clients and how to administer the access of a potentially large number of users.
- One approach is for the server-connection MCA to issue MQI calls on its own authority. But beware, it is normally undesirable for the server-connection MCA, with its powerful access capabilities, to issue MQI calls on behalf of client users.
- Another approach is to use the user ID that flows from the client.
The server-connection MCA can issue MQI calls using the access capabilities of the client user ID. This approach presents a number of questions
to consider:
- There are different formats for the user ID on different platforms. This sometimes causes problems if the format of the user ID on the client differs from the acceptable formats on the server.
- There are potentially many clients, with different, and changing user IDs. The IDs need to be defined and managed on the server.
- Is the user ID to be trusted? Any user ID can be flowed from a client, not necessarily the ID of the logged on user. For example, the client might flow an ID with full mqm authority that was intentionally only defined on the server for security reasons.
- The preferred approach is to define client identification tokens at the server, and so limit the capabilities of client connected applications. This is typically done by setting the server-connection channel property MCAUSER to a special user ID value to be used by clients, and defining few IDs for use by clients with different level of authorization on the server.
Setting the user ID in a security exit
For WebSphere MQ MQI clients, the process that issues the MQI calls is the server-connection MCA. The user ID used by the server-connection MCA is contained in either the MCAUserIdentifier or LongMCAUserIdentifier fields of the MQCD. The contents of these fields are set by:
- Any values set by security exits
- The user ID from the client
- MCAUSER (in the server-connection channel definition)
The security exit can override the values that are visible to it, when it is invoked.
- If the server-connection channel MCAUSER attribute is set to nonblank, the MCAUSER value is used.
- If the server-connection channel MCAUSER attribute is blank, the user ID received from the client is used.
- If the server-connection channel MCAUSER attribute is blank, and no user ID is received from the client then the user ID that started the server-connection channel is used.
The user ID that runs the channel program
When the user ID fields are derived from the user ID that started the server-connection channel, the following value is used:
- For z/OS, the user ID assigned to the channel initiator started task by the z/OS started procedures table.
- For TCP/IP (non-z/OS), the user ID from the inetd.conf entry, or the user ID that started the listener.
- For SNA (non-z/OS), the user ID from the SNA Server entry or (if there is none) the incoming attach request, or the user ID that started the listener.
- For NetBIOS or SPX, the user ID that started the listener.
If any server-connection channel definitions exist that have the MCAUSER attribute set to blank, clients can use this channel definition to connect to the queue manager with access authority determined by the user ID supplied by the client. This might be a security exposure if the system on which the queue manager is running allows unauthorized network connections. The WebSphere MQ default server-connection channel (SYSTEM.DEF.SVRCONN) has the MCAUSER attribute set to blank. To prevent unauthorized access, update the MCAUSER attribute of the default definition with a user ID that has no access to WebSphere MQ MQ objects.
Case of user IDs
When you define a channel with runmqsc, the MCAUSER attribute is changed to uppercase unless the user ID is contained within single quotation marks.
For servers on UNIX, Linux and Windows systems, the content of the MCAUserIdentifier field that is received from the client is changed to lowercase.
For servers on IBM i, the content of the LongMCAUserIdentifier field that is received from the client is changed to uppercase.
For servers on UNIX and Linux systems, the content of the LongMCAUserIdentifier field that is received from the client is changed to lowercase.
By default, the user ID that is passed when a MQ JMS binding application is used, is the user ID for the JVM the application is running on.
It is also possible to pass a user ID via the createQueueConnection method.
Planning confidentiality
Plan how to keep your data confidential.
You can implement confidentiality at the application level or at link level. You might choose to use SSL or TLS, in which case you must plan your usage of digital certificates. You can also use channel exit programs if standard facilities do not satisfy your requirements.
Comparing link level security and application level security
This topic contains information about various aspects of link level security and application level security, and compares the two levels of security.
Link level and application level security are illustrated in Figure 1 .
Figure 1. Link level security and application level security
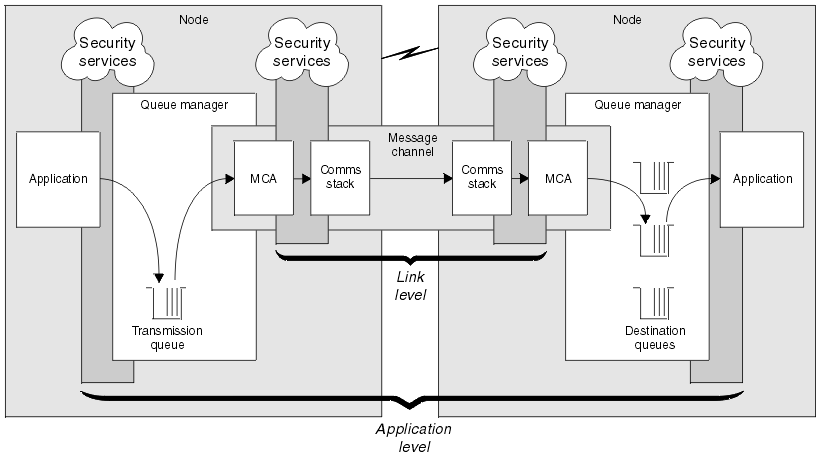
Protecting messages in queues
Link level security can protect messages while they are transferred from one queue manager to another. It is particularly important when messages are transmitted over an insecure network. It cannot, however, protect messages while they are stored in queues at either a source queue manager, a destination queue manager, or an intermediate queue manager.
Application level security, by comparison, can protect messages while they are stored in queues and applies even when distributed queuing is not used. This is the major difference between link level security and application level security and is illustrated in Figure 1 .
Queue managers not running in controlled and trusted environments
If a queue manager is running in a controlled and trusted environment, the access control mechanisms provided by WebSphere MQ might be considered sufficient to protect the messages stored on its queues. This is particularly true if only local queuing is involved and messages never leave the queue manager. Application level security in this case might be considered unnecessary.
Application level security might also be considered unnecessary if messages are transferred to another queue manager that is also running in a controlled and trusted environment, or are received from such a queue manager. The need for application level security becomes greater when messages are transferred to, or received from, a queue manager that is not running in a controlled and trusted environment.
Differences in cost
Application level security might cost more than link level security in terms of administration and performance.
The cost of administration is likely to be greater because there are potentially more constraints to configure and maintain. For example, you might need to ensure that a particular user sends only certain types of message and sends messages only to certain destinations. Conversely, you might need to ensure that a particular user receives only certain types of message and receives messages only from certain sources. Instead of managing the link level security services on a single message channel, you might need to be configuring and maintaining rules for every pair of users who exchange messages across that channel.
There might be an effect on performance if security services are invoked every time an application puts or gets a message.
Organizations tend to consider link level security first because it might be easier to implement. They consider application level security if they discover that link level security does not satisfy all their requirements.
Availability of components
Generally, in a distributed environment, a security service requires a component on at least two systems. For example, a message might be encrypted on one system and decrypted on another. This applies to both link level security and application level security.
In a heterogeneous environment, with different platforms in use, each with different levels of security function, the required components of a security service might not be available for every platform on which they are needed and in a form that is easy to use. This is probably more of an issue for application level security than for link level security, particularly if you intend to provide your own application level security by buying in components from various sources.
Messages in a dead letter queue
If a message is protected by application level security, there might be a problem if, for any reason, the message does not reach its destination and is put on a dead letter queue. If you cannot work out how to process the message from the information in the message descriptor and the dead letter header, you might need to inspect the contents of the application data. You cannot do this if the application data is encrypted and only the intended recipient can decrypt it.
What application level security cannot do
Application level security is not a complete solution. Even if you implement application level security, you might still require some link level security services. For example:
- When a channel starts, the mutual authentication of the two MCAs might still be a requirement. This can be done only by a link level security service.
- Application level security cannot protect the transmission queue header, MQXQH, which includes the embedded message descriptor. Nor can it protect the data in WebSphere MQ channel protocol flows other than message data. Only link level security can provide this protection.
- If application level security services are invoked at the server end of an MQI channel, the services cannot protect the parameters of MQI calls that are sent over the channel. In particular, the application data in an MQPUT, MQPUT1, or MQGET call is unprotected. Only link level security can provide the protection in this case.
Link level security
Link level security refers to those security services that are invoked, directly or indirectly, by an MCA, the communications subsystem, or a combination of the two working together.
Link level security is illustrated in Figure 1 .
Here are some examples of link level security services:
- The MCA at each end of a message channel can authenticate its partner. This is done when the channel starts and a communications connection has been established, but before any messages start to flow. If authentication fails at either end, the channel is closed and no messages are transferred. This is an example of an identification and authentication service.
- A message can be encrypted at the sending end of a channel and decrypted at the receiving end. This is an example of a confidentiality service.
- A message can be checked at the receiving end of a channel to determine whether its contents have been deliberately modified while it was being transmitted over the network. This is an example of a data integrity service.
Link level security provided by WebSphere MQ
The primary means of provision of confidentiality and data integrity in WebSphere MQ is by the use of SSL or TLS. For more information about the use of SSL and TLS in WebSphere MQ, see WebSphere MQ support for SSL and TLS . For authentication, WebSphere MQ provides the facility to use channel authentication records. Channel authentication records offer precise control over the access granted to connecting systems, at the level of individual channels or groups of channels. For more information, see Channel authentication records .Providing your own link level security
This collection of topics describes how you can provide your own link level security services. Writing your own channel exit programs is the main way to provide your own link level security services.
Channel exit programs are introduced in Channel exit programs . The same topic also describes the channel exit program that is supplied with WebSphere MQ for Windows (the SSPI channel exit program). This channel exit program is supplied in source format so that you can modify the source code to suit your requirements. If this channel exit program, or channel exit programs available from other vendors, do not meet your requirements, you can design and write your own. This topic suggests ways in which channel exit programs can provide security services. For information about how to write a channel exit program, see Writing channel-exit programs .
Link level security using a security exit
Security exits normally work in pairs; one at each end of a channel. They are called immediately after the initial data negotiation has completed on channel startup.
Security exits can be used to provide identification and authentication, access control, and confidentiality.
Link level security using a message exit
A message exit can be used only on a message channel, not on an MQI channel. It has access to both the transmission queue header, MQXQH, which includes the embedded message descriptor, and the application data in a message. It can modify the contents of the message and change its length.
A message exit can be used for any purpose that requires access to the whole message rather than a portion of it.
Message exits can be used to provide identification and authentication, access control, confidentiality, data integrity, and non-repudiation, and for reasons other than security.
Link level security using send and receive exits
Send and receive exits can be used on both message and MQI channels. They are called for all types of data that flow on a channel, and for flows in both directions.
Send and receive exits have access to each transmission segment. They can modify its contents and change its length.
On a message channel, if an MCA needs to split a message and send it in more than one transmission segment, a send exit is called for each transmission segment containing a portion of the message and, at the receiving end, a receive exit is called for each transmission segment. The same occurs on an MQI channel if the input or output parameters of an MQI call are too large to be sent in a single transmission segment.
On an MQI channel, byte 10 of a transmission segment identifies the MQI call, and indicates whether the transmission segment contains the input or output parameters of the call. Send and receive exits can examine this byte to determine whether the MQI call contains application data that might need to be protected.
When a send exit is called for the first time, to acquire and initialize any resources it needs, it can ask the MCA to reserve a specified amount of space in the buffer that holds a transmission segment. When it is called later to process a transmission segment, it can use this space to add an encrypted key or a digital signature, for example. The corresponding receive exit at the other end of the channel can remove the data added by the send exit, and use it to process the transmission segment.
Send and receive exits are best suited for purposes in which they do not need to understand the structure of the data they are handling and can therefore treat each transmission segment as a binary object.
Send and receive exits can be used to provide confidentiality and data integrity, and for uses other than security.
Application level security
Application level security refers to those security services that are invoked at the interface between an application and a queue manager to which it is connected.
These services are invoked when the application issues MQI calls to the queue manager. The services might be invoked, directly or indirectly, by the application, the queue manager, another product that supports WebSphere MQ, or a combination of any of these working together. Application level security is illustrated in Figure 1 .
Application level security is also known as end-to-end security or message level security.
Here are some examples of application level security services:
- When an application puts a message on a queue, the message descriptor contains a user ID associated with the application. However, there is no data present, such as an encrypted password, that can be used to authenticate the user ID. A security service can add this data. When the message is eventually retrieved by the receiving application, another component of the service can authenticate the user ID using the data that has travelled with the message. This is an example of an identification and authentication service.
- A message can be encrypted when it is put on a queue by an application and decrypted when it is retrieved by the receiving application. This is an example of a confidentiality service.
- A message can be checked when it is retrieved by the receiving application. This check determines whether its contents have been deliberately modified since it was first put on a queue by the sending application. This is an example of a data integrity service.
WebSphere MQ Advanced Message Security
WebSphere MQ Advanced Message Security (WebSphere MQ AMS) is a separately licensed component of WebSphere MQ that provides a high level of protection for sensitive data flowing through the WebSphere MQ network, while not impacting the end applications.
If you are moving highly sensitive or valuable information, especially confidential or payment-related information such as patient records or credit card details, you must pay special attention to information security. Ensuring that information moving around the enterprise retains its integrity and is protected from unauthorized access is an ongoing challenge and responsibility. You are also likely to be required to comply with security regulations, at the risk of penalties for non-compliance.
You can develop your own security extensions to WebSphere MQ. However, such solutions require specialist skills and can be complicated and expensive to maintain. WebSphere MQ Advanced Message Security helps address these challenges when moving information around the enterprise between virtually every type of commercial IT system.
WebSphere MQ Advanced Message Security extends the security features of WebSphere MQ in the following ways:
- It provides application-level, end-to-end data protection for your point to point messaging infrastructure, using either encryption or digital signing of messages.
- It provides comprehensive security without writing complex security code or modifying or recompiling existing applications.
- It uses Public Key Infrastructure (PKI) technology to provide authentication, authorization, confidentiality, and data integrity services for messages.
- It provides administration of security policies for mainframe and distributed servers.
- It supports both WebSphere MQ servers and clients.
- It integrates with WebSphere MQ Managed File Transfer to provide an end-to-end secure messaging solution.
Providing your own application level security
This collection of topics describes how you can provide your own application level security services.
To help you implement application level security, WebSphere MQ provides two exits, the API exit and the API-crossing exit.
These exits can provide identification and authentication, access control, confidentiality, data integrity, and non-repudiation services, and other functions not related to security.
If the API exit or API-crossing exit is not supported in your system environment, you might want to consider other ways of providing your own application level security. One way is to develop a higher level API that encapsulates the MQI. Programmers then use this API, instead of the MQI, to write WebSphere MQ applications.
The most common reasons for using a higher level API are:
- To hide the more advanced features of the MQI from programmers.
- To enforce standards in the use of the MQI.
- To add function to the MQI. This additional function can be security services.
Some vendor products use this technique to provide application level security for WebSphere MQ.
If you are planning to provide security services in this way, note the following regarding data conversion:
- If a security token, such as a digital signature, has been added to the application data in a message, any code performing data conversion must be aware of the presence of this token.
- A security token might have been derived from a binary image of the application data. Therefore, any checking of the token must be done before converting the data.
- If the application data in a message has been encrypted, it must be decrypted before data conversion.
Channel exit programs
Channel exit programs are programs that are called at defined places in the processing sequence of an MCA. Users and vendors can write their own channel exit programs. Some are supplied by IBM.
There are several types of channel exit program, but only four have a role in providing link level security:
- Security exit
- Message exit
- Send exit
- Receive exit
These four types of channel exit program are illustrated in Figure 1 and are described in the following topics.
Figure 1. Security, message, send, and receive exits on a message channel
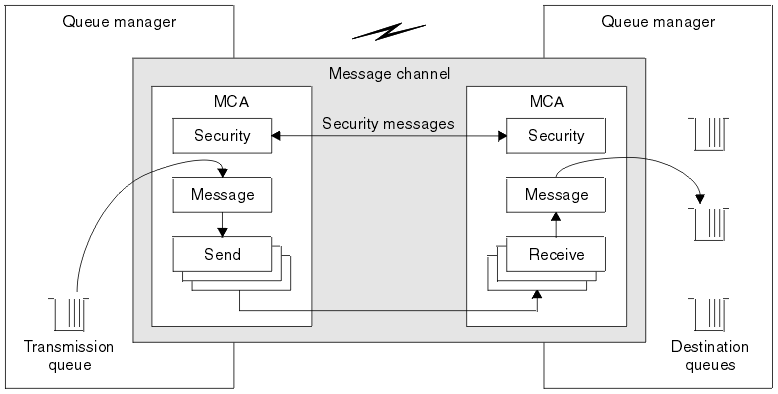
Security exit overview
Security exits normally work in pairs. They are called before messages flow and their purpose is to allow an MCA to authenticate its partner.
Security exits normally work in pairs; one at each end of a channel. They are called immediately after the initial data negotiation has completed on channel startup, but before any messages start to flow. The primary purpose of the security exit is to enable the MCA at each end of a channel to authenticate its partner. However, there is nothing to prevent a security exit from performing other function, even function that has nothing to do with security.
Security exits can communicate with each other by sending security messages. The format of a security message is not defined and is determined by the user. One possible outcome of the exchange of security messages is that one of the security exits might decide not to proceed any further. In that case, the channel is closed and messages do not flow. If there is a security exit at only one end of a channel, the exit is still called and can elect whether to continue or to close the channel.
Security exits can be called on both message and MQI channels. The name of a security exit is specified as a parameter in the channel definition at each end of a channel.
For more information about security exits, see Link level security using a security exit .
Message exit
Message exits operate only on message channels and normally work in pairs. A message exit can operate on the whole message and make various changes to it.
Message exits at the sending and receiving ends of a channel normally work in pairs. A message exit at the sending end of a channel is called after the MCA has got a message from the transmission queue. At the receiving end of a channel, a message exit is called before the MCA puts a message on its destination queue.
A message exit has access to both the transmission queue header, MQXQH, which includes the embedded message descriptor, and the application data in a message. A message exit can modify the contents of the message and change its length. A change of length might be the result of compressing, decompressing, encrypting, or decrypting the message. It might also be the result of adding data to the message, or removing data from it.
Message exits can be used for any purpose that requires access to the whole message, rather than a portion of it, and not necessarily for security.
A message exit can determine that the message it is currently processing should not proceed any further towards its destination. The MCA then puts the message on the dead letter queue. A message exit can also close the channel.
Message exits can be called only on message channels, not on MQI channels. This is because the purpose of an MQI channel is to enable the input and output parameters of MQI calls to flow between the WebSphere MQ MQI client application and the queue manager.
The name of a message exit is specified as a parameter in the channel definition at each end of a channel. You can also specify a list of message exits to be run in succession.
For more information about message exits, see Link level security using a message exit .
Send and receive exits
Send and receive exits typically work in pairs. They operate on transmission segments and are best used where the structure of the data they are processing is not relevant.
A send exit at one end of a channel and a receive exit at the other end normally work in pairs. A send exit is called just before an MCA issues a communications send to send data over a communications connection. A receive exit is called just after an MCA has regained control following a communications receive and has received data from a communications connection. If sharing conversations is in use, over an MQI channel, a different instance of a send and receive exit is called for each conversation.
The WebSphere MQ channel protocol flows between two MCAs on a message channel contain control information as well as message data. Similarly, on an MQI channel, the flows contain control information as well as the parameters of MQI calls. Send and receive exits are called for all types of data.
Message data flows in only one direction on a message channel but, on an MQI channel, the input parameters of an MQI call flow in one direction and the output parameters flow in the other. On both message and MQI channels, control information flows in both directions. As a result, send and receive exits can be called at both ends of a channel.
The unit of data that is transmitted in a single flow between two MCAs is called a transmission segment. Send and receive exits have access to each transmission segment. They can modify its contents and change its length. A send exit, however, must not change the first 8 bytes of a transmission segment. These 8 bytes form part of the WebSphere MQ channel protocol header. There are also restrictions on how much a send exit can increase the length of a transmission segment. In particular, a send exit cannot increase its length beyond the maximum that was negotiated between the two MCAs at channel startup.
On a message channel, if a message is too large to be sent in a single transmission segment, the sending MCA splits the message and sends it in more than one transmission segment. As a consequence, a send exit is called for each transmission segment containing a portion of the message and, at the receiving end, a receive exit is called for each transmission segment. The receiving MCA reconstitutes the message from the transmission segments after they have been processed by the receive exit.
Similarly, on an MQI channel, the input or output parameters of an MQI call are sent in more than one transmission segment if they are too large. This might occur, for example, on an MQPUT, MQPUT1, or MQGET call if the application data is sufficiently large.
Taking these considerations into account, it is more appropriate to use send and receive exits for purposes in which they do not need to understand the structure of the data they are handling and can therefore treat each transmission segment as a binary object.
A send or a receive exit can close a channel.
The names of a send exit and a receive exit are specified as parameters in the channel definition at each end of a channel. You can also specify a list of send exits to be run in succession. Similarly, you can specify a list of receive exits.
For more information about send and receive exits, see Link level security using send and receive exits .
Planning data integrity
Plan how to preserve the integrity of your data.
You can implement data integrity at the application level or at link level.
At the application level, you might choose to use WebSphere MQ Advanced Message Security (AMS) to digitally sign messages in order to protect against unauthorized modification. You can also use API exit programs if standard facilities do not satisfy your requirements.
At the link level, you might choose to use SSL or TLS, in which case you must plan your usage of digital certificates. You can also use channel exit programs if standard facilities do not satisfy your requirements.
Planning auditing
Decide what data you need to audit, and how you will capture and process audit information. Consider how to check that your system is correctly configured.
There are several aspects to activity monitoring. The aspects you must consider are often defined by auditor requirements, and these requirements are often driven by regulatory standards such as HIPAA (Health Insurance Portability and Accountability Act) or SOX (Sarbanes-Oxley). WebSphere MQ provides features intended to help with compliance to such standards.
Consider whether you are interested only in exceptions or whether you are interested in all system behavior.
Some aspects of auditing can also be considered as operational monitoring; one distinction for auditing is that you are often looking at historic data, not just looking at real-time alerts. Monitoring is covered in the section Monitoring and performance .
What data to audit
Consider what types of data or activity you need to audit, as described in the following sections:
- Changes made to WebSphere MQ using the WebSphere MQ interfaces
- Configure WebSphere MQ to issue instrumentation events, specifically command events and configuration events.
- Changes made to WebSphere MQ outside its control
- Some changes can affect how WebSphere MQ behaves, but cannot be directly monitored by WebSphere MQ. Examples of such changes include changes to the configuration files mqs.ini, qm.ini, and mqclient.ini, the creation and deletion of queue managers, installation of binary files such as user exit programs, and changes to file permissions. To monitor these activities, you must use tools running at the level of the operating system. Different tools are available and appropriate for different operating systems. You might also have logs created by associated tools such as sudo.
- Operational control of WebSphere MQ
- You might have to use operating system tools to audit activities such as the starting and stopping of queue managers. In some cases, WebSphere MQ can be configured to issue instrumentation events.
- Application activity within WebSphere MQ
- To audit the actions of applications, for example opening of queues and putting and getting of messages, configure WebSphere MQ to issue appropriate events.
- Intruder alerts
- To audit attempted breaches of security, configure your system to issue authorization events. Channel events might also be useful to show activity, particularly if a channel ends unexpectedly.
Planning the capture, display, and archiving of audit data
Many of the elements you need are reported as WebSphere MQ event messages. You must choose tools that can read and format these messages. If you are interested in long-term storage and analysis you must move them to an auxiliary storage mechanism such as a database. If you do not process these messages, they remain on the event queue, possibly filling the queue. You might decide to implement a tool that automatically takes action based on some events; for example, to issue an alert when a security failure happens.
Verify that your system is correctly configured
A set of tests are supplied with the WebSphere MQ Explorer. Use these to check your object definitions for problems.
Also, check periodically that the system configuration is as you expect. Although command and configuration events can report when something is changed, it is also useful to dump the configuration and compare it to a known good copy.
Planning security by topology
This section covers security in specific situations, namely for channels, queue manager clusters, publish/subscribe and multicast applications, and when using a firewall.
See the following subtopics for more information:
Channel security
When you send or receive a message through a channel, you need a user ID that has access to various WebSphere MQ resources.
To receive messages, you can use either the user ID associated with the message channel agent (MCA), or the user ID associated with the message. Map the asserted user ID to a valid user ID by using channel authentication records. In WebSphere MQ, channels are also protected by SSL and TLS support
MCAs are WebSphere MQ applications that require access to various WebSphere MQ resources. The user IDs associated with sending and receiving channels require access to the following resources:
- The user ID associated with a sending channel requires access to the queue manager, the transmission queue, the dead-letter queue, and access to any resources that are required by channel exits.
- With the user ID associated with the receiving channel you can open the target queues to put messages onto the queues. This involves
the Message Queuing Interface (MQI), so access control checks might need to be made. You can specify whether these checks are made against
the user ID associated with the MCA (as described in this topic),
or against the user ID associated with the message (from the MQMD
context field).
For the channel types to which it applies, the PUTAUT parameter of a channel definition specifies which user ID is used for these checks.
- If you use the default user ID, this user ID will already be defined on the local system.
- If you use a user ID that is not a part of the mqm group in the MCAUSER field of a receiver channel, then you must specify the +dsp +ctrlx authority to the user ID for the channel to work, by using the setmqaut command. The MCAUSER attribute is unused for the SDR channel type.
- If you use the user ID associated with the message, it is likely
that the user ID is from a remote system.
This remote system user ID must be recognized by the target system and have the following attributes:
- the authority to connect to the queue manager
- the authority to set context options (+connect and +setall )
- the ability to make inquiries
- the ability to set attributes on the transmission queue (+inq and +set)
The user ID associated with the MCA depends on the type of MCA. There are two types of MCA:
- Caller MCA
- MCAs that initiate a channel. Caller MCAs can be started as individual processes, as threads of the channel initiator, or as threads of a process pool. The user ID used is the user ID associated with the parent process (the channel initiator), or the user ID associated with the process that starts the MCA.
- Responder MCA
- Responder MCAs are MCAs that are started as a result of a request
by a caller MCA. Responder MCAs can be started as individual processes,
as threads of the listener, or as threads of a process pool. The user ID can be any one of the following types (in this order of preference):
- On APPC, the caller MCA can indicate the user ID to be used for the responder MCA. This is called the network user ID and applies only to channels started as individual processes. Set the network user ID by using the USERID parameter of the channel definition.
- If the USERID parameter is not used, the channel definition of the responder MCA can specify the user ID that the MCA must use. Set the user ID by using the MCAUSER parameter of the channel definition.
- If the user ID has not been set by either of the previous (two) methods, the user ID of the process that starts the MCA or the user ID of the parent process (the listener) is used.
Protecting channel initiator definitions
Only members of the mqm group can manipulate channel initiators.
WebSphere MQ channel initiators are not WebSphere MQ objects; access to them is not controlled by the OAM. WebSphere MQ does not allow users or applications to manipulate these objects, unless their user ID is a member of the mqm group. If you have an application that issues the PCF command StartChannelInitiator, the user ID specified in the message descriptor of the PCF message must be a member of the mqm group on the target queue manager.
A user ID must also be a member of the mqm group on the target machine to issue the equivalent MQSC commands through the Escape PCF command or using runmqsc in indirect mode.
Transmission queues
Queue managers automatically put remote messages on a transmission queue; no special authority is required for this.
However, if you need to put a message directly on a transmission queue, this requires special authorization; see Table 3 .
Channel exits
If channel authentication records are not suitable, you can use channel exits for added security. A security exit forms a secure connection between two security exit programs. One program is for the sending message channel agent (MCA), and one is for the receiving MCA.
Protecting channels with SSL
SSL support in WebSphere MQ uses the queue manager authentication information object, and various MQSC commands. You must also consider your use of digital certificates.
Commands and attributes for SSL support
The Secure Sockets Layer (SSL) protocol provides channel security, with protection against eavesdropping, tampering, and impersonation. WebSphere MQ support for SSL enables you to specify, on the channel definition, that a particular channel uses SSL security. You can also specify details of the type of security you want, such as the encryption algorithm you want to use.
The following MQSC commands support SSL:
- ALTER AUTHINFO
- Modifies the attributes of an authentication information object.
- DEFINE AUTHINFO
- Creates an authentication information object.
- DELETE AUTHINFO
- Deletes an authentication information object.
- DISPLAY AUTHINFO
- Displays the attributes for a specific authentication information object.
- SSLCRLNL
- The SSLCRLNL attribute specifies a namelist of authentication information objects which are used to provide certificate revocation locations to allow enhanced TLS/SSL certificate checking.
- SSLCRYP
- On Windows, UNIX and Linux systems, sets the SSLCryptoHardware queue manager attribute. This attribute is the name of the parameter string that you can use to configure the cryptographic hardware you have on your system.
- SSLEV
- Determines whether an SSL event message is reported if a channel using SSL fails to establish an SSL connection.
- SSLFIPS
- Specifies whether only FIPS-certified algorithms are to be used if cryptography is carried out in WebSphere MQ, rather than in cryptographic hardware. If cryptographic hardware is configured, the cryptographic modules provided by the hardware product are used, and these might be FIPS-certified to a particular level. This depends on the hardware product in use.
- SSLKEYR
- On Windows,UNIX and Linux systems, associates a key repository with a queue manager. The key database is held in a GSKit key database. (The IBM Global Security Kit (GSKit) enables you to use SSL security on Windows,UNIX and Linux systems.)
- SSLRKEYC
- The number of bytes to be sent and received within an SSL conversation before the secret key is renegotiated. The number of bytes includes control information sent by the MCA.
The following channel parameters support SSL:
- SSLCAUTH
- Defines whether WebSphere MQ requires and validates a certificate from the SSL client.
- SSLCIPH
- Specifies the encryption strength and function (CipherSpec), for example NULL_MD5 or RC4_MD5_US. The CipherSpec must match at both ends of channel.
- SSLPEER
- Specifies the distinguished name (unique identifier) of allowed partners.
For an overview of channel security using SSL, see
- WebSphere MQ support for SSL and TLS
For details of MQSC commands associated with SSL, see
- ALTER AUTHINFO
- DEFINE AUTHINFO
- DELETE AUTHINFO
- DISPLAY AUTHINFO
For details of PCF commands associated with SSL, see
- Change, Copy, and Create Authentication Information Object
- Delete Authentication Information Object
- Inquire Authentication Information Object
Self-signed and CA-signed certificates
It is important to plan your use of digital certificates, both when you are developing and testing your application, and for its use in production. You can use CA-signed certificates or self-signed certificates, depending on the usage of your queue managers and client applications.
- CA-signed certificates
- For production systems, obtain your certificates from a trusted certificate authority (CA). When you obtain a certificate from an external CA, you pay for the service.
- Self-signed certificates
- While you are developing your application you can use self-signed
certificates or certificates issued by a local CA, depending on platform:
On Windows, UNIX, and Linux systems, you can use self-signed certificates.
Self-signed certificates are not suitable for production use, for the following reasons:
- Self-signed certificates cannot be revoked, which might allow an attacker to spoof an identity after a private key has been compromised. CAs can revoke a compromised certificate, which prevents its further use. CA-signed certificates are therefore safer to use in a production environment, though self-signed certificates are more convenient for a test system.
- Self-signed certificates never expire. This is both convenient and safe in a test environment, but in a production environment it leaves them open to eventual security breaches. The risk is compounded by the fact that self-signed certificates cannot be revoked.
- A self-signed certificate is used both as a personal certificate and as a root (or trust anchor) CA certificate. A user with a self-signed personal certificate might be able to use it to sign other personal certificates. In general, this is not true of personal certificates issued by a CA, and represents a significant exposure.
CipherSpecs and digital certificates
Only a subset of the supported CipherSpecs can be used with all of the supported types of digital certificate. It is therefore necessary to choose an appropriate CipherSpec for your digital certificate. Similarly, if your organization's security policy requires that a particular CipherSpec be used, then you must obtain a suitable digital certificate.
For more information on the relationship between CipherSpecs and digital certificates, refer to Digital certificates and CipherSpec compatibility in WebSphere MQ
Certificate validation policies
The IETF RFC 5280 standard specifies a series of certificate validation rules which compliant application software must implement in order to prevent impersonation attacks. A set of certificate validation rules is known as a certificate validation policy. For more information about certificate validation policies in WebSphere MQ, see Certificate validation policies in WebSphere MQ .
SNA LU 6.2 security services
SNA LU 6.2 offers session level cryptography, session level authentication, and conversation level authentication.
Note: This collection of topics assumes that you have a basic understanding of Systems Network Architecture (SNA). The other documentation referred to in this section contains a brief introduction to the relevant concepts and terminology. If you require a more comprehensive technical introduction to SNA, see Systems Network Architecture Technical Overview , GC30-3073.
SNA LU 6.2 provides three security services:
- Session level cryptography
- Session level authentication
- Conversation level authentication
For session level cryptography and session level authentication, SNA uses the Data Encryption Standard (DES) algorithm. The DES algorithm is a block cipher algorithm, which uses a symmetric key for encrypting and decrypting data. Both the block and the key are 8 bytes in length.
Session level cryptography
Session level cryptography encrypts and decrypts session data using the DES algorithm. It can therefore be used to provide a link level confidentiality service on SNA LU 6.2 channels.
Logical units (LUs) can provide mandatory (or required) data cryptography, selective data cryptography, or no data cryptography.
On a mandatory cryptographic session, an LU encrypts all outbound data request units and decrypts all inbound data request units.
On a selective cryptographic session, an LU encrypts only the data request units specified by the sending transaction program (TP). The sending LU signals that the data is encrypted by setting an indicator in the request header. By checking this indicator, the receiving LU can tell which request units to decrypt before passing them on to the receiving TP.
In an SNA network, WebSphere MQ MCAs are transaction programs. MCAs do not request encryption for any data that they send. Selective data cryptography is not an option therefore; only mandatory data cryptography or no data cryptography is possible on a session.
For information about how to implement mandatory data cryptography, see the documentation for your SNA subsystem. Refer to the same documentation for information about stronger forms of encryption that might be available for use on your platform, such as Triple DES 24-byte encryption on z/OS.
For more general information about session level cryptography, see Systems Network Architecture LU 6.2 Reference: Peer Protocols , SC31-6808.
Session level authentication
Session level authentication is a session level security protocol that enables two LUs to authenticate each other while they are activating a session. It is also known as LU-LU verification.
Because an LU is effectively the gateway
into a system from the network, you might consider this level of authentication to be sufficient in certain circumstances. For example, if your queue manager needs to exchange messages with a remote queue manager that is running in a controlled and trusted environment, you might be prepared to trust the identities of the remaining components of the remote system after the LU has been authenticated.
Session level authentication is achieved by each LU verifying its partner's password. The password is called an LU-LU password because one password is established between each pair of LUs. The way that an LU-LU password is established is implementation dependent and outside the scope of SNA.
Figure 1 illustrates the flows for session level authentication.
Figure 1. Flows for session level authentication

The protocol for session level authentication is as follows. The numbers in the procedure correspond to the numbers in Figure 1 .
- The primary LU generates a random data value (RD1) and sends it to the secondary LU in the BIND request.
- When the secondary LU receives the BIND request with the random data, it encrypts the data using the DES algorithm with its copy of the LU-LU password as the key. The secondary LU then generates a second random data value (RD2) and sends it, with the encrypted data (ERD1), to the primary LU in the BIND response.
- When the primary LU receives the BIND response, it computes its
own version of the encrypted data from the random data it generated
originally. It does this by using the DES algorithm with its copy
of the LU-LU password as the key. It then compares its version with the encrypted data that it received in the BIND response. If the two
values are the same, the primary LU knows that the secondary LU has the same password as it does and the secondary LU is authenticated.
If the two values do not match, the primary LU terminates the session.
The primary LU then encrypts the random data that it received in the BIND response and sends the encrypted data (ERD2) to the secondary LU in a Function Management Header 12 (FMH-12).
- When the secondary LU receives the FMH-12, it computes its own version of the encrypted data from the random data it generated. It then compares its version with the encrypted data that it received in the FMH-12. If the two values are the same, the primary LU is authenticated. If the two values do not match, the secondary LU terminates the session.
In an enhanced version of the protocol, which provides better protection against man in the middle attacks, the secondary LU computes a DES Message Authentication Code (MAC) from RD1, RD2, and the fully qualified name of the secondary LU, using its copy of the LU-LU password as the key. The secondary LU sends the MAC to the primary LU in the BIND response instead of ERD1.
The primary LU authenticates the secondary LU by computing its own version of the MAC, which it compares with the MAC received in the BIND response. The primary LU then computes a second MAC from RD1 and RD2, and sends the MAC to the secondary LU in the FMH-12 instead of ERD2.
The secondary LU authenticates the primary LU by computing its own version of the second MAC, which it compares with the MAC received in the FMH-12.
For information about how to configure session level authentication, see the documentation for your SNA subsystem. For more general information about session level authentication, see Systems Network Architecture LU 6.2 Reference: Peer Protocols , SC31-6808.
Conversation level authentication
When a local TP attempts to allocate a conversation with a partner TP, the local LU sends an attach request to the partner LU, asking it to attach the partner TP. Under certain circumstances, the attach request can contain security information, which the partner LU can use to authenticate the local TP. This is known as conversation level authentication, or end user verification.
The following topics describe how WebSphere MQ provides support for conversation level authentication.
For more information about conversation level authentication, see Systems Network Architecture LU 6.2 Reference: Peer Protocols, SC31-6808. For information specific to z/OS, see z/OS MVS™ Planning: APPC/MVS Management, SA22-7599.
For more information about CPI-C, see Common Programming Interface Communications CPI-C Specification, SC31-6180. For more information about APPC/MVS TP Conversation Callable Services, see z/OS MVS Programming: Writing Transaction Programs for APPC/MVS, SA22-7621.
Support for conversation level authentication in WebSphere MQ on UNIX systems, and Windows systems
Use this topic to gain an overview of how conversation level authentication works, on platforms other than z/OS.
The support for conversation level authentication in WebSphere MQ for WebSphere MQ on UNIX systems, and WebSphere MQ for Windows is illustrated in Figure 1 . The numbers in the diagram correspond to the numbers in the description that follows.
Figure 1. WebSphere MQ support for conversation level authentication
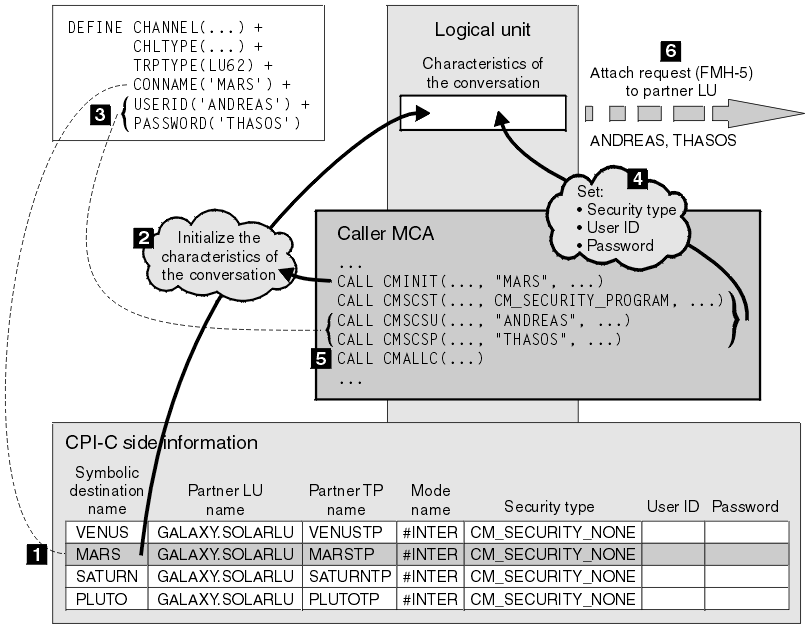
On IBM i, UNIX systems, and Windows systems, an MCA uses Common Programming Interface Communications (CPI-C) calls to communicate with a partner MCA across an SNA network. In the channel definition at the caller end of a channel, the value of the CONNAME parameter is a symbolic destination name, which identifies a CPI-C side information entry (1). This entry specifies:
- The name of the partner LU
- The name of the partner TP, which is a responder MCA
- The name of the mode to be used for the conversation
A side information entry can also specify the following security information:
- A security type.
The commonly implemented security types are CM_SECURITY_NONE, CM_SECURITY_PROGRAM, and CM_SECURITY_SAME, but others are defined in the CPI-C specification.
- A user ID.
- A password.
A caller MCA prepares to allocate a conversation with a responder MCA by issuing the CPI-C call CMINIT, using the value of CONNAME as one of the parameters on the call. The CMINIT call identifies, for the benefit of the local LU, the side information entry that the MCA intends to use for the conversation. The local LU uses the values in this entry to initialize the characteristics of the conversation (2).
The caller MCA then checks the values of the USERID and PASSWORD parameters in the channel definition (3). If USERID is set, the caller MCA issues the following CPI-C calls (4):
- CMSCST, to set the security type for the conversation to CM_SECURITY_PROGRAM.
- CMSCSU, to set the user ID for the conversation to the value of USERID.
- CMSCSP, to set the password for the conversation to the value of PASSWORD. CMSCSP is not called unless PASSWORD is set.
The security type, user ID, and password set by these calls override any values acquired previously from the side information entry.
The caller MCA then issues the CPI-C call CMALLC to allocate the conversation (5). In response to this call, the local LU sends an attach request (Function Management Header 5, or FMH-5) to the partner LU (6).
If the partner LU will accept a user ID and a password, the values of USERID and PASSWORD are included in the attach request. If the partner LU will not accept a user ID and a password, the values are not included in the attach request. The local LU discovers whether the partner LU will accept a user ID and a password as part of an exchange of information when the LUs bind to form a session.
In a later version of the attach request, a password substitute can flow between the LUs instead of a clear password. A password substitute is a DES Message Authentication Code (MAC), or an SHA-1 message digest, formed from the password. Password substitutes can be used only if both LUs support them.
When the partner LU receives an incoming attach request containing a user ID and a password, it might use the user ID and password for the purposes of identification and authentication. By referring to access control lists, the partner LU might also determine whether the user ID has the authority to allocate a conversation and attach the responder MCA.
In addition, the responder MCA might run under the user ID included in the attach request. In this case, the user ID becomes the default user ID for the responder MCA and is used for authority checks when the MCA attempts to connect to the queue manager. It might also be used for authority checks subsequently when the MCA attempts to access the queue manager's resources.
The way in which a user ID and a password in an attach request can be used for identification, authentication, and access control is implementation dependent. For information specific to your SNA subsystem, refer to the appropriate documentation.
If USERID is not set, the caller MCA does not call CMSCST, CMSCSU, and CMSCSP. In this case, the security information that flows in an attach request is determined solely by what is specified in the side information entry and what the partner LU will accept.
Security for queue manager clusters
Though queue manager clusters can be convenient to use, you must pay special attention to their security.
A queue manager cluster is a network of queue managers that are logically associated in some way. A queue manager that is a member of a cluster is called a cluster queue manager.
A queue that belongs to a cluster queue manager can be made known to other queue managers in the cluster. Such a queue is called a cluster queue. Any queue manager in a cluster can send messages to cluster queues without needing any of the following:
- An explicit remote queue definition for each cluster queue
- Explicitly defined channels to and from each remote queue manager
- A separate transmission queue for each outbound channel
You can create a cluster in which two or more queue managers are clones. This means that they have instances of the same local queues, including any local queues declared as cluster queues, and can support instances of the same server applications.
When an application connected to a cluster queue manager sends a message to a cluster queue that has an instance on each of the cloned queue managers, WebSphere MQ decides which queue manager to send it to. When many applications send messages to the cluster queue, WebSphere MQ balances the workload across each of the queue managers that have an instance of the queue. If one of the systems hosting a cloned queue manager fails, WebSphere MQ continues to balance the workload across the remaining queue managers until the system that failed is restarted.
If you are using queue manager clusters, you need to consider the following security issues:
- Allowing only selected queue managers to send messages to your queue manager
- Allowing only selected users of a remote queue manager to send messages to a queue on your queue manager
- Allowing applications connected to your queue manager to send messages only to selected remote queues
These considerations are relevant even if you are not using clusters, but they become more important if you are using clusters.
If an application can send messages to one cluster queue, it can send messages to any other cluster queue without needing additional remote queue definitions, transmission queues, or channels. It therefore becomes more important to consider whether you need to restrict access to the cluster queues on your queue manager, and to restrict the cluster queues to which your applications can send messages.
There are some additional security considerations, which are relevant only if you are using queue manager clusters:
- Allowing only selected queue managers to join a cluster
- Forcing unwanted queue managers to leave a cluster
For more information about all these considerations, see Keeping clusters secure .
Security for WebSphere MQ Publish/Subscribe
There are additional security considerations if you are using WebSphere MQ Publish/Subscribe.
In a publish/subscribe system, there are two types of application: publisher and subscriber. Publishers supply information in the form of WebSphere MQ messages. When a publisher publishes a message, it specifies a topic, which identifies the subject of the information inside the message.
Subscribers are the consumers of the information that is published. A subscriber specifies the topics it is interested in by subscribing to them.
The queue manager is an application supplied with WebSphere MQ Publish/Subscribe. It receives published messages from publishers and subscription requests from subscribers, and routes the published messages to the subscribers. A subscriber is sent messages only on those topics to which it has subscribed.
For more information, see Publish/subscribe security .
Multicast security
Use this information to understand why security processes might be needed with WebSphere MQ Multicast.
WebSphere MQ Multicast does not have in-built security. Security checks are handled in the queue manager at MQOPEN time and the MQMD field setting is handled by the client. Some applications in the network might not be WebSphere MQ applications (For example, LLM applications, see Multicast interoperability with WebSphere MQ Low Latency Messaging for more information), therefore you might need to implement your own security procedures because receiving applications cannot be certain of the validity of context fields.
There are three security processes to consider:
- Access control
-
Access control in WebSphere MQ is based on user IDs. For more information on this subject, see Access control for clients .
- Network security
- An isolated network might be a viable security option to prevent
fake messages. It is possible for an application on the multicast
group address to publish malicious messages using native communication functions, which are indistinguishable from MQ messages because they come from an application on the same multicast group address.
It is also possible for a client on the multicast group address to receive messages that were intended for other clients on the same multicast group address.
Isolating the multicast network ensures that only valid clients and applications have access. This security precaution can prevent malicious messages from coming in, and confidential information from going out.
For information about multicast group network addresses, see: Setting the appropriate network for multicast traffic
- Digital signatures
- A digital signature is formed by encrypting a representation of a message. The encryption uses the private key of the signatory and,
for efficiency, usually operates on a message digest rather than the message itself. Digitally signing a message before an MQPUT is a good
security precaution, but this process might have a detrimental effect
on performance if there is a large volume of messages.
Digital signatures vary with the data being signed. If two different messages are signed digitally by the same entity, the two signatures differ, but both signatures can be verified with the same public key, that is, the public key of the entity that signed the messages.
As mentioned previously in this section, it might be possible for an application on the multicast group address to publish malicious messages using native communication functions, which are indistinguishable from MQ messages. Digital signatures provide proof of origin, and only the sender knows the private key, which provides strong evidence that the sender is the originator of the message.
For more information on this subject, see Cryptographic concepts .
Firewalls and Internet pass-thru
You would normally use a firewall to prevent access from hostile IP addresses, for example in a Denial of Service attack. However, you might need to temporarily block IP addresses within WebSphere MQ, perhaps while you wait for a security administrator to update the firewall rules.
To block one or more IP addresses, create a channel authentication record of type BLOCKADDR or ADDRESSMAP. For more information, see Blocking specific IP addresses .
Security for WebSphere MQ internet pass-thru
Internet pass-thru can simplify communication through a firewall, but this has security implications.
WebSphere MQ internet pass-thru is a WebSphere MQ base product extension that is supplied in SupportPac MS81.
WebSphere MQ internet pass-thru enables two queue managers to exchange messages, or a WebSphere MQ client application to connect to a queue manager, over the Internet without requiring a direct TCP/IP connection. This is useful if a firewall prohibits a direct TCP/IP connection between two systems. It makes the passage of WebSphere MQ channel protocol flows into and out of a firewall simpler and more manageable by tunnelling the flows inside HTTP or by acting as a proxy. Using the Secure Sockets Layer (SSL), it can also be used to encrypt and decrypt messages that are sent over the Internet.
When your WebSphere MQ system communicates with IPT, unless you are using SSLProxyMode in IPT, ensure that the CipherSpec used by WebSphere MQ matches the CipherSuite used by IPT:
- When IPT is acting as the SSL or TLS server and WebSphere MQ is connecting as the SSL or TLS client, the CipherSpec used by WebSphere MQ must correspond to a CipherSuite that is enabled in the relevant IPT key ring.
- When IPT is acting as the SSL or TLS client and is connecting to a WebSphere MQ SSL or TLS server, the IPT CipherSuite must match the CipherSpec defined on the receiving WebSphere MQ channel.
If you migrate from IPT to the integrated WebSphere MQ SSL and TLS support, transfer the digital certificates from IPT Using iKeyman.
For more information about WebSphere MQ internet pass-thru, see MS81: WebSphere MQ internet pass-thru, available from the following address: http://www.ibm.com/software/integration/support/supportpacs/
Set up security
This collection of topics contains information specific to different operating systems, and to the use of clients.
Set up security on Windows, UNIX and Linux systems
Security considerations specific to Windows, UNIX and Linux systems.
WebSphere MQ queue managers transfer information that is potentially valuable, so you need to use an authority system to ensure that unauthorized users cannot access your queue managers. Consider the following types of security controls:
- Who can administer WebSphere MQ
- You can define the set of users who can issue commands to administer WebSphere MQ.
- Who can use WebSphere MQ objects
- You can define which users (usually applications) can use MQI
calls and PCF commands to do the following:
- Who can connect to a queue manager.
- Who can access objects (queues, process definitions, namelists, channels, client connection channels, listeners, services, and authentication information objects), and what type of access they have to those objects.
- Who can access WebSphere MQ messages.
- Who can access the context information associated with a message.
- Channel security
- You need to ensure that channels used to send messages to remote systems can access the required resources.
You can use standard operating facilities to grant access to program libraries, MQI link libraries, and commands. However, the directory containing queues and other queue manager data is private to WebSphere MQ; do not use standard operating system commands to grant or revoke authorizations to MQI resources.
Connecting to WebSphere MQ using Terminal Services
The Create global objects user right can cause problems if you are using Terminal Services.
If you are connecting to a Windows system by using Terminal Services and you have problems creating or starting a queue manager, this might be because of the user right, Create global objects, in recent versions of Windows.
The Create global objects user right limits the users authorized to create objects in the global namespace. In order for an application to create a global object, it must either be running in the global namespace, or the user under which the application is running must have the Create global objects user right applied to it.
Administrators have the Create global objects user right applied by default, so an administrator can create and start queue managers when connected by using Terminal Services without altering the user rights.
If the various methods of administering WebSphere MQ do no work when you use terminal services, try setting the Create global objects user right:
- Open the Administrative Tools panel:
- Windows 2003 and Windows XP
- Access this panel using Control Panel > Administrative Tools.
- Windows Vista and Windows Server 2008
- Access this panel using Control Panel > System and Maintenance > Administrative Tools.
- Double-click Local Security Policy .
- Expand Local Policies.
- Click User Rights Assignment.
- Add the new user or group to the Create global objects policy.
Create groups on Windows
These instructions lead you through the process of administering groups on a workstation or member server machine.
For domain controllers, users and groups are administered through Active Directory. For more details on using Active Directory refer to the appropriate operating system instructions.
Any changes you make to a principal's group membership are not recognized until the queue manager is restarted, or you issue the MQSC command REFRESH SECURITY (or the PCF equivalent).
Use the Computer Management panel to work with user and groups. Any changes made to the current logged on user might not be effective until the user logs in again.
- Windows 2003 and Windows XP
- Access this panel using Control Panel > Administrative Tools > Computer Management.
- Windows Vista and Windows Server 2008
- Access this panel using Control Panel > System and Maintenance > Administrative Tools > Computer Management.
- Windows 7
- Access this panel using Administrative Tools > Computer Management
Create a group on Windows
Create a group by using the control panel.
Procedure
- Open the control panel
- Double-click Administrative Tools. The Administrative Tools panel opens.
- Double-click Computer Management. The Computer Management panel opens.
- Expand Local Users and Groups.
- Right-click Groups, and select New Group.... The New Group panel is displayed.
- Type an appropriate name in the Group name field, then click Create.
- Click Close.
Adding a user to a group on Windows
Add a user to a group by using the control panel.
Procedure
- Open the control panel
- Double-click Administrative Tools. The Administrative Tools panel opens.
- Double-click Computer Management. The Computer Management panel opens.
- From the Computer Management panel, expand Local
Users and Groups.
- Select Users
- Double-click the user that you want to add to a group. The user properties panel is displayed.
- Select the Member Of tab.
- Select the group that you want to add the user to. If the group you want is not visible:
- Click Add.... The Select Groups panel is displayed.
- Click Locations.... The Locations panel is displayed.
- Select the location of the group you want to add the user to from the list and click OK.
- Type the group name in the field provided.
Alternatively, click Advanced... and then Find Now to list the groups available in the currently selected location. From here, select the group you want to add the user to and click OK.
- Click OK. The user properties panel is displayed, showing the group you added.
- Select the group.
- Click Add.... The Select Groups panel is displayed.
- Click OK. The Computer Management panel is displayed.
Display who is in a group on Windows
Display the members of a group by using the control panel.
Procedure
- Open the control panel
- Double-click Administrative Tools. The Administrative Tools panel opens.
- Double-click Computer Management. The Computer Management panel opens.
- From the Computer Management panel, expand Local Users and Groups.
- Select Groups.
- Double-click a group. The group properties panel is displayed. The group properties panel is displayed.
The group members are displayed.
Removing a user from a group on Windows
Remove a user from a group by using the control panel.
Procedure
- Open the control panel
- Double-click Administrative Tools. The Administrative Tools panel opens.
- Double-click Computer Management. The Computer Management panel opens.
- From the Computer Management panel, expand Local Users and Groups.
- Select Users.
- Double-click the user that you want to add to a group. The user properties panel is displayed.
- Select the Member Of tab.
- Select the group that you want to remove the user from, then click Remove .
- Click OK. The Computer Management panel is displayed.
You have now removed the user from the group.
Create groups on HP-UX
On HP-UX, providing you are not using NIS or NIS+, use the System Administration Manager (SAM) to work with groups.
Create a group on HP-UX
Add a user to a group by using the System Administration Manager
Procedure
- From the System Administration Manager (SAM), double click Accounts for Users and Groups.
- Double click Groups.
- Select Add from the Actions pull down to display the Add a New Group panel.
- Enter the name of the group and select the users that you want to add to the group.
- Click Apply to create the group.
You have now created a group.
Adding a user to a group on HP-UX
Add a user to a group by using the System Administration Manager.
Procedure
- From the System Administration Manager (SAM), double click Accounts for Users and Groups.
- Double click Groups.
- Highlight the name of the group and select Modify from the Actions pull down to display the Modify an Existing Group panel.
- Select a user that you want to add to the group and click
Add.
- To add other users to the group, repeat step 4 for each user.
- When you have finished adding names to the list, click OK.
You have now added a user to a group.
Display who is in a group on HP-UX
Display who is in a group by using the System Administration Manager
Procedure
- From the System Administration Manager (SAM), double click Accounts for Users and Groups.
- Double click Groups.
- Highlight the name of the group and select Modify from the Actions pull down to display the Modify an Existing Group panel, showing a list of the users in the group.
The group members are displayed.
Removing a user from a group on HP-UX
Remove a user from a group by using the System Administration Manager.
Procedure
- From the System Administration Manager (SAM), double click Accounts for Users and Groups.
- Double click Groups.
- Highlight the name of the group and select Modify from the Actions pull down to display the Modify an Existing Group panel.
- Select a user that you want to remove from the group and click Remove.
- To remove other users from the group, repeat step 4 for each user.
- When you have finished removing names from the list, click OK.
You have now removed a user from a group
Create groups on AIX
On AIX, providing you are not using NIS or NIS+, use SMITTY to work with groups.
Create a group
Create a group using SMITTY.
Procedure
- From SMITTY, select Security and Users and press Enter.
- Select Groups and press Enter.
- Select Add a Group and press Enter.
- Enter the name of the group and the names of any users that you want to add to the group, separated by commas.
- Press Enter to create the group.
You have now created a group.
Adding a user to a group
Add a user to a group by using SMITTY.
Procedure
- From SMITTY, select Security and Users and press Enter.
- Select Groups and press Enter.
- Select Change / Show Characteristics of Groups and press Enter.
- Enter the name of the group to show a list of the members of the group.
- Add the names of the users that you want to add to the group, separated by commas.
- Press Enter to add the names to the group.
Display who is in a group
Display who is in a group using SMITTY.
Procedure
- From SMITTY, select Security and Users and press Enter.
- Select Groups and press Enter.
- Select Change / Show Characteristics of Groups and press Enter.
- Enter the name of the group to show a list of the members of the group.
The group members are displayed.
Removing a user from a group
Remove a user from a group by using SMITTY.
Procedure
- From SMITTY, select Security and Users and press Enter.
- Select Groups and press Enter.
- Select Change / Show Characteristics of Groups and press Enter.
- Enter the name of the group to show a list of the members of the group.
- Delete the names of the users that you want to remove from the group.
- Press Enter to remove the names from the group.
You have now removed a user from a group.
Create groups on Solaris
On Solaris, providing you are not using NIS or NIS+, use the /etc/group file to work with groups.
Create a group on Solaris
Create a group by using the groupadd command.
Procedure
Type the following command: groupadd group-name where group-name is the name of the group.
The file /etc/group file holds group information.
Adding a user to a group on Solaris
Add a user to a group by using the usermod command.
Procedure
To add a member to a supplementary group, execute the usermod command and list the supplementary groups that the user is currently a member of, and the supplementary groups that the user is to become a member of. For example, if the user is a member of the group groupa, and is to become a member of groupb also, use the following command: usermod -G groupa,groupb user-name , where user-name is the user name.
Display who is in a group on Solaris
To discover who is a member of a group, look at the entry for that group in the /etc/group file.
Removing a user from a group on Solaris
Remove a user from a group by using the usermod command.
Procedure
To remove a member from a supplementary group, execute the usermod command listing the supplementary groups that you want the user to remain a member of. For example, if the user's primary group is users and the user is also a member of the groups mqm, groupa and groupb, to remove the user from the mqm group, the following command is used: usermod -G groupa,groupb user-name, where user-name is the user name.
Create groups on Linux
On Linux, providing you are not using NIS or NIS+, use the /etc/group file to work with groups.
Create a group on Linux
Create a group by using the groupadd command.
Procedure
To create a new group, type the following command: groupadd -g group-ID group-name , where group-ID is the numeric identifier of the group, and group-name is the name of the group.
The file /etc/group file holds group information.
Adding a user to a group on Linux
Add a user to a group by using the usermod command.
Procedure
To add a member to a supplementary group, execute the usermod command and list the supplementary groups that the user is currently a member of, and the supplementary groups that the user is to become a member of. For example, if the user is a member of the group groupa, and is to become a member of groupb also, the following command is used: usermod -G groupa,groupb user-name , where user-name is the user name.
Display who is in a group on Linux
Display who is in a group by using the getent command.
Procedure
To display who is a member of a group, type the following command: getent group group-name , where group-name is the name of the group.
Removing a user from a group
Remove a user from a group by using the usermod command.
Procedure
To remove a member from a supplementary group, execute the usermod command listing the supplementary groups that you want the user to remain a member of. For example, if the user's primary group is users and the user is also a member of the groups mqm, groupa and groupb, to remove the user from the mqm group, the following command is used: usermod -G groupa,groupb user-name , where user-name is the user name.
How authorizations work
The authorization specification tables in the topics in this section define precisely how the authorizations work and the restrictions that apply.
The tables apply to these situations:
- Applications that issue MQI calls
- Administration programs that issue MQSC commands as escape PCFs
- Administration programs that issue PCF commands
In this section, the information is presented as a set of tables that specify the following:
- Action to be performed
- MQI option, MQSC command, or PCF command.
- Access control object
- Queue, process, queue manager, namelist, authentication information, channel, client connection channel, listener, or service.
- Authorization required
- Expressed as an MQZAO_ constant.
In the tables, the constants prefixed by MQZAO_ correspond to the keywords in the authorization list for the setmqaut command for the particular entity. For example, MQZAO_BROWSE corresponds to the keyword +browse, MQZAO_SET_ALL_CONTEXT corresponds to the keyword +setall, and so on. These constants are defined in the header file cmqzc.h, supplied with the product.
Authorizations for MQI calls
MQCONN, MQOPEN, MQPUT1, and MQCLOSE might require authorization checks. The tables in this topic summarize the authorizations needed for each call.
An application is allowed to issue specific MQI calls and options only if the user identifier under which it is running (or whose authorizations it is able to assume) has been granted the relevant authorization.
Four MQI calls might require authorization checks: MQCONN, MQOPEN, MQPUT1, and MQCLOSE.
For MQOPEN and MQPUT1, the authority check is made on the name of the object being opened, and not on the name, or names, resulting after a name has been resolved. For example, an application might be granted authority to open an alias queue without having authority to open the base queue to which the alias resolves. The rule is that the check is carried out on the first definition encountered during the process of resolving a name that is not a queue manager alias, unless the queue manager alias definition is opened directly; that is, its name is displayed in the ObjectName field of the object descriptor. Authority is always needed for the object being opened. In some cases additional queue-independent authority, obtained through an authorization for the queue manager object, is required.
In the tables Not applicable means that authorization checking is not relevant to this operation; No check means that no authorization checking is performed. You will find no mention of namelists, channels, client connection channels, listeners, services, or authentication information objects in these tables. This is because none of the authorizations apply to these objects, except for MQOO_INQUIRE, for which the same authorizations apply as for the other objects.
The special authorization MQZAO_ALL_MQI includes all the authorizations in the tables that are relevant to the object type, except MQZAO_DELETE and MQZAO_DISPLAY, which are classed as administration authorizations.
In order to modify any of the message context options, you must have the appropriate authorizations to issue the call. For example, in order to use MQOO_SET_IDENTITY_CONTEXT or MQPMO_SET_IDENTITY_CONTEXT, you must have +setid permission.
| Authorization required for: | Queue object ( 1 ) | Process object | Queue manager object |
|---|---|---|---|
| MQCONN | Not applicable | Not applicable | MQZAO_CONNECT |
| Authorization required for: | Queue object ( 1 ) | Process object | Queue manager object |
|---|---|---|---|
| MQOO_INQUIRE | MQZAO_INQUIRE | MQZAO_INQUIRE | MQZAO_INQUIRE |
| MQOO_BROWSE | MQZAO_BROWSE | Not applicable | No check |
| MQOO_INPUT_* | MQZAO_INPUT | Not applicable | No check |
| MQOO_SAVE_ ALL_CONTEXT ( 2 ) | MQZAO_INPUT | Not applicable | Not applicable |
| MQOO_OUTPUT (Normal queue) ( 3 ) | MQZAO_OUTPUT | Not applicable | Not applicable |
| MQOO_PASS_ IDENTITY_CONTEXT ( 4 ) | MQZAO_PASS_ IDENTITY_CONTEXT | Not applicable | No check |
| MQOO_PASS_ALL_ CONTEXT ( 4 , 5 ) | MQZAO_PASS _ALL_CONTEXT | Not applicable | No check |
| MQOO_SET_ IDENTITY_CONTEXT ( 4 , 5 ) | MQZAO_SET_ IDENTITY_CONTEXT | Not applicable | MQZAO_SET_ IDENTITY_CONTEXT ( 6 ) |
| MQOO_SET_ ALL_CONTEXT ( 4 , 7 ) | MQZAO_SET_ ALL_CONTEXT | Not applicable | MQZAO_SET_ ALL_CONTEXT ( 6 ) |
| MQOO_OUTPUT (Transmission queue) ( 8 ) | MQZAO_SET_ ALL_CONTEXT | Not applicable | MQZAO_SET_ ALL_CONTEXT ( 6 ) |
| MQOO_SET | MQZAO_SET | Not applicable | No check |
| MQOO_ALTERNATE_ USER_AUTHORITY | ( 9 ) | ( 9 ) | MQZAO_ALTERNATE_ USER_AUTHORITY ( 9 , 10 ) |
| Authorization required for: | Queue object ( 1 ) | Process object | Queue manager object |
|---|---|---|---|
| MQPMO_PASS_ IDENTITY_CONTEXT | MQZAO_PASS_ IDENTITY_CONTEXT ( 11 ) | Not applicable | No check |
| MQPMO_PASS_ALL _CONTEXT | MQZAO_PASS_ ALL_CONTEXT ( 11 ) | Not applicable | No check |
| MQPMO_SET_ IDENTITY_CONTEXT | MQZAO_SET_ IDENTITY_CONTEXT ( 11 ) | Not applicable | MQZAO_SET_ IDENTITY_CONTEXT ( 6 ) |
| MQPMO_SET_ ALL_CONTEXT | MQZAO_SET_ ALL_CONTEXT ( 11 ) | Not applicable | MQZAO_SET_ ALL_CONTEXT ( 6 ) |
| (Transmission queue) ( 8 ) | MQZAO_SET_ ALL_CONTEXT | Not applicable | MQZAO_SET_ ALL_CONTEXT ( 6 ) |
| MQPMO_ALTERNATE_ USER_AUTHORITY | ( 12 ) | Not applicable | MQZAO_ALTERNATE_ USER_AUTHORITY ( 10 ) |
| Authorization required for: | Queue object ( 1 ) | Process object | Queue manager object |
|---|---|---|---|
| MQCO_DELETE | MQZAO_DELETE ( 13 ) | Not applicable | Not applicable |
| MQCO_DELETE _PURGE | MQZAO_DELETE ( 13 ) | Not applicable | Not applicable |
Notes for the tables:
- If opening a model queue:
- MQZAO_DISPLAY authority is needed for the model queue, in addition to the authority to open the model queue for the type of access for which you are opening.
- MQZAO_CREATE authority is not needed to create the dynamic queue.
- The user identifier used to open the model queue is automatically granted all the queue-specific authorities (equivalent to MQZAO_ALL) for the dynamic queue created.
- MQOO_INPUT_* must also be specified. This is valid for a local, model, or alias queue.
- This check is performed for all output cases, except transmission queues (see note 8 ).
- MQOO_OUTPUT must also be specified.
- MQOO_PASS_IDENTITY_CONTEXT is also implied by this option.
- This authority is required for both the queue manager object and the particular queue.
- MQOO_PASS_IDENTITY_CONTEXT, MQOO_PASS_ALL_CONTEXT, and MQOO_SET_IDENTITY_CONTEXT are also implied by this option.
- This check is performed for a local or model queue that has a Usage queue attribute of MQUS_TRANSMISSION, and is being opened directly for output. It does not apply if a remote queue is being opened (either by specifying the names of the remote queue manager and remote queue, or by specifying the name of a local definition of the remote queue).
- At least one of MQOO_INQUIRE (for any object type), or MQOO_BROWSE, MQOO_INPUT_*, MQOO_OUTPUT, or MQOO_SET (for queues) must also be specified. The check carried out is as for the other options specified, using the supplied alternate-user identifier for the specific-named object authority, and the current application authority for the MQZAO_ALTERNATE_USER_IDENTIFIER check.
- This authorization allows any AlternateUserId to be specified.
- An MQZAO_OUTPUT check is also carried out if the queue does not have a Usage queue attribute of MQUS_TRANSMISSION.
- The check carried out is as for the other options specified, using the supplied alternate-user identifier for the specific-named queue authority, and the current application authority for the MQZAO_ALTERNATE_USER_IDENTIFIER check.
- The check is carried out only if both of the following are true:
- A permanent dynamic queue is being closed and deleted.
- The queue was not created by the MQOPEN call that returned the object handle being used.
Otherwise, there is no check.
Authorizations for MQSC commands in escape PCFs
This information summarizes the authorizations needed for each MQSC command contained in Escape PCF.
Not applicable means that this operation is not relevant to this object type.
The user ID under which the program that submits the command is running must also have the following authorities:
- MQZAO_CONNECT authority to the queue manager
- MQZAO_DISPLAY authority on the queue manager in order to perform PCF commands
- Authority to issue the MQSC command within the text of the Escape PCF command
- ALTER object
-
Object Authorization required Queue MQZAO_CHANGE Topic MQZAO_CHANGE Process MQZAO_CHANGE Queue manager MQZAO_CHANGE Namelist MQZAO_CHANGE Authentication information MQZAO_CHANGE Channel MQZAO_CHANGE Client connection channel MQZAO_CHANGE Listener MQZAO_CHANGE Service MQZAO_CHANGE Communication information MQZAO_CHANGE - CLEAR object
-
Object Authorization required Queue MQZAO_CLEAR Topic MQZAO_CLEAR Process Not applicable Queue manager Not applicable Namelist Not applicable Authentication information Not applicable Channel Not applicable Client connection channel Not applicable Listener Not applicable Service Not applicable Communication information Not applicable - DEFINE object NOREPLACE ( 1 )
-
Object Authorization required Queue MQZAO_CREATE ( 2 ) Topic MQZAO_CREATE ( 2 ) Process MQZAO_CREATE ( 2 ) Queue manager Not applicable Namelist MQZAO_CREATE ( 2 ) Authentication information MQZAO_CREATE ( 2 ) Channel MQZAO_CREATE ( 2 ) Client connection channel MQZAO_CREATE ( 2 ) Listener MQZAO_CREATE ( 2 ) Service MQZAO_CREATE ( 2 ) Communication information MQZAO_CREATE ( 2 ) - DEFINE object REPLACE ( 1 , 3 )
-
Object Authorization required Queue MQZAO_CHANGE Topic MQZAO_CHANGE Process MQZAO_CHANGE Queue manager Not applicable Namelist MQZAO_CHANGE Authentication information MQZAO_CHANGE Channel MQZAO_CHANGE Client connection channel MQZAO_CHANGE Listener MQZAO_CHANGE Service MQZAO_CHANGE Communication information MQZAO_CHANGE - DELETE object
-
Object Authorization required Queue MQZAO_DELETE Topic MQZAO_DELETE Process MQZAO_DELETE Queue manager Not applicable Namelist MQZAO_DELETE Authentication information MQZAO_DELETE Channel MQZAO_DELETE Client connection channel MQZAO_DELETE Listener MQZAO_DELETE Service MQZAO_DELETE Communication information MQZAO_DELETE - DISPLAY object
-
Object Authorization required Queue MQZAO_DISPLAY Topic MQZAO_DISPLAY Process MQZAO_DISPLAY Queue manager MQZAO_DISPLAY Namelist MQZAO_DISPLAY Authentication information MQZAO_DISPLAY Channel MQZAO_DISPLAY Client connection channel MQZAO_DISPLAY Listener MQZAO_DISPLAY Service MQZAO_DISPLAY Communication information MQZAO_DISPLAY - START object
-
Object Authorization required Queue Not applicable Topic Not applicable Process Not applicable Queue manager Not applicable Namelist Not applicable Authentication information Not applicable Channel MQZAO_CONTROL Client connection channel Not applicable Listener MQZAO_CONTROL Service MQZAO_CONTROL Communication information Not applicable - STOP object
-
Object Authorization required Queue Not applicable Topic Not applicable Process Not applicable Queue manager Not applicable Namelist Not applicable Authentication information Not applicable Channel MQZAO_CONTROL Client connection channel Not applicable Listener MQZAO_CONTROL Service MQZAO_CONTROL Communication information Not applicable - Channel Commands
-
Command Object Authorization required PING CHANNEL Channel MQZAO_CONTROL RESET CHANNEL Channel MQZAO_CONTROL_EXTENDED RESOLVE CHANNEL Channel MQZAO_CONTROL_EXTENDED - Subscription Commands
-
Command Object Authorization required ALTER SUB Topic MQZAO_CONTROL DEFINE SUB Topic MQZAO_CONTROL DELETE SUB Topic MQZAO_CONTROL DISPLAY SUB Topic MQZAO_DISPLAY - Security Commands
-
Command Object Authorization required SET AUTHREC Queue manager MQZAO_CHANGE DELETE AUTHREC Queue manager MQZAO_CHANGE DISPLAY AUTHREC Queue manager MQZAO_DISPLAY DISPLAY AUTHSERV Queue manager MQZAO_DISPLAY DISPLAY ENTAUTH Queue manager MQZAO_DISPLAY SET CHLAUTH Queue manager MQZAO_CHANGE DISPLAY CHLAUTH Queue manager MQZAO_DISPLAY REFRESH SECURITY Queue manager MQZAO_CHANGE - Status Displays
-
Command Object Authorization required DISPLAY CHSTATUS Queue manager MQZAO_DISPLAY DISPLAY LSSTATUS Queue manager MQZAO_DISPLAY DISPLAY PUBSUB Queue manager MQZAO_DISPLAY DISPLAY SBSTATUS Queue manager MQZAO_DISPLAY DISPLAY SVSTATUS Queue manager MQZAO_DISPLAY DISPLAY TPSTATUS Queue manager MQZAO_DISPLAY - Cluster Commands
-
Command Object Authorization required DISPLAY CLUSQMGR Queue manager MQZAO_DISPLAY REFRESH CLUSTER 'mqm' group membership required RESET CLUSTER 'mqm' group membership required SUSPEND QMGR 'mqm' group membership required RESUME QMGR 'mqm' group membership required - Other Administrative Commands
-
Command Object Authorization required PING QMGR Queue manager MQZAO_DISPLAY REFRESH QMGR Queue manager MQZAO_CHANGE RESET QMGR Queue manager MQZAO_CHANGE DISPLAY CONN Queue manager MQZAO_DISPLAY STOP CONN Queue manager MQZAO_CHANGE
Note:
- For DEFINE commands, MQZAO_DISPLAY authority is also needed for the LIKE object if one is specified, or on the appropriate SYSTEM.DEFAULT.xxx object if LIKE is omitted.
- The MQZAO_CREATE authority is not specific to a particular object or object type. Create authority is granted for all objects for a specified queue manager, by specifying an object type of QMGR on the setmqaut command.
- This applies if the object to be replaced already exists. If it does not, the check is as for DEFINE object NOREPLACE.
Authorizations for PCF commands
This section summarizes the authorizations needed for each PCF command.
No check means that no authorization checking is carried out; Not applicable means that this operation is not relevant to this object type.
The user ID under which the program that submits the command is running must also have the following authorities:
- MQZAO_CONNECT authority to the queue manager
- MQZAO_DISPLAY authority on the queue manager in order to perform PCF commands
The special authorization MQZAO_ALL_ADMIN includes all the authorizations in the following list that are relevant to the object type, except MQZAO_CREATE, which is not specific to a particular object or object type.
- Change object
-
Object Authorization required Queue MQZAO_CHANGE Topic MQZAO_CHANGE Process MQZAO_CHANGE Queue manager MQZAO_CHANGE Namelist MQZAO_CHANGE Authentication information MQZAO_CHANGE Channel MQZAO_CHANGE Client connection channel MQZAO_CHANGE Listener MQZAO_CHANGE Service MQZAO_CHANGE Communication information MQZAO_CHANGE - Clear object
-
Object Authorization required Queue MQZAO_CLEAR Topic MQZAO_CLEAR Process Not applicable Queue manager Not applicable Namelist Not applicable Authentication information Not applicable Channel Not applicable Client connection channel Not applicable Listener Not applicable Service Not applicable Communication information Not applicable - Copy object (without replace) ( 1 )
-
Object Authorization required Queue MQZAO_CREATE ( 2 ) Topic MQZAO_CREATE ( 2 ) Process MQZAO_CREATE ( 2 ) Queue manager Not applicable Namelist MQZAO_CREATE ( 2 ) Authentication information MQZAO_CREATE ( 2 ) Channel MQZAO_CREATE ( 2 ) Client connection channel MQZAO_CREATE ( 2 ) Listener MQZAO_CREATE ( 2 ) Service MQZAO_CREATE ( 2 ) Communication information MQZAO_CREATE ( 2 ) - Copy object (with replace) ( 1 , 4 )
-
Object Authorization required Queue MQZAO_CHANGE Topic MQZAO_CHANGE Process MQZAO_CHANGE Queue manager Not applicable Namelist MQZAO_CHANGE Authentication information MQZAO_CHANGE Channel MQZAO_CHANGE Client connection channel MQZAO_CHANGE Listener MQZAO_CHANGE Service MQZAO_CHANGE Communication information MQZAO_CHANGE - Create object (without replace) ( 3 )
-
Object Authorization required Queue MQZAO_CREATE ( 2 ) Topic MQZAO_CREATE ( 2 ) Process MQZAO_CREATE ( 2 ) Queue manager Not applicable Namelist MQZAO_CREATE ( 2 ) Authentication information MQZAO_CREATE ( 2 ) Channel MQZAO_CREATE ( 2 ) Client connection channel MQZAO_CREATE ( 2 ) Listener MQZAO_CREATE ( 2 ) Service MQZAO_CREATE ( 2 ) Communication information MQZAO_CREATE ( 2 ) - Create object (with replace) ( 3 , 4 )
-
Object Authorization required Queue MQZAO_CHANGE Topic MQZAO_CHANGE Process MQZAO_CHANGE Queue manager Not applicable Namelist MQZAO_CHANGE Authentication information MQZAO_CHANGE Channel MQZAO_CHANGE Client connection channel MQZAO_CHANGE Listener MQZAO_CHANGE Service MQZAO_CHANGE Communication information MQZAO_CHANGE - Delete object
-
Object Authorization required Queue MQZAO_DELETE Topic MQZAO_DELETE Process MQZAO_DELETE Queue manager Not applicable Namelist MQZAO_DELETE Authentication information MQZAO_DELETE Channel MQZAO_DELETE Client connection channel MQZAO_DELETE Listener MQZAO_DELETE Service MQZAO_DELETE Communication information MQZAO_DELETE - Inquire object
-
Object Authorization required Queue MQZAO_DISPLAY Topic MQZAO_DISPLAY Process MQZAO_DISPLAY Queue manager MQZAO_DISPLAY Namelist MQZAO_DISPLAY Authentication information MQZAO_DISPLAY Channel MQZAO_DISPLAY Client connection channel MQZAO_DISPLAY Listener MQZAO_DISPLAY Service MQZAO_DISPLAY Communication information MQZAO_DISPLAY - Inquire object names
-
Object Authorization required Queue No check Topic No check Process No check Queue manager No check Namelist No check Authentication information No check Channel No check Client connection channel No check Listener No check Service No check Communication information No check - Start object
-
Object Authorization required Queue Not applicable Topic Not applicable Process Not applicable Queue manager Not applicable Namelist Not applicable Authentication information Not applicable Channel MQZAO_CONTROL Client connection channel Not applicable Listener MQZAO_CONTROL Service MQZAO_CONTROL Communication information Not applicable - Stop object
-
Object Authorization required Queue Not applicable Topic Not applicable Process Not applicable Queue manager Not applicable Namelist Not applicable Authentication information Not applicable Channel MQZAO_CONTROL Client connection channel Not applicable Listener MQZAO_CONTROL Service MQZAO_CONTROL Communication information Not applicable - Channel Commands
-
Command Object Authorization required Ping Channel Channel MQZAO_CONTROL Reset Channel Channel MQZAO_CONTROL_EXTENDED Resolve Channel Channel MQZAO_CONTROL_EXTENDED - Subscription Commands
-
Command Object Authorization required Change Subscription Topic MQZAO_CONTROL Create Subscription Topic MQZAO_CONTROL Delete Subscription Topic MQZAO_CONTROL Inquire Subscription Topic MQZAO_DISPLAY - Security Commands
-
Command Object Authorization required Set Authority Record Queue manager MQZAO_CHANGE Delete Authority Record Queue manager MQZAO_CHANGE Inquire Authority Records Queue manager MQZAO_DISPLAY Inquire Authority Service Queue manager MQZAO_DISPLAY Inquire Entity Authority Queue manager MQZAO_DISPLAY Set Channel Authentication Record Queue manager MQZAO_CHANGE Inquire Channel Authentication Records Queue manager MQZAO_DISPLAY Refresh Security Queue manager MQZAO_CHANGE - Status Displays
-
Command Object Authorization required Inquire Channel Status Queue manager MQZAO_DISPLAY Inquire Channel Listener Status Queue manager MQZAO_DISPLAY Inquire Pub/Sub Status Queue manager MQZAO_DISPLAY Inquire Subscription Status Queue manager MQZAO_DISPLAY Inquire Service Status Queue manager MQZAO_DISPLAY Inquire Topic Status Queue manager MQZAO_DISPLAY - Cluster Commands
-
Command Object Authorization required Inquire Cluster Queue Manager Queue manager MQZAO_DISPLAY Refresh Cluster 'mqm' group membership required Reset Cluster 'mqm' group membership required Suspend Queue Manager Cluster 'mqm' group membership required Resume Queue Manager Cluster 'mqm' group membership required - Other Administrative Commands
-
Command Object Authorization required Ping Queue Manager Queue manager MQZAO_DISPLAY Refresh Queue Manager Queue manager MQZAO_CHANGE Reset Queue Manager Queue manager MQZAO_CHANGE Reset Queue Statistics Queue MQZAO_DISPLAY and MQZAO_CHANGE Inquire Connection Queue manager MQZAO_DISPLAY Stop Connection Queue manager MQZAO_CHANGE
Note:
- For Copy commands, MQZAO_DISPLAY authority is also needed for the From object.
- The MQZAO_CREATE authority is not specific to a particular object or object type. Create authority is granted for all objects for a specified queue manager, by specifying an object type of QMGR on the setmqaut command.
- For Create commands, MQZAO_DISPLAY authority is also needed for the appropriate SYSTEM.DEFAULT.* object.
- This applies if the object to be replaced already exists. If it does not, the check is as for Copy or Create without replace.
Special considerations for security on Windows
Some security functions behave differently on different versions of Windows.
WebSphere MQ security relies on calls to the operating system API for information about user authorizations and group memberships. Some functions do not behave identically on the Windows systems. This collection of topics includes descriptions of how those differences might affect WebSphere MQ security when you are running WebSphere MQ in a Windows environment.
The SSPI channel exit program
WebSphere MQ for Windows supplies a security exit program, which can be used on both message and MQI channels. The exit is supplied as source and object code, and provides one-way and two-way authentication.
The security exit uses the Security Support Provider Interface (SSPI), which provides the integrated security facilities of Windows platforms.
The security exit provides the following identification and authentication services:
- One way authentication
- This uses Windows NT LAN Manager (NTLM)
authentication support. NTLM allows servers to authenticate their clients. It does not allow a client to authenticate a server, or one server to authenticate another. NTLM was designed for a network environment in which servers are assumed to be genuine. NTLM is supported on all Windows platforms that are supported by WebSphere MQ Version 7.0.
This service is typically used on an MQI channel to enable a server queue manager to authenticate a WebSphere MQ MQI client application. A client application is identified by the user ID associated with the process that is running.
To perform the authentication, the security exit at the client end of a channel acquires an authentication token from NTLM and sends the token in a security message to its partner at the other end of the channel. The partner security exit passes the token to NTLM, which checks that the token is authentic. If the partner security exit is not satisfied with the authenticity of the token, it instructs the MCA to close the channel.
- Two way, or mutual, authentication
- This uses Kerberos authentication services. The Kerberos protocol does not assume that servers in a network environment are genuine.
Servers can authenticate clients and other servers, and clients can authenticate servers. Kerberos is supported on all Windows platforms that are supported by WebSphere MQ Version 7.0.
This service can be used on both message and MQI channels. On a message channel, it provides mutual authentication of the two queue managers. On an MQI channel, it enables the server queue manager and the WebSphere MQ MQI client application to authenticate each other. A queue manager is identified by its name prefixed by the string ibmMQSeries/. A client application is identified by the user ID associated with the process that is running.
To perform the mutual authentication, the initiating security exit acquires an authentication token from the Kerberos security server and sends the token in a security message to its partner. The partner security exit passes the token to the Kerberos server, which checks that it is authentic. The Kerberos security server generates a second token, which the partner sends in a security message to the initiating security exit. The initiating security exit then asks the Kerberos server to check that the second token is authentic. During this exchange, if either security exit is not satisfied with the authenticity of the token sent by the other, it instructs the MCA to close the channel.
The security exit is supplied in both source and object format. You can use the source code as a starting point for writing your own channel exit programs or you can use the object module as supplied. The object module has two entry points, one for one way authentication using NTLM authentication support and the other for two way authentication using Kerberos authentication services.
For more information about how the SSPI channel exit program works, and for instructions on how to implement it, see Using the SSPI security exit on Windows systems .
When you get a 'group not found' error on Windows
This problem can arise because WebSphere MQ loses access to the local mqm group when Windows servers are promoted to, or demoted from, domain controllers. To remedy this problem, re-create the local mqm group.
The symptom is an error indicating the lack of a local mqm group, for example:
 >crtmqm qm0
AMQ8066:Local mqm group not found.
Altering the state of a machine between server and domain controller can affect the operation of WebSphere MQ, because WebSphere MQ uses a locally-defined mqm group. When a server is promoted to be a domain controller, the scope changes from local to domain local. When the machine is demoted to server, all domain local groups are removed. This means that changing a machine from server to domain controller and back to server loses access to a local mqm group.
To remedy this problem, re-create the local mqm group using the standard Windows management tools. Because all group membership information is lost, you must reinstate privileged WebSphere MQ users in the newly-created local mqm group. If the machine is a domain member, you must also add the domain mqm group to the local mqm group to grant privileged domain WebSphere MQ user IDs the required level of authority.
When you have problems with WebSphere MQ and domain controllers on Windows
Certain problems can arise with security settings when Windows servers are promoted to domain controllers.
While promoting Windows 2000, Windows 2003, or Windows Server 2008 servers to domain controllers, you are presented with the option of selecting a default or non-default security setting relating to user and group permissions. This option controls whether arbitrary users are able to retrieve group memberships from the active directory. Because WebSphere MQ relies on group membership information to implement its security policy, it is important that the user ID that is performing WebSphere MQ operations can determine the group memberships of other users.
On Windows 2000, when a domain is created using the default security option, the default user ID created by WebSphere MQ during the installation process can obtain group memberships for other users as required. The product then installs normally, creating default objects, and the queue manager can determine the access authority of local and domain users if required.
On Windows 2000, when a domain is created using the non-default security option, or on Windows 2003 and Windows Server 2008 when a domain is created using the default security option, the user ID created by WebSphere MQ during the installation cannot always determine the required group memberships. In this case, you need to know:
- How Windows 2000 with non-default, or Windows 2003 and Windows Server 2008 with default, security permissions behaves
- How to allow domain mqm group members to read group membership
- How to configure a WebSphere MQ Windows service to run under a domain user
Windows 2000 domain with non-default, or Windows 2003 and Windows Server 2008 domain with default, security permissions
Installation of WebSphere MQ behaves differently on these operating systems depending on whether a local user or domain user performs the installation.
If a local User installs WebSphere MQ, the Prepare WebSphere MQ Wizard detects that the local user created for the WebSphere MQ Windows service can retrieve the group membership information of the installing user. The Prepare WebSphere MQ Wizard asks the user questions about the network configuration to determine whether there are other user accounts defined on domain controllers running on Windows 2000 or later. If so, the WebSphere MQ Windows service needs to run under a domain user account with particular settings and authorities. The Prepare WebSphere MQ Wizard prompts the user for the account details of this user. Its online help provides details of the domain user account required that can be sent to the domain administrator.
If a domain User installs WebSphere MQ, the Prepare WebSphere MQ Wizard detects that the local user created for the WebSphere MQ Windows service cannot retrieve the group membership information of the installing user. In this case, the Prepare WebSphere MQ Wizard always prompts the user for the account details of the domain user account for the WebSphere MQ Windows service to use.
When the WebSphere MQ Windows service needs to use a domain user account, WebSphere MQ cannot operate correctly until this has been configured using the Prepare WebSphere MQ Wizard. The Prepare WebSphere MQ Wizard does not allow the user to continue with other tasks, until the Windows service has been configured with a suitable account.
If a Windows 2000 domain has been configured with non-default security permissions, the usual solution to enable WebSphere MQ to work correctly is to configure it with a suitable domain user account, as described above.
Configure WebSphere MQ Services to run under a domain user on Windows
Use the Prepare WebSphere MQ wizard to enter the account details of the domain user account. Alternatively, you can use the Computer Management panel to alter the Log On details for the installation specific WebSphere MQ Service.
Applying security template files to Windows
Applying a template might affect the security settings applied to WebSphere MQ files and directories. If you use the highly secure template, apply it before installing WebSphere MQ.
Windows supports text-based security template files that you can use to apply uniform security settings to one or more computers with the Security Configuration and Analysis MMC snap-in. In particular, Windows supplies several templates that include a range of security settings with the aim of providing specific levels of security. These templates include Compatible, Secure, and Highly Secure.
Applying one of these templates might affect the security settings applied to WebSphere MQ files and directories. To use the Highly Secure template, configure your machine before you install WebSphere MQ.
If you apply the highly secure template to a machine on which WebSphere MQ is already installed, all the permissions you have set on the WebSphere MQ files and directories are removed. Because these permissions are removed, you lose Administrator, mqm, and, when applicable, Everyone group access from the error directories.
Nested groups
There are restrictions on the use of nested groups. These result partly from the domain functional level and partly from WebSphere MQ restrictions.
Active Directory can support different group types within a Domain context depending on the Domain functional level. By default, Windows 2003 domains are in the Windows 2000 mixed functional level. (Windows server 2003 , Windows XP, Windows Vista, and Windows Server 2008 all follow the Windows 2003 domain model.) The domain functional level determines the supported group types and level of nesting allowed when configuring user IDs in a domain environment. Refer to Active Directory documentation for details on the Group Scope and inclusion criteria.
In addition to Active Directory requirements, further restrictions are imposed on IDs used by WebSphere MQ. The network APIs used by WebSphere MQ do not support all the configurations that are supported by the domain functional level. As a result, WebSphere MQ is not able to query the group memberships of any Domain IDs present in a Domain Local group which is then nested in a local group. Furthermore, multiple nesting of global and universal groups is not supported. However, immediately nested global or universal groups are supported.
Configure additional authority for Windows applications connecting to WebSphere MQ
The account under which WebSphere MQ processes run might need additional authorization before SYNCHRONIZE access to application processes can be granted.
You might experience problems if you have Windows applications, for example ASP pages, connecting to WebSphere MQ that are configured to run at a security level higher than usual.
WebSphere MQ requires SYNCHRONIZE access to application processes in order to coordinate certain actions. APAR IC35116 changed WebSphere MQ so that the appropriate privileges are specified. However, the account under which WebSphere MQ processes run might need additional authorization before the requested access can be granted.
When a server application first attempts to connect to a queue manager WebSphere MQ will modify the process to grant SYNCHRONIZE authority for WebSphere MQ administrators. To configure additional authority to the user ID under which WebSphere MQ processes are running, complete the following steps:
- Start the Local Security Policy tool, click Security Settings ->Local Policies->User Right Assignments, click "Debug Programs".
- Double click "Debug Programs", then add your WebSphere MQ user ID to the list
If the system is in a Windows domain and the effective policy setting is still not set, even though the local policy setting is set, the user ID must be authorized in the same way at domain level, using the Domain Security Policy tool.
Set up security on HP Integrity NonStop Server
Security considerations specific to HP Integrity NonStop Server systems.
The WebSphere MQ client for HP Integrity NonStop Server supports both the Transport Layer Security (TLS) and the Secure Sockets Layer (SSL) protocols to provide link level security when you are connecting to a queue manager. These protocols are supported by using an implementation of OpenSSL. OpenSSL requires a source of random data for providing strong cryptographic operations.
OpenSSL
OpenSSL security overview for WebSphere MQ client for HP Integrity NonStop Server.
The OpenSSL toolkit is an open source implementation of the Secure Sockets Layer (SSL) and Transport Layer Security (TLS) protocols for secure communications over a network.
The toolkit is developed by the OpenSSL Project. For more information about the OpenSSL Project, see http://www.openssl.org . WebSphere MQ client for HP Integrity NonStop Server contains modified versions of the OpenSSL libraries and the openssl command. The libraries and openssl command are ported from the OpenSSL toolkit 1.0.1c, and are supplied as object code only. No source code is provided.
The OpenSSL libraries are loaded by WebSphere MQ client application programs dynamically as required. Only the OpenSSL libraries that are provided by WebSphere MQ are supported for use with WebSphere MQ client applications.
The openssl command, which can be used for certificate management purposes, is installed in the OSS directory opt_installation_path/opt/mqm/bin.
Use the openssl command, you can create and manage keys and digital certificates with various common data formats, and carry out simple certificate authority (CA) tasks.
The default format for key and certificate data that is processed by OpenSSL is the Privacy Enhanced Mail (PEM) format. Data in PEM format is base64 encoded ASCII data. The data can therefore be transferred by using text-based systems such as email, and can be cut and pasted by using text editors and web browsers. PEM is an Internet standard for text-based cryptographic exchanges and is specified in Internet RFCs 1421, 1422, 1423, and 1424. WebSphere MQ assumes that a file with extension .pem contains data in PEM format. A file in PEM format can contain multiple certificates and other encoded objects, and can include comments.
The WebSphere MQ SSL support on other operating systems might require key and certificate data in files to be encoded by using Distinguished Encoding Rules (DER). DER is a set of encoding rules for using the ASN.1 notation in secure communications. Data that is encoded by using DER is binary data, and the format of key and certificate data that is encoded by using DER is also known as PKCS#12 or PFX. A file that contains this data commonly has an extension of .p12 or .pfx. The openssl command can convert between PEM and PKCS#12 format.
Entropy Daemon
OpenSSL requires a source of random data for providing strong cryptographic operations. Random number generation is a capability that is usually provided by the operating system or by a system-wide daemon process. The HP Integrity NonStop Server operating system does not provide this capability within the operating system.
When you are using the SSL and TLS support supplied with WebSphere MQ client for HP Integrity NonStop Server, a process that is called an entropy daemon is needed to provide the source of random data. When you start a client channel that requires SSL or TLS, OpenSSL expects an entropy daemon to be running and providing its services on a socket in the OSS file system at /etc/egd-pool.
An entropy daemon is not provided by WebSphere MQ client for HP Integrity NonStop Server. The WebSphere MQ client for HP Integrity NonStop Server is tested with the following entropy daemons:
- amqjkdm0 (as provided by the WebSphere MQ 5.3 server)
- /usr/local/bin/prngd (Version 0.9.27, as provided by HP Integrity NonStop Server Open Source Technical Library)
Set up WebSphere MQ MQI client security
You must consider WebSphere MQ MQI client security, so that the client applications do not have unrestricted access to resources on the server.
There are two aspects to security between a client application and its queue manager server: authentication and access control.
Note: WebSphere MQ provides Secure Sockets Layer (SSL) support for WebSphere MQ MQI clients on the following platforms:
- UNIX and Linux systems
- Windows
For more information about SSL support for WebSphere MQ queue managers and WebSphere MQ MQI clients, see WebSphere MQ support for SSL and TLS .
For information on running SSL or TLS client applications on AIX with multiple GSKit V8.0 installations, see Running SSL or TLS client applications with multiple installations of GSKit v8.0 on AIX .
Specifying that only FIPS-certified CipherSpecs are used at run time on the MQI client
Create your key repositories using FIPS-compliant software, then specify that the channel must use FIPS-certified CipherSpecs.
In order to be FIPS-compliant at run time, the key repositories must have been created and managed using only FIPS-compliant software such as runmqakm with the -fips option.
You can specify that an SSL or TLS channel must use only FIPS-certified CipherSpecs in three ways, listed in order of precedence:
- Set the FipsRequired field in the MQSCO structure to MQSSL_FIPS_YES.
- Set the environment variable MQSSLFIPS to YES.
- Set the SSLFipsRequired attribute in the client configuration file to YES.
By default, FIPS-certified CipherSpecs is not required.
These values have the same meanings as the equivalent parameter values on ALTER QMGR SSLFIPS (see ALTER QMGR ). If the client process currently has no active SSL or TLS connections, and a FipsRequired value is validly specified on an SSL MQCONNX, all subsequent SSL connections associated with this process must use only the CipherSpecs associated with this value. This applies until this and all other SSL or TLS connections have stopped, at which stage a subsequent MQCONNX can provide a new value for FipsRequired.
If cryptographic hardware is present, the cryptographic modules used by WebSphere MQ can be configured to be those modules provided by the hardware product, and these might be FIPS-certified to a particular level. The configurable modules and whether they are FIPS-certified depends on the hardware product in use.
Where possible, if FIPS-only CipherSpecs is configured then the MQI client rejects connections which specify a non-FIPS CipherSpec with MQRC_SSL_INITIALIZATION_ERROR. WebSphere MQ does not guarantee to reject all such connections and it is your responsibility to determine whether your WebSphere MQ configuration is FIPS-compliant.
Running SSL or TLS client applications with multiple installations of GSKit V8.0 on AIX
SSL or TLS client applications on AIX might experience MQRC_CHANNEL_CONFIG_ERROR and error AMQ6175 when running on AIX systems with multiple GSKit V8.0 installations.
When running client applications on an AIX system with multiple GSKit V8.0 installations, the client connect calls can return MQRC_CHANNEL_CONFIG_ERROR when using SSL or TLS. The /var/mqm/errors logs record error AMQ6175 and AMQ9220 for the failing client application, for example:
 09/08/11 11:16:13 - Process(24412.1) User(user) Program(example)
                    Host(machine.example.ibm.com) Installation(Installation1)
                    VRMF(7.1.0.0)
AMQ6175: The system could not dynamically load the shared library
'/usr/mqm/gskit8/lib64/libgsk8ssl_64.so'. The system returned
error number '8' and error message 'Symbol resolution failed
for /usr/mqm/gskit8/lib64/libgsk8ssl_64.so because:
    Symbol VALUE_EC_NamedCurve_secp256r1__9GSKASNOID (number 16) is not exported from dependent module /db2data/db2inst1/sqllib/lib64/libgsk8cms_64.so.
    Symbol VALUE_EC_NamedCurve_secp384r1__9GSKASNOID (number 17) is not exported from dependent module /db2data/db2inst1/sqllib/lib64/libgsk8cms_64.so.
    Symbol VALUE_EC_NamedCurve_secp521r1__9GSKASNOID (number 18) is not exported from dependent module /db2data/db2inst1/sqllib/lib64/libgsk8cms_64.so.
    Symbol VALUE_EC_ecPublicKey__9GSKASNOID (number 19) is not exported from dependent
module /db2data/db2inst1/sqllib/lib64/libgsk8cms_64.so.
    Symbol VALUE_EC_ecdsa_with_SHA1__9GSKASNOID (number 20) is not exported from dependent module /db2data/db2inst1/sqllib/lib64/libgsk8cms_64.so.
    Symbol VALUE_EC_ecdsa__9GSKASNOID (number 21) is not exported from dependent
      module /db2data/db2inst1/sqllib/lib64/libgsk8cms_64.so.'.

EXPLANATION:
This message applies to AIX systems. The shared library
'/usr/mqm/gskit8/lib64/libgsk8ssl_64.so' failed
to load correctly due to a problem with the library.
ACTION:
Check the file access permissions and that the file has not been corrupted.
----- amqxufnx.c : 1284 -------------------------------------------------------
09/08/11 11:16:13 - Process(24412.1) User(user) Program(example)
                    Host(machine.example.ibm.com) Installation(Installation1)
                    VRMF(7.1.0.0)
AMQ9220: The GSKit communications program could not be loaded.

EXPLANATION:
The attempt to load the GSKit library or procedure
'/usr/mqm/gskit8/lib64/libgsk8ssl_64.so' failed with error code 536895861.
ACTION:
Either the library must be installed on the system or the environment changed
to allow the program to locate it.
----- amqcgska.c : 836 --------------------------------------------------------
A
common cause of this error is that the setting of the LIBPATH or LD_LIBRARY_PATH environment variable has caused the WebSphere MQ client to load a mixed set of libraries from two different GSKit V8.0 installations.
Executing aWebSphere MQ client application in a DB2 environment can cause
this error.
To avoid this error, include the WebSphere MQ library directories at the front of the library path so that the WebSphere MQ libraries take precedence. This can be achieved using the setmqenv command with the -k parameter, for example:
. /usr/mqm/bin/setmqenv -s -kFor more information about the use of the setmqenv command, refer to setmqenv (set WebSphere MQ environment)
Working with SSL or TLS
These topics give instructions for performing single tasks related to using SSL or TLS with WebSphere MQ.
Many of them are used as steps in the higher-level tasks described in the following sections:
- Identifying and authenticating users
- Authorizing access to objects
- Confidentiality of messages
- Data integrity of messages
- Keeping clusters secure
Working with SSL or TLS on HP Integrity NonStop Server
Describes the WebSphere MQ client for HP Integrity NonStop Server OpenSSL security implementation, including security services, components, supported protocol versions, supported CipherSpecs, and unsupported security functionality.
WebSphere MQ SSL & TLS support provides the following security services for client channels:
- Authentication of the server and, optionally, authentication of the client.
- Encryption and decryption of the data that is flowing across a channel.
- Integrity checks on the data that is flowing across a channel.
The SSL and TLS support supplied with the WebSphere MQ client for HP Integrity NonStop Server comprises the following components:
- OpenSSL libraries and the openssl command.
- WebSphere MQ password stash command, amqrsslc.
The following required components for SSL or TLS client channel operation are not provided with the WebSphere MQ client for HP Integrity NonStop Server:
- An entropy daemon to provide a source of random data for OpenSSL cryptography.
Supported protocol versions
The WebSphere MQ client for HP Integrity NonStop Server supports the following protocol versions:
- SSL 3.0
- TLS 1.0
- TLS 1.2
Supported CipherSpecs
The WebSphere MQ client for HP Integrity NonStop Server supports the following CipherSpecs versions:
- TLS_RSA_WITH_AES_128_CBC_SHA
- TLS_RSA_WITH_AES_256_CBC_SHA
- RC4_SHA_US
- RC4_MD5_US
- TRIPLE_DES_SHA_US
- TLS_RSA_WITH_3DES_EDE_CBC_SHA
- DES_SHA_EXPORT1024
- RC4_56_SHA_EXPORT1024
- RC4_MD5_EXPORT
- RC2_MD5_EXPORT
- DES_SHA_EXPORT
- TLS_RSA_WITH_DES_CBC_SHA
- NULL_SHA
- NULL_MD5
- FIPS_WITH_DES_CBC_SHA
- FIPS_WITH_3DES_EDE_CBC_SHA
- TLS_RSA_WITH_AES_128_CBC_SHA256
- TLS_RSA_WITH_AES_256_CBC_SHA256
- TLS_RSA_WITH_NULL_SHA256
- TLS_RSA_WITH_AES_128_GCM_SHA256
- TLS_RSA_WITH_AES_256_GCM_SHA384
- ECDHE_ECDSA_AES_128_CBC_SHA256
- ECDHE_ECDSA_AES_256_CBC_SHA384
- ECDHE_RSA_AES_128_CBC_SHA256
- ECDHE_RSA_AES_256_CBC_SHA384
- ECDHE_ECDSA_AES_128_GCM_SHA256
- ECDHE_ECDSA_AES_256_GCM_SHA384
- ECDHE_RSA_AES_128_GCM_SHA256
- ECDHE_RSA_AES_256_GCM_SHA384
Unsupported security functionality
The WebSphere MQ client for HP Integrity NonStop Server does not currently support:
- PKCS#11 Cryptographic hardware support
- LDAP Certificate Revocation List checking
- OCSP Online Certificate Status Protocol checking
- FIPS 140-2, NSA SUITE B cipher suite controls
Certificate management
Use a set of files to store digital certificate and certificate revocation information.
WebSphere MQ SSL and TLS support uses a set of files to store digital certificate and certificate revocation information. These files are located in a directory specified either programmatically by way of the KeyRepository field in the MQSCO structure passed on the MQCONNX call, by the MQSSLKEYR environment variable, or, in the SSL stanza of the mqclient.ini using the SSLKeyRepository attribute.
The MQSCO structure takes precedence over the MQSSLKEYR environment variable which takes precedence over the ini file stanza value.
The key repository location specifies a directory location and not a filename on the HP Integrity NonStop Server platform.
The WebSphere MQ client for HP Integrity NonStop Server uses the following, case sensitive, named files in the key repository location:
- Personal certificate store
- Certificate trust store
- Pass phrase stash file
- Certificate revocation list file
Personal certificate store
The personal certificate store file, cert.pem.
This file contains the personal certificate and the encrypted private key for the client to use, in PEM format. The existence of this file is optional when you are using SSL or TLS channels that do not require client authentication. Where client authentication is required by the channel, and SSLCAUTH(REQUIRED) is specified on the channel definition, this file must exist and contain both the certificate and encrypted private key.
File permissions must be set on this file to allow read access to the owner of the certificate store.
A correctly formatted cert.pem file must contain exactly two sections with the following headers and footers:
 -----BEGIN PRIVATE KEY-----
Base 64 ASCII encoded private key data here
-----END PRIVATE KEY-----
 -----BEGIN CERTIFICATE-----
Base 64 ASCII encoded certificate data here
-----END CERTIFICATE-----
The pass phrase for the encrypted private key is stored in the pass phrase stash file, Stash.sth.
Certificate trust store
The certificate truststore file, trust.pem.
This file contains the certificates that are needed to validate the personal certificates that are used by queue managers that the client connects to, in PEM format. The certificate truststore is mandatory for all SSL or TLS client channels.
File permissions must be set to limit write access to this file.
A correctly formatted trust.pem file must contain one or more sections with the following headers and footers:
 -----BEGIN CERTIFICATE-----
Base 64 ASCII encoded certificate data here
-----END CERTIFICATE-----
Pass phrase stash file
The pass phrase stash file, Stash.sth.
This file is a binary format private to WebSphere MQ and contains the encrypted pass phrase for use when you are accessing the private key that is held in the cert.pem file. The private key itself is stored in the cert.pem certificate store.
This file is created or altered by using the WebSphere MQ amqrsslc command-line tool with the -s parameter. For example, where the directory /home/alice contains a cert.pem file:
 amqrsslc -s /home/alice/cert

  Enter password for Keystore /home/alice/cert.pem :
    password

  Stashed the password in file /home/alice/Stash.sth
File permissions must be set on this file to allow read access to the owner of the associated personal certificate store.
Certificate revocation list file
The certificate revocation list file, crl.pem.
This file contains the certificate revocation lists (CRLs) that the client uses to validate digital certificates, in PEM format. The existence of this file is optional. If this file is not present, no certificate revocation checks are done when you are validating certificates.
File permissions must be set to limit write access to this file.
A correctly formatted crl.pem file must contain one or more sections with the following headers and footers:
 -----BEGIN X509 CRL-----
Base 64 ASCII encoded CRL data here
-----END X509 CRL-----
Working with SSL or TLS on UNIX, Linux and Windows systems
On UNIX, Linux and Windows systems, Secure Sockets Layer (SSL) support is installed with WebSphere MQ.
For more detailed information about certificate validation policies, see Certificate validation and trust policy design .
Use iKeyman, iKeycmd, runmqakm, and runmqckm
On UNIX, Linux and Windows systems, manage keys and digital certificates with the iKeyman GUI or from the command line using iKeycmd or runmqakm.
- For UNIX and Linux systems:
- Use the strmqikm command to start the iKeyman GUI.
- Use the runmqckm command to perform tasks with the iKeycmd command line interface.
- Use the runmqakm command to perform tasks with the runmqakm command line interface. The command syntax for runmqakm is the same as the syntax for runmqckm.
If you need to manage SSL certificates in a way that is FIPS compliant, use the runmqakm command instead of the runmqckm or strmqikm commands.
If you are using certificates or keys stored on PKCS #11 cryptographic hardware, note that iKeycmd and iKeyman are 64-bit programs. External modules required for PKCS #11 support will be loaded into a 64-bit process, therefore you must have a 64-bit PKCS #11 library installed for the administration of cryptographic hardware. The Windows and Linux x86 32-bit platforms are the only exceptions, as the iKeyman and iKeycmd programs are 32–bit on those platforms.
Before you run the strmqikm command to start the iKeyman GUI, ensure you are working on a machine that is able to run the X Window System and that you do the following:
- Set the DISPLAY environment variable, for example:
export DISPLAY=mypc:0
- Ensure that your PATH environment variable contains /usr/bin and /bin. This is also required for the runmqckm and runmqakm commands. For example:
export PATH=$PATH:/usr/bin:/bin
- For Windows systems:
- Use the strmqikm command to start the iKeyman GUI.
- Use the runmqckm command to perform tasks with the iKeycmd command line interface.
If you need to manage SSL certificates in a way that is FIPS compliant, use the runmqakm command instead of the runmqckm or strmqikm commands.
To request SSL tracing on UNIX, Linux or Windows systems, see strmqtrc .
Related information :
runmqckm, and runmqakm commands
Set up a key repository on UNIX, Linux, and Windows systems
You can set up a key repository by using the iKeyman user interface, or by using the iKeycmd or runmqakm commands.
An SSL or TLS connection requires a key repository at each end of the connection. Each WebSphere MQ queue manager and WebSphere MQ MQI client must have access to a key repository. For more information, see The SSL or TLS key repository .
On UNIX, Linux, and Windows systems, digital certificates are stored in a key database file that is managed by using the iKeyman user interface, or by using the iKeycmd or runmqakm commands. These digital certificates have labels. A specific label associates a personal certificate with a queue manager or WebSphere MQ MQI client. SSL and TLS use that certificate for authentication purposes. On UNIX, Linux, and Windows systems, WebSphere MQ uses ibmwebspheremq as a label prefix to avoid confusion with certificates for other products. The prefix is followed by the name of the queue manager or WebSphere MQ MQI client user logon ID, changed to lowercase. Ensure that you specify the entire certificate label in lowercase.
The key database file name comprises a path and stem name:
- On UNIX and Linux systems, the default path for a queue manager (set when you created the queue manager)
is /var/mqm/qmgrs/<queue_manager_name>/ssl.
On Windows systems, the default path is MQ_INSTALLATION_PATH\Qmgrs\queue_manager_name\ssl, where MQ_INSTALLATION_PATH is the directory in which WebSphere MQ is installed. For example, C:\program files\IBM\WebSphere MQ\Qmgrs\QM1\ssl.
The default stem name is key. Optionally, you can choose your own path and stem name, but the extension must be .kdb.
If you choose your own path or file name, set the permissions to the file to tightly control access to it.
- For a WebSphere MQ client, there is no default path or stem name. Tightly control access to this file. The extension must be .kdb.
Do not create key repositories on a file system that does not support file level locks, for example NFS version 2 on Linux systems.
You can specify the key database file name either before or after creating the key database file.
The user ID from which you run the iKeyman or iKeycmd commands must have write permission for the directory in which the key database file is created or updated. For a queue manager using the default ssl directory, the user ID from which you run iKeyman or iKeycmd must be a member of the mqm group. For a WebSphere MQ MQI client, if you run iKeyman or iKeycmd from a user ID different from that under which the client runs, you must alter the file permissions to enable the WebSphere MQ MQI client to access the key database file at run time.
In iKeyman or iKeycmd version 7.0, new key databases are automatically populated with a set of pre-defined certificate authority (CA) certificates. In iKeyman or iKeycmd version 8.0, key databases are not automatically populated, making the initial setup more secure because you include only the CA certificates that you want, in your key database file.
Note: Because of this change in behavior for GSKit version 8.0 that results in CA certificates no longer being automatically added to the repository, you must manually add your preferred CA certificates. This change of behavior provides you with more granular control over the CA certificates used. See Adding default CA certificates into an empty key repository, on UNIX, Linux or Windows systems with GSKit version 8.0 .
Procedure
Note: If you must manage SSL or TLS certificates in a way that is FIPS-compliant, use the runmqakm command. The iKeyman user interface does not provide a FIPS-compliant option.
- To create a key database by using the iKeyman user interface,
complete the following steps:
- On UNIX and Linux systems, log in as the root user. On Windows systems, log in as Administrator or as a member of the MQM group.
- Start the iKeyman user interface by running the strmqikm command.
- From the Key Database File menu,
click New. The New window opens.
- Click Key database type and select CMS (Certificate
Management System).
- In the File Name field, type
a file name. This field already contains the text key.kdb.
If your stem name is key, leave this field unchanged.
If you specified a different stem name, replace key with your stem name. However, you must not change the .kdb extension.
- In the Location field, type the path. For example:
- For a queue manager: /var/mqm/qmgrs/QM1/ssl (on UNIX and Linux systems) or C:\Program
Files\IBM\WebSphere MQ\qmgrs\QM1\ssl (on Windows systems).
The path must match the value of the SSLKeyRepository attribute of the queue manager.
- For a WebSphere MQ client: /var/mqm/ssl (on UNIX and Linux systems) or C:\mqm\ssl (on Windows systems).
- For a queue manager: /var/mqm/qmgrs/QM1/ssl (on UNIX and Linux systems) or C:\Program
Files\IBM\WebSphere MQ\qmgrs\QM1\ssl (on Windows systems).
- Click Open. The Password Prompt window opens.
- Type a password in the Password field,
and type it again in the Confirm Password field.
- Select the Stash the password to a file check
box.
Note: If you do not stash the password, attempts to start SSL or TLS channels fail because they cannot obtain the password required to access the key database file.
- Click OK.
- Click OK. The Personal Certificates window opens.
- Set the access permissions as described in Accessing and securing your key database files on Windows or Accessing and securing your key database files on UNIX and Linux systems .
- On UNIX and Linux systems, log in as the root user. On Windows systems, log in as Administrator or as a member of the MQM group.
- To create a key database by using the command line, use either of the following commands:
- On UNIX, Linux, and Windows systems:
runmqckm -keydb -create -db filename -pw password -type cms -stash
- Use runmqakm:
 runmqakm -keydb -create -db filename -pw password -type cms
    -stash -fips -strong
where:
- -db filename
- Specifies the fully qualified file name of a CMS key database, and must have a file extension of .kdb.
- -pw password
- Specifies the password for the CMS key database.
- -type cms
- Specifies the type of database. (For WebSphere MQ, it must be cms.)
- -stash
- Saves the key database password to a file.
- -fips
- Disables the use of the BSafe cryptographic library. Only the ICC component is used and this component must be successfully initialized in FIPS mode. When in FIPS mode, the ICC component uses algorithms that are FIPS 140-2 validated. If the ICC component does not initialize in FIPS mode, the runmqakm command fails.
- -strong
- Checks that the password entered satisfies the minimum requirements
for password strength. The minimum requirements for a password are as follows:
- The password must be a minimum length of 14 characters.
- The password must contain a minimum of one lowercase character, one uppercase character, and one digit or special character. Special characters include the asterisk (*), the dollar sign ($), the number sign (#), and the percent sign (%). A space is classified as a special character.
- Each character can occur a maximum of three times in a password.
- A maximum of two consecutive characters in the password can be identical.
- All characters are in the standard ASCII printable character set within the range 0x20 - 0x7E.
- On UNIX, Linux, and Windows systems:
Accessing and securing your key database files on Windows
The key database files might not have appropriate access permissions. You must set appropriate access to these files.
Set access control to the files key.kdb, key.sth, key.crl, and key.rdb, where key is the stem name of your key database, to grant authority to a restricted set of users.
Consider granting access as follows:
- full authority
- BUILTIN\Administrators, NT AUTHORITY\SYSTEM, and the user who created the database files.
- read authority
- For a queue manager, the local mqm group only. This assumes that the MCA is running under a user ID in the mqm group.
- For a client, the user ID under which the client process is running.
Accessing and securing your key database files on UNIX and Linux systems
The key database files might not have appropriate access permissions. You must set appropriate access to these files.
For a queue manager, set permissions on the key database files so that queue manager and channel processes can read them when necessary, but other users cannot read or modify them. Normally, the mqm user needs read permissions. If you have created the key database file by logging in as the mqm user, then the permissions are probably sufficient; if you were not the mqm user, but another user in the mqm group, you probably need to grant read permissions to other users in the mqm group.
Similarly for a client, set permissions on the key database files so that client application processes can read them when necessary, but other users cannot read or modify them. Normally, the user under which the client process runs needs read permissions. If you have created the key database file by logging in as that user, then the permissions are probably sufficient; if you were not the client process user, but another user in that group, you probably need to grant read permissions to other users in the group.
Set the permissions on the files key.kdb, key.sth, key.crl, and key.rdb, where key is the stem name of your key database, to read and write for the file owner, and to read for the mqm or client user group (-rw-r-----).
Adding default CA certificates into an empty key repository, on UNIX, Linux or Windows systems with GSKit version 8.0
Follow this procedure to add one or more of the default CA certificates to an empty key repository with GSKit version 8.
In GSKit version 7.0, the behaviour when creating a new key repository was to automatically add in a set of default CA certificates for commonly-used Certificate Authorities. For GSKit version 8, this behaviour has changed so that CA certificates are no longer automatically added to the repository. The user is now required to manually add CA certificates into the key repository.
Use iKeyman
Perform the following steps on the machine on which you want to add the CA certificate:
- Start the iKeyman GUI using the strmqikm command (on UNIX, Linux and Windows systems).
- From the Key Database File menu, click Open . The Open window opens.
- Click Key database type and select CMS (Certificate Management System).
- Click Browse to navigate to the directory that contains the key database files.
- Select the key database file to which you want to add the certificate, for example key.kdb.
- Click Open . The Password Prompt window opens.
- Type the password you set when you created the key database and click OK . The name of your key database file displays in the File Name field.
- In the Key database content field, select Signer Certificates .
- Click Populate . The Add CA's Certificate window opens.
- The CA certificates that are available to be added to the repository are displayed in a hierarchical tree structure. Select the top level entry for the organization whose CA certificates you wish to trust to view the complete list of valid CA certificates.
- Select the CA certificates you wish to trust from the list and click OK . The certificates are added to the key repository.
Use the command line
Use the following commands to list, then add CA certificates using iKeycmd:
- Issue the following command to list the default CA certificates
along with the organizations which issue them:
runmqckm -cert -listsigners
- Issue the following command to add all of the CA certificates
for the organization specified in the label field:
runmqckm -cert -populate -db filename -pw password -label label
where:
| -db filename | is the fully qualified path name of the key database. |
| -pw password | is the password for the key database. |
| -label label | is the label attached to the certificate. |
Note: Adding a CA certificate to a key repository results in WebSphere MQ trusting all personal certificates signed by that CA certificate. Consider carefully which Certificate Authorities you wish to trust and only add the set of CA certificates needed to authenticate your clients and managers. It is not recommended to add the full set of default CA certificates unless this is a definitive requirement for your security policy.
Locating the key repository for a queue manager on UNIX, Linux or Windows systems
Use this procedure to obtain the location of your queue manager's key database file
Procedure
- Display your queue manager's attributes, using either of the following MQSC commands:
 DISPLAY QMGR ALL
DISPLAY QMGR SSLKEYR
You can also display your queue manager's attributes using the WebSphere MQ Explorer or PCF commands. - Examine the command output for the path and stem name of the key database file. For example,
- on UNIX and Linux systems: /var/mqm/qmgrs/QM1/ssl/key, where /var/mqm/qmgrs/QM1/ssl is the path and key is the stem name
- on Windows: MQ_INSTALLATION_PATH\qmgrs\QM1\ssl\key, where MQ_INSTALLATION_PATH\qmgrs\QM1\ssl is the path and key is the stem name. MQ_INSTALLATION_PATH represents the high-level directory in which WebSphere MQ is installed.
Changing the key repository location for a queue manager on UNIX, Linux or Windows systems
You can change the location of your queue manager's key database file by various means including the MQSC command ALTER QMGR.
You can change the location of your queue manager's key database file by using the MQSC command ALTER QMGR to set your queue manager's key repository attribute. For example, on UNIX and Linux systems:
ALTER QMGR SSLKEYR('/var/mqm/qmgrs/QM1/ssl/MyKey')
The key database file has the fully qualified file name: /var/mqm/qmgrs/QM1/ssl/MyKey.kdb
On Windows:
ALTER QMGR SSLKEYR('C:\Program Files\IBM\WebSphere MQ\Qmgrs\QM1\ssl\Mykey')
The key database file has the fully qualified file name: C:\Program
Files\IBM\WebSphere MQ\Qmgrs\QM1\ssl\Mykey.kdb
You can also alter your queue manager's attributes using the WebSphere MQ Explorer or PCF commands.
When you change the location of a queue manager's key database file, certificates are not transferred from the old location. If the key database file you are now accessing is a new key database file, you must populate it with the CA and personal certificates you need, as described in Importing a personal certificate into a key repository on UNIX, Linux or Windows systems .
Locating the key repository for a WebSphere MQ MQI client on UNIX, Linux and Windows systems.
The location of the key repository is given by the MQSSLKEYR variable, or specified in the MQCONNX call.
Examine the MQSSLKEYR environment variable to obtain the location of your WebSphere MQ MQI client's key database file. For example:
echo $MQSSLKEYRAlso check your application, because the key database file name can also be set in an MQCONNX call, as described in Specifying the key repository location for a WebSphere MQ MQI client on UNIX, Linux or Windows systems . The value set in an MQCONNX call overrides the value of MQSSLKEYR.
Specifying the key repository location for a WebSphere MQ MQI client on UNIX, Linux or Windows systems
There is no default key repository for a WebSphere MQ MQI client. You can specify its location in either of two ways. Ensure that the key database file can be accessed only by intended users or administrators to prevent unauthorized copying to other systems.
You can specify the location of your WebSphere MQ MQI client's key database file in either of two ways:
- Setting the MQSSLKEYR environment variable. For example, on UNIX and Linux systems:
export MQSSLKEYR=/var/mqm/ssl/key
The key database file has the fully-qualified file name:/var/mqm/ssl/key.kdb
On Windows:
set MQSSLKEYR=C:\Program Files\IBM\WebSphere MQ\ssl\key
The key database file has the fully-qualified file name:C:\Program Files\IBM\WebSphere MQ\ssl\key.kdb
Note: The .kdb extension is a mandatory part of the file name, but is not included as part of the value of the environment variable.
- Providing the path and stem name of the key database file in the KeyRepository field of the MQSCO structure when an application makes an MQCONNX call. For more information about using the MQSCO structure in MQCONNX, see Overview for MQSCO .
When changes to certificates or the certificate store become effective on UNIX, Linux or Windows systems.
When you change the certificates in a certificate store, or the location of the certificate store, the changes take effect depending on the type of channel and how the channel is running.
Changes to the certificates in the key database file and to the key repository attribute become effective in the following situations:
- When a new outbound single channel process first runs an SSL channel.
- When a new inbound TCP/IP single channel process first receives a request to start an SSL channel.
- When the MQSC command REFRESH SECURITY TYPE(SSL) is issued to refresh the Websphere MQ SSL environment.
- For client application processes, when the last SSL connection in the process is closed. The next SSL connection will pick up the certificate changes.
- For channels that run as threads of a process pooling process (amqrmppa), when the process pooling process is started or restarted and first runs an SSL channel. If the process pooling process has already run an SSL channel, and you want the change to become effective immediately, run the MQSC command REFRESH SECURITY TYPE(SSL).
- For channels that run as threads of the channel initiator, when the channel initiator is started or restarted and first runs an SSL channel. If the channel initiator process has already run an SSL channel, and you want the change to become effective immediately, run the MQSC command REFRESH SECURITY TYPE(SSL).
- For channels that run as threads of a TCP/IP listener, when the listener is started or restarted and first receives a request to start an SSL channel. If the listener has already run an SSL channel, and you want the change to become effective immediately, run the MQSC command REFRESH SECURITY TYPE(SSL).
You can also refresh the WebSphere MQ SSL environment using the WebSphere MQ Explorer or PCF commands.
Create a self-signed personal certificate on UNIX, Linux, and Windows systems
You can create a self-signed certificate by using iKeyman, iKeycmd, or runmqakm.
Note: WebSphere MQ does not support SHA-3 or SHA-5 algorithms. You can use the digital signature algorithm names SHA384WithRSA and SHA512WithRSA because both algorithms are members of the SHA-2 family.
The digital signature algorithm names SHA3WithRSA and SHA5WithRSA are deprecated because they are an abbreviated form of SHA384WithRSA and SHA512WithRSA respectively.
For more information about why you might want to use self-signed certificates, see Using self-signed certificates for mutual authentication of two queue managers .
Not all digital certificates can be used with all CipherSpecs. Ensure that you create a certificate that is compatible with the CipherSpecs you need to use. WebSphere MQ supports three different types of CipherSpec. For details, see Interoperability of Elliptic Curve and RSA CipherSpecs in the Digital certificates and CipherSpec compatibility in WebSphere MQ topic. To use the Type 1 CipherSpecs (those with names beginning ECDHE_ECDSA_) you must use the runmqakm command to create the certificate and you must specify an Elliptic Curve ECDSA signature algorithm parameter; for example, -sig_alg EC_ecdsa_with_SHA384 .
Use iKeyman
iKeyman does not provide a FIPS-compliant option. If you need to manage SSL or TLS certificates in a way that is FIPS-compliant, use the runmqakm command.
Use the following procedure to obtain a self-signed certificate for your queue manager or WebSphere MQ MQI client:
- Start the iKeyman GUI by using the strmqikm command .
- From the Key Database File menu, click Open. The Open window displays.
- Click Key database type and select CMS (Certificate Management System).
- Click Browse to navigate to the directory that contains the key database files.
- Select the key database file in which you want to save the certificate, for example key.kdb.
- Click Open. The Password Prompt window displays.
- Type the password you set when you created the key database and click OK. The name of your key database file is displayed in the File Name field.
- From the Create menu, click New Self-Signed Certificate. The Create New Self-Signed Certificate window is displayed.
- In the Key Label field, type:
- For a queue manager, ibmwebspheremq followed by the name of your queue manager folded to lowercase. For example, for QM1, ibmwebspheremqqm1, or,
- For a WebSphere MQ client, ibmwebspheremq followed by your logon user ID folded to lowercase, for example ibmwebspheremqmyuserid .
- Type or select a value for any field in the Distinguished name, or any of the Subject alternative name fields.
- For the remaining fields, either accept the default values, or type or select new values. For more information about Distinguished Names, see Distinguished Names .
- Click OK. The Personal Certificates list shows the label of the self-signed personal certificate you created.
Use the command line
Use the following commands to create a self-signed personal certificate by using iKeycmd or runmqakm:
- Use iKeycmd on UNIX, Linux and Windows systems:
 runmqckm -cert -create -db filename -pw password -label label
        -dn distinguished_name -size key_size
 -x509version version -expire days
 -sig_alg algorithm
Instead of -dn distinguished_name, you can use -san_dsname DNS_names, -san_emailaddr email_addresses, or -san_ipaddr IP_addresses.
- Use runmqakm:
 runmqakm -cert -create -db filename -pw password -label label
        -dn distinguished_name -size key_size
 -x509version version -expire days

        -fips -sig_alg algorithm
| -db filename | The fully qualified file name of a CMS key database. |
| -pw password | The password for the CMS key database. |
| -label label | The key label attached to the certificate. |
| -dn distinguished_name |
The X.500 distinguished name enclosed in double quotation marks. At least one attribute is required. You can supply multiple OU or DC attributes. |
| -size key_size | The key size. For iKeycmd, the value can be 512 or 1024. For runmqakm, the value can be 512, 1024, 2048 or 4096. |
| -x509version version | The version of X.509 certificate to create. The value can be 1, 2, or 3. The default is 3. |
| -expire days | The expiration time in days of the certificate. The default is 365 days for a certificate. |
| -fips | Specifies that the command is run in FIPS mode. This mode disables the use of the BSafe cryptographic library. Only the ICC component is used and this component must be successfully initialized in FIPS mode. When in FIPS mode, the ICC component uses algorithms that have been FIPS 140-2 validated. If the ICC component does not initialize in FIPS mode, the runmqakm command fails. |
| -sig_alg | For runmqakm, the hashing algorithm used during the creation of a self-signed certificate. This hashing algorithm is used to create the signature associated with the newly created self-signed certificate. The value can be md5, MD5_WITH_RSA, MD5WithRSA, SHA_WITH_DSA , SHA_WITH_RSA, sha1, SHA1WithDSA , SHA1WithECDSA, SHA1WithRSA, sha224, SHA224_WITH_RSA, SHA224WithDSA , SHA224WithECDSA, SHA224WithRSA , sha256, SHA256_WITH_RSA, SHA256WithDSA, SHA256WithECDSA, SHA256WithRSA, SHA2WithRSA, sha384 , SHA384_WITH_RSA, SHA384WithECDSA , SHA384WithRSA, sha512, SHA512_WITH_RSA, SHA512WithECDSA, SHA512WithRSA, SHAWithDSA, SHAWithRSA , EC_ecdsa_with_SHA1, EC_ecdsa_with_SHA224 , EC_ecdsa_with_SHA256, EC_ecdsa_with_SHA384 , or EC_ecdsa_with_SHA512. The default value is SHA1WithRSA. |
| -sig_alg | For iKeycmd, the asymmetric signature algorithm used for the creation of the entry's key pair. The value can be MD2_WITH_RSA, MD2WithRSA, MD5_WITH_RSA , MD5WithRSA, SHA1WithDSA, SHA1WithRSA, SHA256_WITH_RSA, SHA256WithRSA , SHA2WithRSA, SHA384_WITH_RSA, SHA384WithRSA, SHA512_WITH_RSA, SHA512WithRSA, SHA_WITH_DSA, SHA_WITH_RSA , SHAWithDSA, or SHAWithRSA. The default value is SHA1WithRSA. |
| -san_dnsname DNS_names | A comma- or space-delimited list of DNS names for the entry being created. |
| -san_emailaddr email_addresses | A comma- or space-delimited list of email addresses for the entry being created. |
| -san_ipaddr IP_addresses | A comma- or space-delimited list of IP addresses for the entry being created. |
Requesting a personal certificate on UNIX, Linux, and Windows systems
You can request a personal certificate by using the iKeyman user interface, or by using the iKeycmd or runmqakm commands.
Note: WebSphere MQ does not support SHA-3 or SHA-5 algorithms. You can use the digital signature algorithm names SHA384WithRSA and SHA512WithRSA because both algorithms are members of the SHA-2 family.
The digital signature algorithm names SHA3WithRSA and SHA5WithRSA are deprecated because they are an abbreviated form of SHA384WithRSA and SHA512WithRSA respectively.
Not all digital certificates can be used with all CipherSpecs. Ensure that you request a certificate that is compatible with the CipherSpecs you need to use. WebSphere MQ supports three different types of CipherSpec. For details, see Interoperability of Elliptic Curve and RSA CipherSpecs in the Digital certificates and CipherSpec compatibility in WebSphere MQ topic. To use the Type 1 CipherSpecs (with names beginning ECDHE_ECDSA_) you must use the runmqakm command to request the certificate and you must specify an Elliptic Curve ECDSA signature algorithm parameter; for example, -sig_alg EC_ecdsa_with_SHA384 .
If you are using cryptographic hardware, see Requesting a personal certificate for your PKCS #11 hardware .
Use the iKeyman user interface
About this task
iKeyman does not provide a FIPS-compliant option. If you need to manage SSL or TLS certificates in a way that is FIPS-compliant, use the runmqakm command.
Procedure
Complete the following steps to apply for a personal certificate, by using the iKeyman user interface:
- Start the iKeyman user interface by using the strmqikm command on UNIX, Linux, and Windows
systems.
- From the Key Database File menu,
click Open. The Open window opens.
- Click Key database type and select CMS (Certificate Management System).
- Click Browse to navigate to the directory that contains the key database files.
- Select the key database file from which you want to generate
the request; for example, key.kdb.
- Click Open. The Password Prompt window opens.
- Type the password you set when you created the key database
and click OK. The name of your key database file is shown in the File Name
field.
- From the Create menu, click New Certificate Request. The Create New Key
and Certificate Request window opens.
- In the Key Label field, enter the following labels:
- For a queue manager, enter ibmwebspheremq followed by the name of your queue manager changed to lowercase. For example, for a queue manager called QM1, enter ibmwebspheremqqm1.
- For a WebSphere MQ MQI client, enter ibmwebspheremq followed by your logon user ID, all in lowercase; for example, ibmwebspheremqmyuserid .
- Type or select a value for any field in the Distinguished name field, or any of the Subject alternative name fields. For the remaining fields, either accept the default values, or type or select new values. For more information about Distinguished Names, see Distinguished Names .
- In the Enter the name of a file in which to store the certificate request field, either accept the default certreq.arm, or type a new
value with a full path.
- Click OK. A confirmation
window is displayed.
- Click OK. The Personal Certificate Requests list shows the label of the new personal certificate request you created. The certificate
request is stored in the file you chose in step 11 .
- Request the new personal certificate either by sending the file to a certificate authority (CA), or by copying the file into the request form on the website for the CA.
Use the command line
Procedure
Use the following commands to request a personal certificate by using either the iKeycmd or runmqakm command:
- Use iKeycmd on UNIX, Linux, and Windows systems:
 runmqckm -certreq -create -db filename -pw password -label label
        -dn distinguished_name -size key_size
 -file filename -sig_alg algorithm
Instead of -dn distinguished_name, you can use -san_dsname DNS_names, -san_emailaddr email_addresses, or -san_ipaddr IP_addresses.
- Use runmqakm:
 runmqakm -certreq -create -db filename -pw password -label label
        -dn distinguished_name -size key_size
 -file filename -fips
        -sig_alg algorithm
where:
- -db filename
- Specifies the fully qualified file name of a CMS key database.
- -pw password
- Specifies the password for the CMS key database.
- -label label
- Specifies the key label attached to the certificate.
- -dn distinguished_name
- Specifies the X.500 distinguished name enclosed in double quotation marks. At least one attribute is required. You can supply multiple OU and DC attributes.
- -size key_size
- Specifies the key size. If you are using iKeycmd , the value can be 512 or 1024. If you are using runmqakm, the value can be 512, 1024, or 2048.
- -file filename
- Specifies the file name for the certificate request.
- -fips
- Specifies that the command is run in FIPS mode. This mode disables the use of the BSafe cryptographic library. Only the ICC component is used and this component must be successfully initialized in FIPS mode. When in FIPS mode, the ICC component uses algorithms that are FIPS 140-2 validated. If the ICC component does not initialize in FIPS mode, the runmqakm command fails.
- -sig_alg
- For iKeycmd, specifies the asymmetric signature algorithm used for the creation of the entry's key pair. The value can be MD2_WITH_RSA, MD2WithRSA, MD5_WITH_RSA, MD5WithRSA, SHA1WithDSA , SHA1WithRSA, SHA256_WITH_RSA, SHA256WithRSA, SHA2WithRSA, SHA384_WITH_RSA , SHA384WithRSA, SHA512_WITH_RSA , SHA512WithRSA, SHA_WITH_DSA, SHA_WITH_RSA, SHAWithDSA, or SHAWithRSA . The default value is SHA1WithRSA
- -sig_alg
- For runmqakm, specifies the hashing algorithm used during the creation of a certificate request. This hashing algorithm is used to create the signature associated with the newly created certificate request. The value can be md5, MD5_WITH_RSA, MD5WithRSA, SHA_WITH_DSA , SHA_WITH_RSA, sha1, SHA1WithDSA , SHA1WithECDSA, SHA1WithRSA, sha224, SHA224_WITH_RSA, SHA224WithDSA , SHA224WithECDSA, SHA224WithRSA , sha256, SHA256_WITH_RSA, SHA256WithDSA, SHA256WithECDSA, SHA256WithRSA, SHA2WithRSA, sha384 , SHA384_WITH_RSA, SHA384WithECDSA , SHA384WithRSA, sha512, SHA512_WITH_RSA, SHA512WithECDSA, SHA512WithRSA, SHAWithDSA, SHAWithRSA , EC_ecdsa_with_SHA1, EC_ecdsa_with_SHA224 , EC_ecdsa_with_SHA256, EC_ecdsa_with_SHA384 , or EC_ecdsa_with_SHA512. The default value is SHA1WithRSA.
- -san_dnsname DNS_names
- Specifies a comma-delimited or space-delimited list of DNS names for the entry being created.
- -san_emailaddr email_addresses
- Specifies a comma-delimited or space-delimited list of email addresses for the entry being created.
- -san_ipaddr IP_addresses
- Specifies a comma-delimited or space-delimited list of IP addresses for the entry being created.
Renewing an existing personal certificate on UNIX, Linux, and Windows systems
You can renew a personal certificate by using the iKeyman user interface, or by using the iKeycmd or runmqakm commands.
If you have a requirement to use larger key sizes for your personal certificates, the renewal steps described below do not work, because the recreated certificate request is generated from an existing key.
Follow the steps described in Requesting a personal certificate on UNIX, Linux, and Windows systems to create a new certificate request, using the key sizes you require. This process replaces your existing key.
A personal certificate has an expiry date, after which the certificate can no longer be used. This task explains how to renew an existing personal certificate before it expires.
Use the iKeyman user interface
About this task
iKeyman does not provide a FIPS-compliant option. If you need to manage SSL or TLS certificates in a way that is FIPS-compliant, use the runmqakm command.
Procedure
Complete the following steps to apply for a personal certificate, by using the iKeyman user interface:
- Start the iKeyman user interface by using the strmqikm command on UNIX, Linux, and Windows systems.
- From the Key Database File menu, click Open. The Open window opens.
- Click Key database type and select CMS (Certificate Management System).
- Click Browse to navigate to the directory that contains the key database files.
- Select the key database file from which you want to generate the request; for example, key.kdb.
- Click Open. The Password Prompt window opens.
- Type the password you set when you created the key database and click OK. The name of your key database file is shown in the File Name field.
- Select Personal Certificates from the drop down selection menu, and select the certificate from the list that you want to renew.
- Click the Recreate Request... button. A window opens for you to enter the file name and file location information.
- In the file namefield, either accept the default certreq.arm, or type a new value, including the full file path.
- Click OK. The certificate request is stored in the file you selected in step 9 .
- Request the new personal certificate either by sending the file to a certificate authority (CA), or by copying the file into the request form on the website for the CA.
Use the command line
Procedure
Use the following commands to request a personal certificate by using either the iKeycmd or runmqakm command:
- Use iKeycmd on UNIX, Linux, and Windows systems:
 runmqckm -certreq -recreate -db filename -pw password -label label
 -target filename
- Use runmqakm:
 runmqakm -certreq -recreate -db filename -pw password -label label
  -target filename
where:
- -db filename
- Specifies the fully qualified file name of a CMS key database.
- -pw password
- Specifies the password for the CMS key database.
- -target filename
- Specifies the file name for the certificate request.
What to do next
Once you have received the signed personal certificate from the certificate authority, you can add it to your key database using the steps described in Receiving personal certificates into a key repository on UNIX, Linux and Windows systems .
Receiving personal certificates into a key repository on UNIX, Linux and Windows systems
Use this procedure to receive a personal certificate into the key database file. The key repository must be the same repository where you created the certificate request.
After the CA sends you a new personal certificate, you add it to the key database file from which you generated the new certificate request . If the CA sends the certificate as part of an email message, copy the certificate into a separate file.
Use iKeyman
If you need to manage SSL certificates in a way that is FIPS compliant, use the runmqakm command. iKeyman does not provide a FIPS-compliant option.
Ensure that the certificate file to be imported has write permission for the current user, and then use the following procedure for either a queue manager or a WebSphere MQ MQI client to receive a personal certificate into the key database file:
- Start the iKeyman GUI using the strmqikm command (on Windows UNIX and Linux ).
- From the Key Database File menu, click Open . The Open window opens.
- Click Key database type and select CMS (Certificate Management System).
- Click Browse to navigate to the directory that contains the key database files.
- Select the key database file to which you want to add the certificate, for example key.kdb.
- Click Open , and then click OK . The Password Prompt window opens.
- Type the password you set when you created the key database and click OK . The name of your key database file is displayed in the File Name field. Select the Personal Certificates view.
- Click Receive . The Receive Certificate from a File window opens.
- Type the certificate file name and location for the new personal certificate, or click Browse to select the name and location.
- Click OK . If you already have a personal certificate in your key database, a window opens, asking if you want to set the key you are adding as the default key in the database.
- Click Yes or No . The Enter a Label window opens.
- Click OK . The Personal Certificates field shows the label of the new personal certificate you added.
Use the command line
Use the following commands to add a personal certificate to a key database file using iKeycmd :
- On UNIX, Linux and Windows, issue the following command:
 runmqckm -cert -receive -file filename -db filename -pw password
        -format ascii
where:
| -file filename | is the fully qualified file name of the file containing the personal certificate. |
| -db filename | is the fully qualified file name of a CMS key database. |
| -pw password | is the password for the CMS key database. |
| -format ascii | is the format of the certificate. The value can be ascii for Base64-encoded ASCII or binary for Binary DER data. The default is ascii . |
If you are using cryptographic hardware, refer to Importing a personal certificate to your PKCS #11 hardware .
Extracting a CA certificate from a key repository
Follow this procedure to extract a CA certificate.
Use iKeyman
If you need to manage SSL certificates in a way that is FIPS compliant, use the runmqakm command. iKeyman does not provide a FIPS-compliant option.
Perform the following steps on the machine from which you want to extract the CA certificate:
- Start the iKeyman GUI using the strmqikm command..
- From the Key Database File menu, click Open . The Open window opens.
- Click Key database type and select CMS (Certificate Management System).
- Click Browse to navigate to the directory that contains the key database files.
- Select the key database file from which you want to extract, for example key.kdb.
- Click Open . The Password Prompt window opens.
- Type the password you set when you created the key database and click OK . The name of your key database file is displayed in the File Name field.
- In the Key database content field, select Signer Certificates and select the certificate you want to extract.
- Click Extract . The Extract a Certificate to a File window opens.
- Select the Data type of the certificate, for example Base64-encoded ASCII data for a file with the .arm extension.
- Type the certificate file name and location where you want to store the certificate, or click Browse to select the name and location.
- Click OK . The certificate is written to the file you specified.
Use the command line
Use the following commands to extract a CA certificate using iKeycmd :
- On UNIX, Linux and Windows:
 runmqckm -cert -extract -db filename -pw password -label label -target filename
         -format ascii
where:
| -db filename | is the fully qualified path name of a CMS key database. |
| -pw password | is the password for the CMS key database. |
| -label label | is the label attached to the certificate. |
| -target filename | is the name of the destination file. |
| -format ascii | is the format of the certificate. The value can be ascii for Base64-encoded ASCII or binary for Binary DER data. The default is ascii. |
Extracting the public part of a self-signed certificate from a key repository on UNIX, Linux and Windows systems
Follow this procedure to extract the public part of a self-signed certificate.
Use iKeyman
If you need to manage SSL certificates in a way that is FIPS compliant, use the runmqakm command. iKeyman does not provide a FIPS-compliant option.
Perform the following steps on the machine from which you want to extract the public part of a self-signed certificate:
- Start the iKeyman GUI using the strmqikm command (on UNIX, Linux and Windows).
- From the Key Database File menu, click Open . The Open window opens.
- Click Key database type and select CMS (Certificate Management System).
- Click Browse to navigate to the directory that contains the key database files.
- Select the key database file from which you want to extract the certificate, for example key.kdb.
- Click Open . The Password Prompt window opens.
- Type the password you set when you created the key database and click OK . The name of your key database file is displayed in the File Name field.
- In the Key database content field, select Personal Certificates and select the certificate.
- Click Extract certificate . The Extract a Certificate to a File window opens.
- Select the Data type of the certificate, for example Base64-encoded ASCII data for a file with the .arm extension.
- Type the certificate file name and location where you want to store the certificate, or click Browse to select the name and location.
- Click OK . The certificate is written to the file you specified. Note that when you extract (rather than export) a certificate, only the public part of the certificate is included, so a password is not required.
Use the command line
Use the following commands to extract the public part of a self-signed certificate using iKeycmd or runmqakm:
- On UNIX, Linux and Windows:
runmqckm -cert -extract -db filename -pw password -label label -target filename -format ascii - Use runmqakm:
 runmqakm -cert -extract -db filename -pw password -label label
            -target filename -format ascii -fips
where:
| -db filename | is the fully qualified path name of a CMS key database. |
| -pw password | is the password for the CMS key database. |
| -label label | is the label attached to the certificate. |
| -target filename | is the name of the destination file. |
| -format ascii | is the format of the certificate. The value can be ascii for Base64-encoded ASCII or binary for Binary DER data. The default is ascii. |
Adding a CA certificate (or the public part of a self-signed certificate) into a key repository, on UNIX, Linux or Windows systems
Follow this procedure to add a CA certificate or the public part of a self-signed certificate to the key repository.
If the certificate that you want to add is in a certificate chain, you must also add all the certificates that are above it in the chain. You must add the certificates in strictly descending order starting from the root, followed by the CA certificate immediately below it in the chain, and so on.
Where the following instructions refer to a CA certificate, they also apply to the public part of a self-signed certificate.
Use iKeyman
If you need to manage SSL certificates in a way that is FIPS compliant, use the runmqakm command. iKeyman does not provide a FIPS-compliant option.
Perform the following steps on the machine on which you want to add the CA certificate:
- Start the iKeyman GUI using the strmqikm command (on UNIX, Linux and Windows systems).
- From the Key Database File menu, click Open . The Open window opens.
- Click Key database type and select CMS (Certificate Management System).
- Click Browse to navigate to the directory that contains the key database files.
- Select the key database file to which you want to add the certificate, for example key.kdb.
- Click Open . The Password Prompt window opens.
- Type the password you set when you created the key database and click OK . The name of your key database file displays in the File Name field.
- In the Key database content field, select Signer Certificates .
- Click Add . The Add CA's Certificate from a File window opens.
- Type the certificate file name and location where the certificate is stored, or click Browse to select the name and location.
- Click OK . The Enter a Label window opens.
- In the Enter a Label window, type the name of the certificate.
- Click OK . The certificate is added to the key database.
Use the command line
Use the following commands to add a CA certificate using iKeycmd :
- On UNIX, Linux and Windows,
issue the following command:
 runmqckm -cert -add -db filename -pw password -label label -file filename
        -format ascii
where:
| -db filename | is the fully qualified path name of the CMS key database. |
| -pw password | is the password for the CMS key database. |
| -label label | is the label attached to the certificate. |
| -file filename | is the name of the file containing the certificate. |
| -format ascii | is the format of the certificate. The value can be ascii for Base64-encoded ASCII or binary for Binary DER data. The default is ascii. |
Exporting a personal certificate from a key repository
Follow this procedure to exporting a personal certificate.
Use iKeyman
If you need to manage SSL certificates in a way that is FIPS compliant, use the runmqakm command. iKeyman does not provide a FIPS-compliant option.
Perform the following steps on the machine from which you want to export the personal certificate:
- Start the iKeyman GUI using the strmqikm command (on Windows UNIX and Linux ).
- From the Key Database File menu, click Open . The Open window opens.
- Click Key database type and select CMS (Certificate Management System).
- Click Browse to navigate to the directory that contains the key database files.
- Select the key database file from which you want to export the certificate, for example key.kdb.
- Click Open . The Password Prompt window opens.
- Type the password you set when you created the key database and click OK . The name of your key database file is displayed in the File Name field.
- In the Key database content field, select Personal Certificates and select the certificate you want to export.
- Click Export/Import . The Export/Import key window opens.
- Select Export Key .
- Select the Key file type of the certificate you want to export, for example PKCS12 .
- Type the file name and location to which you want to export the certificate, or click Browse to select the name and location.
- Click OK . The Password Prompt window opens. Note that when you export (rather than extract) a certificate, both the public and private parts of the certificate are included. This is why the exported file is protected by a password. When you extract a certificate, only the public part of the certificate is included, so a password is not required.
- Type a password in the Password field, and type it again in the Confirm Password field.
- Click OK . The certificate is exported to the file you specified.
Use the command line
Use the following commands to export a personal certificate using iKeycmd:
- On UNIX, Linux and Windows:
 runmqckm -cert -export -db filename -pw password -label label -type cms
        -target filename -target_pw password -target_type pkcs12
where:
| -db filename | is the fully qualified path name of the CMS key database. |
| -pw password | is the password for the CMS key database. |
| -label label | is the label attached to the certificate. |
| -type cms | is the type of the database. |
| -target filename | is the fully qualified path name of the destination file. |
| -target_pw password | is the password for encrypting the certificate. |
| -target_type pkcs12 | is the type of the certificate. |
Importing a personal certificate into a key repository on UNIX, Linux or Windows systems
Follow this procedure to import a personal certificate
Before importing a personal certificate in PKCS #12 format into the key database file, you must first add the full valid chain of issuing CA certificates to the key database file (see Adding a CA certificate (or the public part of a self-signed certificate) into a key repository, on UNIX, Linux or Windows systems ).
PKCS #12 files should be considered temporary and deleted after use.
Use iKeyman
If you need to manage SSL certificates in a way that is FIPS-compliant, use the runmqakm command. iKeyman does not provide a FIPS-compliant option.
Perform the following steps on the machine to which you want to import the personal certificate:
- Start the iKeyman GUI using the strmqikm command .
- From the Key Database File menu, click Open. The Open window displays.
- Click Key database type and select CMS (Certificate Management System).
- Click Browse to navigate to the directory that contains the key database files.
- Select the key database file to which you want to add the certificate, for example key.kdb.
- Click Open. The Password Prompt window displays.
- Type the password you set when you created the key database and click OK. The name of your key database file displays in the File Name field.
- In the Key database content field, select Personal Certificates.
- If there are certificates in the Personal Certificates view, follow these steps:
- Click Export/Import. The Export/Import key window is displayed.
- Select Import Key.
- If there are no certificates in the Personal Certificates view, click Import.
- Select the Key file type of the certificate you want to import, for example PKCS12.
- Type the certificate file name and location where the certificate is stored, or click Browse to select the name and location.
- Click OK. The Password Prompt window displays.
- In the Password field, type the password used when the certificate was exported.
- Click OK. The Change Labels window is displayed. This window allows the labels of certificates being imported to be changed if, for example, a certificate with the same label already exists in the target key database. Changing certificate labels has no effect on certificate chain validation. This can be used to change the personal certificate label to that required by WebSphere MQ in order to associate the certificate with the particular queue manager or client (ibmwebspheremqqm1 for example).
- To change a label, select the required label from the Select a label to change list. The label is copied into the Enter a new label entry field. Replace the label text with that of the new label and click Apply.
- The text in the Enter a new label entry field is copied back into the Select a label to change field, replacing the originally selected label and so relabelling the corresponding certificate.
- When you have changed all the labels that needed to be changed, click OK. The Change Labels window closes, and the original IBM Key Management window reappears with the Personal Certificates and Signer Certificates fields updated with the correctly labeled certificates.
- The certificate is imported to the target key database.
Use the command line
To import a personal certificate using iKeycmd, use the following commands:
- On UNIX, Linux and Windows:
 runmqckm -cert -import -file filename -pw password -type pkcs12 -target filename
-target_pw password -target_type cms -label label
where:
| -file filename | is the fully qualified file name of the file containing the PKCS #12 certificate. |
| -pw password | is the password for the PKCS #12 certificate. |
| -type pkcs12 | is the type of the file. |
| -target filename | is the name of the destination CMS key database. |
| -target_pw password | is the password for the CMS key database. |
| -target_type cms | is the type of the database specified by -target |
| -label label | is the label of the certificate to import from the source key database. |
| -new_label label | is the label that the certificate will be assigned in the target database. If you omit -new_label option, the default is to use the same as the -label option. |
iKeycmd does not provide a command to change certificate labels directly. Use the following steps to change a certificate label:
- Export the certificate to a PKCS #12 file using the -cert -export command. Specify the existing certificate label for the -label option.
- Remove the existing copy of the certificate from the original key database using the -cert -delete command.
- Import the certificate from the PKCS #12 file using the -cert -import command. Specify the old label for the -label option and the required new label for the -new_label option. The certificate will be imported back into the key database with the required label.
Importing from a Microsoft .pfx file
Folow this procedure to mport from a Microsoft .pfx file using iKeyman. You cannot use runmqakm to import a .pfx file.
A .pfx file can contain two certificates relating to the same key. One is a personal or site certificate (containing both a public and private key). The other is a CA (signer) certificate (containing only a public key). These certificates cannot coexist in the same CMS key database file, so only one of them can be imported. Also, the "friendly name" or label is attached to only the signer certificate.
The personal certificate is identified by a system generated Unique User Identifier (UUID). This section shows the import of a personal certificate from a pfx file while labeling it with the friendly name previously assigned to the CA (signer) certificate. The issuing CA (signer) certificates should already be added to the target key database. Note that PKCS#12 files should be considered temporary and deleted after use.
Follow these steps to import a personal certificate from a source pfx key database:
- Start the iKeyman GUI using the strmqikm command (on Linux, UNIX or Windows). The IBM Key Management window is displayed.
- From the Key Database File menu, click Open . The Open window is displayed.
- Select a key database type of PKCS12 .
- You are recommended to take a backup of the pfx database before performing this step. Select the pfx key database that you want to import. Click Open . The Password Prompt window is displayed.
- Enter the key database password and click OK . The IBM Key Management window is displayed. The title bar shows the name of the selected pfx key database file, indicating that the file is open and ready.
- Select Signer Certificates from the list. The "friendly name" of the required certificate is displayed as a label in the Signer Certificates panel.
- Select the label entry and click Delete to remove the signer certificate. The Confirm window is displayed.
- Click Yes . The selected label is no longer displayed in the Signer Certificates panel.
- Repeat steps 6, 7, and 8 for all the signer certificates.
- From the Key Database File menu, click Open . The Open window is displayed.
- Select the target key CMS database which the pfx file is being imported into. Click Open . The Password Prompt window is displayed.
- Enter the key database password and click OK . The IBM Key Management window is displayed. The title bar shows the name of the selected key database file, indicating that the file is open and ready.
- Select Personal Certificates from the list.
- If there are certificates in the Personal Certificates view, follow these steps:
- Click Export/Import key. The Export/Import key window is displayed.
- Select Import from Choose Action Type.
- If there are no certificates in the Personal Certificates view, click Import.
- Select the PKCS12 file.
- Enter the name of the pfx file as used in Step 4. Click OK . The Password Prompt window is displayed.
- Specify the same password that you specified when you deleted the signer certificate. Click OK .
- The Change Labels window is displayed (as there should be only a single certificate available for import). The label of the certificate should be a UUID which has a format xxxxxxxx-xxxx-xxxx-xxxx-xxxxxxxxxxxx.
- To change the label select the UUID from the Select a label to change: panel. The label will be replicated into the Enter a new label: field. Replace the label text with that of the friendly name that was deleted in Step 7 and click Apply . The friendly name must be in the form ibmwebspheremq, followed by the queue manager name or the WebSphere MQ MQI client user logon ID in lower case.
- Click OK . The Change Labels window is now removed and the original IBM Key Management window reappears with the Personal Certificates and Signer Certificates panels updated with the correctly labeled personal certificate.
- The pfx personal certificate is now imported to the (target) database.
It is not possible to change a certificate label using iKeycmd
Importing from a PKCS #7 file
The iKeyman and iKeycmd tools do not support PKCS #7 (.p7b) files. Use the runmqckm tool to import certificates from a PKCS #7 file.
Use the following command to add a CA certificate from a PKCS #7 file:
 runmqckm -cert -add -db filename -pw password -type cms -file filename
-label label
| -db filename | is the fully qualified file name of the CMS key database. |
| -pw password | is the password for the key database. |
| -type cms | is the type of the key database. |
| -file filename | is the name of the PKCS #7 file. |
| -label label | is the label that the certificate is assigned in the target database. The first certificate takes the label given. All other certificates, if present, are labeled with their subject name. |
Use the following command to import a personal certificate from a PKCS #7 file:
 runmqckm -cert -import -db filename -pw password -type pkcs7 -target filename
 -target_pw password -target_type cms -label label -new_label label
| -db filename | is the fully qualified file name of the file containing the PKCS #7 certificate. |
| -pw password | is the password for the PKCS #7 certificate. |
| -type pkcs7 | is the type of the file. |
| -target filename | is the name of the destination key database. |
| -target_pw password | is the password for the destination key database. |
| -target_type cms | is the type of the database specified by -target |
| -label label | is the label of the certificate that is to be imported. |
| -new_label label | is the label that the certificate will be assigned
in the target database. If you omit the -new_label option, the default is to use the same as the -label option.
|
Deleting a certificate from a key repository on UNIX, Linux or Windows systems
Use this procedure to remove personal or CA certificates.
Use iKeyman
If you need to manage SSL certificates in a way that is FIPS compliant, use the runmqakm command. iKeyman does not provide a FIPS-compliant option.
- Start the iKeyman GUI using the strmqikm command (on UNIX, Linux and Windows systems).
- From the Key Database File menu, click Open . The Open window opens.
- Click Key database type and select CMS (Certificate Management System).
- Click Browse to navigate to the directory that contains the key database files.
- Select the key database file from which you want to delete the certificate, for example key.kdb.
- Click Open . The Password Prompt window opens.
- Type the password you set when you created the key database and click OK . The name of your key database file is displayed in the File Name field.
- From the drop down list, select Personal Certificates or Signer Certificates
- Select the certificate you want to delete.
- If you do not already have a copy of the certificate and you want to save it, click Export/Import and export it (see Exporting a personal certificate from a key repository ).
- With the certificate selected, click Delete . The Confirm window opens.
- Click Yes . The Personal Certificates field no longer shows the label of the certificate you deleted.
Use the command line
Use the following commands to delete a certificate using iKeycmd or runmqakm:
- On UNIX, Linux and Windows:
runmqckm -cert -delete -db filename -pw password -label label
where:
| -db filename | is the fully qualified file name of a CMS key database. |
| -pw password | is the password for the CMS key database. |
| -label label | is the label attached to the personal certificate. |
| -fips | specifies that the command is run in FIPS mode. This mode disables the use of the BSafe cryptographic library. Only the ICC component is used and this component must be successfully initialized in FIPS mode. When in FIPS mode, the ICC component uses algorithms that have been FIPS 140-2 validated. If the ICC component does not initialize in FIPS mode, the runmqakm command fails. |
Generating strong passwords for key repository protection
You can generate strong passwords for key repository protection using the runmqakm command.
You can use the runmqakm command with the following parameters to generate a strong password:
runmqakm -random -create -length 14 -strong -fips
When using the generated password on the -pw parameter of subsequent certificate administration commands, always place double quotation marks around the password. On UNIX and Linux systems, you must also use a backslash character to escape the following characters if they appear in the password string:
! \ " '
When entering the password in response to a prompt from runmqckm, runmqakm or the iKeyman GUI then it is not necessary to quote or escape the password. It is not necessary because the operating system shell does not affect data entry in these cases.
Configure for cryptographic hardware on UNIX, Linux or Windows systems
You can configure cryptographic hardware for a queue manager or client in a number of ways.
You can configure cryptographic hardware for a queue manager on UNIX, Linux or Windows systems using either of the following methods:
- Use the ALTER QMGR MQSC command with the SSLCRYP parameter, as described in ALTER QMGR .
- Use WebSphere MQ Explorer to configure the cryptographic hardware on your UNIX, Linux or Windows system. For more information, refer to the online help.
You can configure cryptographic hardware for a WebSphere MQ client on UNIX, Linux or Windows systems using either of the following methods:
- Set the MQSSLCRYP environment variable. The permitted values for MQSSLCRYP are the same as for the SSLCRYP parameter, as described in ALTER QMGR . If you use the GSK_PCS11 version of the SSLCRYP parameter, the PKCS #11 token label must be specified entirely in lower-case.
- Set the CryptoHardware field of the SSL configuration options structure, MQSCO, on an MQCONNX call. For more information, see Overview for MQSCO .
If you have configured cryptographic hardware which uses the PKCS #11 interface using any of these methods, you must store the personal certificate for use on your channels in the key database file for the cryptographic token you have configured. This is described in Managing certificates on PKCS #11 hardware .
Managing certificates on PKCS #11 hardware
You can manage digital certificates on cryptographic hardware that supports the PKCS #11 interface. You must create a key database to prepare the WebSphere MQ environment, even if you do not intend to store certificate authority (CA) certificates in it, but will store all your certificates on your cryptographic hardware. A key database is necessary for the queue manager to reference in its SSLKEYR field, or for the client application to reference in the MQSSLKEYR environment variable. This key database is also required if you are creating a certificate request.
Procedure
- To create a key database by using the iKeyman user interface,
complete the following steps:
- On UNIX and Linux systems, log in as the root user. On Windows systems, log in as Administrator or as a member of the MQM group.
- Start the iKeyman user interface by running the strmqikm command.
- Click Key Database File > Open.
- Click Key database
type and select PKCS11Direct.
- In the File Name field, type
the name of the module for managing your cryptographic hardware; for example, PKCS11_API.so.
If you are using certificates or keys stored on PKCS #11 cryptographic hardware, note that iKeycmd and iKeyman are 64-bit programs. External modules required for PKCS #11 support will be loaded into a 64-bit process, therefore you must have a 64-bit PKCS #11 library installed for the administration of cryptographic hardware. The Windows and Linux x86 32-bit platforms are the only exceptions, as the iKeyman and iKeycmd programs are 32-bit on those platforms.
- In the Location field, enter
the path:
- On UNIX and Linux systems, this might be /usr/lib/pksc11, for example.
- On Windows systems, you can type the library name; for example, cryptoki.
Click OK. The Open Cryptographic Token window opens.
- In the Cryptographic Token Password field, type the password that you set when you configured the cryptographic hardware.
- If your cryptographic hardware has the capacity to hold the signer certificates required to receive or import
a personal certificate, clear both secondary key database check boxes
and continue from step 12 . If you require a secondary CMS key database to hold the signer
certificates, select either Open existing secondary key
database file or Create new secondary key database
file.
- In the File Name field, type
a file name. This field already contains the text key.kdb.
If your stem name is key, leave this field unchanged.
If you specified a different stem name, replace key with your stem name. You must not change the .kdb suffix.
- In the Location field, type the path, for example:
- For a queue manager: /var/mqm/qmgrs/QM1/ssl
- For a WebSphere MQ MQI client: /var/mqm/ssl
Click OK. The Password Prompt window opens.
- Enter a password.
- If you selected Open existing secondary key database file in step 8 , type a password in the Password field.
- If you selected Create new secondary key database file in step 8 :
- Type a password in the Password field, and type it again in the Confirm Password field.
- Select Stash the password to a file. Note that if you do not stash the password, attempts to start SSL channels fail because they cannot obtain the password required to access the key database file.
- Click OK. A window opens, confirming that the password is in file key.sth (unless you specified a different stem name).
- Click OK. The Key database content frame displays.
- On UNIX and Linux systems, log in as the root user. On Windows systems, log in as Administrator or as a member of the MQM group.
- To create a key database by using the command line, use either of the following commands:
- On UNIX, Linux, and Windows systems:
runmqckm -keydb -create -db filename -pw password -type cms -stash
- Use runmqakm:
 runmqakm -keydb -create -db filename -pw password -type cms
    -stash -fips -strong
where:
- -db filename
- Specifies the fully qualified file name of a CMS key database, and must have a file extension of .kdb.
- -pw password
- Specifies the password for the CMS key database.
- -type cms
- Specifies the type of database. (For WebSphere MQ, it must be cms.)
- -stash
- Saves the key database password to a file.
- -fips
- Disables the use of the BSafe cryptographic library. Only the ICC component is used and this component must be successfully initialized in FIPS mode. When in FIPS mode, the ICC component uses algorithms that are FIPS 140-2 validated. If the ICC component does not initialize in FIPS mode, the runmqakm command fails.
- -strong
- Checks that the password entered satisfies the minimum requirements
for password strength. The minimum requirements for a password are as follows:
- The password must be a minimum length of 14 characters.
- The password must contain a minimum of one lowercase character, one uppercase character, and one digit or special character. Special characters include the asterisk (*), the dollar sign ($), the number sign (#), and the percent sign (%). A space is classified as a special character.
- Each character can occur a maximum of three times in a password.
- A maximum of two consecutive characters in the password can be identical.
- All characters are in the standard ASCII printable character set within the range 0x20 - 0x7E.
- On UNIX, Linux, and Windows systems:
Requesting a personal certificate for your PKCS #11 hardware
Use this procedure for either a queue manager or a WebSphere MQ MQI client to request a personal certificate for your cryptographic hardware.
Use the iKeyman user interface
About this task
Note: WebSphere MQ does not support SHA-3 or SHA-5 algorithms. You can use the digital signature algorithm names SHA384WithRSA and SHA512WithRSA because both algorithms are members of the SHA-2 family.
The digital signature algorithm names SHA3WithRSA and SHA5WithRSA are deprecated because they are an abbreviated form of SHA384WithRSA and SHA512WithRSA respectively.
Procedure
To request a personal certificate from the iKeyman user interface, complete the following steps:
- Complete the steps to work with your cryptographic hardware.
See Managing certificates on PKCS #11 hardware .
- From the Create menu, click New Certificate Request. The Create
New Key and Certificate Request window opens.
- In the Key Label field, enter the following labels:
- For a queue manager, enter ibmwebspheremq followed by the name of your queue manager changed to lowercase. For example, for a queue manager called QM1, enter ibmwebspheremqqm1.
- For a WebSphere MQ MQI client, enter ibmwebspheremq followed by your logon user ID, all in lowercase; for example, ibmwebspheremqmyuserid .
- Enter values for Common Name and Organization, and select a Country . For the remaining optional fields, either accept the default values, or type or select new values. Note that you can supply only one name in the Organizational Unit field. For more information about these fields, see Distinguished Names .
- In the Enter the name of a file in which to store the certificate request field, either accept the default certreq.arm, or type a new value
with a full path.
- Click OK. A confirmation
window opens.
- Click OK. The Personal Certificate Requests list shows the label of the new personal certificate request you created. The certificate
request is stored in the file you chose in step 5 .
- Request the new personal certificate either by sending the file to a certificate authority (CA), or by copying the file into the request form on the website for the CA.
Use the command line
Procedure
Use the following commands to request a personal certificate by using either the iKeycmd or runmqakm command:
- Use iKeycmd on UNIX, Linux, and Windows systems:
 runmqckm -certreq -create -db filename -pw password -label label
        -dn distinguished_name -size key_size
 -file filename -sig_alg algorithm
Instead of -dn distinguished_name, you can use -san_dsname DNS_names, -san_emailaddr email_addresses, or -san_ipaddr IP_addresses.
- Use runmqakm:
 runmqakm -certreq -create -db filename -pw password -label label
        -dn distinguished_name -size key_size
 -file filename -fips
        -sig_alg algorithm
where:
- -db filename
- Specifies the fully qualified file name of a CMS key database.
- -pw password
- Specifies the password for the CMS key database.
- -label label
- Specifies the key label attached to the certificate.
- -dn distinguished_name
- Specifies the X.500 distinguished name enclosed in double quotation marks. At least one attribute is required. You can supply multiple OU and DC attributes.
- -size key_size
- Specifies the key size. If you are using iKeycmd , the value can be 512 or 1024. If you are using runmqakm, the value can be 512, 1024, or 2048.
- -file filename
- Specifies the file name for the certificate request.
- -fips
- Specifies that the command is run in FIPS mode. This mode disables the use of the BSafe cryptographic library. Only the ICC component is used and this component must be successfully initialized in FIPS mode. When in FIPS mode, the ICC component uses algorithms that are FIPS 140-2 validated. If the ICC component does not initialize in FIPS mode, the runmqakm command fails.
- -sig_alg
- For iKeycmd, specifies the asymmetric signature algorithm used for the creation of the entry's key pair. The value can be MD2_WITH_RSA, MD2WithRSA, MD5_WITH_RSA, MD5WithRSA, SHA1WithDSA , SHA1WithRSA, SHA256_WITH_RSA, SHA256WithRSA, SHA2WithRSA, SHA384_WITH_RSA , SHA384WithRSA, SHA512_WITH_RSA , SHA512WithRSA, SHA_WITH_DSA, SHA_WITH_RSA, SHAWithDSA, or SHAWithRSA . The default value is SHA1WithRSA
- -sig_alg
- For runmqakm, specifies the hashing algorithm used during the creation of a certificate request. This hashing algorithm is used to create the signature associated with the newly created certificate request. The value can be md5, MD5_WITH_RSA, MD5WithRSA, SHA_WITH_DSA , SHA_WITH_RSA, sha1, SHA1WithDSA , SHA1WithECDSA, SHA1WithRSA, sha224, SHA224_WITH_RSA, SHA224WithDSA , SHA224WithECDSA, SHA224WithRSA , sha256, SHA256_WITH_RSA, SHA256WithDSA, SHA256WithECDSA, SHA256WithRSA, SHA2WithRSA, sha384 , SHA384_WITH_RSA, SHA384WithECDSA , SHA384WithRSA, sha512, SHA512_WITH_RSA, SHA512WithECDSA, SHA512WithRSA, SHAWithDSA, SHAWithRSA , EC_ecdsa_with_SHA1, EC_ecdsa_with_SHA224 , EC_ecdsa_with_SHA256, EC_ecdsa_with_SHA384 , or EC_ecdsa_with_SHA512. The default value is SHA1WithRSA.
- -san_dnsname DNS_names
- Specifies a comma-delimited or space-delimited list of DNS names for the entry being created.
- -san_emailaddr email_addresses
- Specifies a comma-delimited or space-delimited list of email addresses for the entry being created.
- -san_ipaddr IP_addresses
- Specifies a comma-delimited or space-delimited list of IP addresses for the entry being created.
Importing a personal certificate to your PKCS #11 hardware
Use this procedure for either a queue manager or a WebSphere MQ MQI client to import a personal certificate to your cryptographic hardware.
Use iKeyman
Procedure
To request a personal certificate from the iKeyman user interface, complete the following steps:
- Complete the steps to work with your cryptographic hardware.
See Managing certificates on PKCS #11 hardware .
- Click Receive. The Receive Certificate
from a File window opens.
- Select the Data type of the new
personal certificate; for example, Base64-encoded ASCII data for a file with the .arm extension.
- Type the certificate file name and location for the new
personal certificate, or click Browse to select
the name and location.
- Click OK. If you already have a personal certificate in your key database a window opens, asking if you want to set the key you are adding as the default key in the database.
- Click Yes or No.
The Enter a Label window opens.
- Type a label. For example, you might use the same label as when you requested the personal certificate. Note that the label must be in the correct WebSphere MQ format:
- For a queue manager, ibmwebspheremq followed by the name of your queue manager in lowercase. For example, for a queue manager called QM1, the label would be: ibmwebspheremqqm1.
- For a WebSphere MQ MQI client, ibmwebspheremq followed by your logon user ID in lowercase. For example, for a user ID MyUserID, the label would be: ibmwebspheremqmyuserid.
- Click OK. The Personal Certificates list shows the label of the new personal certificate you added. This label is formed by adding the cryptographic token label before the label you supplied.
Use the command line
Procedure
To request a personal certificate from a command line, complete the following steps:
- Open a command window that is configured for your environment.
- Enter the appropriate command for your operating system and configuration:
- On Windows, UNIX and Linux systems, use one of the following commands:
runmqckm -cert -receive -file filename -crypto path -tokenlabel hardware_token -pw hardware_password -format cert_format
runmqakm -cert -receive -file filename -crypto path -tokenlabel hardware_token -pw hardware_password -format cert_format -fips
where:
- -file filename
- Specifies the fully qualified file name of the file containing the personal certificate.
- -crypto path
- Specifies the fully qualified path to the PKCS #11 library supplied with the hardware.
- -tokenlabel hardware_token
- Specifies the label given to the storage part of the cryptographic hardware during installation.
- -pw hardware_password
- Specifies the password for access to the hardware.
- -format cert_format
- Specifies the format of the certificate. The value can be ascii for Base64-encoded ASCII or binary for binary DER data. The default is ASCII.
- -fips
- Specifies that the command is run in FIPS mode This mode disables the use of the BSafe cryptographic library. Only the ICC component is used and this component must be successfully initialized in FIPS mode. When in FIPS mode, the ICC component uses algorithms that are FIPS 140-2 validated. If the ICC component does not initialize in FIPS mode, the runmqakm command fails.
- On Windows, UNIX and Linux systems, use one of the following commands:
Identifying and authenticating users
You can identify and authenticate users by using the MQCSP structure or in several types of user exit program.
Use the MQCSP structure
You specify the MQCSP connection security parameters structure on an MQCONNX call; this structure contains a user ID and password. If necessary, you can alter the MQCSP in a security exit.
Note: The object authority manager (OAM) does not use the password. However the OAM does some limited work with the user ID, that could be considered a trivial form of authentication. These checks stop you adopting another user ID, if you use those parameters in your applications.
Implementing identification and authentication in security exits
The primary purpose of a security exit is to enable the MCA at each end of a channel to authenticate its partner. At each end of a message channel, and at the server end of an MQI channel, an MCA typically acts on behalf of the queue manager to which it is connected. At the client end of an MQI channel, an MCA typically acts on behalf of the user of the WebSphere MQ client application. In this situation, mutual authentication actually takes place between two queue managers, or between a queue manager and the user of a WebSphere MQ MQI client application.
The supplied security exit (the SSPI channel exit) illustrates how mutual authentication can be implemented by exchanging authentication tokens that are generated, and then checked, by a trusted authentication server such as Kerberos. For more details, see The SSPI channel exit program .
Mutual authentication can also be implemented by using Public Key Infrastructure (PKI) technology. Each security exit generates some random data, signs it using the private key of the queue manager or user it is representing, and sends the signed data to its partner in a security message. The partner security exit performs the authentication by checking the digital signature using the public key of the queue manager or user. Before exchanging digital signatures, the security exits might need to agree the algorithm for generating a message digest, if more than one algorithm is available for use.
When a security exit sends the signed data to its partner, it also needs to send some means of identifying the queue manager or user it is representing. This might be a Distinguished Name, or even a digital certificate. If a digital certificate is sent, the partner security exit can validate the certificate by working through the certificate chain to the root CA certificate. This provides assurance of the ownership of the public key that is used to check the digital signature.
The partner security exit can validate a digital certificate only if it has access to a key repository that contains the remaining certificates in the certificate chain. If a digital certificate for the queue manager or user is not sent, one must be available in the key repository to which the partner security exit has access. The partner security exit cannot check the digital signature unless it can find the signer's public key.
The Secure Sockets Layer (SSL) and Transport Layer Security (TLS) use PKI techniques like the ones just described. For more information about how SSL and TLS perform authentication, see Secure Sockets Layer (SSL) and Transport Layer Security (TLS) concepts .
If a trusted authentication server or PKI support is not available, other techniques can be used. A common technique, which can be implemented in security exits, uses a symmetric key algorithm.
One of the security exits, exit A, generates a random number and sends it in a security message to its partner security exit, exit B. Exit B encrypts the number using its copy of a key which is known only to the two security exits. Exit B sends the encrypted number to exit A in a security message with a second random number that exit B has generated. Exit A verifies that the first random number has been encrypted correctly, encrypts the second random number using its copy of the key, and sends the encrypted number to exit B in a security message. Exit B then verifies that the second random number has been encrypted correctly. During this exchange, if either security exit is not satisfied with the authenticity of other, it can instruct the MCA to close the channel.
An advantage of this technique is that no key or password is sent over the communications connection during the exchange. A disadvantage is that it does not provide a solution to the problem of how to distribute the shared key in a secure way. One solution to this problem is described in Implementing confidentiality in user exit programs . A similar technique is used in SNA for the mutual authentication of two LUs when they bind to form a session. The technique is described in Session level authentication .
All the preceding techniques for mutual authentication can be adapted to provide one-way authentication.
Implementing identification and authentication in message exits
When an application puts a message on a queue, the UserIdentifier field in the message descriptor contains a user ID associated with the application. However, there is no data present that can be used to authenticate the user ID. This data can be added by a message exit at the sending end of a channel and checked by a message exit at the receiving end of the channel. The authenticating data can be an encrypted password or a digital signature, for example.
This service might be more effective if it is implemented at the application level. The basic requirement is for the user of the application that receives the message to be able to identify and authenticate the user of the application that sent the message. It is therefore natural to consider implementing this service at the application level. For more information, see Identity mapping in the API exit and API-crossing exit .
Implementing identification and authentication in the API exit and API-crossing exit
At the level of an individual message, identification and authentication is a service that involves two users, the sender and the receiver of the message. The basic requirement is for the user of the application that receives the message to be able to identify and authenticate the user of the application that sent the message. Note that the requirement is for one way, not two way, authentication.
Depending on how it is implemented, the users and their applications might need to interface, or even interact, with the service. In addition, when and how the service is used might depend on where the users and their applications are located, and on the nature of the applications themselves. It is therefore natural to consider implementing the service at the application level rather than at the link level.
If you consider implementing this service at the link level, you might need to resolve issues such as the following:
- On a message channel, how do you apply the service only to those messages that require it?
- How do you enable users and their applications to interface, or interact, with the service, if this is a requirement?
- In a multi-hop situation, where a message is sent over more than one message channel on the way to its destination, where do you invoke the components of the service?
Here are some examples of how the identification and authentication service can be implemented at the application level. The term API exit means either an API exit or an API-crossing exit.
- When an application puts a message on a queue, an API exit can acquire an authentication token from a trusted authentication server such as Kerberos. The API exit can add this token to the application data in the message. When the message is retrieved by the receiving application, a second API exit can ask the authentication server to authenticate the sender by checking the token.
- When an application puts a message on a queue, an API exit can append the following items to the application data in the message:
- The digital certificate of the sender
- The digital signature of the sender
If different algorithms for generating a message digest are available for use, the API exit can include the name of the algorithm it has used.
When the message is retrieved by the receiving application, a second API exit can perform the following checks:
- The API exit can validate the digital certificate by working through the certificate chain to the root CA certificate. To do this, the API exit must have access to a key repository that contains the remaining certificates in the certificate chain. This check provide assurance that the sender, identified by the Distinguished Name, is the genuine owner of the public key contained in the certificate.
- The API exit can check the digital signature using the public key contained in the certificate. This check authenticates the sender.
The Distinguished Name of the sender can be sent instead of the whole digital certificate. In this case, the key repository must contain the sender's certificate so that the second API exit can find the public key of the sender. Another possibility is to send all the certificates in the certificate chain.
- When an application puts a message on a queue, the UserIdentifier field in the message descriptor
contains a user ID associated with the application. The user ID can be used to identify the sender. To enable authentication, an API exit
can append some data, such as an encrypted password, to the application data in the message. When the message is retrieved by the receiving application, a second API exit can authenticate the user ID by using the data that has travelled with the message.
This technique might be considered sufficient for messages that originate in a controlled and trusted environment, and in circumstances where a trusted authentication server or PKI support is not available.
Privileged users
A privileged user is one that has full administrative authorities for WebSphere MQ.
In addition to the users listed in the following table, members of any group with +crt authority for queues are indirectly administrators. Similarly, any user that has +set authority on the queue manager, and +put authority on the command queue is an administrator.
You should not grant these privileges to ordinary users and applications.
| Platform | Privileged users |
|---|---|
| Windows systems |
|
| UNIX and Linux systems |
|
Identifying and authenticating users using the MQCSP structure
You can specify the MQCSP connection security parameters structure on an MQCONNX call.
The MQCSP connection security parameters structure contains a user ID and password, which the authorization service can use to identify and authenticate the user.
The authorization service component supplied with WebSphere MQ is called the Object Authority Manager (OAM). The OAM authorizes users based on the ID contained in the MQCSP but does not validate the password. It is possible to implement password validation in the authorization service by using chained exits with the OAM, or by replacing the OAM with an alternative authorization service.
You can alter the MQCSP in a security exit.
Implementing identification and authentication in security exits
You can use a security exit to implement one-way or mutual authentication.
The primary purpose of a security exit is to enable the MCA at each end of a channel to authenticate its partner. At each end of a message channel, and at the server end of an MQI channel, an MCA typically acts on behalf of the queue manager to which it is connected. At the client end of an MQI channel, an MCA typically acts on behalf of the user of the WebSphere MQ MQI client application. In this situation, mutual authentication actually takes place between two queue managers, or between a queue manager and the user of a WebSphere MQ MQI client application.
The supplied security exit (the SSPI channel exit) illustrates how mutual authentication can be implemented by exchanging authentication tokens that are generated, and then checked, by a trusted authentication server such as Kerberos. For more details, see The SSPI channel exit program .
Mutual authentication can also be implemented by using Public Key Infrastructure (PKI) technology. Each security exit generates some random data, signs it using the private key of the queue manager or user it is representing, and sends the signed data to its partner in a security message. The partner security exit performs the authentication by checking the digital signature using the public key of the queue manager or user. Before exchanging digital signatures, the security exits might need to agree the algorithm for generating a message digest, if more than one algorithm is available for use.
When a security exit sends the signed data to its partner, it also needs to send some means of identifying the queue manager or user it is representing. This might be a Distinguished Name, or even a digital certificate. If a digital certificate is sent, the partner security exit can validate the certificate by working through the certificate chain to the root CA certificate. This provides assurance of the ownership of the public key that is used to check the digital signature.
The partner security exit can validate a digital certificate only if it has access to a key repository that contains the remaining certificates in the certificate chain. If a digital certificate for the queue manager or user is not sent, one must be available in the key repository to which the partner security exit has access. The partner security exit cannot check the digital signature unless it can find the signer's public key.
The Secure Sockets Layer (SSL) and Transport Layer Security (TLS) use PKI techniques like the ones just described. For more information about how the Secure Sockets Layer performs authentication, see Secure Sockets Layer (SSL) and Transport Layer Security (TLS) concepts .
If a trusted authentication server or PKI support is not available, other techniques can be used. A common technique, which can be implemented in security exits, uses a symmetric key algorithm.
One of the security exits, exit A, generates a random number and sends it in a security message to its partner security exit, exit B. Exit B encrypts the number using its copy of a key which is known only to the two security exits. Exit B sends the encrypted number to exit A in a security message with a second random number that exit B has generated. Exit A verifies that the first random number has been encrypted correctly, encrypts the second random number using its copy of the key, and sends the encrypted number to exit B in a security message. Exit B then verifies that the second random number has been encrypted correctly. During this exchange, if either security exit is not satisfied with the authenticity of other, it can instruct the MCA to close the channel.
An advantage of this technique is that no key or password is sent over the communications connection during the exchange. A disadvantage is that it does not provide a solution to the problem of how to distribute the shared key in a secure way. One solution to this problem is described in Implementing confidentiality in user exit programs . A similar technique is used in SNA for the mutual authentication of two LUs when they bind to form a session. The technique is described in Session level authentication .
All the preceding techniques for mutual authentication can be adapted to provide one-way authentication.
Identity mapping in message exits
You can use message exits to process information to authenticate a user ID, though it might be better to implement authentication at the application level.
When an application puts a message on a queue, the UserIdentifier field in the message descriptor contains a user ID associated with the application. However, there is no data present that can be used to authenticate the user ID. This data can be added by a message exit at the sending end of a channel and checked by a message exit at the receiving end of the channel. The authenticating data can be an encrypted password or a digital signature, for example.
This service might be more effective if it is implemented at the application level. The basic requirement is for the user of the application that receives the message to be able to identify and authenticate the user of the application that sent the message. It is therefore natural to consider implementing this service at the application level. For more information, see Identity mapping in the API exit and API-crossing exit .
Identity mapping in the API exit and API-crossing exit
An application that receives a message must be able to identify and authenticate the user of the application that sent the message. This service is typically best implemented at the application level. API exits can implement the service in a number of ways.
At the level of an individual message, identification and authentication is a service that involves two users, the sender and the receiver of the message. The basic requirement is for the user of the application that receives the message to be able to identify and authenticate the user of the application that sent the message. Note that the requirement is for one way, not two way, authentication.
Depending on how it is implemented, the users and their applications might need to interface, or even interact, with the service. In addition, when and how the service is used might depend on where the users and their applications are located, and on the nature of the applications themselves. It is therefore natural to consider implementing the service at the application level rather than at the link level.
If you consider implementing this service at the link level, you might need to resolve issues such as the following:
- On a message channel, how do you apply the service only to those messages that require it?
- How do you enable users and their applications to interface, or interact, with the service, if this is a requirement?
- In a multi-hop situation, where a message is sent over more than one message channel on the way to its destination, where do you invoke the components of the service?
Here are some examples of how the identification and authentication service can be implemented at the application level. The term API exit means either an API exit or an API-crossing exit.
- When an application puts a message on a queue, an API exit can acquire an authentication token from a trusted authentication server such as Kerberos. The API exit can add this token to the application data in the message. When the message is retrieved by the receiving application, a second API exit can ask the authentication server to authenticate the sender by checking the token.
- When an application puts a message on a queue, an API exit can append the following items to the application data in the message:
- The digital certificate of the sender
- The digital signature of the sender
If different algorithms for generating a message digest are available for use, the API exit can include the name of the algorithm it has used.
When the message is retrieved by the receiving application, a second API exit can perform the following checks:
- The API exit can validate the digital certificate by working through the certificate chain to the root CA certificate. To do this, the API exit must have access to a key repository that contains the remaining certificates in the certificate chain. This check provide assurance that the sender, identified by the Distinguished Name, is the genuine owner of the public key contained in the certificate.
- The API exit can check the digital signature using the public key contained in the certificate. This check authenticates the sender.
The Distinguished Name of the sender can be sent instead of the whole digital certificate. In this case, the key repository must contain the sender's certificate so that the second API exit can find the public key of the sender. Another possibility is to send all the certificates in the certificate chain.
- When an application puts a message on a queue, the UserIdentifier field in the message descriptor
contains a user ID associated with the application. The user ID can be used to identify the sender. To enable authentication, an API exit
can append some data, such as an encrypted password, to the application data in the message. When the message is retrieved by the receiving application, a second API exit can authenticate the user ID by using the data that has travelled with the message.
This technique might be considered sufficient for messages that originate in a controlled and trusted environment, and in circumstances where a trusted authentication server or PKI support is not available.
Working with revoked certificates
Digital certificates can be revoked by Certificate Authorities. You can check the revocation status of certificates using OCSP, or CRLs on LDAP servers, depending on platform.
During the SSL handshake, the communicating partners authenticate each other with digital certificates. Authentication can include a check that the certificate received can still be trusted. Certificate Authorities (CAs) revoke certificates for various reasons, including:
- The owner has moved to a different organization
- The private key is no longer secret
CAs publish revoked personal certificates in a Certificate Revocation List (CRL). CA certificates that have been revoked are published in an Authority Revocation List (ARL).
On UNIX, Linux and Windows systems, WebSphere MQ SSL support checks for revoked certificates using OCSP (Online Certificate Status Protocol) or using CRLs and ARLs on LDAP (Lightweight Directory Access Protocol) servers. OCSP is the preferred method. However, WebSphere MQ classes for Java and WebSphere MQ classes for JMS cannot use OCSP.
On z/Os and IBM i WebSphere MQ SSL support checks for revoked certificates using CRLs and ARLs on LDAP servers only.
For more information about Certificate Authorities, see Digital certificates .
Revoked certificates and OCSP
WebSphere MQ determines which Online Certificate Status Protocol (OCSP) responder to use, and handles the response received. You might have to take steps to make the OCSP responder accessible.
Note: This information applies only to WebSphere MQ on Windows, UNIX and Linux systems.
To check the revocation status of a digital certificate using OCSP, WebSphere MQ can use two methods to determines which OCSP responder to contact:
- By using the AuthorityInfoAccess (AIA) certificate extension in the certificate to be checked.
- By using a URL specified in an authentication information object or specified by a client application.
A URL specified in an authentication information object or by a client application takes priority over a URL in an AIA certificate extension.
If the URL of the OCSP responder lies behind a firewall, reconfigure the firewall so the OCSP responder can be accessed or set up an OCSP proxy server. Specify the name of the proxy server by using the SSLHTTPProxyName variable in the SSL stanza. On client systems, you can also specify the name of the proxy server by using the environment variable MQSSLPROXY. For more details, see the related information.
If you are not concerned whether TLS or SSL certificates are revoked, perhaps because you are running in a test environment, you can set OCSPCheckExtensions to NO in the SSL stanza. If you set this variable, any AIA certificate extension is ignored. This solution is unlikely to be acceptable in a production environment, where you probably do not want to allow access from users presenting revoked certificates.
The call to access the OCSP responder can result in one of the following three outcomes:
- Good
- The certificate is valid.
- Revoked
- The certificate is revoked.
- Unknown
- This outcome can arise for one of three reasons:
- WebSphere MQ cannot access the OCSP responder.
- The OCSP responder has sent a response, but WebSphere MQ cannot verify the digital signature of the response.
- The OCSP responder has sent a response that indicates that it has no revocation data for the certificate.
If WebSphere MQ receives an OCSP outcome of Unknown, its behavior depends on the setting of the OCSPAuthentication attribute. For queue managers, this attribute is held in the SSL stanza of the qm.ini file for UNIX and Linux systems, or the Windows registry. It can be set using the WebSphere MQ Explorer. For clients, it is held in the SSL stanza of the client configuration file.
If an outcome of Unknown is received and OCSPAuthentication is set to REQUIRED (the default value), WebSphere MQ rejects the connection and issues an error message of type AMQ9716. If queue manager SSL event messages are enabled, an SSL event message of type MQRC_CHANNEL_SSL_ERROR with ReasonQualifier set to MQRQ_SSL_HANDSHAKE_ERROR is generated.
If an outcome of Unknown is received and OCSPAuthentication is set to OPTIONAL, WebSphere MQ allows the SSL channel to start and no warnings or SSL event messages are generated.
If an outcome of Unknown is received and OCSPAuthentication is set to WARN, the SSL channel starts but WebSphere MQ issues a warning message of type AMQ9717 in the error log. If queue manager SSL event messages are enabled, an SSL event message of type MQRC_CHANNEL_SSL_WARNING with ReasonQualifier set to MQRQ_SSL_UNKNOWN_REVOCATION is generated.
Digital signing of OCSP responses
An OCSP responder can sign its responses in one of three ways. Your responder will inform you which method is used.
- The OCSP response can be digitally signed using the same CA certificate that issued the certificate that you are checking. In this case, you do not need to set up any additional certificate; the steps you have already taken to establish SSL connectivity are sufficient to verify the OCSP response.
- The OCSP response can be digitally signed using another certificate signed by the same certificate authority (CA) that issued the certificate you are checking. The signing certificate is sent together with the OCSP response in this case. The certificate flowed from the OCSP responder must have an Extended Key Usage Extension set to id-kp-OCSPSigning so that it can be trusted for this purpose. Because the OCSP response is sent with the certificate which signed it (and that certificate is signed by a CA that is already trusted for SSL connectivity), no additional certificate setup is required.
- The OCSP response can be digitally signed using another certificate that is not directly related to the certificate you are checking. In this case, the OCSP response is signed by a certificate issued by the OCSP responder itself. You must add a copy of the OCSP responder certificate to the key database of the client or queue manager which performs the OCSP checking; see Adding a CA certificate (or the public part of a self-signed certificate) into a key repository, on UNIX, Linux or Windows systems . When a CA certificate is added, by default it is added as a trusted root, which is the required setting in this context. If this certificate is not added, WebSphere MQ cannot verify the digital signature on the OCSP response and the OCSP check results in an Unknown outcome, which might cause WebSphere MQ to close the channel, depending on the value of OCSPAuthentication.
Working with Certificate Revocation Lists and Authority Revocation Lists
WebSphere MQ's support for CRLs and ARLs varies by platform.
CRL and ARL support on each platform is as follows:
- On z/OS, System SSL supports CRLs and ARLs stored in LDAP servers by the Tivoli Public Key Infrastructure product.
- On other platforms, the CRL and ARL support complies with PKIX X.509 V2 CRL profile recommendations.
WebSphere MQ maintains a cache of CRLs and ARLs that have been accessed in the preceding 12 hours.
When a queue manager or WebSphere MQ MQI client receives a certificate, it checks the CRL to confirm that the certificate is still valid. WebSphere MQ first checks in the cache, if there is a cache. If the CRL is not in the cache, WebSphere MQ interrogates the LDAP CRL server locations in the order they occur in the namelist of authentication information objects specified by the SSLCRLNamelist attribute, until WebSphere MQ finds an available CRL. If the namelist is not specified, or is specified with a blank value, CRLs are not checked.
For more information about LDAP, see Using lightweight directory access protocol services with WebSphere MQ for Windows .
Set up LDAP servers
Configure the LDAP Directory Information Tree structure to reflect the hierarchy of Distinguished Names of CAs. Do this using LDAP Data Interchange Format files.
Configure the LDAP Directory Information Tree (DIT) structure to use the hierarchy corresponding to the Distinguished Names of the CAs that issue the certificates and CRLs. You can set up the DIT structure with a file that uses the LDAP Data Interchange Format (LDIF). You can also use LDIF files to update a directory.
LDIF files are ASCII text files that contain the information required to define objects within an LDAP directory. LDIF files contain one or more entries, each of which comprises a Distinguished Name, at least one object class definition and, optionally, multiple attribute definitions.
The certificateRevocationList;binary attribute contains a list, in binary form, of revoked user certificates. The authorityRevocationList;binary attribute contains a binary list of CA certificates that have been revoked. For use with WebSphere MQ SSL, the binary data for these attributes must conform to DER (Definite Encoding Rules) format. For more information about LDIF files, refer to the documentation provided with your LDAP server.
Figure 1 shows a sample LDIF file that you might create as input to your LDAP server to load the CRLs
and ARLs issued by CA1, which is an imaginary Certificate Authority
with the Distinguished Name CN=CA1, OU=Test, O=IBM, C=GB
, set up by the Test organization within IBM.
Figure 1. Sample LDIF file for a Certificate Authority. This might vary from implementation to implementation.
 dn: o=IBM, c=GB
o: IBM
objectclass: top
objectclass: organization

dn: ou=Test, o=IBM, c=GB
ou: Test
objectclass: organizationalUnit

dn: cn=CA1, ou=Test, o=IBM, c=GB
cn: CA1
objectclass: cRLDistributionPoint
objectclass: certificateAuthority
authorityRevocationList;binary:: (DER format data)
certificateRevocationList;binary:: (DER format data)
caCertificate;binary:: (DER format data)
Figure 2 shows the DIT structure that your LDAP server creates when you load the sample LDIF file shown in Figure 1 together with a similar file for CA2, an imaginary Certificate Authority set up by the PKI organization, also within IBM.
Figure 2. Example of an LDAP Directory Information Tree structure
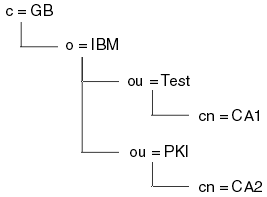
WebSphere MQ checks both CRLs and ARLs.
Note: Ensure that the access control list for your LDAP server allows authorized users to read, search, and compare the entries that hold the CRLs and ARLs. WebSphere MQ accesses the LDAP server using the LDAPUSER and LDAPPWD properties of the AUTHINFO object.
Configure and updating LDAP servers
Use this procedure to configure or update your LDAP server.
- Obtain the CRLs and ARLs in DER format from your Certification Authority, or Authorities.
- Use a text editor or the tool provided with your LDAP server, create one or more LDIF files that contain the Distinguished Name of the CA and the required object class definitions. Copy the DER format data into the LDIF file as the values of either the certificateRevocationList;binary attribute for CRLs, the authorityRevocationList;binary attribute for ARLs , or both.
- Start your LDAP server.
- Add the entries from the LDIF file or files you created at step 2 .
After you have configured your LDAP CRL server, check that it is set up correctly. First, try using a certificate that is not revoked on the channel, and check that the channel starts correctly. Then use a certificate that is revoked, and check that the channel fails to start.
Obtain updated CRLs from the Certification Authorities frequently. Consider doing this on your LDAP servers every 12 hours.
Accessing CRLs and ARLs with a queue manager
A queue manger is associated with one or more authentication information objects, which hold the address of an LDAP CRL server.
Note that in this section, information about Certificate Revocation Lists (CRLs) also applies to Authority Revocation Lists (ARLs).
You tell the queue manager how to access CRLs by supplying the queue manager with authentication information objects, each of which holds the address of an LDAP CRL server. The authentication information objects are held in a namelist, which is specified in the SSLCRLNamelist queue manager attribute.
In the following example, MQSC is used to specify the parameters:
- Define authentication information objects using the DEFINE AUTHINFO
MQSC command, with the AUTHTYPE parameter set to CRLLDAP.
The value CRLLDAP for the AUTHTYPE parameter indicates that CRLs are accessed on LDAP servers. Each authentication information object with type CRLLDAP that you create holds the address of an LDAP server. When you have more than one authentication information object, the LDAP servers to which they point must contain identical information. This provides continuity of service if one or more LDAP servers fail.
On all platforms, the user ID and password are sent to the LDAP server unencrypted.
- Use the DEFINE NAMELIST MQSC command, define a namelist for the names of your authentication information objects.
- Use the ALTER QMGR MQSC command, supply the namelist to the queue manager. For example:
ALTER QMGR SSLCRLNL(sslcrlnlname)
where sslcrlnlname is your namelist of authentication information objects.This command sets a queue manager attribute called SSLCRLNamelist. The queue manager's initial value for this attribute is blank.
You can add up to 10 connections to alternative LDAP servers to the namelist, to ensure continuity of service if one or more LDAP servers fail. Note that the LDAP servers must contain identical information.
Accessing CRLs and ARLs using WebSphere MQ Explorer
You can use WebSphere MQ Explorer to tell a queue manager how to access CRLs.
Note that in this section, information about Certificate Revocation Lists (CRLs) also applies to Authority Revocation Lists (ARLs).
Use the following procedure to set up an LDAP connection to a CRL:
- Ensure that you have started your queue manager.
- Right-click the Authentication Information folder
and click New -> Authentication Information . In the property
sheet that opens:
- On the first page Create Authentication Information , enter a name for the CRL(LDAP) object.
- On the General page of Change Properties , select the connection type. Optionally you can enter a description.
- Select the CRL(LDAP) page of Change Properties .
- Enter the LDAP server name as either the network name or the IP address.
- If the server requires login details, provide a user ID and if necessary a password.
- Click OK .
- Right-click the Namelists folder and click New -> Namelist
. In the property sheet that opens:
- Type a name for the namelist.
- Add the name of the CRL(LDAP) object (from step 2.a ) to the list.
- Click OK .
- Right-click the queue manager, select Properties , and select
the SSL page:
- Select the Check certificates received by this queue manager against Certification Revocation Lists check box.
- Type the name of the namelist (from step 3.a ) in the CRL Namelist field.
Accessing CRLs and ARLs with a WebSphere MQ MQI client
You have three options for specifying the LDAP servers that hold CRLs for checking by a WebSphere MQ MQI client.
Note that in this section, information about Certificate Revocation Lists (CRLs) also applies to Authority Revocation Lists (ARLs).
The three ways of specifying the LDAP servers are as follows:
- Use a channel definition table
- Use the SSL configuration options structure, MQSCO, on an MQCONNX call
- Use the Active Directory (on Windows systems with Active Directory support)
For more details, refer to the related information.
You can include up to 10 connections to alternative LDAP servers to ensure continuity of service if one or more LDAP servers fail. Note that the LDAP servers must contain identical information.
You cannot access LDAP CRLs from a WebSphere MQ MQI client channel running on Linux (zSeries platform).
Location of an OCSP responder, and of LDAP servers that hold CRLs
On a WebSphere MQ MQI client system, you can specify the location of an OCSP responder, and of Lightweight Directory Access Protocol (LDAP) servers that hold certificate revocation lists (CRLs).
You can specify these locations in three ways, listed here in order of decreasing precedence.
When a WebSphere MQ MQI client application issues an MQCONNX call
You can specify an OCSP responder or an LDAP server holding CRLs on an MQCONNX call.
On an MQCONNX call, the connect options structure, MQCNO, can reference an SSL configuration options structure, MQSCO. In turn, the MQSCO structure can reference one or more authentication information record structures, MQAIR. Each MQAIR structure contains all the information a WebSphere MQ MQI client requires to access an OCSP responder or an LDAP server holding CRLs. For example, one of the fields in an MQAIR structure is the URL at which a responder can be contacted. For more information about the MQAIR structure, see MQAIR - Authentication information record .
Use a client channel definition table (ccdt) to access an OCSP responder or LDAP servers
So that a WebSphere MQ MQI client can access an OCSP responder or LDAP servers that hold CRLs, include the attributes of one or more authentication information objects in a client channel definition table.
On a server queue manager, you can define one or more authentication information objects. The attributes of an authentication object contain all the information that is required to access an OCSP responder (on platforms where OCSP is supported) or an LDAP server that holds CRLs. One of the attributes specifies the OCSP responder URL, another specifies the host address, or IP address of a system on which an LDAP server runs.
An authentication information object with AUTHTYPE(OCSP) does not apply for use on IBM i or z/OS queue managers, but it can be specified on those platforms to be copied to the client channel definition table (CCDT) for client use.
To enable a WebSphere MQ MQI client to access an OCSP responder or LDAP servers that hold CRLs, the attributes of one or more authentication information objects can be included in a client channel definition table. You can include such attributes in one of the following ways:
- On the server platforms AIX, HP-UX, Linux, Solaris, and Windows
-
You can define a namelist that contains the names of one or more authentication information objects. You can then set the queue manager attribute, SSLCRLNameList, to the name of this namelist.
If you are using CRLs, more than one LDAP server can be configured to provide higher availability. The intention is that each LDAP server holds the same CRLs. If one LDAP server is unavailable when it is required, a WebSphere MQ MQI client can attempt to access another.
The attributes of the authentication information objects identified by the namelist are referred to collectively here as the certificate revocation location. When you set the queue manager attribute, SSLCRLNameList, to the name of the namelist, the certificate revocation location is copied into the client channel definition table associated with the queue manager. If the CCDT can be accessed from a client system as a shared file, or if the CCDT is then copied to a client system, the WebSphere MQ MQI client on that system can use the certificate revocation location in the CCDT to access an OCSP responder or LDAP servers that hold CRLs.
If the certificate revocation location of the queue manager is changed later, the change is reflected in the CCDT associated with the queue manager. If the queue manager attribute, SSLCRLNameList, is set to blank, the certificate revocation location is removed from the CCDT. These changes are not reflected in any copy of the table on a client system.
If you require the certificate revocation location at the client and server ends of an MQI channel to be different, and the server queue manager is the one that is used to create the certificate revocation location, you can do it as follows:
- On the server queue manager, create the certificate revocation location for use on the client system.
- Copy the CCDT containing the certificate revocation location to the client system.
- On the server queue manager, change the certificate revocation location to what is required at the server end of the MQI channel.
Use Active Directory on Windows
On Windows systems, you can use the setmqcrl control command to publish the current CRL information in Active Directory.
Command setmqcrl does not publish OCSP information.
For information about this command and its syntax, see setmqcrl .
Accessing CRLs and ARLs with WebSphere MQ classes for Java and WebSphere MQ classes for JMS
WebSphere MQ classes for Java™ and WebSphere MQ classes for JMS access CRLs differently from other platforms.
For information about working with CRLs and ARLs with WebSphere MQ classes for Java, see Using certificate revocation lists
For information about working with CRLs and ARLs with WebSphere MQ classes for JMS, see SSLCERTSTORES object property
Manipulating authentication information objects
You can manipulate authentication information objects using MQSC or PCF commands, or the Websphere MQ Explorer.
The following MQSC commands act on authentication information objects:
For a complete description of these commands, see Script (MQSC) Commands .
The following Programmable Command Format (PCF) commands act on authentication information objects:
- Create Authentication Information
- Copy Authentication Information
- Change Authentication Information
- Delete Authentication Information
- Inquire Authentication Information
- Inquire Authentication Information Names
For a complete description of these commands, see Definitions of the Programmable Command Formats .
On platforms where it is available, you can also use the WebSphere MQ Explorer.
Authorizing access to objects
This section contains information about using the object authority manager and channel exit programs to control access to objects.
On UNIX, Linux, and Windows systems. you control access to objects by using the object authority manager (OAM). This collection of topics contains information about using the command interface to the OAM. It also contains a checklist you can use to determine what tasks to perform to apply security to your system, and considerations for granting users the authority to administer WebSphere MQ and to work with WebSphere MQ objects. If the supplied security mechanisms do not meet your needs, you can develop your own channel exit programs.
Controlling access to objects by using the OAM on UNIX, Linux and Windows systems
The object authority manager (OAM) provides a command interface for granting and revoking authority to WebSphere MQ objects.
You must be suitably authorized to use these commands, as described in Authority to administer WebSphere MQ on UNIX, Linux, and Windows systems . User IDs that are authorized to administer WebSphere MQ have super user authority to the queue manager, which means that you do not have to grant them further permission to issue any MQI requests or commands.
Giving access to a WebSphere MQ object on UNIX or Linux systems and Windows
Use the setmqaut control command, or the MQCMD_SET_AUTH_REC PCF command to give users, and groups of users, access to WebSphere MQ objects.
For a full definition of the setmqaut control command and its syntax, see setmqaut , and for a full definition of the MQCMD_SET_AUTH_REC PCF command and its syntax, see Set Authority Record .
The queue manager must be running to use this command. When you have changed access for a principal, the changes are reflected immediately by the OAM.
To give users access to an object, you need to specify:
- The name of the queue manager that owns the objects you are working with; if you do not specify the name of a queue manager, the default queue manager is assumed.
- The name and type of the object (to identify the object uniquely). You specify the name as a profile; this is either the explicit name of the object, or a generic name, including wildcard characters. For a detailed description of generic profiles, and the use of wildcard characters within them, see Using OAM generic profiles on UNIX or Linux systems and Windows .
- One or more principals and group names to which the authority
applies.
If a user ID contains spaces, enclose it in quotation marks when you use this command. On Windows systems, you can qualify a user ID with a domain name. If the actual user ID contains an at sign (@) symbol, replace it with @@ to show that it is part of the user ID, not the delimiter between the user ID and the domain name.
- A list of authorizations. Each item in the list specifies a type
of access that is to be granted to that object (or revoked from it).
Each authorization in the list is specified as a keyword, prefixed
with a plus sign (+) or a minus sign (-). Use a plus sign to add the specified authorization, and a minus sign to remove the authorization.
There must be no spaces between the + or - sign and the keyword.
You can specify any number of authorizations in a single command. For example, the list of authorizations to permit a user or group to put messages on a queue and to browse them, but to revoke access to get messages is:
+browse -get +put
Examples of using the setmqaut command
The following examples show how to use the setmqaut command to grant and revoke permission to use an object:
 setmqaut -m saturn.queue.manager -t queue -n RED.LOCAL.QUEUE
         -g groupa +browse -get +put
In this example:
- saturn.queue.manager is the queue manager name
- queue is the object type
- RED.LOCAL.QUEUE is the object name
- groupa is the identifier of the group with authorizations that are to change
- +browse -get +put is the authorization list for the specified queue
- +browse adds authorization to browse messages on the queue (to issue MQGET with the browse option)
- -get removes authorization to get (MQGET) messages from the queue
- +put adds authorization to put (MQPUT) messages on the queue
The following command revokes put authority on the queue MyQueue from principal fvuser and from groups groupa and groupb. On UNIX and Linux systems, this command also revokes put authority for all principals in the same primary group as fvuser.
 setmqaut -m saturn.queue.manager -t queue -n MyQueue -p fvuser
         -g groupa -g groupb -put
Use the command with a different authorization service
If you are using your own authorization service instead of the OAM, you can specify the name of this service on the setmqaut command to direct the command to this service. You must specify this parameter if you have multiple installable components running at the same time; if you do not, the update is made to the first installable component for the authorization service. By default, this is the supplied OAM.
Use OAM generic profiles on UNIX or Linux systems and Windows
OAM generic profiles enable you to set the authority a user has to many objects at once, rather than having to issue separate setmqaut commands against each individual object when it is created.
Using generic profiles in the setmqaut command enables you to set a generic authority for all objects that fit that profile.
This collection of topics describes the use of generic profiles in more detail.
Use wildcard characters in OAM profiles
What makes a profile generic is the use of special characters (wildcard characters) in the profile name. For example, the question mark (?) wildcard character matches any single character in a name. So, if you specify ABC.?EF, the authorization you give to that profile applies to any objects with the names ABC.DEF , ABC.CEF, ABC.BEF, and so on.
The wildcard characters available are:
- ?
- Use the question mark (?) instead of any single character. For example, AB.?D applies to the objects AB.CD , AB.ED, and AB.FD.
- *
- Use the asterisk (*) as:
- A qualifier in a profile name to match any one qualifier
in an object name. A qualifier is the part of an object name delimited
by a period. For example, in ABC.DEF.GHI, the qualifiers
are ABC, DEF, and GHI
.
For example, ABC.*.JKL applies to the objects ABC.DEF.JKL, and ABC.GHI.JKL. (Note that it does not apply to ABC.JKL; * used in this context always indicates one qualifier.)
- A character within a qualifier in a profile name to match zero
or more characters within the qualifier in an object name.
For example, ABC.DE*.JKL applies to the objects ABC.DE.JKL, ABC.DEF.JKL, and ABC.DEGH.JKL .
- A qualifier in a profile name to match any one qualifier
in an object name. A qualifier is the part of an object name delimited
by a period. For example, in ABC.DEF.GHI, the qualifiers
are ABC, DEF, and GHI
.
- **
- Use the double asterisk (**) once in a profile name as:
- The entire profile name to match all object names. For example if you use -t prcs to identify processes, then use ** as the profile name, you change the authorizations for all processes.
- As either the beginning, middle, or ending qualifier in a profile name to match zero or more qualifiers in an object name. For example, **.ABC identifies all objects with the final qualifier ABC.
Note: When using wildcard characters on UNIX and Linux systems, you must enclose the profile name in single quotation marks.
Profile priorities
An important point to understand when using generic profiles is the priority that profiles are given when deciding what authorities to apply to an object being created. For example, suppose that you have issued the commands:
 setmqaut -n AB.* -t q +put -p fred
setmqaut -n AB.C* -t q +get -p fred
The first gives put authority to all queues for the principal fred with names that match the profile AB.*; the second gives get authority to the same types of queue that match the profile AB.C*.
Suppose that you now create a queue called AB.CD. According to the rules for wildcard matching, either setmqaut could apply to that queue. So, does it have put or get authority?
To find the answer, you apply the rule that, whenever multiple profiles can apply to an object, only the most specific applies . The way that you apply this rule is by comparing the profile names from left to right. Wherever they differ, a non-generic character is more specific then a generic character. So, in the example above, the queue AB.CD has get authority (AB.C* is more specific than AB.*).
When you are comparing generic characters, the order of specificity is:
- ?
- *
- **
Dumping profile settings
For a full definition of the dmpmqaut control command and its syntax, see dmpmqaut , and for a full definition of the MQCMD_INQUIRE_AUTH_RECS PCF command and its syntax, see Inquire Authority Records .
The following examples show the use of the dmpmqaut control command to dump authority records for generic profiles:
- This example dumps all authority records with a profile that matches
queue a.b.c for principal user1.
dmpmqaut -m qm1 -n a.b.c -t q -p user1
The resulting dump looks something like this:profile: a.b.* object type: queue entity: user1 type: principal authority: get, browse, put, inq
Note: Although UNIX and Linux users can use the -p option for the dmpmqaut command, they must use -g groupname instead when defining authorizations.
- This example dumps all authority records with a profile that matches
queue a.b.c.
dmpmqaut -m qmgr1 -n a.b.c -t q
The resulting dump looks something like this:profile: a.b.c object type: queue entity: Administrator type: principal authority: all - - - - - - - - - - - - - - - - - profile: a.b.* object type: queue entity: user1 type: principal authority: get, browse, put, inq - - - - - - - - - - - - - - - - - profile: a.** object type: queue entity: group1 type: group authority: get
- This example dumps all authority records for profile a.b.*, of type queue.
dmpmqaut -m qmgr1 -n a.b.* -t q
The resulting dump looks something like this:profile: a.b.* object type: queue entity: user1 type: principal authority: get, browse, put, inq
- This example dumps all authority records for queue manager qmX.
dmpmqaut -m qmX
The resulting dump looks something like this:profile: q1 object type: queue entity: Administrator type: principal authority: all - - - - - - - - - - - - - - - - - profile: q* object type: queue entity: user1 type: principal authority: get, browse - - - - - - - - - - - - - - - - - profile: name.* object type: namelist entity: user2 type: principal authority: get - - - - - - - - - - - - - - - - - profile: pr1 object type: process entity: group1 type: group authority: get
- This example dumps all profile names and object types for queue manager qmX.
dmpmqaut -m qmX -l
The resulting dump looks something like this:profile: q1, type: queue profile: q*, type: queue profile: name.*, type: namelist profile: pr1, type: process
Note: For WebSphere MQ for Windows only, all principals displayed include domain information, for example:
 profile:     a.b.*
object type: queue entity:      user1@domain1
type:        principal
authority:   get, browse, put, inq
Use wildcard characters in OAM profiles
Use wildcard characters in an object authority manager (OAM) profile name to make that profile applicable to more than one object.
What makes a profile generic is the use of special characters (wildcard characters) in the profile name. For example, the question mark (?) wildcard character matches any single character in a name. So, if you specify ABC.?EF, the authorization you give to that profile applies to any objects with the names ABC.DEF, ABC.CEF, ABC.BEF, and so on.
The wildcard characters available are:
- ?
- Use the question mark (?) instead of any single character. For example, AB.?D applies to the objects AB.CD, AB.ED, and AB.FD.
- *
- Use the asterisk (*) as:
- A qualifier in a profile name to match any one qualifier
in an object name. A qualifier is the part of an object name delimited
by a period. For example, in ABC.DEF.GHI, the qualifiers
are ABC, DEF, and GHI.
For example, ABC.*.JKL applies to the objects ABC.DEF.JKL, and ABC.GHI.JKL. (Note that it does not apply to ABC.JKL; * used in this context always indicates one qualifier.)
- A character within a qualifier in a profile name to match zero
or more characters within the qualifier in an object name.
For example, ABC.DE*.JKL applies to the objects ABC.DE.JKL, ABC.DEF.JKL, and ABC.DEGH.JKL.
- A qualifier in a profile name to match any one qualifier
in an object name. A qualifier is the part of an object name delimited
by a period. For example, in ABC.DEF.GHI, the qualifiers
are ABC, DEF, and GHI.
- **
- Use the double asterisk (**) once in a profile name as:
- The entire profile name to match all object names. For example if you use -t prcs to identify processes, then use ** as the profile name, you change the authorizations for all processes.
- As either the beginning, middle, or ending qualifier in a profile name to match zero or more qualifiers in an object name. For example, **.ABC identifies all objects with the final qualifier ABC.
Note: When using wildcard characters on UNIX and Linux systems, you must enclose the profile name in single quotation marks.
Profile priorities
More than one generic profile can apply to a single object. Where this is the case, the most specific rule applies.
An important point to understand when using generic profiles is the priority that profiles are given when deciding what authorities to apply to an object being created. For example, suppose that you have issued the commands:
 setmqaut -n AB.* -t q +put -p fred
setmqaut -n AB.C* -t q +get -p fred
The first gives put authority to all queues for the principal fred with names that match the profile AB.*; the second gives get authority to the same types of queue that match the profile AB.C*.
Suppose that you now create a queue called AB.CD. According to the rules for wildcard matching, either setmqaut could apply to that queue. So, does it have put or get authority?
To find the answer, you apply the rule that, whenever multiple profiles can apply to an object, only the most specific applies . The way that you apply this rule is by comparing the profile names from left to right. Wherever they differ, a non-generic character is more specific then a generic character. So, in the example above, the queue AB.CD has get authority (AB.C* is more specific than AB.*).
When you are comparing generic characters, the order of specificity is:
- ?
- *
- **
Dumping profile settings
Use the dmpmqaut control command or the MQCMD_INQUIRE_AUTH_RECS PCF command to dump the current authorizations associated with a specified profile.
For a full definition of the dmpmqaut control command and its syntax, see dmpmqaut , and for a full definition of the MQCMD_INQUIRE_AUTH_RECS PCF command and its syntax, see Inquire Authority Records .
The following examples show the use of the dmpmqaut control command to dump authority records for generic profiles:
- This example dumps all authority records with a profile that matches
queue a.b.c for principal user1.
dmpmqaut -m qm1 -n a.b.c -t q -p user1
The resulting dump looks something like this example:profile: a.b.* object type: queue entity: user1 type: principal authority: get, browse, put, inq
Note: UNIX and Linux users cannot use the -p option; they must use -g groupname instead.
- This example dumps all authority records with a profile that matches
queue a.b.c.
dmpmqaut -m qmgr1 -n a.b.c -t q
The resulting dump looks something like this example:profile: a.b.c object type: queue entity: Administrator type: principal authority: all - - - - - - - - - - - - - - - - - profile: a.b.* object type: queue entity: user1 type: principal authority: get, browse, put, inq - - - - - - - - - - - - - - - - - profile: a.** object type: queue entity: group1 type: group authority: get
- This example dumps all authority records for profile a.b.*, of type queue.
dmpmqaut -m qmgr1 -n a.b.* -t q
The resulting dump looks something like this example:profile: a.b.* object type: queue entity: user1 type: principal authority: get, browse, put, inq
- This example dumps all authority records for queue manager qmX.
dmpmqaut -m qmX
The resulting dump looks something like this example:profile: q1 object type: queue entity: Administrator type: principal authority: all - - - - - - - - - - - - - - - - - profile: q* object type: queue entity: user1 type: principal authority: get, browse - - - - - - - - - - - - - - - - - profile: name.* object type: namelist entity: user2 type: principal authority: get - - - - - - - - - - - - - - - - - profile: pr1 object type: process entity: group1 type: group authority: get
- This example dumps all profile names and object types for queue manager qmX.
dmpmqaut -m qmX -l
The resulting dump looks something like this example:profile: q1, type: queue profile: q*, type: queue profile: name.*, type: namelist profile: pr1, type: process
Note: For WebSphere MQ for Windows only, all principals displayed include domain information, for example:
 profile:     a.b.*
object type: queue entity:      user1@domain1
type:        principal
authority:   get, browse, put, inq
Display access settings
Use the dspmqaut control command, or the MQCMD_INQUIRE_ENTITY_AUTH PCF command to view the authorizations that a specific principal or group has for a particular object.
The queue manager must be running to use this command. When you change access for a principal, the changes are reflected immediately by the OAM. Authorization can be displayed for only one group or principal at a time. For a full definition of the dmpmqaut control command and its syntax, see dmpmqaut , and for a full definition of the MQCMD_INQUIRE_ENTITY_AUTH PCF command and its syntax, see Inquire Entity Authority .
The following example shows the use of the dspmqaut control command to display the authorizations that the group GpAdmin has to a process definition named Annuities that is on queue manager QueueMan1.
dspmqaut -m QueueMan1 -t process -n Annuities -g GpAdmin
Changing and revoking access to a WebSphere MQ object
To change the level of access that a user or group has to an object, use the setmqaut command. To revoke the access of a particular user that is a member of a group that has authorization, remove the user from the group.
The process of removing the user from a group is described in:
- Create groups on Windows
- Create groups on HP-UX
- Create groups on AIX
- Create groups on Solaris
- Create groups on Linux
.
The user ID that creates a WebSphere MQ object is granted full control authorities to that object. If you remove this user ID from the local mqm group (or the Administrators group on Windows systems) these authorities are not revoked. Use the setmqaut control command or the MQCMD_DELETE_AUTH_REC PCF command to revoke access to an object for the user ID that created it, after removing it from the mqm or Administrators group. For a full definition of the setmqaut control command and its syntax, see setmqaut , and for a full definition of the MQCMD_INQUIRE_ENTITY_AUTH PCF command and its syntax, see Inquire Entity Authority .
On Windows, delete the OAM entries corresponding to a particular Windows user account before deleting the user profile. It is impossible to remove the OAM entries after removing the user account.
Preventing security access checks on Windows, UNIX and Linux systems
To turn off all security checking you can disable the OAM. This might be suitable for a test environment. Having disabled or removed the OAM, you cannot add an OAM to an existing queue manager.
If you decide that you do not want to perform security checks (for example, in a test environment), you can disable the OAM in one of two ways:
- Before you create a queue manager, set the operating system environment variable MQSNOAUT as follows (if you do this, you cannot add an OAM
later):
On Windows systems:
SET MQSNOAUT=yes
On UNIX and Linux systems:
export MQSNOAUT=yes
See MQSNOAUT for more information about the implications of setting the MQSNOAUT variable.
- Use the WebSphere MQ Explorer or edit the queue manager configuration file to remove the service (if you do this, you cannot add an OAM later).
If you use setmqaut, or dspmqaut while the OAM is disabled, note the following points:
- The OAM does not validate the specified principal, or group, meaning that the command can accept invalid values.
- The OAM does not perform security checks and indicates that all principals and groups are authorized to perform all applicable object operations.
When an OAM is removed, it cannot be put back on an existing queue manager. This is because the OAM needs to be in place at object creation time. To use the WebSphere MQ OAM again after it has been removed, the queue manager needs to be rebuilt.
Granting required access to resources
Use this topic to determine what tasks to perform to apply security to your WebSphere MQ system. During this task, you decide what actions are necessary to apply the appropriate level of security to the elements of your WebSphere MQ installation. Each individual task you are referred to gives step-by-step instructions for all platforms.
Procedure
- Do you need to limit access to your queue manager to certain users?
- No: Take no further action.
- Yes: Go to the next question.
- Do these users need partial administrative
access on a subset of queue manager resources?
- No: Go to the next question.
- Yes: See Granting partial administrative access on a subset of queue manager resources .
- Do these users
need full administrative access on a subset of queue manager resources?
- No: Go to the next question.
- Yes: See Granting full administrative access on a subset of queue manager resources .
- Do these users need read only access to all queue manager resources?
- No: Go to the next question.
- Yes: See Granting read-only access to all resources on a queue manager .
- Do these users need full administrative access on all queue manager resources?
- No: Go to the next question.
- Yes: See Granting full administrative access to all resources on a queue manager .
- Do you need user applications to connect to your queue manager?
- No: Disable connectivity, as described in Removing connectivity to the queue manager
- Yes: See Allowing user applications to connect to your queue manager .
Granting partial administrative access on a subset of queue manager resources
You need to give certain users partial administrative access to some, but not all, queue manager resources. Use this table to determine the actions you need to take.
| The users need to administer objects of this type | Perform this action |
|---|---|
| Queues | Grant partial administrative access to the required queues, as described in Granting limited administrative access to some queues |
| Topics | Grant partial administrative access to the required topics, as described in Granting limited administrative access to some topics |
| Channels | Grant partial administrative access to the required channels, as described in Granting limited administrative access to some channels |
| The queue manager | Grant partial administrative access to the queue manager, as described in Granting limited administrative access to a queue manager |
| Processes | Grant partial administrative access to the required processes, as described in Granting limited administrative access to some processes |
| Namelists | Grant partial administrative access to the required namelists, as described in Granting limited administrative access to some namelists |
| Services | Grant partial administrative access to the required services, as described in Granting limited administrative access to some services |
Granting limited administrative access to some queues
Grant partial administrative access to some queues on a queue manager, to each group of users with a business need for it. To grant limited administrative access to some queues for some actions, use the appropriate commands for your operating system.
Procedure
- For UNIX, Linux and Windows systems, issue the following command:
setmqaut -m QMgrName -n ObjectProfile -t queue -g GroupName ReqdAction
- The variable names have the following meanings:
- QMgrName
- The name of the queue manager. On z/OS, this value can also be the name of a queue-sharing group.
- ObjectProfile
- The name of the object or generic profile for which to change authorizations.
- GroupName
- The name of the group to be granted access.
- ReqdAction
- The action you are allowing the group to take:
- On UNIX, Linux and Windows systems, any combination of the following authorizations: +chg, +clr, +dlt, +dsp. The authorization +alladm is equivalent to +chg +clr +dlt +dsp.
Note: Granting +crt for queues indirectly makes the user or group an administrator. Do not use +crt authority to grant limited administrative access to some queues.
- QType
-
For the DISPLAY command, one of the values QUEUE, QLOCAL, QALIAS, QMODEL, QREMOTE, or QCLUSTER.
For other values of ReqdAction, one of the values QLOCAL, QALIAS, QMODEL, or QREMOTE.
Granting limited administrative access to some topics
Grant partial administrative access to some topics on a queue manager, to each group of users with a business need for it. To grant limited administrative access to some topics for some actions, use the appropriate commands for your operating system.
Procedure
- For UNIX, Linux and Windows systems, issue the following command:
setmqaut -m QMgrName -n ObjectProfile -t topic -g GroupName ReqdAction
- The variable names have the following meanings:
- QMgrName
- The name of the queue manager.
- ObjectProfile
- The name of the object or generic profile for which to change authorizations.
- GroupName
- The name of the group to be granted access.
- ReqdAction
- The action you are allowing the group to take:
- On UNIX, Linux and Windows systems, any combination of the following authorizations: +chg, +clr, +crt, +dlt, +dsp. +ctrl. The authorization +alladm is equivalent to +chg +clr +dlt +dsp.
Granting limited administrative access to some channels
Grant partial administrative access to some channels on a queue manager, to each group of users with a business need for it. To grant limited administrative access to some channels for some actions, use the appropriate commands for your operating system.
Procedure
- For UNIX, Linux and Windows systems, issue the following command:
setmqaut -m QMgrName -n ObjectProfile -t channel -g GroupName ReqdAction
- The variable names have the following meanings:
- QMgrName
- The name of the queue manager. On z/OS, this value can also be the name of a queue-sharing group.
- ObjectProfile
- The name of the object or generic profile for which to change authorizations.
- GroupName
- The name of the group to be granted access.
- ReqdAction
- The action you are allowing the group to take:
- On UNIX, Linux and Windows systems, any combination of the following authorizations: +chg, +clr, +crt, +dlt, +dsp. +ctrl, +ctrlx. The authorization +alladm is equivalent to +chg +clr +dlt +dsp.
Granting limited administrative access to a queue manager
Grant partial administrative access to a queue manager, to each group of users with a business need for it. To grant limited administrative access to perform some actions on the queue manager, use the appropriate commands for your operating system.
Procedure
- For UNIX, Linux and Windows systems, issue the following command:
setmqaut -m QMgrName -n ObjectProfile -t qmgr -g GroupName ReqdAction
- For IBM i, issue the following command:
GRTMQMAUT OBJ('ObjectProfile') OBJTYPE(*MQM) USER(GroupName) AUT(ReqdAction) MQMNAME('QMgrName')
To determine which MQSC commands the user can perform on the queue manager, issue the following commands for each MQSC command:
 RDEFINE MQCMDS QMgrName.ReqdAction.QMGR UACC(NONE)
PERMIT QMgrName.ReqdAction.QMGR CLASS(MQCMDS) ID(GroupName) ACCESS(ALTER)
To permit the user to use the DISPLAY QMGR command, issue the following commands:
 RDEFINE MQCMDS QMgrName.DISPLAY.QMGR UACC(NONE)
PERMIT QMgrName.DISPLAY.QMGR CLASS(MQCMDS) ID(GroupName) ACCESS(READ)
The variable names have the following meanings:
- QMgrName
- The name of the queue manager.
- ObjectProfile
- The name of the object or generic profile for which to change authorizations.
- GroupName
- The name of the group to be granted access.
- ReqdAction
- The action you are allowing the group to take:
- On UNIX, Linux and Windows systems, any combination of the following authorizations: +chg, +clr, +crt, +dlt, +dsp. The authorization +alladm
is equivalent to +chg +clr +dlt +dsp.
Although +set is an MQI authorization and not normally considered administrative, granting +set on the queue manager can indirectly lead to full administrative authority. Do not grant +set to ordinary users and applications.
- On UNIX, Linux and Windows systems, any combination of the following authorizations: +chg, +clr, +crt, +dlt, +dsp. The authorization +alladm
is equivalent to +chg +clr +dlt +dsp.
Granting limited administrative access to some processes
Grant partial administrative access to some processes on a queue manager, to each group of users with a business need for it. To grant limited administrative access to some processes for some actions, use the appropriate commands for your operating system.
Procedure
- For UNIX, Linux and Windows systems, issue the following command:
setmqaut -m QMgrName -n ObjectProfile -t process -g GroupName ReqdAction
- The variable names have the following meanings:
- QMgrName
- The name of the queue manager.
- ObjectProfile
- The name of the object or generic profile for which to change authorizations.
- GroupName
- The name of the group to be granted access.
- ReqdAction
- The action you are allowing the group to take:
- On UNIX, Linux and Windows systems, any combination of the following authorizations: +chg, +clr, +crt, +dlt, +dsp. The authorization +alladm is equivalent to +chg +clr +dlt +dsp.
Granting limited administrative access to some namelists
Grant partial administrative access to some namelists on a queue manager, to each group of users with a business need for it. To grant limited administrative access to some namelists for some actions, use the appropriate commands for your operating system.
Procedure
- For UNIX, Linux and Windows systems, issue the following command:
setmqaut -m QMgrName -n ObjectProfile -t namelist -g GroupName ReqdAction
- The variable names have the following meanings:
- QMgrName
- The name of the queue manager.
- ObjectProfile
- The name of the object or generic profile for which to change authorizations.
- GroupName
- The name of the group to be granted access.
- ReqdAction
- The action you are allowing the group to take:
- On UNIX, Linux and Windows systems, any combination of the following authorizations: +chg, +clr, +crt, +dlt, +ctrl, +ctrlx, +dsp. The authorization +alladm is equivalent to +chg +clr +dlt +dsp.
Granting limited administrative access to some services
Grant partial administrative access to some services on a queue manager, to each group of users with a business need for it. To grant limited administrative access to some services for some actions, use the appropriate commands for your operating system.
Note: Service objects do not exist on z/OS.
Procedure
- For UNIX, Linux and Windows systems, issue the following command:
setmqaut -m QMgrName -n ObjectProfile -t service -g GroupName ReqdAction
- For IBM i, issue the following command:
GRTMQMAUT OBJ('ObjectProfile') OBJTYPE(*SVC) USER(GroupName) AUT(ReqdAction) MQMNAME('QMgrName')
These commands grant access to the specified service. To determine which MQSC commands the user can perform on the service, issue the following commands for each MQSC command:
 RDEFINE MQCMDS QMgrName.ReqdAction.SERVICE UACC(NONE)
PERMIT QMgrName.ReqdAction.SERVICE CLASS(MQCMDS) ID(GroupName) ACCESS(ALTER)
To permit the user to use the DISPLAY SERVICE command, issue the following commands:
 RDEFINE MQCMDS QMgrName.DISPLAY.SERVICE UACC(NONE)
PERMIT QMgrName.DISPLAY.SERVICE CLASS(MQCMDS) ID(GroupName) ACCESS(READ)
The variable names have the following meanings:
- QMgrName
- The name of the queue manager.
- ObjectProfile
- The name of the object or generic profile for which to change authorizations.
- GroupName
- The name of the group to be granted access.
- ReqdAction
- The action you are allowing the group to take:
- On UNIX, Linux and Windows systems, any combination of the following authorizations: +chg, +clr, +crt, +dlt, +ctrl, +ctrlx, +dsp. The authorization +alladm is equivalent to +chg +clr +dlt +dsp.
Granting full administrative access on a subset of queue manager resources
You need to give certain users full administrative access to some, but not all, queue manager resources. Use these tables to determine the actions you need to take.
| The users need to administer objects of this type | Perform this action |
|---|---|
| Queues | Grant full administrative access to the required queues, as described in Granting full administrative access to some queues |
| Topics | Grant full administrative access to the required topics, as described in Granting full administrative access to some topics |
| Channels | Grant full administrative access to the required channels, as described in Granting full administrative access to some channels |
| The queue manager | Grant full administrative access to the queue manager, as described in Granting full administrative access to a queue manager |
| Processes | Grant full administrative access to the required processes, as described in Granting full administrative access to some processes |
| Namelists | Grant full administrative access to the required namelists, as described in Granting full administrative access to some namelists |
| Services | Grant full administrative access to the required services, as described in Granting full administrative access to some services |
Granting full administrative access to some queues
Grant full administrative access to some queues on a queue manager, to each group of users with a business need for it. To grant full administrative access to some queues, use the appropriate commands for your operating system.
Procedure
- For UNIX, Linux and Windows systems, issue the following command:
setmqaut -m QMgrName -n ObjectProfile -t queue -g GroupName +alladm
- For IBM i, issue
the following command:
GRTMQMAUT OBJ('ObjectProfile') OBJTYPE(*Q) USER(GroupName) AUT(*ALLADM) MQMNAME('QMgrName') - For z/OS, issue
the following commands:
 RDEFINE MQADMIN QMgrName.QUEUE.ObjectProfile UACC(NONE)
PERMIT QMgrName.QUEUE.ObjectProfile CLASS(MQADMIN) ID(GroupName ) ACCESS(ALTER)
The variable names have the following meanings:- QMgrName
- The name of the queue manager. On z/OS, this value can also be the name of a queue-sharing group.
- ObjectProfile
- The name of the object or generic profile for which to change authorizations.
- GroupName
- The name of the group to be granted access.
Granting full administrative access to some topics
Grant full administrative access to some topics on a queue manager, to each group of users with a business need for it. To grant full administrative access to some topics for some actions, use the appropriate commands for your operating system.
Procedure
- For UNIX, Linux and Windows systems, issue the following command:
setmqaut -m QMgrName -n ObjectProfile -t topic -g GroupName +alladm
- For IBM i, issue
the following command:
GRTMQMAUT OBJ('ObjectProfile') OBJTYPE(*TOPIC) USER(GroupName) AUT(ALLADM) MQMNAME('QMgrName') - For z/OS, issue
the following commands:
 RDEFINE MQADMIN QMgrName.TOPIC.ObjectProfile UACC(NONE)
PERMIT QMgrName.TOPIC.ObjectProfile CLASS(MQADMIN) ID(GroupName ) ACCESS(ALTER)
The variable names have the following meanings:- QMgrName
- The name of the queue manager. On z/OS, this value can also be the name of a queue-sharing group.
- ObjectProfile
- The name of the object or generic profile for which to change authorizations.
- GroupName
- The name of the group to be granted access.
Granting full administrative access to some channels
Grant full administrative access to some channels on a queue manager, to each group of users with a business need for it. To grant full administrative access to some channels, use the appropriate commands for your operating system.
Procedure
- For UNIX, Linux and Windows systems, issue the following command:
setmqaut -m QMgrName -n ObjectProfile -t channel -g GroupName +alladm
- For IBM i, issue
the following command:
GRTMQMAUT OBJ('ObjectProfile') OBJTYPE(*CHL) USER(GroupName) AUT(ALLADM) MQMNAME('QMgrName') - For z/OS, issue
the following commands:
 RDEFINE MQADMIN QMgrName.CHANNEL.ObjectProfile UACC(NONE)
PERMIT QMgrName.CHANNEL.ObjectProfile CLASS(MQADMIN) ID(GroupName ) ACCESS(ALTER)
The variable names have the following meanings:- QMgrName
- The name of the queue manager. On z/OS, this value can also be the name of a queue-sharing group.
- ObjectProfile
- The name of the object or generic profile for which to change authorizations.
- GroupName
- The name of the group to be granted access.
Granting full administrative access to a queue manager
Grant full administrative access to a queue manager, to each group of users with a business need for it. To grant full administrative access to the queue manager, use the appropriate commands for your operating system.
Procedure
- For UNIX, Linux and Windows systems, issue the following command:
setmqaut -m QMgrName -t qmgr -g GroupName +alladm
- For IBM i, issue
the following command:
GRTMQMAUT OBJ('ObjectProfile') OBJTYPE(*MQM) USER(GroupName) AUT(*ALLADM) MQMNAME('QMgrName') - For z/OS, issue
the following commands:
 RDEFINE MQADMIN QMgrName.QMGR UACC(NONE)
PERMIT QMgrName.QMGR CLASS(MQADMIN) ID(GroupName ) ACCESS(ALTER)
The variable names have the following meanings:- QMgrName
- The name of the queue manager. On z/OS, this value can also be the name of a queue-sharing group.
- ObjectProfile
- The name of the object or generic profile for which to change authorizations.
- GroupName
- The name of the group to be granted access.
Granting full administrative access to some processes
Grant full administrative access to some processes on a queue manager, to each group of users with a business need for it. To grant full administrative access to some processes, use the appropriate commands for your operating system.
Procedure
- For UNIX, Linux and Windows systems, issue the following command:
setmqaut -m QMgrName -n ObjectProfile -t process -g GroupName +alladm
- For IBM i, issue
the following command:
GRTMQMAUT OBJ('ObjectProfile') OBJTYPE(*PRC) USER(GroupName) AUT(*ALLADM) MQMNAME('QMgrName') - For z/OS, issue
the following commands:
 RDEFINE MQADMIN QMgrName.CHANNEL.ObjectProfile UACC(NONE)
PERMIT QMgrName.PROCESS.ObjectProfile CLASS(MQADMIN) ID(GroupName ) ACCESS(ALTER)
The variable names have the following meanings:- QMgrName
- The name of the queue manager. On z/OS, this value can also be the name of a queue-sharing group.
- ObjectProfile
- The name of the object or generic profile for which to change authorizations.
- GroupName
- The name of the group to be granted access.
Granting full administrative access to some namelists
Grant full administrative access to some namelists on a queue manager, to each group of users with a business need for it. To grant full administrative access to some namelists, use the appropriate commands for your operating system.
Procedure
- For UNIX, Linux and Windows systems, issue the following command:
setmqaut -m QMgrName -n ObjectProfile -t namelist -g GroupName +alladm
- For IBM i, issue
the following command:
GRTMQMAUT OBJ('ObjectProfile') OBJTYPE(*NMLIST) USER(GroupName) AUT(*ALLADM) MQMNAME('QMgrName') - For z/OS, issue
the following commands:
 RDEFINE MQADMIN QMgrName.NAMELIST.ObjectProfile UACC(NONE)
PERMIT QMgrName.NAMELIST.ObjectProfile CLASS(MQADMIN) ID(GroupName ) ACCESS(ALTER)
The variable names have the following meanings:- QMgrName
- The name of the queue manager. On z/OS, this value can also be the name of a queue-sharing group.
- ObjectProfile
- The name of the object or generic profile for which to change authorizations.
- GroupName
- The name of the group to be granted access.
Granting full administrative access to some services
Grant full administrative access to some services on a queue manager, to each group of users with a business need for it. To grant full administrative access to some services, use the appropriate commands for your operating system.
Procedure
- For UNIX, Linux and Windows systems, issue the following command:
setmqaut -m QMgrName -n ObjectProfile -t service -g GroupName +alladm
- For IBM i, issue
the following command:
GRTMQMAUT OBJ('ObjectProfile') OBJTYPE(*SVC) USER(GroupName) AUT(*ALLADM) MQMNAME('QMgrName') - For z/OS, issue
the following commands:
 RDEFINE MQADMIN QMgrName.SERVICE.ObjectProfile UACC(NONE)
PERMIT QMgrName.SERVICE.ObjectProfile CLASS(MQADMIN) ID(GroupName ) ACCESS(ALTER)
The variable names have the following meanings:- QMgrName
- The name of the queue manager. On z/OS, this value can also be the name of a queue-sharing group.
- ObjectProfile
- The name of the object or generic profile for which to change authorizations.
- GroupName
- The name of the group to be granted access.
Granting read-only access to all resources on a queue manager
Grant read-only access to all the resources on a queue manager, to each user or group of users with a business need for it. Use the Add Role Based Authorities wizard or the appropriate commands for your operating system.
Procedure
- Use the wizard:
- In the WebSphere MQ Explorer Navigator pane, right-click the queue manager and click Object Authorities > Add Role Based Authorities The Add Role Based Authorities wizard opens.
- For UNIX and Windows systems, issue the following commands:
 setmqaut -m QMgrName -n ** -t queue -g GroupName +browse +dsp
setmqaut -m QMgrName -n SYSTEM.ADMIN.COMMAND.QUEUE -t queue -g GroupName +dsp +inq +put
setmqaut -m QMgrName -n SYSTEM.MQEXPLORER.REPLY.MODEL -t queue -g GroupName +dsp +inq +get
setmqaut -m QMgrName -n ** -t topic -g GroupName +dsp
setmqaut -m QMgrName -n ** -t channel -g GroupName +dsp
setmqaut -m QMgrName -n ** -t clntconn -g GroupName +dsp
setmqaut -m QMgrName -n ** -t authinfo -g GroupName +dsp
setmqaut -m QMgrName -n ** -t listener -g GroupName +dsp
setmqaut -m QMgrName -n ** -t namelist -g GroupName +dsp
setmqaut -m QMgrName -n ** -t process -g GroupName +dsp
setmqaut -m QMgrName -n ** -t service -g GroupName +dsp
setmqaut -m QMgrName -t qmgr -g GroupName +dsp +inq +connect
The specific authorities to SYSTEM.ADMIN.COMMAND.QUEUE and SYSTEM.MQEXPLORER.REPLY.MODEL are necessary only if you want to use the MQ Explorer. - For IBM i, issue
the following commands:
GRTMQMAUT OBJ(*ALL) OBJTYPE(*Q) USER('GroupName') AUT(*ADMDSP *BROWSE) MQMNAME('QMgrName') GRTMQMAUT OBJ(*ALL) OBJTYPE(*TOPIC) USER('GroupName') AUT(*ADMDSP) MQMNAME('QMgrName') GRTMQMAUT OBJ(*ALL) OBJTYPE(*CHL) USER('GroupName') AUT(*ADMDSP) MQMNAME('QMgrName') GRTMQMAUT OBJ(*ALL) OBJTYPE(*CLTCN) USER('GroupName') AUT(*ADMDSP) MQMNAME('QMgrName') GRTMQMAUT OBJ(*ALL) OBJTYPE(*AUTHINFO) USER('GroupName') AUT(*ADMDSP) MQMNAME('QMgrName') GRTMQMAUT OBJ(*ALL) OBJTYPE(*LSR) USER('GroupName') AUT(*ADMDSP)MQMNAME('QMgrName') GRTMQMAUT OBJ(*ALL) OBJTYPE(*NMLIST) USER('GroupName') AUT(*ADMDSP) MQMNAME('QMgrName') GRTMQMAUT OBJ(*ALL) OBJTYPE(*PRC) USER('GroupName') AUT(*ADMDSP) MQMNAME('QMgrName') GRTMQMAUT OBJ(*ALL) OBJTYPE(*SVC) USER('GroupName') AUT(*ADMDSP) MQMNAME('QMgrName') GRTMQMAUT OBJ('object-name') OBJTYPE(*MQM) USER('GroupName') AUT(*ADMDSP *CONNECT *INQ) MQMNAME('QMgrName') - For z/OS, issue
the following commands:
 RDEFINE MQQUEUE QMgrName.** UACC(NONE)
PERMIT QMgrName.** CLASS(MQQUEUE) ID(GroupName) ACCESS(READ)
RDEFINE MQTOPIC QMgrName.** UACC(NONE)
PERMIT QMgrName.** CLASS(MQTOPIC) ID(GroupName) ACCESS(READ)
RDEFINE MQPROC QMgrName.** UACC(NONE)
PERMIT QMgrName.** CLASS(MQPROC) ID(GroupName) ACCESS(READ)
RDEFINE MQNLIST QMgrName.** UACC(NONE)
PERMIT QMgrName.** CLASS(MQNLIST) ID(GroupName) ACCESS(READ)
RDEFINE MQCONN QMgrName.BATCH UACC(NONE)
PERMIT QMgrName.BATCH CLASS(MQCONN) ID(GroupName) ACCESS(READ)
RDEFINE MQCONN QMgrName.CICS UACC(NONE)
PERMIT QMgrName.CICS CLASS(MQCONN) ID(GroupName) ACCESS(READ)
RDEFINE MQCONN QMgrName.IMS UACC(NONE)
PERMIT QMgrName.IMS CLASS(MQCONN) ID(GroupName) ACCESS(READ)
RDEFINE MQCONN QMgrName.CHIN UACC(NONE)
PERMIT QMgrName.CHIN CLASS(MQCONN) ID(GroupName) ACCESS(READ)
The variable names have the following meanings:- QMgrName
- The name of the queue manager. On z/OS, this value can also be the name of a queue-sharing group.
- GroupName
- The name of the group to be granted access.
Granting full administrative access to all resources on a queue manager
Grant full administrative access to all the resources on a queue manager, to each user or group of users with a business need for it. Use the Add Role Based Authorities wizard or the appropriate commands for your operating system.
Procedure
- Use the wizard:
- In the WebSphere MQ Explorer Navigator pane, right-click the queue manager and click Object Authorities > Add Role Based Authorities The Add Role Based Authorities wizard opens.
- For UNIX and Linux systems, issue
the following commands:
 setmqaut -m QMgrName -n ** -t queue -g GroupName +alladm +browse
setmqaut -m QMgrName -n @class -t queue -g GroupName +crt
setmqaut -m QMgrName -n SYSTEM.ADMIN.COMMAND.QUEUE -t queue -g GroupName +dsp +inq +put
setmqaut -m QMgrName -n SYSTEM.MQEXPLORER.REPLY.QUEUE -t queue -g GroupName +dsp +inq +get
setmqaut -m QMgrName -n ** -t topic -g GroupName +alladm
setmqaut -m QMgrName -n @class -t topic -g GroupName +crt
setmqaut -m QMgrName -n ** -t channel -g GroupName +alladm
setmqaut -m QMgrName -n @class -t channel -g GroupName +crt
setmqaut -m QMgrName -n ** -t clntconn -g GroupName +alladm
setmqaut -m QMgrName -n @class -t clntconn -g GroupName +crt
setmqaut -m QMgrName -n ** -t authinfo -g GroupName +alladm
setmqaut -m QMgrName -n @class -t authinfo -g GroupName +crt
setmqaut -m QMgrName -n ** -t listener -g GroupName +alladm
setmqaut -m QMgrName -n @class -t listener -g GroupName +crt
setmqaut -m QMgrName -n ** -t namelist -g GroupName +alladm
setmqaut -m QMgrName -n @class -t namelist -g GroupName +crt
setmqaut -m QMgrName -n ** -t process -g GroupName +alladm
setmqaut -m QMgrName -n @class -t process -g GroupName +crt
setmqaut -m QMgrName -n ** -t service -g GroupName +alladm
setmqaut -m QMgrName -n @class -t service -g GroupName +crt
setmqaut -m QMgrName -t qmgr -g GroupName +alladm +conn
- For Windows systems, issue the same commands as for UNIX and Linux systems, but using the profile
name @CLASS instead of @class.
- For IBM i,
issue the following command:
GRTMQMAUT OBJ(*ALL) OBJTYPE(*ALL) USER('GroupName') AUT(*ALLADM) MQMNAME('QMgrName') - For z/OS, issue
the following commands:
 RDEFINE MQADMIN QMgrName.*.** UACC(NONE)
PERMIT QMgrName.*.** CLASS(MQADMIN) ID(GroupName) ACCESS(ALTER)
The variable names have the following meanings:- QMgrName
- The name of the queue manager. On z/OS, this value can also be the name of a queue-sharing group.
- GroupName
- The name of the group to be granted access.
Removing connectivity to the queue manager
If you do not want user applications to connect to your queue manager, remove their authority to connect to it. Revoke the authority of all users to connect to the queue manager by using the appropriate command for your operating system.
Procedure
- For UNIX, Linux and Windows systems, issue the following command:
setmqaut -m QMgrName -t qmgr -g GroupName -connect
- For IBM i, issue
the following command:
RVKMQMAUT OBJ ('QMgrName') OBJTYPE(*MQM) USER(*ALL) AUT(*CONNECT) - For z/OS, issue
the following commands:
 RDEFINE MQCONN QMgrName.BATCH UACC(NONE)
RDEFINE MQCONN QMgrName.CHIN UACC(NONE)
RDEFINE MQCONN QMgrName.CICS UACC(NONE)
RDEFINE MQCONN QMgrName.IMS UACC(NONE)
Do not issue any PERMIT commands. The variable names have the following meanings:
- QMgrName
- The name of the queue manager. On z/OS, this value can also be the name of a queue-sharing group.
- GroupName
- The name of the group to be denied access.
Allowing user applications to connect to your queue manager
You want to allow user application to connect to your queue manager. Use the tables in this topic to determine what actions to take.
First, determine whether client applications will connect to your queue manager.
If none of the applications that will connect to your queue manager are client applications, disable remote access as described in Disabling remote access to the queue manager .
If one or more of the applications that will connect to your queue manager are client applications, secure remote connectivity as described in Securing remote connectivity to the queue manager .
In both cases, set up connection security as described in Setting up connection security
To control access to resources for each user connecting to the queue manager, see the following table. If the statement in the first column is true, take the action listed in the second column.
| Statement | Take this action |
|---|---|
| You have applications that make use of queues | See Controlling user access to queues |
| You have applications that make use of topics | See Controlling user access to topics . |
| You have applications that inquire on the queue manager object | See Granting authority to inquire on a queue manager . |
| You have applications that use process objects | See Granting authority to access processes |
| You have applications that make use of namelists | See Granting authority to access namelists |
Securing remote connectivity to the queue manager
You can secure remote connectivity to the queue manager using SSL or TLS, a security exit, channel authentication records, or a combination of these methods. You connect a client to the queue manager by using a client-connection channel on the client workstation and a server-connection channel on the server. Secure such connections in one of the following ways.
Procedure
- Use SSL or TLS with channel authentication records:
- Prevent any Distinguished Name (DN) from opening a channel, by using an SSLPEERMAP channel authentication record to map all DNs to USERSRC(NOACCESS).
- Allow specific DNs or sets of DNs to open a channel by using an SSLPEERMAP channel authentication record to map them to USERSRC(CHANNEL).
- Use SSL or TLS with a security exit:
- Set MCAUSER on the server-connection channel to a user identifier with no privileges.
- Write a security exit to assign an MCAUSER value depending on the value of SSL DN it receives in the SSLPeerNamePtr and SSLPeerNameLength fields passed to the exit in the MQCD structure.
- Use SSL or TLS with fixed channel definition values:
- Set SSLPEER on the server-connection channel to a specific value or narrow range of values.
- Set MCAUSER on the server-connection channel to the user ID the channel should run with.
- Use channel authentication records on channels that do not use SSL or TLS:
- Prevent any IP address from opening channels, by using an address-mapping channel authentication record with ADDRESS(*) and USERSRC(NOACCESS).
- Allow specific IP addresses to open channels, by using address-mapping channel authentication records for those addresses with USERSRC(CHANNEL).
- Use a security exit:
- Write a security exit to authorize connections based on any property you choose, for example, the originating IP address.
- It is also possible to use channel authentication records with a security exit, or to use all three methods, if your particular circumstances require it.
Blocking specific IP addresses
You can prevent a specific channel accepting an inbound connection from an IP address, or prevent the whole queue manager from allowing access from an IP address, by using a channel authentication record. Enable channel authentication records by running the following command:
ALTER QMGR CHLAUTH(ENABLED)To disallow specific channels from accepting an inbound connection and ensure that connections are only accepted when using the correct channel name, one type of rule can be used to block IP addresses. To disallow an IP address access to the whole queue manager, you would normally use a firewall to permanently block it. However, another type of rule can be used to allow you to block a few addresses temporarily, for example while you are waiting for the firewall to be updated.
Procedure
- To block IP addresses from using a specific channel, set a channel authentication record by using the MQSC command SET
CHLAUTH, or the PCF command Set Channel Authentication
Record.
SET CHLAUTH(generic-channel-name) TYPE(ADDRESSMAP) ADDRLIST(generic-ip-address) USERSRC(NOACCESS)
- generic-channel-name is either the name of a channel to which you want to control access, or a pattern including the asterisk (*) symbol as a wildcard that matches the channel name.
- generic-ip-address is either the address from which you are refusing connections, or a pattern including the asterisk (*) as a wildcard or the hyphen (-) to indicate a range, that matches the address. For more information about filtering IP addresses with patterns, see Generic IP addresses
- To block IP addresses from using the whole queue manager, as a temporary measure until the firewall can be updated, set a channel authentication record by using the MQSC command SET CHLAUTH,
or the PCF command Set Channel Authentication Record. It must be noted that this type of rule will hold the inbound
connection open for 30 seconds before it is failed. To avoid this delay, and then only if the inbound connections to be blocked are channels, use the type of rule described above. This rule operates
at the listener, before the channel name requested is known. You must therefore specify the channel name as an asterisk (*), matching all channels. You can specify the IP address in the channel authentication record singly, as a generic IP address pattern, or as a list of IP
addresses.
SET CHLAUTH('*') TYPE(BLOCKADDR) ADDRLIST(generic-ip-address)- generic-ip-address is either the address from which you are refusing connections, or a pattern including the asterisk (*) as a wildcard or the hyphen (-) to indicate a range, that matches the address. For more information about filtering IP addresses with patterns, see Generic IP addresses
Temporarily blocking specific IP addresses if the queue manager is not running
You might want to block particular IP addresses, or ranges of addresses, when the queue manager is not running and you cannot therefore issue MQSC commands. You can temporarily block IP addresses on an exceptional basis by modifying the blockaddr.ini file.
The blockaddr.ini file contains a copy of the BLOCKADDR definitions that are used by the queue manager. This file is read by the listener if the listener is started before the queue manager. In these circumstances, the listener uses any values that you have manually added to the blockaddr.ini file.
However, be aware that when the queue manager is started, it writes the set of BLOCKADDR definitions to the blockaddr.ini file, over-writing any manual editing you might have done. Similarly, every time you add or delete a BLOCKADDR definition by using the SET CHLAUTH command, the blockaddr.ini file is updated. You can therefore make permanent changes to the BLOCKADDR definitions only by using the SET CHLAUTH command when the queue manager is running.
Procedure
- Open the blockaddr.ini file in a text editor. The file is located in the data directory of the queue manager.
- Add IP addresses as simple keyword-value pairs, where the keyword is Addr. For information about filtering IP addresses with patterns, see Generic IP addresses . For example:
 Addr = 192.0.2.0
Addr = 192.0.*
Addr = 192.0.2.1-8
Blocking specific user IDs
You can prevent specific users from using a channel by specifying user IDs that, if asserted, cause the channel to end. Do this by setting a channel authentication record. Ensure that channel authentication records are enabled as follows:
ALTER QMGR CHLAUTH(ENABLED)
Procedure
Set a channel authentication record using the MQSC command SET CHLAUTH, or the PCF command Set Channel Authentication Record. For example, you can issue the MQSC command:
SET CHLAUTH('generic-channel-name') TYPE(BLOCKUSER) USERLIST(userID1, userID2)
- generic-channel-name is either the name of a channel to which you want to control access, or a pattern including the asterisk (*) symbol as a wildcard that matches the channel name.
- The user list provided on a TYPE(BLOCKUSER) only applies to SVRCONN channels and not queue manager to queue manager channels.
- UserID1 and userID2 are each the ID of a user that is to be prevented from using the channel. You can also specify the special value *MQADMIN to refer to privileged administrative users. For more information about privileged users, see Privileged users . For more information about *MQADMIN, see SET CHLAUTH .
Mapping a remote queue manager to an MCAUSER user ID
You can use a channel authentication record to set the MCAUSER attribute of a channel, according to the queue manager from which the channel is connecting. Ensure that channel authentication records are enabled as follows:
ALTER QMGR CHLAUTH(ENABLED)
Optionally, you can restrict the IP addresses to which the rule applies. Note that this technique does not apply to server-connection channels. If you specify the name of a server-connection channel in the commands shown below, it has no effect.
Procedure
- Set a channel authentication record using the MQSC command SET CHLAUTH, or the PCF command Set Channel Authentication
Record.
For example, you can issue the MQSC command:
SET CHLAUTH('generic-channel-name') TYPE (QMGRMAP) QMNAME(generic-partner-qmgr-name ) USERSRC(MAP) MCAUSER(user)- generic-channel-name is either the name of a channel to which you want to control access, or a pattern including the asterisk (*) symbol as a wildcard that matches the channel name.
- generic-partner-qmgr-name is either the name of the queue manager, or a pattern including the asterisk (*) symbol as a wildcard that matches the queue manager name.
- User is the user ID to be used for all connections from the specified queue manager.
- To restrict this command to certain IP addresses, include
the ADDRESS parameter, as follows:
SET CHLAUTH('generic-channel-name') TYPE (QMGRMAP) QMNAME(generic-partner-qmgr-name ) USERSRC(MAP) MCAUSER(user) ADDRESS(generic-ip-address)- generic-channel-name is either the name of a channel to which you want to control access, or a pattern including the asterisk (*) symbol as a wildcard that matches the channel name.
- generic-ip-address is either a single address, or a pattern including the asterisk (*) symbol as a wildcard or the hyphen (-) to indicate a range, that matches the address. For more information about generic IP addresses, see Generic IP addresses .
Mapping a client asserted user ID to an MCAUSER user ID
You can use a channel authentication record to change the MCAUSER attribute of a server-connection channel, according to the original user ID received from a client. Ensure that channel authentication records are enabled as follows:
ALTER QMGR CHLAUTH(ENABLED)Note that this technique applies only to server-connection channels. It has no effect on other channel types.
Procedure
Set a channel authentication record using the MQSC command SET CHLAUTH, or the PCF command Set Channel Authentication Record . For example, you can issue the MQSC command:
SET CHLAUTH('generic-channel-name') TYPE (USERMAP) CLNTUSER(client-user-name) USERSRC(MAP) MCAUSER(user)
- generic-channel-name is either the name of a channel to which you want to control access, or a pattern including the asterisk (*) symbol as a wildcard that matches the channel name.
- client-user-name is the user ID asserted by the client.
- User is the user ID to be used instead of the client user name.
Mapping an SSL or TLS Distinguished Name to an MCAUSER user ID
You can use a channel authentication record to set the MCAUSER attribute of a channel, according to the Distinguished Name (DN) received. Ensure that channel authentication records are enabled as follows:
ALTER QMGR CHLAUTH(ENABLED)
Procedure
Set a channel authentication record using the MQSC command SET CHLAUTH, or the PCF command Set Channel Authentication Record. For example, you can issue the MQSC command:
 SET CHLAUTH('generic-channel-name') TYPE (SSLPEERMAP) SSLPEER(generic-ssl-peer-name
) USERSRC(MAP) MCAUSER(user)
- generic-channel-name is either the name of a channel to which you want to control access, or a pattern including the asterisk (*) symbol as a wildcard that matches the channel name.
- generic-ssl-peer-name is a string following the standard WebSphere MQ rules for SSLPEER values. See WebSphere MQ rules for SSLPEER values .
- User is the user ID to be used for all connections using the specified DN.
Blocking access from a remote queue manager
You can use a channel authentication record to prevent a remote queue manager from starting channels. Ensure that channel authentication records are enabled as follows:
ALTER QMGR CHLAUTH(ENABLED)Note that this technique does not apply to server-connection channels. If you specify the name of a server-connection channel in the command shown below, it has no effect.
Procedure
Set a channel authentication record using the MQSC command SET CHLAUTH, or the PCF command Set Channel Authentication Record. For example, you can issue the MQSC command:
SET CHLAUTH('generic-channel-name') TYPE(QMGRMAP) QMNAME('generic-partner-qmgr-name') USERSRC(NOACCESS)
- generic-channel-name is either the name of a channel to which you want to control access, or a pattern including the asterisk (*) symbol as a wildcard that matches the channel name.
- generic-partner-qmgr-name is either the name of the queue manager, or a pattern including the asterisk (*) symbol as a wildcard that matches the queue manager name.
Blocking access for a client asserted user ID
You can use a channel authentication record to prevent a client asserted user ID from starting channels. Ensure that channel authentication records are enabled as follows:
ALTER QMGR CHLAUTH(ENABLED)Note that this technique applies only to server-connection channels. It has no effect on other channel types.
Procedure
Set a channel authentication record using the MQSC command SET CHLAUTH, or the PCF command Set Channel Authentication Record. For example, you can issue the MQSC command:
SET CHLAUTH('generic-channel-name') TYPE(USERMAP) CLNTUSER('client-user-name') USERSRC(NOACCESS)
- generic-channel-name is either the name of a channel to which you want to control access, or a pattern including the asterisk (*) symbol as a wildcard that matches the channel name.
- client-user-name is the user ID asserted by the client.
Blocking access for an SSL Distinguished Name
You can use a channel authentication record to prevent an SSL Distinguished Name from starting channels. Ensure that channel authentication records are enabled as follows:
ALTER QMGR CHLAUTH(ENABLED)
Procedure
Set a channel authentication record using the MQSC command SET CHLAUTH, or the PCF command Set Channel Authentication Record. For example, you can issue the MQSC command:
SET CHLAUTH('generic-channel-name') TYPE(SSLPEERMAP) SSLPEER('generic-ssl-peer-name') USERSRC(NOACCESS)
- generic-channel-name is either the name of a channel to which you want to control access, or a pattern including the asterisk (*) symbol as a wildcard that matches the channel name.
- generic-ssl-peer-name is a string following the standard WebSphere MQ rules for SSLPEER values. See WebSphere MQ rules for SSLPEER values .
Mapping an IP address to an MCAUSER user ID
You can use a channel authentication record to set the MCAUSER attribute of a channel, according to the IP address from which the connection is received. Ensure that channel authentication records are enabled as follows:
ALTER QMGR CHLAUTH(ENABLED)
Procedure
Set a channel authentication record using the MQSC command SET CHLAUTH, or the PCF command Set Channel Authentication Record. For example, you can issue the MQSC command:
SET CHLAUTH('generic-channel-name') TYPE(ADDRESSMAP) ADDRESS('generic-ip-address') USERSRC(MAP) MCAUSER(user)
- generic-channel-name is either the name of a channel to which you want to control access, or a pattern including the asterisk (*) symbol as a wildcard that matches the channel name.
- User is the user ID to be used for all connections using the specified DN.
- generic-ip-address is either the address from which the connection is being made, or a pattern including the asterisk (*) as a wildcard or the hyphen (-) to indicate a range, that matches the address.
Disabling remote access to the queue manager
If you do not want client applications to connect to your queue manager, disable remote access to it. Prevent client applications connecting to the queue manager in one of the following ways:
Procedure
- Delete all server-connection channels using the MQSC command DELETE CHANNEL.
- Set the message channel agent user identifier (MCAUSER) of the channel to a user ID with no access rights, using the MQSC command ALTER CHANNEL.
Set up connection security
Grant the authority to connect to the queue manager to each user or group of users with a business need to do so. To set up connection security, use the appropriate commands for your operating system.
Procedure
- For UNIX, Linux and Windows systems, issue the following command:
setmqaut -m QMgrName -t qmgr -g GroupName +connect
- For IBM i, issue
the following command:
GRTMQMAUT OBJ('QMgrName') OBJTYPE(*MQM) USER('GroupName') AUT(*CONNECT) - For z/OS, issue
the following commands:
 RDEFINE MQCONN QMgrName.BATCH UACC(NONE)
PERMIT QMgrName.BATCH CLASS(MQCONN) ID(GroupName) ACCESS(READ)
RDEFINE MQCONN QMgrName.CICS UACC(NONE)
PERMIT QMgrName.CICS CLASS(MQCONN) ID(GroupName) ACCESS(READ)
RDEFINE MQCONN QMgrName.IMS UACC(NONE)
PERMIT QMgrName.IMS CLASS(MQCONN) ID(GroupName) ACCESS(READ)
RDEFINE MQCONN QMgrName.CHIN UACC(NONE)
PERMIT QMgrName.CHIN CLASS(MQCONN) ID(GroupName) ACCESS(READ)
These commands give authority to connect for batch, CICS, IMS™ and the channel initiator (CHIN). If you do not use a particular type of connection, omit the relevant commands. The variable names have the following meanings:- QMgrName
- The name of the queue manager. On z/OS, this value can also be the name of a queue-sharing group.
- ObjectProfile
- The name of the object or generic profile for which to change authorizations.
- GroupName
- The name of the group to be granted access.
Controlling user access to queues
You want to control application access to queues. Use this topic to determine what actions to take.
For each true statement in the first column, take the action indicated in the second column.
| Statement | Action |
|---|---|
| The application gets messages from a queue | See Granting authority to get messages from queues |
| The application sets context | See Granting authority to set context |
| The application passes context | See Granting authority to pass context |
| The application puts messages on a clustered queue | See Authorizing putting messages on remote cluster queues |
| The application puts messages on a local queue | See Granting authority to put messages to a local queue |
| The application puts messages on a model queue | See Granting authority to put messages to a model queue |
| The application puts messages on a remote queue | See Granting authority to put messages to a remote cluster queue |
Granting authority to get messages from queues
Grant the authority to get messages from a queue or set of queues, to each group of users with a business need for it. To grant the authority to get messages from some queues, use the appropriate commands for your operating system.
Procedure
- For UNIX, Linux and Windows systems, issue the following command:
setmqaut -m QMgrName -n ObjectProfile -t queue -g GroupName +get
- For IBM i, issue the following command:
GRTMQMAUT OBJ('ObjectProfile') OBJTYPE(*Q) USER(GroupName) AUT(*GET) MQMNAME('QMgrName') - For z/OS, issue
the following commands:
 RDEFINE MQQUEUE QMgrName.ObjectProfile UACC(NONE)
PERMIT QMgrName.ObjectProfile CLASS(MQQUEUE) ID(GroupName) ACCESS(UPDATE)
The variable names have the following meanings:- QMgrName
- The name of the queue manager. On z/OS, this value can also be the name of a queue-sharing group.
- ObjectProfile
- The name of the object or generic profile for which to change authorizations.
- GroupName
- The name of the group to be granted access.
Granting authority to set context
Grant the authority to set context on a message that is being put, to each group of users with a business need for it. To grant the authority to set context on some queues, use the appropriate commands for your operating system.
Procedure
- For UNIX, Linux and Windows systems, issue one of the following commands:
- To set identity context only:
setmqaut -m QMgrName -n ObjectProfile -t queue -g GroupName +setid
- To set all context:
setmqaut -m QMgrName -n ObjectProfile -t queue -g GroupName +setall
- To set identity context only:
- For IBM i, issue one of the following commands:
- To set identity context only:
GRTMQMAUT OBJ('ObjectProfile') OBJTYPE(*Q) USER(GroupName) AUT(*SETID) MQMNAME('QMgrName') - To set all context:
GRTMQMAUT OBJ('ObjectProfile') OBJTYPE(*Q) USER(GroupName) AUT(*SETALL) MQMNAME('QMgrName')
- To set identity context only:
- For z/OS, issue
one of the following sets of commands:
- To set identity context only:
 RDEFINE MQQUEUE QMgrName.ObjectProfile UACC(NONE)
PERMIT QMgrName.ObjectProfile CLASS(MQQUEUE) ID(GroupName) ACCESS(UPDATE)
- To set all context:
 RDEFINE MQQUEUE QMgrName.ObjectProfile UACC(NONE)
PERMIT QMgrName.ObjectProfile CLASS(MQQUEUE) ID(GroupName) ACCESS(CONTROL)
The variable names have the following meanings:
- QMgrName
- The name of the queue manager. On z/OS, this value can also be the name of a queue-sharing group.
- ObjectProfile
- The name of the object or generic profile for which to change authorizations.
- GroupName
- The name of the group to be granted access.
- To set identity context only:
Granting authority to pass context
Grant the authority to pass context from a retrieved message to one that is being put, to each group of users with a business need for it. To grant the authority to pass context on some queues, use the appropriate commands for your operating system.
Procedure
- For UNIX, Linux and Windows systems, issue one of the following commands:
- To pass identity context only:
setmqaut -m QMgrName -n ObjectProfile -t queue -g GroupName +passid
- To pass all context:
setmqaut -m QMgrName -n ObjectProfile -t queue -g GroupName +passall
- To pass identity context only:
- For IBM i, issue one of the following commands:
- To pass identity context only:
GRTMQMAUT OBJ('ObjectProfile') OBJTYPE(*Q) USER(GroupName) AUT(*PASSID) MQMNAME('QMgrName') - To pass all context:
GRTMQMAUT OBJ('ObjectProfile') OBJTYPE(*Q) USER(GroupName) AUT(*PASSALL) MQMNAME('QMgrName')
- To pass identity context only:
- For z/OS, issue
the following commands to pass identity context or all context:
 RDEFINE MQQUEUE QMgrName.ObjectProfile UACC(NONE)
PERMIT QMgrName.ObjectProfile CLASS(MQQUEUE) ID(GroupName) ACCESS(UPDATE)
The variable names have the following meanings:- QMgrName
- The name of the queue manager. On z/OS, this value can also be the name of a queue-sharing group.
- ObjectProfile
- The name of the object or generic profile for which to change authorizations.
- GroupName
- The name of the group to be granted access.
Granting authority to put messages to a local queue
Grant the authority to put messages to a local queue or set of queues, to each group of users with a business need for it. To grant the authority to put messages to some local queues, use the appropriate commands for your operating system.
Procedure
- For UNIX, Linux and Windows systems, issue the following command:
setmqaut -m QMgrName -n ObjectProfile -t queue -g GroupName +put
- For IBM i, issue the following command:
GRTMQMAUT OBJ('ObjectProfile') OBJTYPE(*Q) USER(GroupName) AUT(*PUT) MQMNAME('QMgrName') - For z/OS, issue
the following commands:
 RDEFINE MQQUEUE QMgrName.ObjectProfile UACC(NONE)
PERMIT QMgrName.ObjectProfile CLASS(MQQUEUE) ID(GroupName) ACCESS(UPDATE)
The variable names have the following meanings:- QMgrName
- The name of the queue manager. On z/OS, this value can also be the name of a queue-sharing group.
- ObjectProfile
- The name of the object or generic profile for which to change authorizations.
- GroupName
- The name of the group to be granted access.
Granting authority to put messages to a model queue
Grant the authority to put messages to a model queue or set of model queues, to each group of users with a business need for it. Model queues are used to create dynamic queues. You must therefore grant authority to both the model and dynamic queues. To grant these authorities, use the appropriate commands for your operating system.
Procedure
- For UNIX, Linux and Windows systems, issue the following commands:
 setmqaut -m QMgrName -n ModelQueueName -t queue -g GroupName +put
setmqaut -m QMgrName -n ObjectProfile -t queue -g GroupName +put
- For IBM i, issue the following commands:
GRTMQMAUT OBJ('ModelQueueName') OBJTYPE(*Q) USER(GroupName) AUT(*PUT) MQMNAME('QMgrName') GRTMQMAUT OBJ('ObjectProfile') OBJTYPE(*Q) USER(GroupName) AUT(*PUT) MQMNAME('QMgrName') - For z/OS, issue
the following commands:
 RDEFINE MQQUEUE QMgrName.ModelQueueName UACC(NONE)
PERMIT QMgrName.ModelQueueName CLASS(MQQUEUE) ID(GroupName) ACCESS(UPDATE)
RDEFINE MQQUEUE QMgrName.ObjectProfile UACC(NONE)
PERMIT QMgrName.ObjectProfile CLASS(MQQUEUE) ID(GroupName) ACCESS(UPDATE)
The variable names have the following meanings:- QMgrName
- The name of the queue manager. On z/OS, this value can also be the name of a queue-sharing group.
- ModelQueueName
- The name of the model queue on which dynamic queues are based.
- ObjectProfile
- The name of the dynamic queue or generic profile for which to change authorizations.
- GroupName
- The name of the group to be granted access.
Granting authority to put messages to a remote cluster queue
Grant the authority to put messages to a remote cluster queue or set of queues, to each group of users with a business need for it. To put a message on a remote cluster queue, you can either put it on a local definition of a remote queue, or a fully qualified remote queue. If you are using a local definition of a remote queue, you need authority to put to the local object: see Granting authority to put messages to a local queue . If you are using a fully qualified remote queue, you need authority to put to the remote queue. Grant this authority using the appropriate commands for your operating system.
Procedure
- For UNIX, Linux and Windows systems, issue the following command:
setmqaut -m QMgrName -t rqmname -n ObjectProfile -g GroupName +put
Note that you can use the rqmname object for remote cluster queues only.
- For IBM i, issue the following command:
GRTMQMAUT OBJTYPE(*RMTMQMNAME) OBJ('ObjectProfile') USER(GroupName) AUT(*PUT) MQMNAME('QMgrName')Note that you can use the RMTMQMNAME object for remote cluster queues only.
- For z/OS, issue
the following commands:
 RDEFINE MQQUEUE  QMgrNameObjectProfile UACC(NONE)
PERMIT QMgrNameObjectProfile CLASS(MQADMIN)
ID(GroupName) ACCESS(UPDATE)
Note that you can use the name of the remote queue manager (or queue-sharing group) for remote cluster queues only. The variable names have the following meanings:
- QMgrName
- The name of the queue manager. On z/OS, this value can also be the name of a queue-sharing group.
- ObjectProfile
- The name of the remote queue manager or generic profile for which to change authorizations.
- GroupName
- The name of the group to be granted access.
Controlling user access to topics
You need to control the access of applications to topics. Use this topic to determine what actions to take.
For each true statement in the first column, take the action indicated in the second column.
| Statement | Action |
|---|---|
| The application publishes messages to a topic | See Granting authority to publish messages to a topic |
| The application subscribes to a topic | See Granting authority to subscribe to topics |
Granting authority to publish messages to a topic
Grant the authority to publish messages to a topic or set of topics, to each group of users with a business need for it. To grant the authority to publish messages to some topics, use the appropriate commands for your operating system.
Procedure
- For UNIX, Linux and Windows systems, issue the following command:
setmqaut -m QMgrName -n ObjectProfile -t topic -g GroupName +pub
- For IBM i, issue the following command:
GRTMQMAUT OBJ('ObjectProfile') OBJTYPE(*TOPIC) USER(GroupName) AUT(*PUB) MQMNAME('QMgrName') - For z/OS, issue
the following commands:
 RDEFINE MQTOPIC QMgrName.ObjectProfile UACC(NONE)
PERMIT QMgrName.ObjectProfile CLASS(MQTOPIC) ID(GroupName) ACCESS(UPDATE)
The variable names have the following meanings:- QMgrName
- The name of the queue manager. On z/OS, this value can also be the name of a queue-sharing group.
- ObjectProfile
- The name of the object or generic profile for which to change authorizations.
- GroupName
- The name of the group to be granted access.
Granting authority to subscribe to topics
Grant the authority to subscribe to a topic or set of topics, to each group of users with a business need for it. To grant the authority to subscribe to some topics, use the appropriate commands for your operating system.
Procedure
- For UNIX, Linux and Windows systems, issue the following command:
setmqaut -m QMgrName -n ObjectProfile -t topic -g GroupName +sub
- For IBM i, issue
the following command:
GRTMQMAUT OBJ('ObjectProfile') OBJTYPE(*TOPIC) USER(GroupName) AUT(*SUB) MQMNAME('QMgrName') - For z/OS, issue
the following commands:
 RDEFINE MQTOPIC QMgrName.SUBSCRIBE.ObjectProfile UACC(NONE)
PERMIT QMgrName.SUBSCRIBE.ObjectProfile CLASS(MQTOPIC) ID(GroupName) ACCESS(UPDATE)
The variable names have the following meanings:- QMgrName
- The name of the queue manager. On z/OS, this value can also be the name of a queue-sharing group.
- ObjectProfile
- The name of the object or generic profile for which to change authorizations.
- GroupName
- The name of the group to be granted access.
Granting authority to inquire on a queue manager
Grant the authority to inquire on a queue manager, to each group of users with a business need for it. To grant the authority to inquire on a queue manager, use the appropriate commands for your operating system.
Procedure
- For UNIX, Linux and Windows systems, issue the following command:
setmqaut -m QMgrName -n ObjectProfile -t qmgr -g GroupName +inq
- For IBM i, issue the following command:
GRTMQMAUT OBJ('ObjectProfile') OBJTYPE(*MQM) USER(GroupName) AUT(*INQ) MQMNAME('QMgrName') - For z/OS, issue
the following commands:
 RDEFINE MQCMDS QMgrName.ObjectProfile UACC(NONE)
PERMIT QMgrName ObjectProfile CLASS(MQCMDS) ID(GroupName ) ACCESS(READ)
These commands grant access to the specified queue manager. To permit the user to use the MQINQ command, issue the following commands:RDEFINE MQCMDS QMgrName.MQINQ.QMGR UACC(NONE) PERMIT QMgrName.MQINQ.QMGR CLASS(MQCMDS) ID(GroupName) ACCESS(READ)
The variable names have the following meanings:- QMgrName
- The name of the queue manager. On z/OS, this value can also be the name of a queue-sharing group.
- ObjectProfile
- The name of the object or generic profile for which to change authorizations.
- GroupName
- The name of the group to be granted access.
Granting authority to access processes
Grant the authority to access a process or set of processes, to each group of users with a business need for it. To grant the authority to access some processes, use the appropriate commands for your operating system.
Procedure
- For UNIX, Linux and Windows systems, issue the following command:
setmqaut -m QMgrName -n ObjectProfile -t process -g GroupName +all
- For IBM i, issue the following command:
GRTMQMAUT OBJ('ObjectProfile') OBJTYPE(*PRC) USER(GroupName) AUT(*ALL) MQMNAME('QMgrName') - For z/OS, issue
the following commands:
 RDEFINE MQPROC QMgrName.ObjectProfile UACC(NONE)
PERMIT QMgrName.ObjectProfile CLASS(MQPROC) ID(GroupName) ACCESS(READ)
The variable names have the following meanings:- QMgrName
- The name of the queue manager. On z/OS, this value can also be the name of a queue-sharing group.
- ObjectProfile
- The name of the object or generic profile for which to change authorizations.
- GroupName
- The name of the group to be granted access.
Granting authority to access namelists
Grant the authority to access a namelist or set of namelists, to each group of users with a business need for it. To grant the authority to access some namelists, use the appropriate commands for your operating system.
Procedure
- For UNIX, Linux and Windows systems, issue the following command:
 setmqaut -m QMgrName -n ObjectProfile -t namelist -g GroupName
 +all
- For IBM i, issue the following command:
GRTMQMAUT OBJ('ObjectProfile ') OBJTYPE(*NMLIST) USER(GroupName) AUT(*ALL) MQMNAME('QMgrName') - For z/OS, issue
the following commands:
 RDEFINE MQNLIST QMgrName.ObjectProfile UACC(NONE)
PERMIT QMgrName.ObjectProfile
 CLASS(MQNLIST) ID(GroupName) ACCESS(READ)
The variable names have the following meanings:- QMgrName
- The name of the queue manager. On z/OS, this value can also be the name of a queue-sharing group.
- ObjectProfile
- The name of the object or generic profile for which to change authorizations.
- GroupName
- The name of the group to be granted access.
Authority to administer WebSphere MQ on UNIX, Linux, and Windows systems
WebSphere MQ administrators can use all WebSphere MQ commands and grant authorities for other users. When administrators issue commands to remote queue managers, they must have the required authority on the remote queue manager. Further considerations apply to Windows systems.
WebSphere MQ administrators have authority to use all WebSphere MQ commands (including the commands to grant WebSphere MQ authorities for other users)
To be a WebSphere MQ administrator, you must be a member of a special group called the mqm group (or a member of the Administrators group on Windows systems). The mqm group is created automatically when WebSphere MQ is installed; add further users to the group to allow them to perform administration. All members of this group have access to all resources. This access can be revoked only by removing a user from the mqm group and issuing the REFRESH SECURITY command. Administrators can use control commands to administer WebSphere MQ. One of these control commands is setmqaut, which is used to grant authorities to other users to enable them to access or control WebSphere MQ resources. The PCF commands for managing authority records are available to non-administrators who have been granted dsp and chg authorities on the queue manager. For more information about managing authorities using PCF commands, see Programmable Command Formats .
Administrators can use the control command runmqsc to issue WebSphere MQ Script (MQSC) commands. When runmqsc is used in indirect mode to send MQSC commands to a remote queue manager, each MQSC command is encapsulated within an Escape PCF command. Administrators must have the required authorities for the MQSC commands to be processed by the remote queue manager. The WebSphere MQ Explorer issues PCF commands to perform administration tasks. Administrators require no additional authorities to use the WebSphere MQ Explorer to administer a queue manager on the local system. When the WebSphere MQ Explorer is used to administer a queue manager on another system, administrators must have the required authorities for the PCF commands to be processed by the remote queue manager.
For more information about authority checks when PCF and MQSC commands are processed, see the following topics:
- For PCF commands that operate on queue managers, queues, processes, namelists, and authentication information objects, see Authority to work with WebSphere MQ objects . Refer to this section for the equivalent MQSC commands encapsulated within Escape PCF commands.
- For PCF commands that operate on channels, channel initiators, listeners, and clusters, see Channel security .
- For PCF commands that operate on authority records, see Authority checking for PCF commands
Additionally, on Windows systems, the SYSTEM account has full access to WebSphere MQ resources.
On UNIX and Linux platforms, a special user ID of mqm is also created, for use by the product only. It must never be available to non-privileged users. All WebSphere MQ objects are owned by user ID mqm.
On Windows systems, members of the Administrators group can also administer any queue manager, as can the SYSTEM account. You can also create a domain mqm group on the domain controller that contains all privileged user IDs active within the domain, and add it to the local mqm group. Some commands, for example crtmqm, manipulate authorities on WebSphere MQ objects and so need authority to work with these objects (as described in the following sections). Members of the mqm group have authority to work with all objects, but there might be circumstances on Windows systems when authority is denied if you have a local user and a domain-authenticated user with the same name. This is described in Principals and groups .
Windows versions with a User Account Control (UAC) feature restricts the actions users can perform on certain operating system facilities, even if they are members of the Administrators group. If your userid is in the Administrators group but not the mqm group you must use an elevated command prompt to issue WebSphere MQ admin commands such as crtmqm, otherwise the error "AMQ7077: You are not authorized to perform the requested operation" is generated. To open an elevated command prompt, right-click the start menu item, or icon, for the command prompt, and select "Run as administrator".
You do not need to be a member of the mqm group to do the following:
- Issue commands from an application program that issues PCF commands, or MQSC commands within an Escape PCF command, unless the commands manipulate channel initiators. (These commands are described in Protecting channel initiator definitions ).
- Issue MQI calls from an application program (unless you want to use the fast path bindings on the MQCONNX call).
- Use the crtmqcvx command to create a fragment of code that performs data conversion on data type structures.
- Use the dspmq command to display queue managers.
- Use the dspmqtrc command to display WebSphere MQ formatted trace output.
A 12 character limitation applies to both group and user IDs.
UNIX and Linux platforms generally restrict the length of a user ID to 12 characters. AIX Version 5.3 has raised this limit but WebSphere MQ continues to observe a 12 character restriction on all UNIX and Linux platforms. If you use a user ID of greater than 12 characters, WebSphere MQ replaces it with the value UNKNOWN. Do not define a user ID with a value of UNKNOWN.
Managing the mqm group
Users in the mqm group are granted full administrative privileges over WebSphere MQ. For this reason, you should not enrol applications and ordinary users in the mqm group. The mqm group should contain the accounts of the WebSphere MQ administrators only.
If your domain controller runs on Windows 2000 or Windows 2003, your domain administrator might have to set up a special account for WebSphere MQ to use. This is described in the Configuring WebSphere MQ accounts .
Authority to work with WebSphere MQ objects on UNIX, Linux and Windows systems
All objects are protected by WebSphere MQ, and principals must be given appropriate authority to access them. Different principals need different access rights to different objects.
Queue managers, queues, process definitions, namelists, channels, client connection channels, listeners, services, and authentication information objects are all accessed from applications that use MQI calls or PCF commands. These resources are all protected by WebSphere MQ, and applications need to be given permission to access them. The entity making the request might be a user, an application program that issues an MQI call, or an administration program that issues a PCF command. The identifier of the requester is referred to as the principal.
Different groups of principals can be granted different types of access authority to the same object. For example, for a specific queue, one group might be allowed to perform both put and get operations; another group might be allowed only to browse the queue (MQGET with browse option). Similarly, some groups might have put and get authority to a queue, but not be allowed to alter attributes of the queue or delete it.
Some operations are particularly sensitive and should be limited to privileged users. For example:
- Accessing some special queues, such as transmission queues or the command queue SYSTEM.ADMIN.COMMAND.QUEUE
- Running programs that use full MQI context options
- Create and deleting application queues
Full access permission to an object is automatically given to the user ID that created the object and to all members of the mqm group (and to the members of the local Administrators group on Windows systems).
When security checks are made on UNIX, Linux and Windows systems
Security checks are typically made on connecting to a queue manager, opening or closing objects, and putting or getting messages.
The security checks made for a typical application are as follows:
- Connecting to the queue manager (MQCONN or MQCONNX calls)
- This is the first time that the application is associated with a particular queue manager. The queue manager interrogates the operating environment to discover the user ID associated with the application. WebSphere MQ then verifies
that the user ID is authorized to connect to the queue manager and retains the user ID for future checks.
Users do not have to sign on to WebSphere MQ; WebSphere MQ assumes that users have signed on to the underlying operating system and have been authenticated by that.
- Opening the object (MQOPEN or MQPUT1 calls)
- WebSphere MQ objects
are accessed by opening the object and issuing commands against it.
All resource checks are performed when the object is opened, rather
than when it is actually accessed. This means that the MQOPEN
request must specify the type of access required (for example, whether
the user wants only to browse the object or perform an update like
putting messages onto a queue).
WebSphere MQ checks the resource that is named in the MQOPEN request. For an alias or remote queue object, the authorization used is that of the object itself, not the queue to which the alias or remote queue resolves. This means that the user does not need permission to access it. Limit the authority to create queues to privileged users. If you do not, users might bypass the normal access control simply by creating an alias. If a remote queue is referred to explicitly with both the queue and queue manager names, the transmission queue associated with the remote queue manager is checked.
The authority to a dynamic queue is based on that of the model queue from which it is derived, but is not necessarily the same. This is described in Note 1 .
The user ID used by the queue manager for access checks is the user ID obtained from the operating environment of the application connected to the queue manager. A suitably authorized application can issue an MQOPEN call specifying an alternative user ID; access control checks are then made on the alternative user ID. This does not change the user ID associated with the application, only that used for access control checks.
- Putting and getting messages (MQPUT or MQGET calls)
- No access control checks are performed.
- Closing the object (MQCLOSE)
- No access control checks are performed, unless the MQCLOSE results in a dynamic queue being deleted. In this case, there is a check that the user ID is authorized to delete the queue.
- Subscribing to a topic (MQSUB)
- When an application subscribes to a topic, it specifies the type of operation that it needs to perform. It is either creating a new subscription, altering an existing subscription, or resuming an existing subscription without changing it. For each type of operation, the queue manager checks that the user ID that is associated with the application has the authority to perform the operation.
- When an application subscribes to a topic, the authority checks are performed against the topic objects that are found in the topic tree at, or above, the point in the topic tree at which the application subscribed. The authority checks might involve checks on more than one topic object.
- The user ID that the queue manager uses for the authority checks is the user ID obtained from the operating system when the application connects to the queue manager.
- The queue manager performs authority checks on subscriber queues but not on managed queues.
How access control is implemented by WebSphere MQ on UNIX, Linux and Windows systems
WebSphere MQ uses the security services provided by the underlying operating system, using the object authority manager. WebSphere MQ supplies commands to create and maintain access control lists.
An access control interface called the Authorization Service Interface is part of WebSphere MQ. WebSphere MQ supplies an implementation of an access control manager (conforming to the Authorization Service Interface) known as the object authority manager (OAM). This is automatically installed and enabled for each queue manager you create, unless you specify otherwise (as described in Preventing security access checks on Windows, UNIX and Linux systems ). The OAM can be replaced by any user or vendor written component that conforms to the Authorization Service Interface.
The OAM exploits the security features of the underlying operating system, using operating system user and group IDs. Users can access WebSphere MQ objects only if they have the correct authority. Controlling access to objects by using the OAM on UNIX, Linux and Windows systems describes how to grant and revoke this authority.
The OAM maintains an access control list (ACL) for each resource that it controls. Authorization data is stored on a local queue called SYSTEM.AUTH.DATA.QUEUE. Access to this queue is restricted to users in the mqm group, and additionally on Windows, to users in the Administrators group, and users logged in with the SYSTEM ID. User access to the queue cannot be changed.
WebSphere MQ supplies commands to create and maintain access control lists. For more information on these commands, see Controlling access to objects by using the OAM on UNIX, Linux and Windows systems .
WebSphere MQ passes the OAM a request containing a principal, a resource name, and an access type. The OAM grants or rejects access based on the ACL that it maintains. WebSphere MQ follows the decision of the OAM; if the OAM cannot make a decision, WebSphere MQ does not allow access.
Identifying the user ID on Windows, UNIX and Linux systems
The object authority manager identifies the principal that is requesting access to a resource. The user ID used as the principal varies according to context.
The object authority manager (OAM) must be able to identify who is requesting access to a particular resource. WebSphere MQ uses the term principal to refer to this identifier. The principal is established when the application first connects to the queue manager; it is determined by the queue manager from the user ID associated with the connecting application. (If the application issues XA calls without connecting to the queue manager, then the user ID associated with the application that issues the xa_open call is used for authority checks by the queue manager.)
On UNIX and Linux systems, the authorization routines checks either the real (logged-in) user ID, or the effective user ID associated with the application. The user ID checked can be dependent on the bind type, for details see Installable services .
WebSphere MQ propagates the user ID received from the system in the message header (MQMD structure) of each message as identification of the user. This identifier is part of the message context information and is described in Context authority on UNIX, Linux and Windows systems . Applications cannot alter this information unless they have been authorized to change context information.
Principals and groups
Principals can belong to groups. You can grant access to a particular resource to groups rather than to individuals, to reduce the amount of administration required. On UNIX and Linux systems all Access Control Lists (ACLs) are based on groups, but on Windows systems, ACLS are based on user IDs and groups.
For example, you might define a group consisting of users who want to run a particular application. Other users can be given access to all the resources they require by adding their user ID to the appropriate group. This process is described in:
- Create groups on Windows
- Create groups on HP-UX
- Create groups on AIX
- Create groups on Solaris
- Create groups on Linux
A principal can belong to more than one group (its group set). It has the aggregate of all the authorities granted to each group in its group set. These authorities are cached, so any changes you make to the group membership of the principal are not recognized until the queue manager is restarted, unless you issue the MQSC command REFRESH SECURITY (or the PCF equivalent).
- UNIX and Linux systems
- All ACLs are based on groups. When a user is granted access to a particular resource, the primary group of the user ID is included
in the ACL. The individual user ID is not included and authority is granted to all members of that group. Because of this, be aware that you can inadvertently change the authority of a principal by changing the authority of another principal in the same group.
All users are nominally assigned to the default user group nobody and by default, no authorizations are given to this group. You can change the authorization in the nobody group to grant access to WebSphere MQ resources to users without specific authorizations.
Do not define a user ID with the value
UNKNOWN
. The valueUNKNOWN
is used when a user ID is too long, so arbitrary user IDs would use the access authorities of UNKNOWN.User IDs can contain up to 12 characters and group names up to 12 characters.
- Windows systems
- ACLs are based on both user IDs and groups. Checks are the same as for UNIX systems except that individual user IDs can be displayed in the ACL as well. You can have different users on different domains with the same user ID. WebSphere MQ permits user IDs to be qualified by a domain name so that these users can be given different levels of access.
The group name can optionally include a domain name, specified in the following formats:
 GroupName@domain
domain\GroupName
Global groups are checked by the OAM in two cases only:- The queue manager security stanza includes the setting: GroupModel=GlobalGroups; see Security .
- The queue manager is using an alternate security access group; see crtmqm .
User IDs can contain up to 20 characters, domain names up to 15 characters, and group names up to 64 characters.
The OAM first checks the local security database, then the database of the primary domain, and finally the database of any trusted domains. The first user ID encountered is used by the OAM for checking. Each of these user IDs might have different group memberships on a particular computer.
Some control commands (for example, crtmqm) change authorities on WebSphere MQ objects using the object authority manager (OAM). The OAM searches the security databases in the order given in the preceding paragraph to determine the authority rights for a particular user ID. As a result, the authority determined by the OAM might override the fact that a user ID is a member of the local mqm group. For example, if you issue the crtmqm command from a user ID authenticated by a domain controller that has membership of the local mqm group through a global group, the command fails if the system has a local user of the same name who is not in the local mqm group.
Windows security identifiers (SIDs)
WebSphere MQ on Windows uses the SID where it is available. If a Windows SID is not supplied with an authorization request, WebSphere MQ identifies the user based on the user name alone, but this might result in the wrong authority being granted.
On Windows systems, the security identifier (SID) is used to supplement the user ID. The SID contains information that identifies the full user account details on the Windows security account manager (SAM) database where the user is defined. When a message is created on WebSphere MQ for Windows, WebSphere MQ stores the SID in the message descriptor. When WebSphere MQ on Windows performs authorization checks, it uses the SID to query the full information from the SAM database. (The SAM database in which the user is defined must be accessible for this query to succeed.)
By default, if a Windows SID is not supplied with an authorization request, WebSphere MQ identifies the user based on the user name alone. It does this by searching the security databases in the following order:
- The local security database
- The security database of the primary domain
- The security database of trusted domains
If the user name is not unique, incorrect WebSphere MQ authority might be granted. To prevent this problem, include an SID in each authorization request; the SID is used by WebSphere MQ to establish user credentials.
To specify that all authorization requests must include an SID, use regedit. Set the SecurityPolicy to NTSIDsRequired.
Alternate-user authority on UNIX, Linux and Windows systems
You can specify that a user ID can use the authority of another user when accessing a WebSphere MQ object. This is called alternate-user authority, and you can use it on any WebSphere MQ object.
Alternate-user authority is essential where a server receives requests from a program and wants to ensure that the program has the required authority for the request. The server might have the required authority, but it needs to know whether the program has the authority for the actions it has requested.
For example, assume that a server program running under user ID PAYSERV retrieves a request message from a queue that was put on the queue by user ID USER1. When the server program gets the request message, it processes the request and puts the reply back into the reply-to queue specified with the request message. Instead of using its own user ID (PAYSERV) to authorize opening the reply-to queue, the server can specify a different user ID, in this case, USER1. In this example, you can use alternate-user authority to control whether PAYSERV is allowed to specify USER1 as an alternate-user ID when it opens the reply-to queue.
The alternate-user ID is specified on the AlternateUserId field of the object descriptor.
Context authority on UNIX, Linux and Windows systems
Context is information that applies to a particular message and is contained in the message descriptor, MQMD, which is part of the message. Applications can specify the context data when either an MQOPEN or MQPUT call is made.
The context information comes in two sections:
- Identity section
- Who the message came from. It consists of the UserIdentifier, AccountingToken, and ApplIdentityData fields.
- Origin section
- Where the message came from, and when it was put onto the queue. It consists of the PutApplType, PutApplName, PutDate, PutTime, and ApplOriginData fields.
Applications can specify the context data when either an MQOPEN or MQPUT call is made. This data might be generated by the application, passed on from another message, or generated by the queue manager by default. For example, context data can be used by server programs to check the identity of the requester, testing whether the message came from an application running under an authorized user ID.
A server program can use the UserIdentifier to determine the user ID of an alternative user. You use context authorization to control whether the user can specify any of the context options on any MQOPEN or MQPUT1 call.
See Controlling context information for information about the context options, and Overview for MQMD for descriptions of the message descriptor fields relating to context.
Implementing access control in security exits
You can implement access control in a security exit by use of the MCAUserIdentifier or the object authority manager.
MCAUserIdentifier
Every instance of a channel that is current has an associated channel definition structure, MQCD. The initial values of the fields in MQCD are determined by the channel definition that is created by a WebSphere MQ administrator. In particular, the initial value of one of the fields, MCAUserIdentifier, is determined by the value of the MCAUSER parameter on the DEFINE CHANNEL command, or by the equivalent to MCAUSER if the channel definition is created in another way.
The MQCD structure is passed to a channel exit program when it is called by an MCA. When a security exit is called by an MCA, the security exit can change the value of MCAUserIdentifier, replacing any value that was specified in the channel definition.
On IBM i, UNIX, Linux and Windows systems, unless the value of MCAUserIdentifier is blank, the queue manager uses the value of MCAUserIdentifier as the user ID for authority checks when an MCA attempts to access the queue manager's resources after it has connected to the queue manager. If the value of MCAUserIdentifier is blank, the queue manager uses the default user ID of the MCA instead. This applies to RCVR, RQSTR, CLUSRCVR and SVRCONN channels. For sending MCAs, the default user ID is always used for authority checks, even if the value of MCAUserIdentifier is not blank.
On z/OS, the queue manager might use the value of MCAUserIdentifier for authority checks, provided it is not blank. For receiving MCAs and server connection MCAs, whether the queue manager uses the value of MCAUserIdentifier for authority checks depends on:
- The value of the PUTAUT parameter in the channel definition
- The RACF profile used for the checks
- The access level of the channel initiator address space user ID to the RESLEVEL profile
For sending MCAs, it depends on:
- Whether the sending MCA is a caller or a responder
- The access level of the channel initiator address space user ID to the RESLEVEL profile
The user ID that a security exit stores in MCAUserIdentifier can be acquired in various ways. Here are some examples:
- Provided there is no security exit at the client end of an MQI
channel, a user ID associated with the WebSphere MQ client application flows from the client connection MCA to the server connection MCA when the client application issues an MQCONN call. The server connection MCA stores this user ID in the RemoteUserIdentifier field in the channel definition structure, MQCD. If the value of MCAUserIdentifier is blank at this time, the MCA stores the same user ID in MCAUserIdentifier.
If the MCA does not store the user ID in MCAUserIdentifier,
a security exit can do it later by setting MCAUserIdentifier to the value of RemoteUserIdentifier.
If the user ID that flows from the client system is entering a new security domain and is not valid on the server system, the security exit can substitute the user ID for one that is valid and store the substituted user ID in MCAUserIdentifier.
- The user ID can be sent by the partner security exit in a security message.
On a message channel, a security exit called by the sending MCA can send the user ID under which the sending MCA is running. A security exit called by the receiving MCA can then store the user ID in MCAUserIdentifier. Similarly, on an MQI channel, a security exit at the client end of the channel can send the user ID associated with the WebSphere MQ MQI client application. A security exit at the server end of the channel can then store the user ID in MCAUserIdentifier. As in the previous example, if the user ID is not valid on the target system, the security exit can substitute the user ID for one that is valid and store the substituted user ID in MCAUserIdentifier.
If a digital certificate is received as part of the identification and authentication service, a security exit can map the Distinguished Name in the certificate to a user ID that is valid on the target system. It can then store the user ID in MCAUserIdentifier.
- If SSL is used on the channel, the partner's Distinguished Name (DN) is passed to the exit in the SSLPeerNamePtr field of the MQCD, and the DN of the issuer of that certificate is passed to the exit in the SSLRemCertIssNamePtr field of the MQCXP.
For more information about the MCAUserIdentifier field, the channel definition structure, MQCD, and the channel exit parameter structure, MQCXP, see Channel-exit calls and data structures . For more information about the user ID that flows from a client system on an MQI channel, see Access control .
Note: Security exit applications constructed prior to the release of WebSphere MQ v7.1 may require updating. For more information see Channel security exit programs .
WebSphere MQ object authority manager user authentication
On WebSphere MQ MQI client connections, security exits can be used to modify or create the MQCSP structure used in object authority manager (OAM) user authentication. This is described in Channel-exit programs for messaging channels
Implementing access control in message exits
You might need to use a message exit to substitute one user ID with another.
Consider a client application that sends a message to a server application. The server application can extract the user ID from the UserIdentifier field in the message descriptor and, provided it has alternate user authority, ask the queue manager to use this user ID for authority checks when it accesses WebSphere MQ resources on behalf of the client.
If the PUTAUT parameter is set to CTX (or ALTMCA on z/OS) in the channel definition, the user ID in the UserIdentifier field of each incoming message is used for authority checks when the MCA opens the destination queue.
In certain circumstances, when a report message is generated, it is put using the authority of the user ID in the UserIdentifier field of the message causing the report. In particular, confirm-on-delivery (COD) reports and expiration reports are always put with this authority.
Because of these situations, it might be necessary to substitute one user ID for another in the UserIdentifier field as a message enters a new security domain. This can be done by a message exit at the receiving end of the channel. Alternatively, you can ensure that the user ID in the UserIdentifier field of an incoming message is defined in the new security domain.
If an incoming message contains a digital certificate for the user of the application that sent the message, a message exit can validate the certificate and map the Distinguished Name in the certificate to a user ID that is valid on the receiving system. It can then set the UserIdentifier field in the message descriptor to this user ID.
If it is necessary for a message exit to change the value of the UserIdentifier field in an incoming message, it might be appropriate for the message exit to authenticate the sender of the message at the same time. For more details, see Identity mapping in message exits .
Implementing access control in the API exit and API-crossing exit
An API or API-crossing exit can provide access controls to supplement those provided by WebSphere MQ. In particular, the exit can provide access control at the message level. The exit can ensure that an application puts on a queue, or gets from a queue, only those messages that satisfy certain criteria.
Consider the following examples:
- A message contains information about an order. When an application attempts to put a message on a queue, an API or API-crossing exit can check that the total value of the order is less than some prescribed limit.
- Messages arrive on a destination queue from remote queue managers. When an application attempts to get a message from the queue, an API or API-crossing exit can check that the sender of the message is authorized to send a message to the queue.
Confidentiality of messages
To maintain confidentiality, encrypt your messages. There are various methods of encrypting messages in WebSphere MQ depending on your needs.
Your choice of CipherSpec determines what level of confidentiality you have.
If you need application-level, end-to-end data protection for your point to point messaging infrastructure, you can use WebSphere MQ Advanced Message Security to encrypt the messages, or write your own API exit or API-crossing exit.
If you need to encrypt messages only while they are being transported through a channel, because you have adequate security on your queue managers, you can use SSL or TLS, or you can write your own security exit, message exit, or send and receive exit programs.
For more information about WebSphere MQ Advanced Message Security, see WebSphere MQ Advanced Message Security .The use of SSL and TLS with WebSphere MQ is described at WebSphere MQ support for SSL and TLS . The use of exit programs in message encryption is described at Implementing confidentiality in user exit programs .
Connecting two queue managers using SSL or TLS
Secure communications that use the SSL or TLS cryptographic security protocols involve setting up the communication channels and managing the digital certificates that you will use for authentication.
To set up your SSL or TLS installation you must define your channels to use SSL or TLS. You must also obtain and manage your digital certificates. On a test system, you can use self-signed certificates or certificates issued by a local certificate authority (CA). On a production system, do not use self-signed certificates. For more information, see ../zs14140_.htm .
For full information about creating and managing certificates, see Working with SSL or TLS on UNIX, Linux and Windows systems .
This collection of topics introduces the tasks involved in setting up SSL communications, and provides step-by-step guidance on completing those tasks.
You might also want to test SSL or TLS client authentication, which are an optional part of the protocols. During the SSL or TLS handshake, the SSL or TLS client always obtains and validates a digital certificate from the server. With the WebSphere MQ implementation, the SSL or TLS server always requests a certificate from the client.
Notes:
- In this context, an SSL client refers to the connection initiating the handshake.
- See the Glossary for further details.
On UNIX, Linux and Windows systems, the SSL or TLS client sends a certificate only if it has one labeled in the correct WebSphere MQ format, which is ibmwebspheremq followed by the name of your queue manager changed to lowercase. For example, for QM1, ibmwebspheremqqm1.
WebSphere MQ uses the ibmwebspheremq prefix on a label to avoid confusion with certificates for other products. Ensure that you specify the entire certificate label in lowercase.
The SSL or TLS server always validates the client certificate if one is sent. If the client does not send a certificate, authentication fails only if the end of the channel that is acting as the SSL or TLS server is defined with either the SSLCAUTH parameter set to REQUIRED or an SSLPEER parameter value set. For more information about connecting a queue manager anonymously, that is, when the SSL or TLS client does not send a certificate, see Connecting two queue managers using one-way authentication .
Use self-signed certificates for mutual authentication of two queue managers
Follow these sample instructions to implement mutual authentication between two queue managers, using self-signed SSL or TLS certificates.
Scenario:
- You have two queue managers, QM1 and QM2, which need to communicate securely. You require mutual authentication to be carried out between QM1 and QM2.
- You have decided to test your secure communication using self-signed certificates.
The resulting configuration looks like this:
Figure 1. Configuration resulting from this task
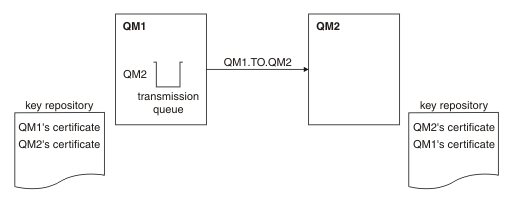
In Figure 1 , the key repository for QM1 contains the certificate for QM1 and the public certificate from QM2. The key repository for QM2 contains the certificate for QM2 and the public certificate from QM1.
Procedure
- Prepare the key repository on each queue manager, according
to operating system:
- On UNIX, Linux, and Windows systems .
- Create a self-signed certificate for each queue manager:
- On UNIX, Linux, and Windows systems .
- Extract a copy of each certificate:
- On UNIX, Linux, and Windows systems .
- Transfer the public part of the QM1 certificate to the QM2 system and vice versa, using a utility such as FTP.
- Add the partner certificate to the key repository for each queue manager:
- On UNIX, Linux, and Windows systems .
- On QM1, define a sender channel and associated transmission queue, by issuing commands like the following example:
 DEFINE CHANNEL(QM1.TO.QM2) CHLTYPE(SDR) TRPTYPE(TCP) CONNAME(QM1.MACH.COM) XMITQ(QM2)
SSLCIPH(RC4_MD5_US) DESCR('Sender channel using SSL from QM1 to QM2')

DEFINE QLOCAL(QM2) USAGE(XMITQ)
This example uses CipherSpec RC4_MD5. The CipherSpecs at each end of the channel must be the same. - On QM2, define a receiver channel, by issuing a command like the following example:
 DEFINE CHANNEL(QM1.TO.QM2) CHLTYPE(RCVR) TRPTYPE(TCP) SSLCIPH(RC4_MD5_US)
SSLCAUTH(REQUIRED) DESCR('Receiver channel using SSL from QM1 to QM2')
The channel must have the same name as the sender channel you defined in step 6, and use the same CipherSpec. - Start the channel.
Key repositories and channels are created as illustrated in Figure 1
What to do next
Check that the task has been completed successfully by using DISPLAY commands. If the task was successful, the resulting output is similar to that shown in the following examples.
From queue manager QM1, enter the following command:
DISPLAY CHS(QM1.TO.QM2) SSLPEER SSLCERTIThe resulting output is like the following example:
 DISPLAY CHSTATUS(QM1.TO.QM2) SSLPEER SSLCERTI
     4 : DISPLAY CHSTATUS(QM1.TO.QM2) SSLPEER SSLCERTI
AMQ8417: Display Channel Status details.
   CHANNEL(QM1.TO.QM2)                     CHLTYPE(SDR)
   CONNAME(9.20.25.40)                     CURRENT
   RQMNAME(QM2)
   SSLCERTI("CN=QM2,OU=WebSphere MQ Development,O=IBM,ST=Hampshire,C=UK")
   SSLPEER("SERIALNUMBER=4C:D0:49:D5:02:5E:02,CN=QM2,OU=WebSphere MQ Development,O=IBM,ST=Hampshire,C=UK")
   STATUS(RUNNING)                         SUBSTATE(MQGET)
   XMITQ(QM2)
From queue manager QM2, enter the following command:
DISPLAY CHS(QM1.TO.QM2) SSLPEER SSLCERTIThe resulting output is like the following example:
 DISPLAY CHSTATUS(QM1.TO.QM2) SSLPEER SSLCERTI
     5 : DISPLAY CHSTATUS(QM1.TO.QM2) SSLPEER SSLCERTI
AMQ8417: Display Channel Status details.
   CHANNEL(QM2.TO.QM1)                     CHLTYPE(RCVR)
   CONNAME(9.20.35.92)                     CURRENT
   RQMNAME(QM1)
   SSLCERTI("CN=QM1,OU=WebSphere MQ Development,O=IBM,ST=Hampshire,C=UK")
   SSLPEER("SERIALNUMBER=4C:D0:49:D5:02:5F:38,CN=QM1,OU=WebSphere MQ Development,O=IBM,ST=Hampshire,C=UK")
   STATUS(RUNNING)                         SUBSTATE(RECEIVE)
   XMITQ( )
In each case, the value of SSLPEER must match that of the DN in the partner certificate that was created in Step 2. The issuers name matches the peer name because the certificate is self-signed .
SSLPEER is optional. If it is specified, its value must be set so that the DN in the partner certificate (created in step 2) is allowed. For more information about the use of SSLPEER, see WebSphere MQ rules for SSLPEER values .
Use CA-signed certificates for mutual authentication of two queue managers
Follow these sample instructions to implement mutual authentication between two queue managers, using CA-signed SSL or TLS certificates.
Scenario:
- You have two queue managers called QMA and QMB, which need to communicate securely. You require mutual authentication to be carried out between QMA and QMB.
- In the future you are planning to use this network in a production environment, and therefore you have decided to use CA-signed certificates from the beginning.
The resulting configuration looks like this:
Figure 1. Configuration resulting from this task

In Figure 1 , the key repository for QMA contains QMA's certificate and the CA certificate. The key repository for QMB contains QMB's certificate and the CA certificate. In this example both QMA's certificate and QMB's certificate were issued by the same CA. If QMA's certificate and QMB's certificate were issued by different CAs then the key repositories for QMA and QMB must contain both CA certificates.
Procedure
- Prepare the key repository on each queue manager, according
to operating system:
- On UNIX, Linux, and Windows systems .
- Request a CA-signed certificate for each queue manager. You might use different CAs for the two queue managers.
- On UNIX, Linux, and Windows systems .
- Add the Certificate Authority certificate to the key repository
for each queue manager: If the Queue managers are using different Certificate Authorities then the CA certificate for each Certificate Authority must be added to both key repositories.
- On UNIX, Linux, and Windows systems .
- Add the CA-signed certificate to the key repository for each queue manager:
- On UNIX, Linux, and Windows systems .
- On QMA, define a sender channel and associated transmission queue by issuing commands like the following example:
 DEFINE CHANNEL(TO.QMB) CHLTYPE(SDR) TRPTYPE(TCP) CONNAME(QMB.MACH.COM) XMITQ(QMB)
SSLCIPH(RC2_MD5_EXPORT) DESCR('Sender channel using SSL from QMA to QMB')

DEFINE QLOCAL(QMB) USAGE(XMITQ)
This example uses CipherSpec RC4_MD5. The CipherSpecs at each end of the channel must be the same. - On QMB, define a receiver channel by issuing a command like the following example:
 DEFINE CHANNEL(TO.QMB) CHLTYPE(RCVR) TRPTYPE(TCP) SSLCIPH(RC2_MD5_EXPORT)
SSLCAUTH(REQUIRED) DESCR('Receiver channel using SSL to QMB')
The channel must have the same name as the sender channel you defined in step 6, and use the same CipherSpec. - Start the channel:
Key repositories and channels are created as illustrated in Figure 1 .
What to do next
Check that the task has been completed successfully by using DISPLAY commands. If the task was successful, the resulting output is like that shown in the following examples.
From queue manager QMA, enter the following command:
DISPLAY CHS(TO.QMB) SSLPEER SSLCERTIThe resulting output is like the following example:
 DISPLAY CHSTATUS(TO.QMB) SSLPEER SSLCERTI
     4 : DISPLAY CHSTATUS(TO.QMB) SSLPEER SSLCERTI
AMQ8417: Display Channel Status details.
   CHANNEL(TO.QMB)                         CHLTYPE(SDR)
   CONNAME(9.20.25.40)                     CURRENT
   RQMNAME(QMB)
   SSLCERTI("CN=WebSphere MQ CA,OU=WebSphere MQ Devt,O=IBM,ST=Hampshire,C=UK")
   SSLPEER("SERIALNUMBER=4C:D0:49:D5:02:5F:38,CN=QMB,OU=WebSphere MQ Development,O=IBM,ST=Hampshire,C=UK")
   STATUS(RUNNING)                         SUBSTATE(MQGET)
   XMITQ(QMB)
From the queue manager QMB, enter the following command:
DISPLAY CHS(TO.QMB) SSLPEER SSLCERTIThe resulting output is like the following example:
 DISPLAY CHSTATUS(TO.QMB) SSLPEER SSLCERTI
     5 : DISPLAY CHSTATUS(TO.QMB) SSLPEER SSLCERTI
AMQ8417: Display Channel Status details.
   CHANNEL(TO.QMB)                         CHLTYPE(RCVR)
   CONNAME(9.20.35.92)                     CURRENT
   RQMNAME(QMA)
   SSLCERTI("CN=WebSphere MQ CA,OU=WebSphere MQ Devt,O=IBM,ST=Hampshire,C=UK")
   SSLPEER("SERIALNUMBER=4C:D0:49:D5:02:5F:38,CN=QMA,OU=WebSphere MQ Development,O=IBM,ST=Hampshire,C=UK")
   STATUS(RUNNING)                         SUBSTATE(RECEIVE)
   XMITQ( )
In each case, the value of SSLPEER must match that of the Distinguished Name (DN) in the partner certificate that was created in Step 2. The issuer name matches the subject DN of the CA certificate that signed the personal certificate added in Step 4.
Connecting two queue managers using one-way authentication
Follow these sample instructions to modify a system with mutual authentication to allow a queue manager to connect using one-way authentication to another; that is, when the SSL or TLS client does not send a certificate.
Scenario:
- Your two queue managers (QM1 and QM2) have been set up as in Using CA-signed certificates for mutual authentication of two queue managers .
- You want to change QM1 so that it connects using one-way authentication to QM2.
The resulting configuration looks like this:
Figure 1. Queue managers allowing one-way authentication
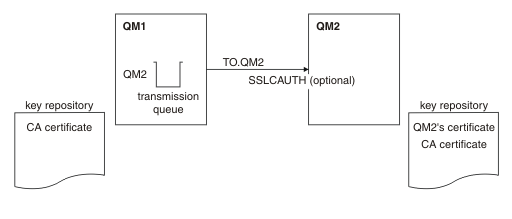
Procedure
- Remove QM1's personal certificate from its key repository,
according to operating system:
- On UNIX, Linux, and Windows systems . The certificate
is labeled as follows:
- ibmwebspheremq followed by the name of your queue manager folded to lower case. For example, for QM1 , ibmwebspheremqqm1.
- On UNIX, Linux, and Windows systems . The certificate
is labeled as follows:
- Optional: On QM1, if any SSL or TLS channels have run previously, refresh the SSL or TLS environment.
- Allow anonymous connections on the receiver.
Key repositories and channels are changed as illustrated in Figure 1
What to do next
If the sender channel was running and you issued the REFRESH SECURITY TYPE(SSL) command (in step 2), the channel restarts automatically. If the sender channel was not running, start it.
At the server end of the channel, the presence of the peer name parameter value on the channel status display indicates that a client certificate has flowed.
Verify that the task has been completed successfully by issuing some DISPLAY commands. If the task was successful, the resulting output is similar to that shown in the following examples:
From the QM1 queue manager, enter the following command:
DISPLAY CHS(TO.QM2) SSLPEER SSLCERTIThe resulting output will be similar to the following example:
 DISPLAY CHSTATUS(TO.QMB) SSLPEER SSLCERTI
     4 : DISPLAY CHSTATUS(TO.QMB) SSLPEER
AMQ8417: Display Channel Status details.
   CHANNEL(TO.QM2)                         CHLTYPE(SDR)
   CONNAME(9.20.25.40)                     CURRENT
   RQMNAME(QM2)
   SSLCERTI("CN=WebSphere MQ CA,OU=WebSphere MQ Devt,O=IBM,ST=Hampshire,C=UK")
   SSLPEER("SERIALNUMBER=4C:D0:49:D5:02:5F:38,CN=QMB,OU=WebSphere MQ Development,O=IBM,ST=Hampshire,C=UK")
   STATUS(RUNNING)                         SUBSTATE(MQGET)
   XMITQ(QM2)
From the QM2 queue manager, enter the following command:
DISPLAY CHS(TO.QM2) SSLPEER SSLCERTIThe resulting output will be similar to the following example:
 DISPLAY CHSTATUS(TO.QM2) SSLPEER SSLCERTI
     5 : DISPLAY CHSTATUS(TO.QM2) SSLPEER SSLCERTI
AMQ8417: Display Channel Status details.
   CHANNEL(TO.QM2)                         CHLTYPE(RCVR)
   CONNAME(9.20.35.92)                     CURRENT
   RQMNAME(QMA)                            SSLCERTI( )
   SSLPEER( )                              STATUS(RUNNING)
   SUBSTATE(RECEIVE)                       XMITQ( )
On QM2, the SSLPEER field is empty, showing that QM1 did not send a certificate. On QM1, the value of SSLPEER matches that of the DN in QM2's personal certificate.
Connecting a client to a queue manager securely
Secure communications that use the SSL or TLS cryptographic security protocols involve setting up the communication channels and managing the digital certificates that you will use for authentication.
To set up your SSL or TLS installation you must define your channels to use SSL or TLS. You must also obtain and manage your digital certificates. On a test system, you can use self-signed certificates or certificates issued by a local certificate authority (CA). On a production system, do not use self-signed certificates. For more information, see ../zs14140_.htm .
For full information about creating and managing certificates, see Working with SSL or TLS on UNIX, Linux and Windows systems .
This collection of topics introduces the tasks involved in setting up SSL communications, and provides step-by-step guidance on completing those tasks.
You might also want to test SSL or TLS client authentication, which are an optional part of the protocols. During the SSL or TLS handshake, the SSL or TLS client always obtains and validates a digital certificate from the server. With the WebSphere MQ implementation, the SSL or TLS server always requests a certificate from the client.
On UNIX, Linux, and Windows systems, the SSL or TLS client sends a certificate only if it has one labeled in the correct WebSphere MQ format, which is ibmwebspheremq followed by your logon user ID changed to lowercase, for example ibmwebspheremqmyuserid.
WebSphere MQ uses the ibmwebspheremq prefix on a label to avoid confusion with certificates for other products. Ensure that you specify the entire certificate label in lowercase.
The SSL or TLS server always validates the client certificate if one is sent. If the client does not send a certificate, authentication fails only if the end of the channel that is acting as the SSL or TLS server is defined with either the SSLCAUTH parameter set to REQUIRED or an SSLPEER parameter value set. For more information about connecting a queue manager anonymously, see Connecting a client to a queue manager anonymously .
Use self-signed certificates for mutual authentication of a client and queue manager
Follow these sample instructions to implement mutual authentication between a client and a queue manager, by using self-signed SSL or TLS certificates.
Scenario:
- You have a client, C1, and a queue manager, QM1, which need to communicate securely. You require mutual authentication to be carried out between C1 and QM1.
- You have decided to test your secure communication by using self-signed certificates.
DCM on IBM i does not support self-signed certificates, so this task is not applicable on IBM i systems.
The resulting configuration looks like this:
Figure 1. Configuration resulting from this task
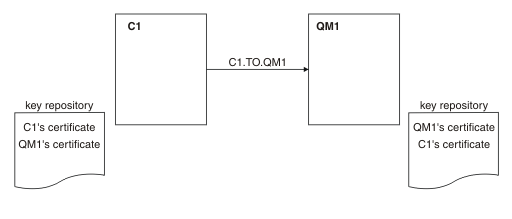
In Figure 1 , the key repository for QM1 contains the certificate for QM1 and the public certificate from C1. The key repository for C1 contains the certificate for C1 and the public certificate from QM1.
Procedure
- Prepare the key repository on the client and queue manager, according to operating system:
- On UNIX, Linux, and Windows systems .
- Create self-signed certificates for the client and queue manager:
- On UNIX, Linux, and Windows systems .
- Extract a copy of each certificate:
- On UNIX, Linux, and Windows systems .
- Transfer the public part of the C1 certificate to the QM1
system and vice versa, using a utility such as FTP.
- Add the partner certificate to the key repository for the client and queue manager:
- On UNIX, Linux, and Windows systems .
- Define a client-connection channel in either of the following ways:
- Use the MQCONNX call with the MQSCO structure on C1, as described in Creating a client-connection channel on the WebSphere MQ MQI client .
- Use a client channel definition table, as described in Creating server-connection and client-connection definitions on the server .
- On QM1, define a server-connection channel, by issuing
a command like the following example:
 DEFINE CHANNEL(C1.TO.QM1) CHLTYPE(SVRCONN) TRPTYPE(TCP) SSLCIPH(RC4_MD5_US)
SSLCAUTH(REQUIRED) DESCR('Receiver channel using SSL from C1 to QM1')
The channel must have the same name as the client-connection channel you defined in step 6, and use the same CipherSpec.
Key repositories and channels are created as illustrated in Figure 1
What to do next
Check that the task has been completed successfully by using DISPLAY commands. If the task was successful, the resulting output is similar to that shown in the following example.
From queue manager QM1, enter the following command:
DISPLAY CHSTATUS(C1.TO.QM1) SSLPEER SSLCERTIThe resulting output is like the following example:
 DISPLAY CHSTATUS(C1.TO.QM1) SSLPEER SSLCERTI
     5 : DISPLAY CHSTATUS(C1.TO.QM1) SSLPEER SSLCERTI
AMQ8417: Display Channel Status details.
   CHANNEL(C1.TO.QM1)                    CHLTYPE(SVRCONN)
   CONNAME(9.20.35.92)                     CURRENT
   SSLCERTI("CN=QM1,OU=WebSphere MQ Development,O=IBM,ST=Hampshire,C=UK")
   SSLPEER("SERIALNUMBER=4C:D0:49:D5:02:5E:02,CN=QM2,OU=WebSphere MQ Development,O=IBM,ST=Hampshire,C=UK")
   STATUS(RUNNING)                         SUBSTATE(RECEIVE)
It is optional to set the SSLPEER filter attribute of the channel definitions. If the channel definition SSLPEER is set, its value must match the subject DN in the partner certificate that was created in Step 2. After a successful connection, the SSLPEER field in the DISPLAY CHSTATUS output shows the subject DN of the remote client certificate.
Use CA-signed certificates for mutual authentication of a client and queue manager
Follow these sample instructions to implement mutual authentication between a client and a queue manager, by using CA-signed SSL or TLS certificates.
Scenario:
- You have a client, C1, and a queue manager, QM1, which need to communicate securely. You require mutual authentication to be carried out between C1 and QM1.
- In the future you are planning to use this network in a production environment, and therefore you have decided to use CA-signed certificates from the beginning.
The resulting configuration looks like this:
Figure 1. Configuration resulting from this task
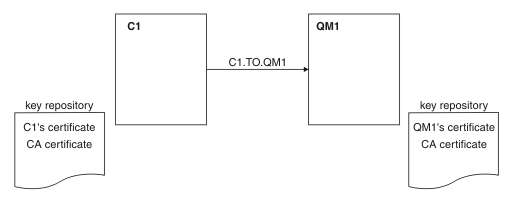
In Figure 1 , the key repository for C1 contains certificate for C1 and the CA certificate. The key repository for QM1 contains the certificate for QM1 and the CA certificate. In this example both C1's certificate and QM1's certificate were issued by the same CA. If C1's certificate and QM1's certificate were issued by different CAs then the key repositories for C1 and QM1 must contain both CA certificates.
Procedure
- Prepare the key repository on the client and queue manager, according to operating system:
- On UNIX, Linux, and Windows systems .
- Request a CA-signed certificate for the client and queue manager. You might use different CAs for the client and queue manager.
- On UNIX, Linux, and Windows systems .
- Add the certificate authority certificate to the key repository
for the client and queue manager. If the client and queue manager are using different Certificate Authorities then the CA certificate
for each Certificate Authority must be added to both key repositories.
- On UNIX, Linux, and Windows systems .
- Add the CA-signed certificate to the key repository for the client and queue manager:
- On UNIX, Linux, and Windows systems .
- Define a client-connection channel in either of the following ways:
- Use the MQCONNX call with the MQSCO structure on C1, as described in Creating a client-connection channel on the WebSphere MQ MQI client .
- Use a client channel definition table, as described in Creating server-connection and client-connection definitions on the server .
- On QM1, define a server-connection channel by issuing a command like the following example:
 DEFINE CHANNEL(C1.TO.QM1) CHLTYPE(SVRCONN) TRPTYPE(TCP) SSLCIPH(RC2_MD5_EXPORT)
SSLCAUTH(REQUIRED) DESCR('Receiver channel using SSL from C1 to QM1')
The channel must have the same name as the client-connection channel you defined in step 6, and use the same CipherSpec.
Key repositories and channels are created as illustrated in Figure 1 .
What to do next
Check that the task has been completed successfully by using DISPLAY commands. If the task was successful, the resulting output is like that shown in the following example.
From the queue manager QM1, enter the following command:
DISPLAY CHSTATUS(TO.QMB) SSLPEER SSLCERTIThe resulting output is like the following example:
 DISPLAY CHSTATUS(C1.TO.QM1) SSLPEER SSLCERTI
     5 : DISPLAY CHSTATUS(C1.TO.QM1) SSLPEER SSLCERTI
AMQ8417: Display Channel Status details.
   CHANNEL(C1.TO.QM1)                      CHLTYPE(SVRCONN)
   CONNAME(9.20.35.92)                     CURRENT
   SSLCERTI("CN=WebSphere MQ CA,OU=WebSphere MQ Devt,O=IBM,ST=Hampshire,C=UK")
   SSLPEER("SERIALNUMBER=4C:D0:49:D5:02:5F:38,CN=QMA,OU=WebSphere MQ Development,O=IBM,ST=Hampshire,C=UK")
   STATUS(RUNNING)                         SUBSTATE(RECEIVE)
The SSLPEER field in the DISPLAY CHSTATUS output shows the subject DN of the remote client certificate that was created in Step 2. The issuer name matches the subject DN of the CA certificate that signed the personal certificate added in Step 4.
Connecting a client to a queue manager anonymously
Follow these sample instructions to modify a system with mutual authentication to allow a queue manager to connect anonymously to another.
Scenario:
- Your queue manager and client (QM1 and C1) have been set up as in Using CA-signed certificates for mutual authentication of a client and queue manager .
- You want to change C1 so that it connects anonymously to QM1.
The resulting configuration looks like this:
Figure 1. Client and queue manager allowing anonymous connection

Procedure
- Remove the personal certificate from key repository for C1, according to operating system:
- On UNIX, Linux, and Windows systems . The certificate
is labeled as follows:
- ibmwebspheremq followed by your logon user ID folded to lower case, for example ibmwebspheremqmyuserid.
- On UNIX, Linux, and Windows systems . The certificate
is labeled as follows:
- Restart the client application, or cause the client application to close and reopen all SSL or TLS connections.
- Allow anonymous connections on the queue manager, by issuing
the following command:
ALTER CHANNEL(C1.TO.QM1) CHLTYPE(SVRCONN) SSLCAUTH(OPTIONAL)
Key repositories and channels are changed as illustrated in Figure 1
What to do next
At the server end of the channel, the presence of the peer name parameter value on the channel status display indicates that a client certificate has flowed.
Verify that the task has been completed successfully by issuing some DISPLAY commands. If the task was successful, the resulting output is similar to that shown in the following example:
From queue manager QM1, enter the following command:
DISPLAY CHSTATUS(C1.TO.QM1) SSLPEER SSLCERTIThe resulting output will be similar to the following example:
 DISPLAY CHSTATUS(C1.TO.QM1) SSLPEER SSLCERTI
     5 : DISPLAY CHSTATUS(C1.TO.QM1) SSLPEER SSLCERTI
AMQ8417: Display Channel Status details.
   CHANNEL(C1.TO.QM1)                      CHLTYPE(SVRCONN)
   CONNAME(9.20.35.92)                     CURRENT
   SSLCERTI( )                             SSLPEER( )
   STATUS(RUNNING)                         SUBSTATE(RECEIVE)
The SSLCERTI and SSLPEER fields are empty, showing that C1 did not send a certificate.
Specifying CipherSpecs
Specify a CipherSpec by using the SSLCIPH parameter in either the DEFINE CHANNEL MQSC command or the ALTER CHANNEL MQSC command.
Some of the CipherSpecs that you can use with WebSphere MQ are FIPS compliant. Others, such as NULL_MD5, are not. Similarly, some of the FIPS compliant CipherSpecs are also Suite B compliant although others, such as TLS_RSA_WITH_3DES_EDE_CBC_SHA, are not. All Suite B compliant CipherSpecs are also FIPS compliant. All Suite B compliant CipherSpecs fall into two groups: 128 bit (for example, ECDHE_ECDSA_AES_128_GCM_SHA256) and 192 bit (for example, ECDHE_ECDSA_AES_256_GCM_SHA384),
The following diagram illustrates the relationship between these subsets:
Cipher specifications that you can use with WebSphere MQ SSL and TLS support are listed in the following table. When you request a personal certificate, you specify a key size for the public and private key pair. The key size that is used during the SSL handshake is the size stored in the certificate unless it is determined by the CipherSpec, as noted in the table.
A table describing the CipherSpecs you can use with WebSphere MQ SSL and TLS support.
| CipherSpec name | Protocol used | Data integrity | Encryption algorithm | Encryption bits | FIPS 1 | Suite B 128 bit | Suite B 192 bit |
|---|---|---|---|---|---|---|---|
| NULL_MD5 a | SSL 3.0 | MD5 | None | 0 | No | No | No |
| NULL_SHA a | SSL 3.0 | SHA-1 | None | 0 | No | No | No |
| RC4_MD5_EXPORT 2 a | SSL 3.0 | MD5 | RC4 | 40 | No | No | No |
| RC4_MD5_US a | SSL 3.0 | MD5 | RC4 | 128 | No | No | No |
| RC4_SHA_US a | SSL 3.0 | SHA-1 | RC4 | 128 | No | No | No |
| RC2_MD5_EXPORT 2 a | SSL 3.0 | MD5 | RC2 | 40 | No | No | No |
| DES_SHA_EXPORT 2 a | SSL 3.0 | SHA-1 | DES | 56 | No | No | No |
| RC4_56_SHA_EXPORT1024 3 b | SSL 3.0 | SHA-1 | RC4 | 56 | No | No | No |
| DES_SHA_EXPORT1024 3 b | SSL 3.0 | SHA-1 | DES | 56 | No | No | No |
| TRIPLE_DES_SHA_US a | SSL 3.0 | SHA-1 | 3DES | 168 | No | No | No |
| TLS_RSA_WITH_AES_128_CBC_SHA a | TLS 1.0 | SHA-1 | AES | 128 | Yes | No | No |
| TLS_RSA_WITH_AES_256_CBC_SHA 4 a | TLS 1.0 | SHA-1 | AES | 256 | Yes | No | No |
| TLS_RSA_WITH_DES_CBC_SHA a | TLS 1.0 | SHA-1 | DES | 56 | No 5 | No | No |
| TLS_RSA_WITH_3DES_EDE_CBC_SHA a 8 | TLS 1.0 | SHA-1 | 3DES | 168 | Yes | No | No |
| FIPS_WITH_DES_CBC_SHA b | SSL 3.0 | SHA-1 | DES | 56 | No 6 | No | No |
| FIPS_WITH_3DES_EDE_CBC_SHA b | SSL 3.0 | SHA-1 | 3DES | 168 | No 7 | No | No |
| TLS_RSA_WITH_AES_128_GCM_SHA256 b | TLS 1.2 | AEAD AES-128 GCM | AES | 128 | Yes | No | No |
| TLS_RSA_WITH_AES_256_GCM_SHA384 b | TLS 1.2 | AEAD AES-256 GCM | AES | 256 | Yes | No | No |
| TLS_RSA_WITH_AES_128_CBC_SHA256 b | TLS 1.2 | SHA-256 | AES | 128 | Yes | No | No |
| TLS_RSA_WITH_AES_256_CBC_SHA256 b | TLS 1.2 | SHA-256 | AES | 256 | Yes | No | No |
| ECDHE_ECDSA_RC4_128_SHA256 b | TLS 1.2 | SHA-1 | RC4 | 128 | No | No | No |
| ECDHE_ECDSA_3DES_EDE_CBC_SHA256 b 8 | TLS 1.2 | SHA-1 | 3DES | 168 | Yes | No | No |
| ECDHE_RSA_RC4_128_SHA256 b | TLS 1.2 | SHA_1 | RC4 | 128 | No | No | No |
| ECDHE_RSA_3DES_EDE_CBC_SHA256 b 8 | TLS 1.2 | SHA-1 | 3DES | 168 | Yes | No | No |
| ECDHE_ECDSA_AES_128_CBC_SHA256 b | TLS 1.2 | SHA-256 | AES | 128 | Yes | No | No |
| ECDHE_ECDSA_AES_256_CBC_SHA384 b | TLS 1.2 | SHA-384 | AES | 256 | Yes | No | No |
| ECDHE_RSA_AES_128_CBC_SHA256 b | TLS 1.2 | SHA-256 | AES | 128 | Yes | No | No |
| ECDHE_RSA_AES_256_CBC_SHA384 b | TLS 1.2 | SHA-384 | AES | 256 | Yes | No | No |
| ECDHE_ECDSA_AES_128_GCM_SHA256 b | TLS 1.2 | AEAD AES-128 GCM | AES | 128 | Yes | Yes | No |
| ECDHE_ECDSA_AES_256_GCM_SHA384 b | TLS 1.2 | AEAD AES-256 GCM | AES | 256 | Yes | No | Yes |
| ECDHE_RSA_AES_128_GCM_SHA256 b | TLS 1.2 | AEAD AES-128 GCM | AES | 128 | Yes | No | No |
| ECDHE_RSA_AES_256_GCM_SHA384 b | TLS 1.2 | AEAD AES-256 GCM | AES | 256 | Yes | No | No |
| TLS_RSA_WITH_NULL_SHA256 b | TLS 1.2 | SHA-256 | None | 0 | No | No | No |
| ECDHE_RSA_NULL_SHA256 b | TLS 1.2 | SHA-1 | None | 0 | No | No | No |
| ECDHE_ECDSA_NULL_SHA256 b | TLS 1.2 | SHA-1 | None | 0 | No | No | No |
| TLS_RSA_WITH_NULL_NULL b | TLS 1.2 | None | None | 0 | No | No | No |
| TLS_RSA_WITH_RC4_128_SHA256 b | TLS 1.2 | SHA-1 | RC4 | 128 | No | No | No |
|
Notes:
| |||||||
Obtaining information about CipherSpecs using WebSphere MQ Explorer
You can use WebSphere MQ Explorer to display descriptions of CipherSpecs.
Use the following procedure to obtain information about the CipherSpecs in Specifying CipherSpecs :
- Open WebSphere MQ Explorer and expand the Queue Managers folder.
- Ensure that you have started your queue manager.
- Select the queue manager you want to work with and click Channels.
- Right-click the channel you want to work with and select Properties.
- Select the SSL property page.
- Select from the list the CipherSpec you want to work with. A description is displayed in the window below the list.
Alternatives for specifying CipherSpecs
For those platforms where the operating system provides the SSL support, your system might support new CipherSpecs. You can specify a new CipherSpec with the SSLCIPH parameter, but the value you supply depends on your platform.
Note: This section does not apply to UNIX, Linux or Windows systems, because the CipherSpecs are provided with the WebSphere MQ product, so new CipherSpecs do not become available after shipment.
For those platforms where the operating system provides the SSL support, your system might support new CipherSpecs that are not included in Specifying CipherSpecs . You can specify a new CipherSpec with the SSLCIPH parameter, but the value you supply depends on your platform. In all cases the specification must correspond to an SSL CipherSpec that is both valid and supported by the version of SSL your system is running.
- IBM i
- A two-character string representing a hexadecimal value.
For more information about the permitted values, refer to the appropriate information center (search on cipher_spec):
- For V5R3, the iSeries Information Center at http://publib.boulder.ibm.com/infocenter/iseries/v5r3/index.jsp
- For V5R4, the IBM i Information Center at http://publib.boulder.ibm.com/infocenter/iseries/v5r4/index.jsp
You can use either the CHGMQMCHL or the CRTMQMCHL command to specify the value, for example:
CRTMQMCHL CHLNAME('channel name') SSLCIPH('hexadecimal value')You can also use the ALTER QMGR MQSC command to set the SSLCIPH parameter. - z/OS
- A two-character string representing a hexadecimal value. The hexadecimal
codes correspond to the values defined in the SSL protocol.
For more information, refer to the description of gsk_environment_open() in the API reference chapter of z/OS Cryptographic Services System SSL Programming , SC24-5901, where there is a list of all the supported SSL V3.0 and TLS V1.0 cipher specifications in the form of 2-digit hexadecimal codes.
Considerations for WebSphere MQ clusters
With WebSphere MQ clusters it is safest to use the CipherSpec names in Specifying CipherSpecs . If you use an alternative specification, be aware that the specification might not be valid on other platforms. For more information, refer to SSL and clusters .
Specifying a CipherSpec for a WebSphere MQ MQI client
You have three options for specifying a CipherSpec for a WebSphere MQ MQI client.
These options are as follows:
- Use a channel definition table
- Use the SSL configuration options structure, MQSCO, on an MQCONNX call
- Use the Active Directory (on Windows systems with Active Directory support)
Specifying a CipherSuite with WebSphere MQ classes for Java and WebSphere MQ classes for JMS
WebSphere MQ classes for Java™ and WebSphere MQ classes for JMS specify CipherSuites differently from other platforms.
For information about specifying a CipherSuite with WebSphere MQ classes for Java, see Secure Sockets Layer (SSL) support
For information about specifying a CipherSuite with WebSphere MQ classes for JMS, see Using Secure Sockets Layer (SSL) with WebSphere MQ classes for JMS
Resetting SSL and TLS secret keys
WebSphere MQ supports the resetting of secret keys on queue managers and clients.
Secret keys are reset when a specified number of unencrypted bytes of data have flowed across the channel, or after the channel has been idle for a period.
Queue manager
For a queue manager, use the command ALTER QMGR with the parameter SSLRKEYC to set the values used during key renegotiation. On IBM i, use CHGMQM with the SSLRSTCNT parameter.
MQI client
By default, MQI clients do not renegotiate the secret key. You can make an MQI client renegotiate the key in any of three ways. In the following list, the methods are shown in order of priority. If you specify multiple values, the highest priority value is used.
- By using the KeyResetCount field in the MQSCO structure on an MQCONNX call
- By using the environment variable MQSSLRESET
- By setting the SSLKeyResetCount attribute in the MQI client configuration file
These variables can be set to an integer in the range 0 through 999 999 999, representing the number of unencrypted bytes sent and received within an SSL or TLS conversation before the SSL or TLS secret key is renegotiated. Specifying a value of 0 indicates that SSL or TLS secret keys are never renegotiated. If you specify an SSL or TLS secret key reset count in the range 1 byte through 32 KB, SSL or TLS channels will use a secret key reset count of 32 KB. This is to avoid excessive key resets which would occur for small SSL or TLS secret key reset values.
If a value greater than zero is specified and channel heartbeats are enabled for the channel, the secret key is also renegotiated before message data is sent or received following a channel heartbeat.
The count of bytes until the next secret key renegotiation is reset after each successful renegotiation.
For full details of the MQSCO sctructure, see KeyResetCount (MQLONG) . For full details of MQSSLRESET, see MQSSLRESET . For more information about the use of SSL or TLS in the client configuration file, see SSL stanza of the client configuration file .
Java
For WebSphere MQ classes for Java™, an application can reset the secret key in either of the following ways:
- By setting the sslResetCount field in the MQEnvironment class.
- By setting the environment property MQC.SSL_RESET_COUNT_PROPERTY in a Hashtable object. The application then assigns the hashtable to the properties field in the MQEnvironment class, or passes the hashtable to an MQQueueManager object on its constructor.
If the application uses more than one of these ways, the usual precedence rules apply. See Class com.ibm.mq.MQEnvironment for the precedence rules.
The value of the sslResetCount field or environment property MQC.SSL_RESET_COUNT_PROPERTY represents the total number of bytes sent and received by the WebSphere MQ classes for Java client code before the secret key is renegotiated. The number of bytes sent is the number before encryption, and the number of bytes received is the number after decryption. The number of bytes also includes control information sent and received by the WebSphere MQ classes for Java client.
If the reset count is zero, which is the default value, the secret key is never renegotiated. The reset count is ignored if no CipherSuite is specified.
JMS
For WebSphere MQ classes for JMS, the SSLRESETCOUNT property represents the total number of bytes sent and received by a connection before the secret key that is used for encryption is renegotiated. The number of bytes sent is the number before encryption, and the number of bytes received is the number after decryption. The number of bytes also includes control information sent and received by WebSphere MQ classes for JMS. For example, to configure a ConnectionFactory object that can be used to create a connection over an SSL or TLS enabled MQI channel with a secret key that is renegotiated after 4 MB of data have flowed, issue the following command to JMSAdmin:
ALTER CF(my.cf) SSLRESETCOUNT(4194304)If the value of SSLRESETCOUNT is zero, which is the default value, the secret key is never renegotiated. The SSLRESETCOUNT property is ignored if SSLCIPHERSUITE is not set.
.NET
For .NET unmanaged clients, the integer property SSLKeyResetCount indicates the number of unencrypted bytes sent and received within an SSL or TLS conversation before the secret key is renegotiated.
For information about the use of object properties in WebSphere MQ classes for .NET, see Getting and setting attribute values .
XMS .NET
For XMS .NET unmanaged clients, see the documentation for Message Service Client for .NET
Implementing confidentiality in user exit programs
Implementing confidentiality in security exits
Security exits can play a role in the confidentiality service by generating and distributing the symmetric key for encrypting and decrypting the data that flows on the channel. A common technique for doing this uses PKI technology.
One security exit generates a random data value, encrypts it with the public key of the queue manager or user that the partner security exit is representing, and sends the encrypted data to its partner in a security message. The partner security exit decrypts the random data value with the private key of the queue manager or user it is representing. Each security exit can now use the random data value to derive the symmetric key independently of the other by using an algorithm known to both of them. Alternatively, they can use the random data value as the key.
If the first security exit has not authenticated its partner by this time, the next security message sent by the partner can contain an expected value encrypted with the symmetric key. The first security exit can now authenticate its partner by checking that the partner security exit was able to encrypt the expected value correctly.
The security exits can also use this opportunity to agree the algorithm for encrypting and decrypting the data that flows on the channel, if more than one algorithm is available for use.
Implementing confidentiality in message exits
A message exit at the sending end of a channel can encrypt the application data in a message and another message exit at the receiving end of the channel can decrypt the data. For performance reasons, a symmetric key algorithm is normally used for this purpose. For more information about how the symmetric key can be generated and distributed, see Implementing confidentiality in user exit programs .
Headers in a message, such as the transmission queue header, MQXQH, which includes the embedded message descriptor, must not be encrypted by a message exit. This is because data conversion of the message headers takes place either after a message exit is called at the sending end or before a message exit is called at the receiving end. If the headers are encrypted, data conversion fails and the channel stops.
Implementing confidentiality in send and receive exits
Send and receive exits can be used to encrypt and decrypt the data that flows on a channel. They are more appropriate than message exits for providing this service for the following reasons:
- On a message channel, message headers can be encrypted as well as the application data in the messages.
- Send and receive exits can be used on MQI channels as well as message channels. Parameters on MQI calls might contain sensitive application data that needs to be protected while it flows on an MQI channel. You can therefore use the same send and receive exits on both kinds of channels.
Implementing confidentiality in the API exit and API-crossing exit
The application data in a message can be encrypted by an API or API-crossing exit when the message is put by the sending application and decrypted by a second exit when the message is retrieved by the receiving application. For performance reasons, a symmetric key algorithm is typically used for this purpose. However, at the application level, where many users might be sending messages to each other, the problem is how to ensure that only the intended receiver of a message is able to decrypt the message. One solution is to use a different symmetric key for each pair of users that send messages to each other. But this solution might be difficult and time consuming to administer, particularly if the users belong to different organizations. A standard way of solving this problem is known as digital enveloping and uses PKI technology.
When an application puts a message on a queue, an API or API-crossing exit generates a random symmetric key and uses the key to encrypt the application data in the message. The exit encrypts the symmetric key with the public key of the intended receiver. It then replaces the application data in the message with the encrypted application data and the encrypted symmetric key. In this way, only the intended receiver can decrypt the symmetric key and therefore the application data. If an encrypted message has more than one possible intended receiver, the exit can encrypt a copy of the symmetric key for each intended receiver.
If different algorithms for encrypting and decrypting the application data are available for use, the exit can include the name of the algorithm it has used.
Data integrity of messages
To maintain data integrity, you can use various types of user exit program to provide message digests or digital signatures for your messages.
Data integrity
- Implementing data integrity in messages
- When you use SSL or TLS, your choice of CipherSpec determines the level of data integrity in the enterprise. If you use the WebSphere MQ Advanced Message Service (AMS) you can specify the integrity for a unique message.
- Implementing data integrity in message exits
-
A message can be digitally signed by a message exit at the sending end of a channel. The digital signature can then be checked by a message exit at the receiving end of a channel to detect whether the message has been deliberately modified.
Some protection can be provided by using a message digest instead of a digital signature. A message digest might be effective against casual or indiscriminate tampering, but it does not prevent the more informed individual from changing or replacing the message, and generating a completely new digest for it. This is particularly true if the algorithm that is used to generate the message digest is a well known one.
- Implementing data integrity in send and receive exits
- On a message channel, message exits are more appropriate for providing this service because a message exit has access to a whole message. On an MQI channel, parameters on MQI calls might contain application data that needs to be protected and only send and receive exits can provide this protection.
- Implementing data integrity in the API exit or API-crossing exit
-
A message can be digitally signed by an API or API-crossing exit when the message is put by the sending application. The digital signature can then be checked by a second exit when the message is retrieved by the receiving application to detect whether the message has been deliberately modified.
Some protection can be provided by using a message digest instead of a digital signature. A message digest might be effective against casual or indiscriminate tampering, but it does not prevent the more informed individual from changing or replacing the message, and generating a completely new digest for it. This is particularly true if the algorithm that is used to generate the message digest is a well known one,
Connecting two queue managers using SSL or TLS
Secure communications that use the SSL or TLS cryptographic security protocols involve setting up the communication channels and managing the digital certificates that you will use for authentication.
To set up your SSL or TLS installation you must define your channels to use SSL or TLS. You must also obtain and manage your digital certificates. On a test system, you can use self-signed certificates or certificates issued by a local certificate authority (CA). On a production system, do not use self-signed certificates. For more information, see ../zs14140_.htm .
For full information about creating and managing certificates, see Working with SSL or TLS on UNIX, Linux and Windows systems .
This collection of topics introduces the tasks involved in setting up SSL communications, and provides step-by-step guidance on completing those tasks.
You might also want to test SSL or TLS client authentication, which are an optional part of the protocols. During the SSL or TLS handshake, the SSL or TLS client always obtains and validates a digital certificate from the server. With the WebSphere MQ implementation, the SSL or TLS server always requests a certificate from the client.
Notes:
- In this context, an SSL client refers to the connection initiating the handshake.
- See the Glossary for further details.
On UNIX, Linux and Windows systems, the SSL or TLS client sends a certificate only if it has one labeled in the correct WebSphere MQ format, which is ibmwebspheremq followed by the name of your queue manager changed to lowercase. For example, for QM1, ibmwebspheremqqm1.
WebSphere MQ uses the ibmwebspheremq prefix on a label to avoid confusion with certificates for other products. Ensure that you specify the entire certificate label in lowercase.
The SSL or TLS server always validates the client certificate if one is sent. If the client does not send a certificate, authentication fails only if the end of the channel that is acting as the SSL or TLS server is defined with either the SSLCAUTH parameter set to REQUIRED or an SSLPEER parameter value set. For more information about connecting a queue manager anonymously, that is, when the SSL or TLS client does not send a certificate, see Connecting two queue managers using one-way authentication .
Digital certificate labels, understanding the requirements
When setting up SSL and TLS to use digital certificates, there might be specific label requirements that you must follow, depending on the platform used and the method you use to connect.
What is the certificate label?
A certificate label is a unique identifier representing a digital certificate stored in a key repository, and provides a convenient human-readable name with which to refer to a particular certificate when performing key management functions. You assign the certificate label when adding a certificate to a key repository for the first time.
The certificate label is separate from the certificate's Subject Distinguished Name or Subject Common Name fields. Note that the Subject Distinguished Name and Subject Common Name are fields within the certificate itself. These are defined when the certificate is created and cannot be changed. However, you can change the label associated with a digital certificate if necessary.
How is the certificate label used?
WebSphere MQ uses certificate labels to locate a personal certificate that is sent during the SSL handshake. This eliminates ambiguity when more than one personal certificate exists in the key repository.
Certificate labels follow a naming convention; you need to ensure that you use the correct label naming convention corresponding to the platform that you are using.
In this context, an SSL or TLS client refers to the connection partner initiating the handshake, which might be a WebSphere MQ client or another queue manager.
During the SSL or TLS handshake, the SSL or TLS client always obtains and validates a digital certificate from the server. With the WebSphere MQ implementation, the SSL or TLS server always requests a certificate from the client and the client always provide a certificate to the server if a one is found. If the client is unable to locate a personal certificate, the client sends a no certificate response to the server.
The SSL or TLS server always validates the client certificate if one is sent. If the client does not send a certificate, authentication fails if the end of the channel that is acting as the SSL or TLS server is defined with either the SSLCAUTH parameter set to REQUIRED or an SSLPEER parameter value set.
For more information about connecting a queue manager using one-way authentication, that is, when the SSL or TLS client does not send a certificate, see Connecting two queue managers using one-way authentication .
, UNIX, Linux, and Windows systems
About this task
On , UNIX, Linux, and Windows systems, the SSL or TLS server sends a certificate to the client, only if the server finds one labeled in the correct WebSphere MQ format. On these systems, the correct format is ibmwebspheremq, followed by the name of your queue manager changed to lower case.
For example, for a queue manager named QM1, the certificate label requirement is:
ibmwebspheremqqm1If no certificate is found in the queue manager's key repository, matching the required label in the correct case and format, an error occurs and the SSL or TLS handshake fails.
WebSphere MQ client
About this task
When connecting from a WebSphere MQ client application, the SSL or TLS client sends a certificate only if it has one a certificate with a label in the format ibmwebspheremq, followed by the username of the user running the client application process.
For example, for the username wasadmin, the certificate label requirement is as shown, folded to lower case:
ibmwebspheremqwasadmin
The above label requirement applies to Message Service Clients for C, or C++, and .NET.
WebSphere MQ Java or WebSphere MQ JMS client
About this task
WebSphere MQ Java or WebSphere MQ JMS clients use the facilities of their Java Secure Socket Extension (JSSE) provider to select a personal certificate during the SSL or TLS handshake and therefore are not subject to certificate label requirements.
The default behavior, is that the JSSE client iterates through the certificates in the key repository, selecting the first acceptable personal certificate found. However, this behavior is only a default, and is dependent on the implementation of the JSSE provider.
In addition, the JSSE interface is highly customizable through configuration and direct access at runtime by the application. Consult the documentation supplied by your JSSE provider for specific details.
For troubleshooting, or to better understand the handshake performed by the WebSphere MQ Java client application in combination with your specific JSSE provider, you can enable debugging by setting
javax.net.debug=sslin the JVM environment.
You can use -Djavax.net.debug=ssl on the command line, or set the variable within the application, or through configuration.
Use self-signed certificates for mutual authentication of two queue managers
Follow these sample instructions to implement mutual authentication between two queue managers, using self-signed SSL or TLS certificates.
Scenario:
- You have two queue managers, QM1 and QM2, which need to communicate securely. You require mutual authentication to be carried out between QM1 and QM2.
- You have decided to test your secure communication using self-signed certificates.
The resulting configuration looks like this:
Figure 1. Configuration resulting from this task
In Figure 1 , the key repository for QM1 contains the certificate for QM1 and the public certificate from QM2. The key repository for QM2 contains the certificate for QM2 and the public certificate from QM1.
Procedure
- Prepare the key repository on each queue manager, according
to operating system:
- On UNIX, Linux, and Windows systems .
- Create a self-signed certificate for each queue manager:
- On UNIX, Linux, and Windows systems .
- Extract a copy of each certificate:
- On UNIX, Linux, and Windows systems .
- Transfer the public part of the QM1 certificate to the QM2 system and vice versa, using a utility such as FTP.
- Add the partner certificate to the key repository for each queue manager:
- On UNIX, Linux, and Windows systems .
- On QM1, define a sender channel and associated transmission queue, by issuing commands like the following example:
 DEFINE CHANNEL(QM1.TO.QM2) CHLTYPE(SDR) TRPTYPE(TCP) CONNAME(QM1.MACH.COM) XMITQ(QM2)
SSLCIPH(RC4_MD5_US) DESCR('Sender channel using SSL from QM1 to QM2')

DEFINE QLOCAL(QM2) USAGE(XMITQ)
This example uses CipherSpec RC4_MD5. The CipherSpecs at each end of the channel must be the same. - On QM2, define a receiver channel, by issuing a command like the following example:
 DEFINE CHANNEL(QM1.TO.QM2) CHLTYPE(RCVR) TRPTYPE(TCP) SSLCIPH(RC4_MD5_US)
SSLCAUTH(REQUIRED) DESCR('Receiver channel using SSL from QM1 to QM2')
The channel must have the same name as the sender channel you defined in step 6, and use the same CipherSpec. - Start the channel.
Key repositories and channels are created as illustrated in Figure 1
What to do next
Check that the task has been completed successfully by using DISPLAY commands. If the task was successful, the resulting output is similar to that shown in the following examples.
From queue manager QM1, enter the following command:
DISPLAY CHS(QM1.TO.QM2) SSLPEER SSLCERTIThe resulting output is like the following example:
 DISPLAY CHSTATUS(QM1.TO.QM2) SSLPEER SSLCERTI
     4 : DISPLAY CHSTATUS(QM1.TO.QM2) SSLPEER SSLCERTI
AMQ8417: Display Channel Status details.
   CHANNEL(QM1.TO.QM2)                     CHLTYPE(SDR)
   CONNAME(9.20.25.40)                     CURRENT
   RQMNAME(QM2)
   SSLCERTI("CN=QM2,OU=WebSphere MQ Development,O=IBM,ST=Hampshire,C=UK")
   SSLPEER("SERIALNUMBER=4C:D0:49:D5:02:5E:02,CN=QM2,OU=WebSphere MQ Development,O=IBM,ST=Hampshire,C=UK")
   STATUS(RUNNING)                         SUBSTATE(MQGET)
   XMITQ(QM2)
From queue manager QM2, enter the following command:
DISPLAY CHS(QM1.TO.QM2) SSLPEER SSLCERTIThe resulting output is like the following example:
 DISPLAY CHSTATUS(QM1.TO.QM2) SSLPEER SSLCERTI
     5 : DISPLAY CHSTATUS(QM1.TO.QM2) SSLPEER SSLCERTI
AMQ8417: Display Channel Status details.
   CHANNEL(QM2.TO.QM1)                     CHLTYPE(RCVR)
   CONNAME(9.20.35.92)                     CURRENT
   RQMNAME(QM1)
   SSLCERTI("CN=QM1,OU=WebSphere MQ Development,O=IBM,ST=Hampshire,C=UK")
   SSLPEER("SERIALNUMBER=4C:D0:49:D5:02:5F:38,CN=QM1,OU=WebSphere MQ Development,O=IBM,ST=Hampshire,C=UK")
   STATUS(RUNNING)                         SUBSTATE(RECEIVE)
   XMITQ( )
In each case, the value of SSLPEER must match that of the DN in the partner certificate that was created in Step 2. The issuers name matches the peer name because the certificate is self-signed .
SSLPEER is optional. If it is specified, its value must be set so that the DN in the partner certificate (created in step 2) is allowed. For more information about the use of SSLPEER, see WebSphere MQ rules for SSLPEER values .
Use CA-signed certificates for mutual authentication of two queue managers
Follow these sample instructions to implement mutual authentication between two queue managers, using CA-signed SSL or TLS certificates.
Scenario:
- You have two queue managers called QMA and QMB, which need to communicate securely. You require mutual authentication to be carried out between QMA and QMB.
- In the future you are planning to use this network in a production environment, and therefore you have decided to use CA-signed certificates from the beginning.
The resulting configuration looks like this:
Figure 1. Configuration resulting from this task
In Figure 1 , the key repository for QMA contains QMA's certificate and the CA certificate. The key repository for QMB contains QMB's certificate and the CA certificate. In this example both QMA's certificate and QMB's certificate were issued by the same CA. If QMA's certificate and QMB's certificate were issued by different CAs then the key repositories for QMA and QMB must contain both CA certificates.
Procedure
- Prepare the key repository on each queue manager, according
to operating system:
- On UNIX, Linux, and Windows systems .
- Request a CA-signed certificate for each queue manager. You might use different CAs for the two queue managers.
- On UNIX, Linux, and Windows systems .
- Add the Certificate Authority certificate to the key repository
for each queue manager: If the Queue managers are using different Certificate Authorities then the CA certificate for each Certificate Authority must be added to both key repositories.
- On UNIX, Linux, and Windows systems .
- Add the CA-signed certificate to the key repository for each queue manager:
- On UNIX, Linux, and Windows systems .
- On QMA, define a sender channel and associated transmission queue by issuing commands like the following example:
 DEFINE CHANNEL(TO.QMB) CHLTYPE(SDR) TRPTYPE(TCP) CONNAME(QMB.MACH.COM) XMITQ(QMB)
SSLCIPH(RC2_MD5_EXPORT) DESCR('Sender channel using SSL from QMA to QMB')

DEFINE QLOCAL(QMB) USAGE(XMITQ)
This example uses CipherSpec RC4_MD5. The CipherSpecs at each end of the channel must be the same. - On QMB, define a receiver channel by issuing a command like the following example:
 DEFINE CHANNEL(TO.QMB) CHLTYPE(RCVR) TRPTYPE(TCP) SSLCIPH(RC2_MD5_EXPORT)
SSLCAUTH(REQUIRED) DESCR('Receiver channel using SSL to QMB')
The channel must have the same name as the sender channel you defined in step 6, and use the same CipherSpec. - Start the channel:
Key repositories and channels are created as illustrated in Figure 1 .
What to do next
Check that the task has been completed successfully by using DISPLAY commands. If the task was successful, the resulting output is like that shown in the following examples.
From queue manager QMA, enter the following command:
DISPLAY CHS(TO.QMB) SSLPEER SSLCERTIThe resulting output is like the following example:
 DISPLAY CHSTATUS(TO.QMB) SSLPEER SSLCERTI
     4 : DISPLAY CHSTATUS(TO.QMB) SSLPEER SSLCERTI
AMQ8417: Display Channel Status details.
   CHANNEL(TO.QMB)                         CHLTYPE(SDR)
   CONNAME(9.20.25.40)                     CURRENT
   RQMNAME(QMB)
   SSLCERTI("CN=WebSphere MQ CA,OU=WebSphere MQ Devt,O=IBM,ST=Hampshire,C=UK")
   SSLPEER("SERIALNUMBER=4C:D0:49:D5:02:5F:38,CN=QMB,OU=WebSphere MQ Development,O=IBM,ST=Hampshire,C=UK")
   STATUS(RUNNING)                         SUBSTATE(MQGET)
   XMITQ(QMB)
From the queue manager QMB, enter the following command:
DISPLAY CHS(TO.QMB) SSLPEER SSLCERTIThe resulting output is like the following example:
 DISPLAY CHSTATUS(TO.QMB) SSLPEER SSLCERTI
     5 : DISPLAY CHSTATUS(TO.QMB) SSLPEER SSLCERTI
AMQ8417: Display Channel Status details.
   CHANNEL(TO.QMB)                         CHLTYPE(RCVR)
   CONNAME(9.20.35.92)                     CURRENT
   RQMNAME(QMA)
   SSLCERTI("CN=WebSphere MQ CA,OU=WebSphere MQ Devt,O=IBM,ST=Hampshire,C=UK")
   SSLPEER("SERIALNUMBER=4C:D0:49:D5:02:5F:38,CN=QMA,OU=WebSphere MQ Development,O=IBM,ST=Hampshire,C=UK")
   STATUS(RUNNING)                         SUBSTATE(RECEIVE)
   XMITQ( )
In each case, the value of SSLPEER must match that of the Distinguished Name (DN) in the partner certificate that was created in Step 2. The issuer name matches the subject DN of the CA certificate that signed the personal certificate added in Step 4.
Connecting two queue managers using one-way authentication
Follow these sample instructions to modify a system with mutual authentication to allow a queue manager to connect using one-way authentication to another; that is, when the SSL or TLS client does not send a certificate.
Scenario:
- Your two queue managers (QM1 and QM2) have been set up as in Using CA-signed certificates for mutual authentication of two queue managers .
- You want to change QM1 so that it connects using one-way authentication to QM2.
The resulting configuration looks like this:
Figure 1. Queue managers allowing one-way authentication
Procedure
- Remove QM1's personal certificate from its key repository,
according to operating system:
- On UNIX, Linux, and Windows systems . The certificate
is labeled as follows:
- ibmwebspheremq followed by the name of your queue manager folded to lower case. For example, for QM1 , ibmwebspheremqqm1.
- On UNIX, Linux, and Windows systems . The certificate
is labeled as follows:
- Optional: On QM1, if any SSL or TLS channels have run previously, refresh the SSL or TLS environment.
- Allow anonymous connections on the receiver.
Key repositories and channels are changed as illustrated in Figure 1
What to do next
If the sender channel was running and you issued the REFRESH SECURITY TYPE(SSL) command (in step 2), the channel restarts automatically. If the sender channel was not running, start it.
At the server end of the channel, the presence of the peer name parameter value on the channel status display indicates that a client certificate has flowed.
Verify that the task has been completed successfully by issuing some DISPLAY commands. If the task was successful, the resulting output is similar to that shown in the following examples:
From the QM1 queue manager, enter the following command:
DISPLAY CHS(TO.QM2) SSLPEER SSLCERTIThe resulting output will be similar to the following example:
 DISPLAY CHSTATUS(TO.QMB) SSLPEER SSLCERTI
     4 : DISPLAY CHSTATUS(TO.QMB) SSLPEER
AMQ8417: Display Channel Status details.
   CHANNEL(TO.QM2)                         CHLTYPE(SDR)
   CONNAME(9.20.25.40)                     CURRENT
   RQMNAME(QM2)
   SSLCERTI("CN=WebSphere MQ CA,OU=WebSphere MQ Devt,O=IBM,ST=Hampshire,C=UK")
   SSLPEER("SERIALNUMBER=4C:D0:49:D5:02:5F:38,CN=QMB,OU=WebSphere MQ Development,O=IBM,ST=Hampshire,C=UK")
   STATUS(RUNNING)                         SUBSTATE(MQGET)
   XMITQ(QM2)
From the QM2 queue manager, enter the following command:
DISPLAY CHS(TO.QM2) SSLPEER SSLCERTIThe resulting output will be similar to the following example:
 DISPLAY CHSTATUS(TO.QM2) SSLPEER SSLCERTI
     5 : DISPLAY CHSTATUS(TO.QM2) SSLPEER SSLCERTI
AMQ8417: Display Channel Status details.
   CHANNEL(TO.QM2)                         CHLTYPE(RCVR)
   CONNAME(9.20.35.92)                     CURRENT
   RQMNAME(QMA)                            SSLCERTI( )
   SSLPEER( )                              STATUS(RUNNING)
   SUBSTATE(RECEIVE)                       XMITQ( )
On QM2, the SSLPEER field is empty, showing that QM1 did not send a certificate. On QM1, the value of SSLPEER matches that of the DN in QM2's personal certificate.
Connecting a client to a queue manager securely
Secure communications that use the SSL or TLS cryptographic security protocols involve setting up the communication channels and managing the digital certificates that you will use for authentication.
To set up your SSL or TLS installation you must define your channels to use SSL or TLS. You must also obtain and manage your digital certificates. On a test system, you can use self-signed certificates or certificates issued by a local certificate authority (CA). On a production system, do not use self-signed certificates. For more information, see ../zs14140_.htm .
For full information about creating and managing certificates, see Working with SSL or TLS on UNIX, Linux and Windows systems .
This collection of topics introduces the tasks involved in setting up SSL communications, and provides step-by-step guidance on completing those tasks.
You might also want to test SSL or TLS client authentication, which are an optional part of the protocols. During the SSL or TLS handshake, the SSL or TLS client always obtains and validates a digital certificate from the server. With the WebSphere MQ implementation, the SSL or TLS server always requests a certificate from the client.
On UNIX, Linux, and Windows systems, the SSL or TLS client sends a certificate only if it has one labeled in the correct WebSphere MQ format, which is ibmwebspheremq followed by your logon user ID changed to lowercase, for example ibmwebspheremqmyuserid.
WebSphere MQ uses the ibmwebspheremq prefix on a label to avoid confusion with certificates for other products. Ensure that you specify the entire certificate label in lowercase.
The SSL or TLS server always validates the client certificate if one is sent. If the client does not send a certificate, authentication fails only if the end of the channel that is acting as the SSL or TLS server is defined with either the SSLCAUTH parameter set to REQUIRED or an SSLPEER parameter value set. For more information about connecting a queue manager anonymously, see Connecting a client to a queue manager anonymously .
Use self-signed certificates for mutual authentication of a client and queue manager
Follow these sample instructions to implement mutual authentication between a client and a queue manager, by using self-signed SSL or TLS certificates.
Scenario:
- You have a client, C1, and a queue manager, QM1, which need to communicate securely. You require mutual authentication to be carried out between C1 and QM1.
- You have decided to test your secure communication by using self-signed certificates.
DCM on IBM i does not support self-signed certificates, so this task is not applicable on IBM i systems.
The resulting configuration looks like this:
Figure 1. Configuration resulting from this task
In Figure 1 , the key repository for QM1 contains the certificate for QM1 and the public certificate from C1. The key repository for C1 contains the certificate for C1 and the public certificate from QM1.
Procedure
- Prepare the key repository on the client and queue manager, according to operating system:
- On UNIX, Linux, and Windows systems .
- Create self-signed certificates for the client and queue manager:
- On UNIX, Linux, and Windows systems .
- Extract a copy of each certificate:
- On UNIX, Linux, and Windows systems .
- Transfer the public part of the C1 certificate to the QM1
system and vice versa, using a utility such as FTP.
- Add the partner certificate to the key repository for the client and queue manager:
- On UNIX, Linux, and Windows systems .
- Define a client-connection channel in either of the following ways:
- Use the MQCONNX call with the MQSCO structure on C1, as described in Creating a client-connection channel on the WebSphere MQ MQI client .
- Use a client channel definition table, as described in Creating server-connection and client-connection definitions on the server .
- On QM1, define a server-connection channel, by issuing
a command like the following example:
 DEFINE CHANNEL(C1.TO.QM1) CHLTYPE(SVRCONN) TRPTYPE(TCP) SSLCIPH(RC4_MD5_US)
SSLCAUTH(REQUIRED) DESCR('Receiver channel using SSL from C1 to QM1')
The channel must have the same name as the client-connection channel you defined in step 6, and use the same CipherSpec.
Key repositories and channels are created as illustrated in Figure 1
What to do next
Check that the task has been completed successfully by using DISPLAY commands. If the task was successful, the resulting output is similar to that shown in the following example.
From queue manager QM1, enter the following command:
DISPLAY CHSTATUS(C1.TO.QM1) SSLPEER SSLCERTIThe resulting output is like the following example:
 DISPLAY CHSTATUS(C1.TO.QM1) SSLPEER SSLCERTI
     5 : DISPLAY CHSTATUS(C1.TO.QM1) SSLPEER SSLCERTI
AMQ8417: Display Channel Status details.
   CHANNEL(C1.TO.QM1)                    CHLTYPE(SVRCONN)
   CONNAME(9.20.35.92)                     CURRENT
   SSLCERTI("CN=QM1,OU=WebSphere MQ Development,O=IBM,ST=Hampshire,C=UK")
   SSLPEER("SERIALNUMBER=4C:D0:49:D5:02:5E:02,CN=QM2,OU=WebSphere MQ Development,O=IBM,ST=Hampshire,C=UK")
   STATUS(RUNNING)                         SUBSTATE(RECEIVE)
It is optional to set the SSLPEER filter attribute of the channel definitions. If the channel definition SSLPEER is set, its value must match the subject DN in the partner certificate that was created in Step 2. After a successful connection, the SSLPEER field in the DISPLAY CHSTATUS output shows the subject DN of the remote client certificate.
Use CA-signed certificates for mutual authentication of a client and queue manager
Follow these sample instructions to implement mutual authentication between a client and a queue manager, by using CA-signed SSL or TLS certificates.
Scenario:
- You have a client, C1, and a queue manager, QM1, which need to communicate securely. You require mutual authentication to be carried out between C1 and QM1.
- In the future you are planning to use this network in a production environment, and therefore you have decided to use CA-signed certificates from the beginning.
The resulting configuration looks like this:
Figure 1. Configuration resulting from this task
In Figure 1 , the key repository for C1 contains certificate for C1 and the CA certificate. The key repository for QM1 contains the certificate for QM1 and the CA certificate. In this example both C1's certificate and QM1's certificate were issued by the same CA. If C1's certificate and QM1's certificate were issued by different CAs then the key repositories for C1 and QM1 must contain both CA certificates.
Procedure
- Prepare the key repository on the client and queue manager, according to operating system:
- On UNIX, Linux, and Windows systems .
- Request a CA-signed certificate for the client and queue manager. You might use different CAs for the client and queue manager.
- On UNIX, Linux, and Windows systems .
- Add the certificate authority certificate to the key repository
for the client and queue manager. If the client and queue manager are using different Certificate Authorities then the CA certificate
for each Certificate Authority must be added to both key repositories.
- On UNIX, Linux, and Windows systems .
- Add the CA-signed certificate to the key repository for the client and queue manager:
- On UNIX, Linux, and Windows systems .
- Define a client-connection channel in either of the following ways:
- Use the MQCONNX call with the MQSCO structure on C1, as described in Creating a client-connection channel on the WebSphere MQ MQI client .
- Use a client channel definition table, as described in Creating server-connection and client-connection definitions on the server .
- On QM1, define a server-connection channel by issuing a command like the following example:
 DEFINE CHANNEL(C1.TO.QM1) CHLTYPE(SVRCONN) TRPTYPE(TCP) SSLCIPH(RC2_MD5_EXPORT)
SSLCAUTH(REQUIRED) DESCR('Receiver channel using SSL from C1 to QM1')
The channel must have the same name as the client-connection channel you defined in step 6, and use the same CipherSpec.
Key repositories and channels are created as illustrated in Figure 1 .
What to do next
Check that the task has been completed successfully by using DISPLAY commands. If the task was successful, the resulting output is like that shown in the following example.
From the queue manager QM1, enter the following command:
DISPLAY CHSTATUS(TO.QMB) SSLPEER SSLCERTIThe resulting output is like the following example:
 DISPLAY CHSTATUS(C1.TO.QM1) SSLPEER SSLCERTI
     5 : DISPLAY CHSTATUS(C1.TO.QM1) SSLPEER SSLCERTI
AMQ8417: Display Channel Status details.
   CHANNEL(C1.TO.QM1)                      CHLTYPE(SVRCONN)
   CONNAME(9.20.35.92)                     CURRENT
   SSLCERTI("CN=WebSphere MQ CA,OU=WebSphere MQ Devt,O=IBM,ST=Hampshire,C=UK")
   SSLPEER("SERIALNUMBER=4C:D0:49:D5:02:5F:38,CN=QMA,OU=WebSphere MQ Development,O=IBM,ST=Hampshire,C=UK")
   STATUS(RUNNING)                         SUBSTATE(RECEIVE)
The SSLPEER field in the DISPLAY CHSTATUS output shows the subject DN of the remote client certificate that was created in Step 2. The issuer name matches the subject DN of the CA certificate that signed the personal certificate added in Step 4.
Connecting a client to a queue manager anonymously
Follow these sample instructions to modify a system with mutual authentication to allow a queue manager to connect anonymously to another.
Scenario:
- Your queue manager and client (QM1 and C1) have been set up as in Using CA-signed certificates for mutual authentication of a client and queue manager .
- You want to change C1 so that it connects anonymously to QM1.
The resulting configuration looks like this:
Figure 1. Client and queue manager allowing anonymous connection
Procedure
- Remove the personal certificate from key repository for C1, according to operating system:
- On UNIX, Linux, and Windows systems . The certificate
is labeled as follows:
- ibmwebspheremq followed by your logon user ID folded to lower case, for example ibmwebspheremqmyuserid.
- On UNIX, Linux, and Windows systems . The certificate
is labeled as follows:
- Restart the client application, or cause the client application to close and reopen all SSL or TLS connections.
- Allow anonymous connections on the queue manager, by issuing
the following command:
ALTER CHANNEL(C1.TO.QM1) CHLTYPE(SVRCONN) SSLCAUTH(OPTIONAL)
Key repositories and channels are changed as illustrated in Figure 1
What to do next
At the server end of the channel, the presence of the peer name parameter value on the channel status display indicates that a client certificate has flowed.
Verify that the task has been completed successfully by issuing some DISPLAY commands. If the task was successful, the resulting output is similar to that shown in the following example:
From queue manager QM1, enter the following command:
DISPLAY CHSTATUS(C1.TO.QM1) SSLPEER SSLCERTIThe resulting output will be similar to the following example:
 DISPLAY CHSTATUS(C1.TO.QM1) SSLPEER SSLCERTI
     5 : DISPLAY CHSTATUS(C1.TO.QM1) SSLPEER SSLCERTI
AMQ8417: Display Channel Status details.
   CHANNEL(C1.TO.QM1)                      CHLTYPE(SVRCONN)
   CONNAME(9.20.35.92)                     CURRENT
   SSLCERTI( )                             SSLPEER( )
   STATUS(RUNNING)                         SUBSTATE(RECEIVE)
The SSLCERTI and SSLPEER fields are empty, showing that C1 did not send a certificate.
Specifying CipherSpecs
Specify a CipherSpec by using the SSLCIPH parameter in either the DEFINE CHANNEL MQSC command or the ALTER CHANNEL MQSC command.
Some of the CipherSpecs that you can use with WebSphere MQ are FIPS compliant. Others, such as NULL_MD5, are not. Similarly, some of the FIPS compliant CipherSpecs are also Suite B compliant although others, such as TLS_RSA_WITH_3DES_EDE_CBC_SHA, are not. All Suite B compliant CipherSpecs are also FIPS compliant. All Suite B compliant CipherSpecs fall into two groups: 128 bit (for example, ECDHE_ECDSA_AES_128_GCM_SHA256) and 192 bit (for example, ECDHE_ECDSA_AES_256_GCM_SHA384),
The following diagram illustrates the relationship between these subsets:
Cipher specifications that you can use with WebSphere MQ SSL and TLS support are listed in the following table. When you request a personal certificate, you specify a key size for the public and private key pair. The key size that is used during the SSL handshake is the size stored in the certificate unless it is determined by the CipherSpec, as noted in the table.
A table describing the CipherSpecs you can use with WebSphere MQ SSL and TLS support.
| CipherSpec name | Protocol used | Data integrity | Encryption algorithm | Encryption bits | FIPS 1 | Suite B 128 bit | Suite B 192 bit |
|---|---|---|---|---|---|---|---|
| NULL_MD5 a | SSL 3.0 | MD5 | None | 0 | No | No | No |
| NULL_SHA a | SSL 3.0 | SHA-1 | None | 0 | No | No | No |
| RC4_MD5_EXPORT 2 a | SSL 3.0 | MD5 | RC4 | 40 | No | No | No |
| RC4_MD5_US a | SSL 3.0 | MD5 | RC4 | 128 | No | No | No |
| RC4_SHA_US a | SSL 3.0 | SHA-1 | RC4 | 128 | No | No | No |
| RC2_MD5_EXPORT 2 a | SSL 3.0 | MD5 | RC2 | 40 | No | No | No |
| DES_SHA_EXPORT 2 a | SSL 3.0 | SHA-1 | DES | 56 | No | No | No |
| RC4_56_SHA_EXPORT1024 3 b | SSL 3.0 | SHA-1 | RC4 | 56 | No | No | No |
| DES_SHA_EXPORT1024 3 b | SSL 3.0 | SHA-1 | DES | 56 | No | No | No |
| TRIPLE_DES_SHA_US a | SSL 3.0 | SHA-1 | 3DES | 168 | No | No | No |
| TLS_RSA_WITH_AES_128_CBC_SHA a | TLS 1.0 | SHA-1 | AES | 128 | Yes | No | No |
| TLS_RSA_WITH_AES_256_CBC_SHA 4 a | TLS 1.0 | SHA-1 | AES | 256 | Yes | No | No |
| TLS_RSA_WITH_DES_CBC_SHA a | TLS 1.0 | SHA-1 | DES | 56 | No 5 | No | No |
| TLS_RSA_WITH_3DES_EDE_CBC_SHA a 8 | TLS 1.0 | SHA-1 | 3DES | 168 | Yes | No | No |
| FIPS_WITH_DES_CBC_SHA b | SSL 3.0 | SHA-1 | DES | 56 | No 6 | No | No |
| FIPS_WITH_3DES_EDE_CBC_SHA b | SSL 3.0 | SHA-1 | 3DES | 168 | No 7 | No | No |
| TLS_RSA_WITH_AES_128_GCM_SHA256 b | TLS 1.2 | AEAD AES-128 GCM | AES | 128 | Yes | No | No |
| TLS_RSA_WITH_AES_256_GCM_SHA384 b | TLS 1.2 | AEAD AES-256 GCM | AES | 256 | Yes | No | No |
| TLS_RSA_WITH_AES_128_CBC_SHA256 b | TLS 1.2 | SHA-256 | AES | 128 | Yes | No | No |
| TLS_RSA_WITH_AES_256_CBC_SHA256 b | TLS 1.2 | SHA-256 | AES | 256 | Yes | No | No |
| ECDHE_ECDSA_RC4_128_SHA256 b | TLS 1.2 | SHA-1 | RC4 | 128 | No | No | No |
| ECDHE_ECDSA_3DES_EDE_CBC_SHA256 b 8 | TLS 1.2 | SHA-1 | 3DES | 168 | Yes | No | No |
| ECDHE_RSA_RC4_128_SHA256 b | TLS 1.2 | SHA_1 | RC4 | 128 | No | No | No |
| ECDHE_RSA_3DES_EDE_CBC_SHA256 b 8 | TLS 1.2 | SHA-1 | 3DES | 168 | Yes | No | No |
| ECDHE_ECDSA_AES_128_CBC_SHA256 b | TLS 1.2 | SHA-256 | AES | 128 | Yes | No | No |
| ECDHE_ECDSA_AES_256_CBC_SHA384 b | TLS 1.2 | SHA-384 | AES | 256 | Yes | No | No |
| ECDHE_RSA_AES_128_CBC_SHA256 b | TLS 1.2 | SHA-256 | AES | 128 | Yes | No | No |
| ECDHE_RSA_AES_256_CBC_SHA384 b | TLS 1.2 | SHA-384 | AES | 256 | Yes | No | No |
| ECDHE_ECDSA_AES_128_GCM_SHA256 b | TLS 1.2 | AEAD AES-128 GCM | AES | 128 | Yes | Yes | No |
| ECDHE_ECDSA_AES_256_GCM_SHA384 b | TLS 1.2 | AEAD AES-256 GCM | AES | 256 | Yes | No | Yes |
| ECDHE_RSA_AES_128_GCM_SHA256 b | TLS 1.2 | AEAD AES-128 GCM | AES | 128 | Yes | No | No |
| ECDHE_RSA_AES_256_GCM_SHA384 b | TLS 1.2 | AEAD AES-256 GCM | AES | 256 | Yes | No | No |
| TLS_RSA_WITH_NULL_SHA256 b | TLS 1.2 | SHA-256 | None | 0 | No | No | No |
| ECDHE_RSA_NULL_SHA256 b | TLS 1.2 | SHA-1 | None | 0 | No | No | No |
| ECDHE_ECDSA_NULL_SHA256 b | TLS 1.2 | SHA-1 | None | 0 | No | No | No |
| TLS_RSA_WITH_NULL_NULL b | TLS 1.2 | None | None | 0 | No | No | No |
| TLS_RSA_WITH_RC4_128_SHA256 b | TLS 1.2 | SHA-1 | RC4 | 128 | No | No | No |
|
Notes:
| |||||||
Obtaining information about CipherSpecs using WebSphere MQ Explorer
You can use WebSphere MQ Explorer to display descriptions of CipherSpecs.
Use the following procedure to obtain information about the CipherSpecs in Specifying CipherSpecs :
- Open WebSphere MQ Explorer and expand the Queue Managers folder.
- Ensure that you have started your queue manager.
- Select the queue manager you want to work with and click Channels.
- Right-click the channel you want to work with and select Properties.
- Select the SSL property page.
- Select from the list the CipherSpec you want to work with. A description is displayed in the window below the list.
Alternatives for specifying CipherSpecs
For those platforms where the operating system provides the SSL support, your system might support new CipherSpecs. You can specify a new CipherSpec with the SSLCIPH parameter, but the value you supply depends on your platform.
Note: This section does not apply to UNIX, Linux or Windows systems, because the CipherSpecs are provided with the WebSphere MQ product, so new CipherSpecs do not become available after shipment.
For those platforms where the operating system provides the SSL support, your system might support new CipherSpecs that are not included in Specifying CipherSpecs . You can specify a new CipherSpec with the SSLCIPH parameter, but the value you supply depends on your platform. In all cases the specification must correspond to an SSL CipherSpec that is both valid and supported by the version of SSL your system is running.
- IBM i
- A two-character string representing a hexadecimal value.
For more information about the permitted values, refer to the appropriate information center (search on cipher_spec):
- For V5R3, the iSeries Information Center at http://publib.boulder.ibm.com/infocenter/iseries/v5r3/index.jsp
- For V5R4, the IBM i Information Center at http://publib.boulder.ibm.com/infocenter/iseries/v5r4/index.jsp
You can use either the CHGMQMCHL or the CRTMQMCHL command to specify the value, for example:
CRTMQMCHL CHLNAME('channel name') SSLCIPH('hexadecimal value')You can also use the ALTER QMGR MQSC command to set the SSLCIPH parameter. - z/OS
- A two-character string representing a hexadecimal value. The hexadecimal
codes correspond to the values defined in the SSL protocol.
For more information, refer to the description of gsk_environment_open() in the API reference chapter of z/OS Cryptographic Services System SSL Programming , SC24-5901, where there is a list of all the supported SSL V3.0 and TLS V1.0 cipher specifications in the form of 2-digit hexadecimal codes.
Considerations for WebSphere MQ clusters
With WebSphere MQ clusters it is safest to use the CipherSpec names in Specifying CipherSpecs . If you use an alternative specification, be aware that the specification might not be valid on other platforms. For more information, refer to SSL and clusters .
Specifying a CipherSpec for a WebSphere MQ MQI client
You have three options for specifying a CipherSpec for a WebSphere MQ MQI client.
These options are as follows:
- Use a channel definition table
- Use the SSL configuration options structure, MQSCO, on an MQCONNX call
- Use the Active Directory (on Windows systems with Active Directory support)
Specifying a CipherSuite with WebSphere MQ classes for Java and WebSphere MQ classes for JMS
WebSphere MQ classes for Java™ and WebSphere MQ classes for JMS specify CipherSuites differently from other platforms.
For information about specifying a CipherSuite with WebSphere MQ classes for Java, see Secure Sockets Layer (SSL) support
For information about specifying a CipherSuite with WebSphere MQ classes for JMS, see Using Secure Sockets Layer (SSL) with WebSphere MQ classes for JMS
Auditing
You can check for security intrusions, or attempted intrusions, by using event messages. You can also check the security of your system by using the WebSphere MQ Explorer.
To detect attempts to perform unauthorized actions such as connecting to a queue manager or put a message on a queue, inspect the event messages produced by your queue managers, particularly authority event messages. For more information about queue manager event messages, see Queue manager events , and for more information about event monitoring in general, see Event monitoring .
Keeping clusters secure
Authorize or prevent queue managers joining clusters or putting messages on cluster queues. Force a queue manager to leave a cluster. Take account of some additional considerations when configuring SSL for clusters.
Stopping unauthorized queue managers sending messages
Prevent unauthorized queue managers sending messages to your queue manager using a channel security exit.
Clustering has no effect on the way security exits work. You can restrict access to a queue manager in the same way as you would in a distributed queuing environment.
Prevent selected queue managers from sending messages to your queue manager:
Procedure
- Define a channel security exit program on the CLUSRCVR channel definition.
- Write a program that authenticates queue managers trying to send messages on your cluster-receiver channel and denies them access if they are not authorized.
What to do next
Channel security exit programs are called at MCA initiation and termination.
Stopping unauthorized queue managers putting messages on your queues
Use the channel put authority attribute on the cluster-receiver channel to stop unauthorized queue managers putting messages on your queues. Authorize a remote queue manager by checking the user ID in the message using RACF on z/OS, or the OAM on other platforms. Use the security facilities of a platform and the access control mechanism in WebSphere MQ to control access to queues.
Procedure
- To prevent certain queue managers from putting messages on a queue, use the security facilities available on your platform.
For example:
- RACF or other external security managers on WebSphere MQ for z/OS
- The object authority manager (OAM) on other platforms.
- Use the put authority, PUTAUT, attribute
on the CLUSRCVR channel definition.
The PUTAUT attribute allows you to specify what user identifiers are to be used to establish authority to put a message to a queue.
The options on the PUTAUT attribute are:
- DEF
- Use the default user ID. On z/OS, the check might involve using both the user ID received from the network and that derived from MCAUSER.
- CTX
- Use the user ID in the context information associated with the message. On z/OS the check might involve using either the user ID received from the network, or that derived from MCAUSER, or both. Use this option if the link is trusted and authenticated.
- ONLYMCA (z/OS only)
- As for DEF, but any user ID received from the network is not used. Use this option if the link is not trusted. You want to allow only a specific set of actions on it, which are defined for the MCAUSER.
- ALTMCA (z/OS only)
- As for CTX, but any user ID received from the network is not used.
Authorizing putting messages on remote cluster queues
On z/OS set up authorization to put to a cluster queue using RACF. On other platforms, authorize access to connect to the queue manager and to put to the queue on that queue manager.
Procedure
- For z/OS, issue
the following commands:
 RDEFINE MQQUEUE QMgrName.QUEUE.QueueName UACC(NONE)
PERMIT QMgrName.QUEUE.QueueName CLASS(MQADMIN) ID(GroupName) ACCESS(UPDATE)
- For UNIX, Linux and Windows systems, issue the following commands:
 setmqaut -m QMgrName -t qmgr -g GroupName +connect
setmqaut -m QMgrName -t queue -n QueueName -g GroupName -all +put
- For IBM i, issue the following commands:
 GRTMQMAUT OBJ('QMgrName') OBJTYPE(*MQM) USER(GroupName) AUT(*CONNECT)
GRTMQMAUT OBJ('QueueName') OBJTYPE(*Q) USER(GroupName) AUT(*PUT) MQMNAME('QMgrName')
The user can put messages only to the specified cluster queue, and no other cluster queues.The variable names have the following meanings:
- QMgrName
- The name of the queue manager. On z/OS, this value can also be the name of a queue-sharing group.
- GroupName
- The name of the group to be granted access.
- QueueName
- Name of the queue or generic profile for which to change authorizattions.
What to do next
If you specify a reply-to queue when you put a message on a cluster queue, the consuming application must have authority to send the reply. Set this authority by following the instructions in Granting authority to put messages to a remote cluster queue .
Preventing queue managers joining a cluster
If a rogue queue manager joins a cluster it is difficult to prevent it receiving messages you do not want it to receive.
Procedure
To ensure that only certain authorized queue managers join a cluster you have a choice of three techniques:
- Use channel authentication records you can block the cluster channel connection based on: the remote IP address, the remote queue manager name, or the SSL/TLS Distinguished Name provided by the remote system.
- Write an exit program to prevent unauthorized queue managers from writing to SYSTEM.CLUSTER.COMMAND.QUEUE. Do not restrict access to SYSTEM.CLUSTER.COMMAND.QUEUE such that no queue manager can write to it, or you would prevent any queue manager from joining the cluster.
- A security exit program on the CLUSRCVR channel definition.
Security exits on cluster channels
When a cluster-sender channel is first started, it uses attributes defined manually by a system administrator. When the channel is stopped and restarted, it picks up the attributes from the corresponding cluster-receiver channel definition. The original cluster-sender channel definition is overwritten with the new attributes, including the SecurityExit attribute.
Procedure
- You must define a security exit on both the cluster-sender end and the cluster-receiver end of a channel.
The initial connection must be made with a security-exit handshake, even though the security exit name is sent over from the cluster-receiver definition.
- Validate the PartnerName in the MQCXP structure in the security exit.
The exit must allow the channel to start only if the partner queue manager is authorized
- Design the security exit on the cluster-receiver definition to be receiver initiated.
- If you design it as sender initiated, an unauthorized queue manager without a security exit can join the cluster because no security checks are performed.
Not until the channel is stopped and restarted can the SCYEXIT name be sent over from the cluster-receiver definition and full security checks made.
- To view the cluster-sender channel definition that is currently in use, use the command:
- DISPLAY CLUSQMGR(queue manager) ALL
The command displays the attributes that have been sent across from the cluster-receiver definition.
- To view the original definition, use the command:
DISPLAY CHANNEL(channel name) ALL
- You might need to define a channel auto-definition exit, CHADEXIT,
on the cluster-sender queue manager, if the queue managers are on different platforms.
Use the channel auto-definition exit to set the SecurityExit attribute to an appropriate format for the target platform.
- Deploy and configure the security-exit.
- Windows, UNIX and Linux systems
-
- The security-exit dynamic link library must be in the path specified in the SCYEXIT attribute of the channel definition.
- The channel auto-definition exit dynamic link library must be in the path specified in the CHADEXIT attribute of the queue manager definition.
-
Forcing unwanted queue managers to leave a cluster
Force an unwanted queue manager to leave a cluster by issuing the RESET CLUSTER command at a full repository queue manager.
You can force an unwanted queue manager to leave a cluster. If for example, a queue manager is deleted but its cluster-receiver channels are still defined to the cluster. You might want to tidy up.
Only full repository queue managers are authorized to eject a queue manager from a cluster.
Follow this procedure to eject the queue manager OSLO from the cluster NORWAY:
Procedure
- On a full repository queue manager, issue the command:
RESET CLUSTER(NORWAY) QMNAME(OSLO) ACTION(FORCEREMOVE)
- Alternative use the QMID instead of QMNAME in the command:
RESET CLUSTER(NORWAY) QMID(qmid) ACTION(FORCEREMOVE)
The queue manager that is force removed does not change: its local cluster definitions show it to be in the cluster. The definitions at all other queue managers do not show it in the cluster.
Preventing queue managers receiving messages
You can prevent a cluster queue manager from receiving messages it is unauthorized to receive by using exit programs. It is difficult to stop a queue manager that is a member of a cluster from defining a queue. There is a danger that a rogue queue manager joins a cluster, and defines its own instance of one of the queues in the cluster. It can now receive messages that it is not authorized to receive. To prevent a queue manager receiving messages, use one of the following options given in the procedure.
Procedure
- A channel exit program on each cluster-sender channel. The exit program uses the connection name to determine the suitability of the destination queue manager to be sent the messages.
- A cluster workload exit program, which uses the destination records to determine the suitability of the destination queue and queue manager to be sent the messages.
SSL and clusters
When configuring SSL for clusters, be aware a CLUSRCVR channel definition is propagated to other queue managers as an auto-defined CLUSSDR channel. If a CLUSRCVR channel uses SSL, you must configure SSL on all queue managers that communicate using the channel.
For more information about SSL, see WebSphere MQ support for SSL and TLS . The advice there is generally applicable to cluster channels, but you might want to give some special consideration to the following:
In a WebSphere MQ cluster a particular CLUSRCVR channel definition is frequently propagated to many other queue managers where it is transformed into an auto-defined CLUSSDR. Subsequently the auto-defined CLUSSDR is used to start a channel to the CLUSRCVR. If the CLUSRCVR is configured for SSL connectivity the following considerations apply:
- All queue managers that want to communicate with this CLUSRCVR must have access to SSL support. This SSL provision must support the CipherSpec for the channel.
- The different queue managers to which the auto-defined cluster-sender
channels have been propagated will each have a different distinguished
name associated. If distinguished name peer checking is to be used
on the CLUSRCVR it must be set up so all of the distinguished
names that can be received are successfully matched.
For example, let us assume that all of the queue managers that will host cluster-sender channels which will connect to a particular CLUSRCVR, have certificates associated. Let us also assume that the distinguished names in all of these certificates define the country as UK, organization as IBM, the organization unit as WebSphere MQ Development, and all have common names in the form DEVT.QMnnn, where nnn is numeric.
In this case an SSLPEER value of C=UK, O=IBM, OU=WebSphere MQ Development, CN=DEVT.QM* on the CLUSRCVR will allow all the required cluster-sender channels to connect successfully, but will prevent unwanted cluster-sender channels from connecting.
- If custom CipherSpec strings are used, be aware that the custom string formats are not allowed on all platforms. An example of this is that the CipherSpec string RC4_SHA_US has a value of 05 on IBM i but is not a valid specification on UNIX, Linux or Windows systems. So if custom SSLCIPH parameters are used on a CLUSRCVR, all resulting auto-defined cluster-sender channels should reside on platforms on which the underlying SSL support implements this CipherSpec and on which it can be specified with the custom value. If you cannot select a value for the SSLCIPH parameter that will be understood throughout your cluster you will need a channel auto definition exit to change it into something the platforms being used will understand. Use the textual CipherSpec strings where possible (for example RC4_MD5_US).
An SSLCRLNL parameter applies to an individual queue manager and is not propagated to other queue managers within a cluster.
Upgrading clustered queue managers and channels to SSL
Upgrade the cluster channels one at a time, changing all the CLUSRCVR channels before the CLUSSDR channels.
Consider the following considerations, as these might affect your choice of CipherSpec for a cluster:
- Some CipherSpecs are not available on all platforms. Take care to choose a CipherSpec that is supported by all of the queue managers in the cluster.
- Some CipherSpecs might be new in the current WebSphere MQ release
and not supported in older releases. A cluster containing queue managers running at different MQ releases is only be able to use the CipherSpecs
supported by each release.
To use a new CipherSpec within a cluster, you must first migrate all of the cluster queue managers to the current release.
- Some CipherSpecs require a specific type of digital certificate to be used, notably those that use Elliptic Curve Cryptography.
Upgrade all queue managers in the cluster to WebSphere MQ V6 or higher, if they are not already at these levels. Distribute the certificates and keys so that SSL works from each of them. Change one CLUSRCVR at a time, and allow the changes to flow through the cluster before changing the next. Make sure that you do not change the reverse path until the changes for the current channel have been distributed throughout the cluster.
Procedure
- Switch the CLUSRCVR channels to SSL in any order you like. The changes flow in the opposite direction over channels which are not changed to SSL.
- Switch all manual CLUSSDR channels to SSL. This does not have any effect on the operation of the cluster, unless you use the REFRESH CLUSTER command with the REPOS(YES) option.
Disabling SSL on clustered queue managers and channels
To disable SSL, set the SSLCIPH parameter to ' ', and run the RESET CLUSTER command.
Procedure
- Set the value of the SSLCIPH parameter
to ' ', an empty string in a single quotation mark.
- Run the RESET CLUSTER command against each queue manager pointing to the other queue managers in the cluster. That
is, if you have two queue managers in your cluster, run the RSTMQMCL command four times in total, twice for each queue manager.
The RESET CLUSTER command replaces the auto-defined cluster-sender channels with the newer version.
Example
On QM1:
 RESET CLUSTER(clustername) QMNAME(QM1) ACTION(FORCEREMOVE)QUEUES(NO)
RESET CLUSTER(clustername) QMNAME(QM2) ACTION(FORCEREMOVE)QUEUES(NO)
On QM2:
 RESET CLUSTER(clustername) QMNAME(QM2) ACTION(FORCEREMOVE)QUEUES(NO)
RESET CLUSTER(clustername) QMNAME(QM1) ACTION(FORCEREMOVE)QUEUES(NO)
Publish/subscribe security
The components and interactions that are involved in publish/subscribe are described as an introduction to the more detailed explanations and examples that follow.
There are a number of components involved in publishing and subscribing to a topic. Some of the security relationships between them are illustrated in Figure 1 and described in the following example.
Figure 1. Publish/subscribe security relationships

- Topics
- Topics are identified by topic strings, and are typically organized into trees, see Topic trees . You need to associate a topic with a topic object to control access to the topic. Topic security model explains how you secure topics using topic objects.
- Administrative topic objects
- You can control who has access to a topic, and for what purpose, by using the command setmqaut with a list of administrative topic objects. See the examples, Grant access to a user to subscribe to a topic and Grant access to a user to publish to a topic .
- Subscriptions
-
Subscribe to one or more topics by creating a subscription supplying a topic string, which can include wildcards, to match against the topic strings of publications. For further details, see:
- Subscribe using a topic object
- Subscribing using the topic object name
- Subscribe using a topic
- Subscribing using a topic string where the topic node does not exist
- Subscribe using a topic with wildcards
- Subscribing using a topic string that contains wildcard characters
A subscription contains information about the identity of the subscriber and the identity of the destination queue on to which the publications are to be placed. It also contains information about how the publication is to be placed on the destination queue.
As well as defining which subscribers have the authority to subscribe to certain topics, you can restrict subscriptions to being used by an individual subscriber. You can also control what information about the subscriber is used by the queue manager when publications are placed on to the destination queue. See Subscription security .
- Queues
-
The destination queue is an important queue to secure. It is local to the subscriber, and publications that matched the subscription are placed onto it. You need to consider access to the destination queue from two perspectives:
- Putting a publication on to the destination queue.
- Getting the publication off the destination queue.
The queue manager puts a publication onto the destination queue using an identity provided by the subscriber. The subscriber, or a program that has been delegated the task of getting publications, takes messages off the queue. See Authority to destination queues .
There are no topic object aliases, but you can use an alias queue as the alias for a topic object. If you do so, as well as checking authority to use the topic for publish or subscribe, the queue manager checks authority to use the queue.
- Publish/subscribe security between queue managers
-
Your permission to publish or subscribe to a topic is checked on the local queue manager using local identities and authorizations. Authorization does not depend on whether the topic is defined or not, nor where it is defined. Consequently, you need to perform topic authorization on every queue manager in a cluster when clustered topics are used.
Note: The security model for topics differs from the security model for queues. You can achieve the same result for queues by defining a queue alias locally for every clustered queue.
Queue managers exchange subscriptions in a cluster. In most WebSphere MQ cluster configurations, channels are configured with PUTAUT=DEF to place messages onto target queues using the authority of the channel process. You can modify the channel configuration to use PUTAUT=CTX to require the subscribing user to have authority to propagate a subscription onto another queue manager in a cluster.
Publish/subscribe security between queue managers describes how to change your channel definitions to control who is allowed to propagate subscriptions onto other servers in the cluster.
- Authorization
- You can apply authorization to topic objects, just like queues and other objects. There are three authorization operations, pub, sub, and resume that you can apply only to topics. The details are described in Specifying authorities for different object types .
- Function calls
-
In publish and subscribe programs, like in queued programs, authorization checks are made when objects are opened, created, changed, or deleted. Checks are not made when MQPUT or MQGET MQI calls are made to put and get publications.
To publish a topic, perform an MQOPEN on the topic, which performs the authorization checks. Publish messages to the topic handle using the MQPUT command, which performs no authorization checks.
To subscribe to a topic, typically you perform an MQSUB command to create or resume the subscription, and also to open the destination queue to receive publications. Alternatively, perform a separate MQOPEN to open the destination queue, and then perform the MQSUB to create or resume the subscription.
Whichever calls you use, the queue manager checks that you can subscribe to the topic and get the resulting publications from the destination queue. If the destination queue is unmanaged, authorization checks are also made that the queue manager is able to place publications on the destination queue. It uses the identity it adopted from a matching subscription. It is assumed that the queue manager is always able to place publications onto managed destination queues.
- Roles
-
Users are involved in four roles in running publish/subscribe applications:
- Publisher
- Subscriber
- Topic administrator
- WebSphere MQ Administrator - member of group mqm
Define groups with appropriate authorizations corresponding to the publish, subscribe, and topic administration roles. You can then assign principals to these groups authorizing them to perform specific publish and subscribe tasks.
In addition, you need to extend the administrative operations authorizations to the administrator of the queues and channels responsible for moving publications and subscriptions.
Topic security model
Only defined topic objects can have associated security attributes. For a description of topic objects, see Administrative topic objects . The security attributes specify whether a specified user ID, or security group, is permitted to perform a subscribe or a publish operation on each topic object.
The security attributes are associated with the appropriate administration node in the topic tree. When an authority check is made for a particular user ID during a subscribe or publish operation, the authority granted is based on the security attributes of the associated topic tree node.
The security attributes are an access control list, indicating what authority a particular operating system user ID or security group has to the topic object.
Consider the following example where the topic objects have been defined with the security attributes, or authorities shown:
| Topic name | Topic string | Authorities - not z/OS | z/OS authorities |
|---|---|---|---|
| SECROOT | SEC | None | None |
| SECGOOD | SEC/GOOD | usr1+subscribe | ALTER
Hlq.SUBSCRIBE.SECGOOD |
| SECBAD | SEC/BAD | None | None
Hlq.SUBSCRIBE.SECBAD |
| SECCOMB | SEC/COMB | None | None
Hlq.SUBSCRIBE.SECCOMB |
| SECCOMBB | SEC/COMB/GOOD/BAD | None | None
Hlq.SUBSCRIBE.SECCOMBB |
| SECCOMBG | SEC/COMB/GOOD | usr2+subscribe | ALTER
Hlq.SUBSCRIBE.SECCOMBG |
| SECCOMBN | SEC/COMB/BAD | None | None
Hlq.SUBSCRIBE.SECCOMBN |
The topic tree with the associated security attributes at each node can be represented as follows:

The examples listed give the following authorizations:
- At the root node of the tree /SEC, no user has authority at that node.
- usr1 has been granted subscribe authority to the object /SEC/GOOD
- usr2 has been granted subscribe authority to the object /SEC/COMB/GOOD
Subscribing using the topic object name
When subscribing to a topic object by specifying the MQCHAR48 name, the corresponding node in the topic tree is located. If the security attributes associated with the node indicate that the user has authority to subscribe, then access is granted.
If the user is not granted access, the parent node in the tree determines if the user has authority to subscribe at the parent node level. If so, then access is granted. If not, then the parent of that node is considered. The recursion continues until a node is located that grants subscribe authority to the user. The recursion stops when the root node is considered without authority having been granted. In the latter case, access is denied.
In short, if any node in the path grants authority to subscribe to that user or application, the subscriber is allowed to subscribe at that node, or anywhere below that node in the topic tree.
The root node in the example is SEC.
The user is granted subscribe authority if the access control list indicates that the user ID itself has authority, or that an operating system security group of which the user ID is a member has authority.
So, for example:
- If usr1 tries to subscribe, using a topic string of SEC/GOOD, the subscription would be allowed as the user ID has access to the node associated with that topic. However, if usr1 tried to subscribe using topic string SEC/COMB/GOOD the subscription would not be allowed as the user ID does not have access to the node associated with it.
- If usr2 tries to subscribe, using a topic string of SEC/COMB/GOOD the subscription would be allowed to as the user ID has access to the node associated with the topic. However, if usr2 tried to subscribe to SEC/GOOD the subscription would not be allowed as the user ID does not have access to the node associated with it.
- If usr2 tries to subscribe using a topic string of SEC/COMB/GOOD/BAD the subscription would be allowed to because the user ID has access to the parent node SEC/COMB/GOOD.
- If usr1 or usr2 tries to subscribe using a topic string of /SEC/COMB/BAD, neither would be allowed as they do not have access to the topic node associated with it, or the parent nodes of that topic.
A subscribe operation specifying the name of a topic object that does not exist results in an MQRC_UNKNOWN_OBJECT_NAME error.
Subscribing using a topic string where the topic node exists
The behavior is the same as when specifying the topic by the MQCHAR48 object name.
Subscribing using a topic string where the topic node does not exist
Consider the case of an application subscribing, specifying a topic string representing a topic node that does not currently exist in the topic tree. The authority check is performed as outlined in the previous section. The check starts with the parent node of that which is represented by the topic string. If the authority is granted, a new node representing the topic string is created in the topic tree.
For example, usr1 tries to subscribe to a topic SEC/GOOD/NEW. Authority is granted as usr1 has access to the parent node SEC/GOOD. A new topic node is created in the tree as the following diagram shows. The new topic node is not a topic object it does not have any security attributes associated with it directly; the attributes are inherited from its parent.

Subscribing using a topic string that contains wildcard characters
Consider the case of subscribing using a topic string that contains a wildcard character. The authority check is made against the node in the topic tree that matches the fully qualified part of the topic string.
So, if an application subscribes to SEC/COMB/GOOD/*, an authority check is carried out as outlined in the previous two sections on the node SEC/COMB/GOOD in the topic tree.
Similarly, if an application needs to subscribe to SEC/COMB/*/GOOD, an authority check is carried out on the node SEC/COMB.
Authority to destination queues
When subscribing to a topic, one of the parameters is the handle hobj of a queue that has been opened for output to receive the publications.
If hobj is not specified, but is blank, a managed queue is created if the following conditions apply:
- The MQSO_MANAGED option has been specified.
- The subscription does not exist.
- Create is specified.
If hobj is blank, and you are altering or resuming an existing subscription, the previously provided destination queue could be either managed or unmanaged.
The application or user making the MQSUB request must have the authority to put messages to the destination queue it has provided; in effect authority to have published messages put on that queue. The authority check follows the existing rules for queue security checking.
The security checking includes alternate user ID and context security checks where required. To be able to set any of the Identity context fields you must specify the MQSO_SET_IDENTITY_CONTEXT option as well as the MQSO_CREATE or MQSO_ALTER option. You cannot set any of the Identity context fields on an MQSO_RESUME request.
If the destination is a managed queue, no security checks are performed against the managed destination. If you are allowed to subscribe to a topic it is assumed that you can use managed destinations.
Publishing using the topic name or topic string where the topic node exists
The security model for publishing is the same as that for subscribing, with the exception of wildcards. Publications do not contain wildcards; so there is no case of a topic string containing wildcards to consider.
The authorities to publish and subscribe are distinct. A user or group can have the authority to do one without necessarily being able to do the other.
When publishing to a topic object by specifying either the MQCHAR48 name or the topic string, the corresponding node in the topic tree is located. If the security attributes associated with the topic node indicates that the user has authority to publish, then access is granted.
If access is not granted, the parent node in the tree determines if the user has authority to publish at that level. If so, then access is granted. If not, the recursion continues until a node is located which grants publish authority to the user. The recursion stops when the root node is considered without authority having been granted. In the latter case, access is denied.
In short, if any node in the path grants authority to publish to that user or application, the publisher is allowed to publish at that node or anywhere below that node in the topic tree.
Publishing using the topic name or topic string where the topic node does not exist
As with the subscribe operation, when an application publishes, specifying a topic string representing a topic node that does not currently exist in the topic tree, the authority check is performed starting with the parent of the node represented by the topic string. If the authority is granted, a new node representing the topic string is created in the topic tree.
Publishing using an alias queue that resolves to a topic object
If you publish using an alias queue that resolves to a topic object then security checking occurs on both the alias queue and the underlying topic to which it resolves.
The security check on the alias queue verifies that the user has authority to put messages on that alias queue and the security check on the topic verifies that the user can publish to that topic. When an alias queue resolves to another queue, checks are not made on the underlying queue. Authority checking is performed differently for topics and queues.
Closing a subscription
There is additional security checking if you close a subscription using the MQCO_REMOVE_SUB option if you did not create the subscription under this handle.
A security check is performed to ensure that you have the correct authority to do this as the action results in the removal of the subscription. If the security attributes associated with the topic node indicate that the user has authority, then access is granted. If not, then the parent node in the tree is considered to determine if the user has authority to close the subscription. The recursion continues until either authority is granted or the root node is reached.
Defining, altering, and deleting a subscription
No subscribe security checks are performed when a subscription is created administratively, rather than using an MQSUB API request. The administrator has already been given this authority through the command.
Security checks are performed to ensure that publications can be put on the destination queue associated with the subscription. The checks are performed in the same way as for an MQSUB request.
The user ID that is used for these security checks depends upon the command being issued. If the SUBUSER parameter is specified it affects the way the check is performed, as shown in Table 2 :
User IDs used for security checks for commands
| Command | SUBUSER specified and blank | SUBUSER specified and completed | SUBUSER not specified |
|---|---|---|---|
| DEFINE | Use the administrator ID | Use the user ID specified in SUBUSER | Use the administrator ID |
| ALTER | Use the administrator ID | Use the user ID specified in SUBUSER | Use the user ID from the existing subscription |
The only security check performed when deleting subscriptions using the DELETE SUB command is the command security check.
Example publish/subscribe security setup
This section describes a scenario that has access control setup on topics in a way that allows the security control to be applied as required.
Grant access to a user to subscribe to a topic
This topic is the first one in a list of tasks that tells you how to grant access to topics by more than one user. This task assumes that no administrative topic objects exist, nor have any profiles been defined for subscription or publication. The applications are creating new subscriptions, rather than resuming existing ones, and are doing so using the topic string only.
An application can make a subscription by providing a topic object, or a topic string, or a combination of both. Whichever way the application selects, the effect is to make a subscription at a certain point in the topic tree. If this point in the topic tree is represented by an administrative topic object, a security profile is checked based on the name of that topic object.
Figure 1. Topic object access example
| Topic | Subscribe access required | Topic object |
|---|---|---|
| Price | No user | None |
| Price/Fruit | USER1 | FRUIT |
Define a new topic object as follows:
Procedure
- Issue the MQSC command DEF TOPIC(FRUIT) TOPICSTR('Price/Fruit').
- Grant access as follows:
- Other platforms:
Grant access to USER1 to subscribe to topic "Price/Fruit" by granting the user access to the FRUIT object. Do this, using the authorization command for the platform:
- Windows, UNIX and Linux systems
-
setmqaut -t topic -n FRUIT -p USER1 +sub
-
- Other platforms:
When USER1 attempts to subscribe to topic "Price/Fruit" the result is success.
When USER2 attempts to subscribe to topic "Price/Fruit" the result is failure with an MQRC_NOT_AUTHORIZED message, together with:
- On other platforms, the following authorization event:
 MQRC_NOT_AUTHORIZED
ReasonQualifier	  MQRQ_SUB_NOT_AUTHORIZED
UserIdentifier	    USER2
AdminTopicNames	  FRUIT, SYSTEM.BASE.TOPIC
TopicString		   "Price/Fruit"
Note that this is an illustration of what you see; not all the fields.
Grant access to a user to subscribe to a topic deeper within the tree
This topic is the second in a list of tasks that tells you how to grant access to topics by more than one user. This topic uses the setup described in Grant access to a user to subscribe to a topic . If the point in the topic tree where the application makes the subscription is not represented by an administrative topic object, move up the tree until the closest parent administrative topic object is located. The security profile is checked, based on the name of that topic object.
Figure 1. Example of granting access to a topic within a topic tree
| Topic | Subscribe access required | Topic object |
|---|---|---|
| Price | No user | None |
| Price/Fruit | USER1 | FRUIT |
| Price/Fruit/Apples | USER1 | |
| Price/Fruit/Oranges | USER1 |
In the previous task USER1 was granted access to subscribe to topic "Price/Fruit" by granting it access to the hlq.SUBSCRIBE.FRUIT profile on z/OS and subscribe access to the FRUIT profile on other platforms. This single profile also grants USER1 access to subscribe to "Price/Fruit/Apples", "Price/Fruit/Oranges" and "Price/Fruit/#".
When USER1 attempts to subscribe to topic "Price/Fruit/Apples" the result is success.
When USER2 attempts to subscribe to topic "Price/Fruit/Apples" the result is failure with an MQRC_NOT_AUTHORIZED message, together with:
- On z/OS, the following messages seen on the console
that show the full security path through the topic tree that has been attempted:
 ICH408I USER(USER2   ) ...
  hlq.SUBSCRIBE.FRUIT ...

ICH408I USER(USER2   ) ...
  hlq.SUBSCRIBE.SYSTEM.BASE.TOPIC ...
- On other platforms, the following authorization event:
 MQRC_NOT_AUTHORIZED
ReasonQualifier	  MQRQ_SUB_NOT_AUTHORIZED
UserIdentifier	    USER2
AdminTopicNames	  FRUIT, SYSTEM.BASE.TOPIC
TopicString		   "Price/Fruit/Apples"
Note the following:
- The messages you receive on z/OS are identical to those received in the previous task as the same topic objects and profiles are controlling the access.
- The event message you receive on other platforms is similar to the one received in the previous task, but the actual topic string is different.
Grant another user access to subscribe to only the topic deeper within the tree
This topic is the third in a list of tasks that tells you how to grant access to subscribe to topics by more than one user. This topic uses the setup described in Grant access to a user to subscribe to a topic deeper within the tree . In the previous task USER2 was refused access to topic "Price/Fruit/Apples". This topic tells you how to grant access to that topic, but not to any other topics.
Figure 1. Granting access to specific topics within a topic tree
| Topic | Subscribe access required | Topic object |
|---|---|---|
| Price | No user | None |
| Price/Fruit | USER1 | FRUIT |
| Price/Fruit/Apples | USER1 and USER2 | APPLE |
| Price/Fruit/Oranges | USER1 |
Define a new topic object as follows:
Procedure
- Issue the MQSC command DEF TOPIC(APPLE) TOPICSTR('Price/Fruit/Apples').
- Grant access as follows:
- Other platforms:
In the previous task USER1 was granted access to subscribe to topic "Price/Fruit/Apples" by granting the user subscribe access to the FRUIT profile.
This single profile also granted USER1 access to subscribe to "Price/Fruit/Oranges" and "Price/Fruit/#", and this access remains even with the addition of the new topic object and the profiles associated with it.
Grant access to USER2 to subscribe to topic "Price/Fruit/Apples" by granting the user subscribe access to the APPLE profile. Do this, using the authorization command for the platform:
- Windows, UNIX and Linux systems
-
setmqaut -t topic -n APPLE -p USER2 +sub
-
- Other platforms:
On z/OS, when USER1 attempts to subscribe to topic "Price/Fruit/Apples" the first security check on the hlq.SUBSCRIBE.APPLE profile fails, but on moving up the tree the hlq.SUBSCRIBE.FRUIT profile allows USER1 to subscribe, so the subscription succeeds and no return code is sent to the MQSUB call. However, a RACF ICH message is generated for the first check:
    ICH408I USER(USER1   ) ...
      hlq.SUBSCRIBE.APPLE ...
When USER2 attempts to subscribe to topic "Price/Fruit/Apples" the result is success because the security check passes on the first profile.
When USER2 attempts to subscribe to topic "Price/Fruit/Oranges" the result is failure with an MQRC_NOT_AUTHORIZED message, together with:
- On Windows, UNIX and Linux platforms,
the following authorization event:
 MQRC_NOT_AUTHORIZED
ReasonQualifier	  MQRQ_SUB_NOT_AUTHORIZED
UserIdentifier	    USER2
AdminTopicNames	  FRUIT, SYSTEM.BASE.TOPIC
TopicString		   "Price/Fruit/Oranges"
The disadvantage of this setup is that, on z/OS, you receive additional ICH messages on the console. You can avoid this if you secure the topic tree in a different manner.
Change access control to avoid additional messages
This topic is the fourth in a list of tasks that tells you how to grant access to subscribe to topics by more than one user and to avoid additional RACF ICH408I messages on z/OS. This topic enhances the setup described in Grant another user access to subscribe to only the topic deeper within the tree so that you avoid additional error messages. This topic tells you how to grant access to topics deeper in the tree, and how to remove access to the topic lower down the tree when no user requires it.
Figure 1. Example of granting access control to avoid additional messages.
Define a new topic object as follows:
Procedure
- Issue the MQSC command DEF TOPIC(ORANGE) TOPICSTR('Price/Fruit/Oranges').
- Grant access as follows:
- Other platforms:
Setup the equivalent access by using the authorization commands for the platform:
- Windows, UNIX and Linux systems
-
 setmqaut -t topic -n ORANGE -p USER1 +sub
setmqaut -t topic -n APPLE -p USER1 +sub
-
- Other platforms:
On z/OS, when USER1 attempts to subscribe to topic "Price/Fruit/Apples" the first security check on the hlq.SUBSCRIBE.APPLE profile succeeds.
Similarly, when USER2 attempts to subscribe to topic "Price/Fruit/Apples" the result is success because the security check passes on the first profile.
When USER2 attempts to subscribe to topic "Price/Fruit/Oranges" the result is failure with an MQRC_NOT_AUTHORIZED message, together with:
- On other platforms, the following authorization event:
 MQRC_NOT_AUTHORIZED
ReasonQualifier	  MQRQ_SUB_NOT_AUTHORIZED
UserIdentifier	    USER2
AdminTopicNames	  ORANGE, FRUIT, SYSTEM.BASE.TOPIC
TopicString		   "Price/Fruit/Oranges"
Grant access to a user to publish to a topic
This topic is the first one in a list of tasks that tells you how to grant access to publish topics by more than one user. This task assumes that no administrative topic objects exist on the right hand side of the topic tree, nor have any profiles been defined for publication. The assumption used is that publishers are using the topic string only.
An application can publish to a topic by providing a topic object, or a topic string, or a combination of both. Whichever way the application selects, the effect is to publish at a certain point in the topic tree. If this point in the topic tree is represented by an administrative topic object, a security profile is checked based on the name of that topic object. For example:
Figure 1. Granting publish access to a topic
| Topic | Publish access required | Topic object |
|---|---|---|
| Price | No user | None |
| Price/Vegetables | USER1 | VEG |
Define a new topic object as follows:
Procedure
- Issue the MQSC command DEF TOPIC(VEG) TOPICSTR('Price/Vegetables').
- Grant access as follows:
- Other platforms:
Grant access to USER1 to publish to topic "Price/Vegetables" by granting the user access to the VEG profile. Do this, using the authorization command for the platform:
- Windows, UNIX and Linux systems
-
setmqaut -t topic -n VEG -p USER1 +pub
-
- Other platforms:
When USER1 attempts to publish to topic "Price/Vegetables" the result is success; that is, the MQOPEN call succeeds.
When USER2 attempts to publish to topic "Price/Vegetables" the MQOPEN call fails with an MQRC_NOT_AUTHORIZED message, together with:
- On other platforms, the following authorization event:
 MQRC_NOT_AUTHORIZED
ReasonQualifier	  MQRQ_OPEN_NOT_AUTHORIZED
UserIdentifier	    USER2
AdminTopicNames	  VEG, SYSTEM.BASE.TOPIC
TopicString		   "Price/Vegetables"
Note that this is an illustration of what you see; not all the fields.
Grant access to a user to publish to a topic deeper within the tree
This topic is the second in a list of tasks that tells you how to grant access to publish to topics by more than one user. This topic uses the setup described in Grant access to a user to publish to a topic . If the point in the topic tree where the application publishes is not represented by an administrative topic object, move up the tree until the closest parent administrative topic object is located. The security profile is checked, based on the name of that topic object.
Figure 1. Granting publish access to a topic within a topic tree
| Topic | Subscribe access required | Topic object |
|---|---|---|
| Price | No user | None |
| Price/Vegetables | USER1 | VEG |
| Price/Vegetables/Potatoes | USER1 | |
| Price/Vegetables/Onions | USER1 |
In the previous task USER1 was granted access to publish topic "Price/Vegetables/Potatoes" by granting it access to the hlq.PUBLISH.VEG profile on z/OS or publish access to the VEG profile on other platforms. This single profile also grants USER1 access to publish at "Price/Vegetables/Onions".
When USER1 attempts to publish at topic "Price/Vegetables/Potatoes" the result is success; that is the MQOPEN call succeeds.
When USER2 attempts to subscribe to topic "Price/Vegetables/Potatoes" the result is failure; that is, the MQOPEN call fails with an MQRC_NOT_AUTHORIZED message, together with:
- On z/OS, the following messages seen on the console
that show the full security path through the topic tree that has been attempted:
 ICH408I USER(USER2   ) ...
  hlq.PUBLISH.VEG ...

ICH408I USER(USER2   ) ...
  hlq.PUBLISH.SYSTEM.BASE.TOPIC ...
- On other platforms, the following authorization event:
 MQRC_NOT_AUTHORIZED
ReasonQualifier	  MQRQ_OPEN_NOT_AUTHORIZED
UserIdentifier	    USER2
AdminTopicNames	  VEG, SYSTEM.BASE.TOPIC
TopicString		   "Price/Vegetables/Potatoes"
Note the following:
- The messages you receive on z/OS are identical to those received in the previous task as the same topic objects and profiles are controlling the access.
- The event message you receive on other platforms is similar to the one received in the previous task, but the actual topic string is different.
Grant access for publish and subscribe
This topic is the last in a list of tasks that tells you how to grant access to publish and subscribe to topics by more than one user. This topic uses the setup described in Grant access to a user to publish to a topic deeper within the tree . In a previous task USER1 was given access to subscribe to the topic "Price/Fruit". This topic tells you how to grant access to that user to publish to that topic.
Figure 1. Granting access for publishing and subscribing
| Topic | Subscribe access required | Publish access required | Topic object |
|---|---|---|---|
| Price | No user | No user | None |
| Price/Fruit | USER1 | USER1 | FRUIT |
| Price/Fruit/Apples | USER1 and USER2 | APPLE | |
| Price/Fruit/Oranges | USER1 | ORANGE |
Procedure
Grant access as follows:
- Other platforms:
Grant access to USER1 to publish to topic "Price/Fruit" by granting the user publish access to the FRUIT profile. Do this, using the authorization command for the platform:
- Windows, UNIX and Linux systems
-
setmqaut -t topic -n FRUIT -p USER1 +pub
-
On z/OS, when USER1 attempts to publish to topic "Price/Fruit" the security check on the MQOPEN call passes.
When USER2 attempts to publish at topic "Price/Fruit" the result is failure with an MQRC_NOT_AUTHORIZED message, together with:
- On Windows, UNIX, and Linux platforms,
the following authorization event:
 MQRC_NOT_AUTHORIZED
ReasonQualifier	  MQRQ_OPEN_NOT_AUTHORIZED
UserIdentifier	    USER2
AdminTopicNames	  FRUIT, SYSTEM.BASE.TOPIC
TopicString		   "Price/Fruit"
Following the complete set of these tasks, gives USER1 and USER2 the following access authorities for publish and subscribe to the topics listed:
| Topic | Subscribe access required | Publish access required | Topic object |
|---|---|---|---|
| Price | No user | No user | None |
| Price/Fruit | USER1 | USER1 | FRUIT |
| Price/Fruit/Apples | USER1 and USER2 | APPLE | |
| Price/Fruit/Oranges | USER1 | ORANGE | |
| Price/Vegetables | USER1 | VEG | |
| Price/Vegetables/Potatoes | |||
| Price/Vegetables/Onions |
Where you have different requirements for security access at different levels within the topic tree, careful planning ensures that you do not receive extraneous security warnings on the z/OS console log. Setting up security at the correct level within the tree avoids misleading security messages.
Subscription security
MQSO_ALTERNATE_USER_AUTHORITY
The AlternateUserId field contains a user identifier to use to validate this MQSUB call. The call can succeed only if this AlternateUserId is authorized to subscribe to the topic with the specified access options, regardless of whether the user identifier under which the application is running is authorized to do so.
MQSO_SET_IDENTITY_CONTEXT
The subscription is to use the accounting token and application identity data supplied in the PubAccountingToken and PubApplIdentityData fields.
If this option is specified, the same authorization check is carried out as if the destination queue was accessed using an MQOPEN call with MQOO_SET_IDENTITY_CONTEXT, except in the case where the MQSO_MANAGED option is also used in which case there is no authorization check on the destination queue.
If this option is not specified, the publications sent to this subscriber have default context information associated with them as follows:
| Field in MQMD | Value used |
|---|---|
| UserIdentifier | The user ID associated with the subscription (see SUBUSER field on DISPLAY SBSTATUS) at the time the publication is made. |
| AccountingToken | Determined from the environment if possible; set to MQACT_NONE otherwise. |
| ApplIdentityData | Set to blanks. |
If a subscription is altered without using this option where previously the subscription had supplied identity context information, default context information is generated for the altered subscription.
If a subscription allowing different user IDs to use it with option MQSO_ANY_USERID, is resumed by a different user ID, default identity context is generated for the new user ID now owning the subscription and any subsequent publications are delivered containing the new identity context.
AlternateSecurityId
This is a security identifier that is passed with the AlternateUserId to the authorization service to allow appropriate authorization checks to be performed. AlternateSecurityId is used only if MQSO_ALTERNATE_USER_AUTHORITY is specified, and the AlternateUserId field is not entirely blank up to the first null character or the end of the field.
MQSO_ANY_USERID subscription option
When MQSO_ANY_USERID is specified, the identity of the subscriber is not restricted to a single user ID. This allows any user to alter or resume the subscription when they have suitable authority. Only a single user may have the subscription at any one time. An attempt to resume use of a subscription currently in use by another application will cause the call to fail with MQRC_SUBSCRIPTION_IN_USE.
To add this option to an existing subscription the MQSUB call (using MQSO_ALTER) must come from the same user ID as the original subscription.
If an MQSUB call refers to an existing subscription with MQSO_ANY_USERID set, and the user ID differs from the original subscription, the call succeeds only if the new user ID has authority to subscribe to the topic. After successful completion, future publications to this subscriber are put to the subscriber's queue with the new user ID set in the publication.
MQSO_FIXED_USERID
When MQSO_FIXED_USERID is specified, the subscription can only be altered or resumed by a single owning user ID. This user ID is the last user ID to alter the subscription that set this option, thereby removing the MQSO_ANY_USERID option, or if no alters have taken place, it is the user ID that created the subscription.
If an MQSUB verb refers to an existing subscription with MQSO_ANY_USERID set and alters the subscription (using MQSO_ALTER) to use option MQSO_FIXED_USERID, the user ID of the subscription is now fixed at this new user ID. The call succeeds only if the new user ID has authority to subscribe to the topic.
If a user ID other than the one recorded as owning a subscription trys to resume or alter an MQSO_FIXED_USERID subscription, the call will fail with MQRC_IDENTITY_MISMATCH. The owning user ID of a subscription can be viewed using the DISPLAY SBSTATUS command.
If neither MQSO_ANY_USERID or MQSO_FIXED_USERID is specified, the default is MQSO_FIXED_USERID.
WebSphere MQ Advanced Message Security
IBM WebSphere MQ Advanced Message Security (WebSphere MQ AMS) is a separately licensed component of WebSphere MQ that provides a high level of protection for sensitive data flowing through the WebSphere MQ network, while not impacting the end applications.
WebSphere MQ AMS overview
WebSphere MQ applications can use WebSphere MQ Advanced Message Security to send sensitive data, such as high-value financial transactions and personal information, with different levels of protection by using a public key cryptography model.
Behavior that has changed between version 7.0.1 and version 7.5
As IBMWebSphere MQ Advanced Message Security became a component in WebSphere MQ 7.5, some aspects of WebSphere MQ AMS functionality have changed, what might affect existing applications, administrative scripts, or management procedures.
Review the following list of changes carefully before upgrading queue managers to version 7.5. Decide whether you must plan to make changes to existing applications, scripts, and procedures before starting to migrate systems to WebSphere MQ version 7.5:
- WebSphere MQ AMS installation is a part of WebSphere MQ installation process.
- WebSphere MQ AMS security capabilities are enabled with its installation and controlled with security policies. You do not need to enable interceptors to allow WebSphere MQ AMS start intercepting data.
- WebSphere MQ AMS in WebSphere MQ version 7.5 does not require the use of the cfgmqs command as in the stand-alone version of WebSphere MQ AMS.
Features and functions of WebSphere MQ Advanced Message Security V7.5
WebSphere MQ Advanced Message Security expands WebSphere MQ security services to provide data signing and encryption at the message level. The expanded services guarantees that message data has not been modified between when it is originally placed on a queue and when it is retrieved. In addition, WebSphere MQ AMS verifies that a sender of message data is authorized to place signed messages on a target queue.
Here is a complete list of WebSphere MQ AMS functions:
- Secures sensitive or high-value transactions processed by WebSphere MQ.
- Detects and removes rogue or unauthorized messages before they are processed by a receiving application.
- Verifies that messages were not modified while in transit from queue to queue.
- Protects the data not only as it flows across the network but also when it is put on a queue.
- Secures existing proprietary and customer-written applications for WebSphere MQ.
Key concepts
Learn about the key concepts in WebSphere MQ Advanced Message Security to understand how the tool works and how to manage it effectively.
Public key infrastructure
Public key infrastructure (PKI) is a system of facilities, policies, and services that support the use of public key cryptography to obtain secure communication.
There is no single standard that defines the components of a public key infrastructure, but a PKI typically involves usage of public key certificates and comprises certificate authorities (CA) and other registration authorities (RA) that provide the following services:
- Issuing digital certificates
- Validating digital certificates
- Revoking digital certificates
- Distributing certificates
Identity of users and applications are represented by distinguished name (DN) field in a certificate associated with signed or encrypted messages. WebSphere MQ Advanced Message Security uses this identity to represent a user or an application. To authenticate this identity, the user or application must have access to the keystore where the certificate and associated private key are stored. Each certificate is represented by a label in the keystore.
Digital certificates
WebSphere MQ Advanced Message Security associates users and applications with X.509 standard digital certificates. X.509 certificates are typically signed by a trusted certificate authority (CA) and involve private and public keys which are used for encryption and decryption.
Digital certificates provide protection against impersonation by binding a public key to its owner, whether that owner is an individual, a queue manager, or some other entity. Digital certificates are also known as public key certificates, because they give you assurance about the ownership of a public key when you use an asymmetric key scheme. This scheme requires that a public key and a private key be generated for an application. Data encrypted with the public key can only be decrypted using the corresponding private key while data encrypted with the private key can only be decrypted using the corresponding public key. The private key is stored in a key database file that is password-protected. Only its owner has the access to the private key used to decrypt messages that are encrypted using the corresponding public key.
If public keys are sent directly by their owner to another entity, there is a risk that the message could be intercepted and the public key substituted by another. This is known as a "man-in-the-middle" attack. The solution is to exchange public keys through a trusted third party, giving the user a strong assurance that the public key belongs to the entity with which you are communicating. Instead of sending your public key directly, you ask a trusted third party to incorporate it into a digital certificate. The trusted third-party who issues digital certificates is called a certificate authority (CA).
For more information about digital certificates, see What is in a digital certificate .
A digital certificate contains the public key for an entity and states that the public key belongs to that entity:
- when a certificate is for an individual entity, it is called a personal certificate or user certificate.
- when a certificate is for a certificate authority, the certificate is called a CA certificate or signer certificate.
Note: WebSphere MQ Advanced Message Security supports self-signed certificates in both Java and native applications
Object authority manager
The Object Authority Manager (OAM) is the authorization service component supplied with the WebSphere MQ products.
The access to WebSphere MQ Advanced Message Security entities is controlled through WebSphere MQ user groups and the OAM. Administrators can use the command-line interface to grant or revoke authorizations as required. Different groups of users can have different kinds of access authority to the same objects. For example, one group could perform both PUT and GET operations for a specific queue while another group might be allowed only to browse the queue. Similarly, some groups might have GET and PUT authority to a queue, but are not allowed to alter or delete the queue.
Through the OAM, you can control:
- Access to WebSphere MQ Advanced Message Security objects through MQI. When an application program attempts to access objects, the OAM checks if the user profile making the request has the authorization for the operation requested. This means that queues, and the messages on queues, can be protected from unauthorized access.
- Permission to use PCF and MQSC commands.
Supported technology
WebSphere MQ Advanced Message Security depends on several technology components to provide a security infrastructure.
WebSphere MQ Advanced Message Security supports the following WebSphere MQ application programming interfaces (APIs):
- Message queue interface (MQI)
- WebSphere MQ Java™ Message Service (JMS) 1.0.2 and 1.1.
- WebSphere MQ Base Classes for Java
- WebSphere MQ classes for .Net in an unmanaged mode
Note: WebSphere MQ Advanced Message Security supports X.509 compliant certificate authorities.
Known limitations
Learn about limitations of WebSphere MQ Advanced Message Security.
- The following WebSphere MQ options are not supported:
- Publish/subscribe.
- Channel data conversion.
- Distribution lists.
- Application message segmentation
- The use of non-threaded applications using API exit on HP-UX platforms.
- WebSphere MQ classes for .NET in a managed mode (client or bindings connections).
- Message Service client for .NET (XMS) applications.
- Message Service client for C/C++ (XMS supportPac IA94) applications.
- All Java™ applications are dependant on IBM Java Runtime.
WebSphere MQ AMS does not support JRE provided by other vendors.
- JMS and Java client applications using AMS in client mode.
Any JMS, or Java, client application (including WebSphere MQ Explorer and Managed File Transfer Agents) cannot use Advanced Message Security in client mode with a WebSphere MQ queue manager earlier than version 7.5.
In order to use message protection policies, these applications either need to interact with a WebSphere MQ version 7.5 queue manager, or connect in local bindings mode to a queue manager on the same machine as the application.
- You should avoid putting two or more certificates with the same Distinguished Names, in a single keystore file, because the WebSphere MQ Advanced Message Security intereceptor's functioning with such certificates is undefined.
User scenarios
Familiarize yourself with possible scenarios to understand what business goals you can achieve with WebSphere MQ Advanced Message Security.
Quick Start Guide for Windows platforms
Use this guide to quickly configure IBM WebSphere MQ Advanced Message Security to provide message security on Windows platforms. By the time you complete it, you will have created a key database to verify user identities, and defined signing/encryption policies for your queue manager. You should have at least the following features installed on your system:
- Server
- Development Toolkit (for the Sample programs)
- Advanced Message Security
Refer to WebSphere MQ features for Windows systems for details.
1. Creating a queue manager and a queue
About this task
All the following examples use a queue named TEST.Q for passing messages between applications. WebSphere MQ Advanced Message Security uses interceptors to sign and encrypt messages at the point they enter the WebSphere MQ infrastructure through the standard WebSphere MQ interface. The basic setup is done in WebSphere MQ and is configured in the following steps.You can use WebSphere MQ Explorer to create the queue manager QM_VERIFY_AMS and its local queue called TEST.Q by using all the default wizard settings, or you can use the commands found in \WebSphere MQ\bin. Remember that you must be a member of the mqm user group to run the following administrative commands.
Procedure
- Create a queue manager
crtmqm QM_VERIFY_AMS
- Start the queue manager
strmqm QM_VERIFY_AMS
- Create a queue called TEST.Q by entering the following command into runmqsc for queue manager QM_VERIFY_AMS
DEFINE QLOCAL(TEST.Q)
Results
If the procedure is completed, command entered into runmqsc will display details about TEST.Q:
DISPLAY Q(TEST.Q)
2. Creating and authorizing users
About this task
There are two users that appear in this example: alice, the sender, and bob, the receiver. To use the application queue, these users need to be granted authority to use it. Also to successfully use the protection policies that we will define these users must be granted access to some system queues. For more information about the setmqaut command refer to setmqaut .
Procedure
- Create the two users and ensure that HOMEPATH and HOMEDRIVE are set for both these users.
- Authorize the users to connect to the queue manager and to work with the queue
 setmqaut -m QM_VERIFY_AMS -t qmgr -p alice -p bob +connect +inq
setmqaut -m QM_VERIFY_AMS -n TEST.Q -t queue -p alice +put
setmqaut -m QM_VERIFY_AMS -n TEST.Q -t queue -p bob +get
- You must also allow the two users to browse the system policy queue and put messages on the error queue.
 setmqaut -m QM_VERIFY_AMS -t queue -n SYSTEM.PROTECTION.POLICY.QUEUE -p alice -p bob +browse
setmqaut -m QM_VERIFY_AMS -t queue -n SYSTEM.PROTECTION.ERROR.QUEUE -p alice -p bob +put
Results
Users are now created and the required authorities granted to them.
What to do next
To verify if the steps were carried out correctly, use the amqsput and amqsget samples as described in section 7. Testing the setup .
3. Creating key database and certificates
About this task
Interceptor requires the public key of the sending users to encrypt the message. Thus, the key database of user identities mapped to public and private keys must be created. In the real system, where users and applications are dispersed over several computers, each user would have its own private keystore. Similarly, in this guide, we create key databases for alice and bob and share the user certificates between them.Note: In this guide, we use sample applications written in C connecting using local bindings. If you plan to use Java™ applications using client bindings, you must create a JKS keystore and certificates using the keytool command, which is part of the JRE (see Quick Start Guide for Java clients for more details). For all other languages, and for Java applications using local bindings, the steps in this guide are correct.
Procedure
- Use the IBM Key Management GUI (strmqikm.exe) to create a new key database
for the user alice.
 Type:       CMS
Filename:   alicekey.kdb
Location:   C:/Documents and Settings/alice/AMS
Note:
- It is advisable to use a strong password to secure the database.
- Make sure that Stash password to a file check box is selected.
- Change the key database content view to Personal
Certificates.
- Select New Self Signed; self signed
certificates are used in this scenario.
- Create a certificate identifying the user alice for use in encryption, using these fields:
 Key label: Alice_Cert
Common Name: alice
Organisation: IBM
Country: GB
Note:
- For the purpose of this guide, we are using self-signed certificate which can be created without using a Certificate Authority. For production systems, it is advisable not to use self-signed certificates but instead rely on certificates signed by a Certificate Authority.
- The Key label parameter specifies the name for the certificate, which interceptors will look up to receive necessary information.
- The Common Name and optional parameters specifies the details of the Distinguished Name (DN), which must be unique for each user.
- Repeat step 1-4 for the user bob
Results
The two users alice and bob each now have a self-signed certificate.
4. Creating keystore.conf
About this task
You must point WebSphere MQ Advanced Message Security interceptors to the directory where the key databases and certificates are located.This is done via the keystore.conf file, which hold that information in the plain text form. Each user must have a separate keystore.conf file. This step must be done for both, alice and bob.The content of keystore.conf should be of the form:
 cms.keystore = <dir>/keystore_file
cms.certificate = certificate_label
Example
For this scenario, the contents of the keystore.conf will be as follows:
 cms.keystore = C:/Documents and Settings/alice/AMS/alicekey
cms.certificate = Alice_Cert
Note:
- The path to the keystore file must be provided with no file extension.
- The certificate label can include spaces, thus "Alice_Cert" and "Alice_Cert " for example, are recognized as labels of two different certificates. However, to avoid confusion, it is better not to use spaces in label's name.
- There are the following keystore formats: CMS (Cryptographic Message Syntax), JKS (Java Keystore) and JCEKS (Java Cryptographic Extension Keystore). For more information, refer to Structure of the configuration file .
- %HOMEDRIVE%\%HOMEPATH%\.mqs\keystore.conf (eg.
C:\Documents and Settings\alice\.mqs\keystore.conf) is the default location where WebSphere MQ Advanced Message Security searches
for the keystore.conf file. For information about
how to use a non-default location for the keystore.conf,
see Using keystores and certificates .
- To create .mqs directory, you must use the command prompt.
5. Sharing Certificates
About this task
Share the certificates between the two key databases so that each user can successfully identify the other. This is done by directly exporting each user's certificate to the other user's key database.
Procedure
- Export the certificate identifying alice to an external file:
runmqakm -cert -extract -db "C:/Documents and Settings/alice/AMS/alicekey.kdb" -pw passw0rd -label Alice_Cert -target alice_public.arm
- Add the certificate to bob's keystore:
runmqakm -cert -add -db "C:/Documents and Settings/bob/AMS/bobkey.kdb" -pw passw0rd -label Alice_Cert -file alice_public.arm
- Repeat steps for bob:
 runmqakm -cert -extract -db "C:/Documents and Settings/alice/AMS/bobkey.kdb" -pw passw0rd -label Bob_Cert -target bob_public.arm

runmqakm -cert -add -db "C:/Documents and Settings/bob/AMS/alicekey.kdb" -pw passw0rd -label Bob_Cert -file bob_public.arm
Results
The two users alice and bob are now able to successfully identify each other having created and shared self-signed certificates.
What to do next
Verify that a certificate is in the keystore either by browsing it using the GUI or running the following commands which print out its details:
 runmqakm -cert -details -db "C:/Documents and Settings/bob/AMS/bobkey.kdb"
-pw passw0rd -label Alice_Cert
 runmqakm -cert -details -db "C:/Documents and Settings/alice/AMS/alicekey.kdb"
-pw passw0rd -label Bob_Cert
6. Defining queue policy
About this task
With the queue manager created and interceptors prepared to intercept messages and access encryption keys, we can start defining protection policies on QM_VERIFY_AMS using the setmqspl command. Refer to setmqspl for more information on this command. Each policy name must be the same as the queue name it is to be applied to.
Example
This is an example of a policy defined for the TEST.Q queue. In the example, messages are signed with the SHA1 algorithm and encrypted with the AES256 algorithm. alice is the only valid sender and bob is the only receiver of the messages on this queue:
setmqspl -m QM_VERIFY_AMS -p TEST.Q -s SHA1 -a "CN=alice,O=IBM,C=GB" -e AES256 -r "CN=bob,O=IBM,C=GB"
Note: The DNs match exactly those specified in the receptive user's certificate from the key database.
What to do next
To verify the policy you have defined, issue the following command:
dspmqspl -m QM_VERIFY_AMSTo print the policy details as a set of setmqspl commands, the -export flag. This allows storing already defined policies:
dspmqspl -m QM_VERIFY_AMS -export >restore_my_policies.bat
7. Testing the setup
About this task
By running different programs under different users you can verify if the application has been properly configured.
Procedure
- Switch user to run as user alice
Right-click cmd.exe and select Run as.... When prompted, log in as the user alice.
- As the user alice put a message using a sample application:
amqsput TEST.Q QM_VERIFY_AMS
- Type the text of the message, then press Enter.
- Switch user to run as user bob
Open another window by right-clicking cmd.exe and selecting Run as.... When prompted, log in as the user bob.
- As the user Bob get a message using a sample application:
amqsget TEST.Q QM_VERIFY_AMS
Results
If the application has been configured properly for both users, the user alice's message is displayed when bob runs the getting application.
8. Testing encryption
About this task
To verify that the encryption is occurring as expected, create an alias queue which references the original queue TEST.Q. This alias queue will have no security policy and so no user will have the information to decrypt the message and therefore the encrypted data will be shown.
Procedure
- Use the runmqsc command against queue manager QM_VERIFY_AMS, create an alias queue.
DEFINE QALIAS(TEST.ALIAS) TARGET(TEST.Q)
- Grant bob access to browse from the alias
queue
setmqaut -m QM_VERIFY_AMS -n TEST.ALIAS -t queue -p bob +browse
- As the user alice, put another message using a sample application just as before:
amqsput TEST.Q QM_VERIFY_AMS
- As the user bob, browse the message using a sample application via the alias queue this time:
amqsbcg TEST.ALIAS QM_VERIFY_AMS
- As the user bob, get the message using a sample application from the local queue:
amqsget TEST.Q QM_VERIFY_AMS
Results
The output from the amqsbcg application shows the encrypted data that is on the queue proving that the message has been encrypted.Quick Start Guide for UNIX platforms
Use this guide to quickly configure IBM WebSphere MQ Advanced Message Security to provide message security on UNIX platforms. By the time you complete it, you will have created a key database to verify user identities, and defined signing/encryption policies for your queue manager.
You should have at least the following components installed on your system:
- Runtime
- Server
- Sample programs
- IBM Global Security Kit
- MQ Advanced Message Security
Refer to the following topics for the component names on each specific platform:
- WebSphere MQ components for Linux systems
- WebSphere MQ components for HP-UX systems
- WebSphere MQ components for AIX systems
- WebSphere MQ components for Solaris systems
1. Creating a queue manager and a queue
About this task
All the following examples use a queue named TEST.Q for passing messages between applications. WebSphere MQ Advanced Message Security uses interceptors to sign and encrypt messages at the point they enter the WebSphere MQ infrastructure through the standard WebSphere MQ interface. The basic setup is done in WebSphere MQ and is configured in the following steps.You can use WebSphere MQ Explorer to create the queue manager QM_VERIFY_AMS and its local queue called TEST.Q by using all the default wizard settings, or you can use the commands found in <MQ_INSTALL_PATH>/bin. Remember that you must be a member of the mqm user group to run the following administrative commands.
Procedure
- Create a queue manager
crtmqm QM_VERIFY_AMS
- Start the queue manager
strmqm QM_VERIFY_AMS
- Create a queue called TEST.Q by entering the following command into runmqsc for queue manager QM_VERIFY_AMS
DEFINE QLOCAL(TEST.Q)
Results
If the procedure completed successfully, the following command entered into runmqsc will display details about TEST.Q:
DISPLAY Q(TEST.Q)
2. Creating and authorizing users
About this task
There are two users that appear in this example: alice, the sender, and bob, the receiver. To use the application queue, these users need to be granted authority to use it. Also to successfully use the protection policies that we will define these users must be granted access to some system queues. For more information about the setmqaut command refer to setmqaut .
Procedure
- Create the two users
 Useradd alice
useradd bob
- Authorize the users to connect to the queue manager and to work with the queue
 setmqaut -m QM_VERIFY_AMS -t qmgr -p alice -p bob +connect +inq
setmqaut -m QM_VERIFY_AMS -n TEST.Q -t queue -p alice +put
setmqaut -m QM_VERIFY_AMS -n TEST.Q -t queue -p bob +get
- You must also allow the two users to browse the system policy queue and put messages on the error queue.
 setmqaut -m QM_VERIFY_AMS -t queue -n SYSTEM.PROTECTION.POLICY.QUEUE -p alice -p bob +browse
setmqaut -m QM_VERIFY_AMS -t queue -n SYSTEM.PROTECTION.ERROR.QUEUE -p alice -p bob +put
Results
User groups are now created and the required authorities granted to them. This way users who are assigned to those groups will also have permission to connect to the queue manager and to put and get from the queue.
What to do next
To verify if the steps were carried out correctly, use the amqsput and amqsget samples as described in section 8. Testing encryption .
3. Creating key database and certificates
About this task
To encrypt the message to interceptor requires the public key of the sending users. Thus, the key database of user identities mapped to public and private keys must be created. In the real system, where users and applications are dispersed over several computers, each user would have its own private keystore. Similarly, in this guide, we create key databases for alice and bob and share the user certificates between them.Note: In this guide, we suse sample applications written in C connecting using local bindings. If you plan to use Java™ applications using client bindings, you must create a JKS keystore and certificates using the keytool command, which is part of the JRE (see Quick Start Guide for Java clients for more details). For all other languages, and for Java applications using local bindings, the steps in this guide are correct.
Procedure
- Create a new key database for the user alice
 mkdir /home/alice/.mqs -p
runmqakm -keydb -create -db /home/alice/.mqs/alicekey.kdb -pw passw0rd -stash
Note:
- It is advisable to use a strong password to secure the database.
- The stash parameter stores the password into the key.sth file, which interceptors can use to open the database.
- Ensure the key database is readable
chmod +r /home/alice/.mqs/alicekey.kdb
- Create a certificate identifying the user alice for use in encryption
 runmqakm -cert -create -db /home/alice/.mqs/alicekey.kdb -pw passw0rd
-label Alice_Cert -dn "cn=alice,o=IBM,c=GB" -default_cert yes
Note:
- For the purpose of this guide, we are using self-signed certificate which can be created without using a Certificate Authority. For production systems, it is advisable not to use self-signed certificates but instead rely on certificates signed by a Certificate Authority.
- The label parameter specifies the name for the certificate, which interceptors will look up to receive necessary information.
- The DN parameter specifies the details of the Distinguished Name (DN), which must be unique for each user.
- Now we have created the key database, we should set the ownership of it, and ensure it is unreadable by all other users.
 chown alice /home/alice/.mqs/alicekey.kdb /home/alice/.mqs/alicekey.sth
chmod 400 /home/alice/.mqs/alicekey.kdb /home/alice/.mqs/alicekey.sth
- Repeat step 1-4 for the user bob
Results
The two users alice and bob each now have a self-signed certificate.
4. Creating keystore.conf
About this task
You must point WebSphere MQ Advanced Message Security interceptors to the directory where the key databases and certificates are located. This is done via the keystore.conf file, which hold that information in the plain text form. Each user must have a separate keystore.conf file. This step should be done for both alice and bob.The content of keystore.conf must be of the form:
 cms.keystore = <dir>/keystore_file
cms.certificate = certificate_label
Example
For this scenario, the contents of the keystore.conf will be as follows:
 cms.keystore = /home/alice/.mqs/alicekey
cms.certificate = Alice_Cert
Note:
- The path to the keystore file must be provided with no file extension.
- There are the following keystore formats: CMS (Cryptographic Message Syntax), JKS (Java Keystore) and JCEKS (Java Cryptographic Extension Keystore). For more information, refer to Structure of the configuration file .
- HOME/.mqs/keystore.conf is the default location where WebSphere MQ Advanced Message Security searches for the keystore.conf file. For information about how to use a non-default location for the keystore.conf, see Using keystores and certificates .
5. Sharing Certificates
About this task
Share the certificates between the two key databases so that each user can successfully identify the other. This is done by directly exporting each user's certificate to the other user's key database.
Procedure
- Export the certificate identifying alice to an external file:
runmqakm -cert -extract -db /home/alice/.mqs/alicekey.kdb -pw passw0rd -label Alice_Cert -target alice_public.arm
- Add the certificate to bob's keystore:
runmqakm -cert -add -db /home/bob/.mqs/bobkey.kdb -pw passw0rd -label Alice_Cert -file alice_public.arm
- Repeat the step for bob:
runmqakm -cert -extract -db /home/bob/.mqs/bobkey.kdb -pw passw0rd -label Bob_Cert -target bob_public.arm
Results
The two users alice and bob are now able to successfully identify each other having created and shared self-signed certificates.
What to do next
Verify that a certificate is in the keystore by running the following commands which print out its details:
 runmqakm -cert -details -db /home/bob/.mqs/bobkey.kdb -pw passw0rd -label Alice_Cert
runmqakm -cert -details -db /home/alice/.mqs/alicekey.kdb -pw passw0rd -label Bob_Cert
6. Defining queue policy
About this task
With the queue manager created and interceptors prepared to intercept messages and access encryption keys, we can start defining protection policies on QM_VERIFY_AMS using the setmqspl command. Refer to setmqspl for more information on this command. Each policy name must be the same as the queue name it is to be applied to.
Example
This is an example of a policy defined for the TEST.Q queue. In this example, messages are signed by the user alice using the SHA1 algorithm, and encrypted using the 256-bit AES algorithm.alice is the only valid sender and bob is the only receiver of the messages on this queue:
setmqspl -m QM_VERIFY_AMS -p TEST.Q -s SHA1 -a "CN=alice,O=IBM,C=GB" -e AES256 -r "CN=bob,O=IBM,C=GB"
Note: The DNs match exactly those specified in the receptive user's certificate from the key database.
What to do next
To verify the policy you have defined, issue the following command:
dspmqspl -m QM_VERIFY_AMSTo print the policy details as a set of setmqspl commands, the -export flag. This allows storing already defined policies:
dspmqspl -m QM_VERIFY_AMS -export >restore_my_policies.bat
7. Testing the setup
About this task
By running different programs under different users you can verify if the application has been properly configured.
Procedure
- Change to the directory containing the samples. If MQ is installed in a non-default location, this may be in a different place.
cd /opt/mqm/samp/bin
- Switch user to run as user alice
su alice
- As the user alice, put a message using a sample application:
./amqsput TEST.Q QM_VERIFY_AMS
- Type the text of the message, then press Enter.
- Stop running as user alice
exit
- Switch user to run as user bob
su bob
- As the user bob, get a message using a sample application:
./amqsget TEST.Q QM_VERIFY_AMS
Results
If the application has been configured properly for both users, the user alice's message is displayed when bob runs the getting application.
8. Testing encryption
About this task
To verify that the encryption is occurring as expected, create an alias queue which references the original queue TEST.Q. This alias queue will have no security policy and so no user will have the information to decrypt the message and therefore the encrypted data will be shown.
Procedure
- Use the runmqsc command against queue manager QM_VERIFY_AMS, create an alias queue.
DEFINE QALIAS(TEST.ALIAS) TARGET(TEST.Q)
- Grant bob access to browse from the alias
queue
setmqaut -m QM_VERIFY_AMS -n TEST.ALIAS -t queue -p bob +browse
- As the user alice, put another message using a sample application just as before:
./amqsput TEST.Q QM_VERIFY_AMS
- As the user bob, browse the message using a sample application via the alias queue this time:
./amqsbcg TEST.ALIAS QM_VERIFY_AMS
- As the user bob, get the message using a sample application from the local queue:
./amqsget TEST.Q QM_VERIFY_AMS
Results
The output from the amqsbcg application will show the encrypted data that is on the queue proving that the message has been encrypted.Quick Start Guide for Java clients
Use this guide to quickly configure IBM WebSphere MQ Advanced Message Security to provide message security for Java™ applications connecting using client bindings. By the time you complete it, you will have created a key store to verify user identities, and defined signing/encryption policies for your queue manager. Ensure you have the appropriate components installed as described in the Quick Start Guide ( Windows or UNIX ).
1. Creating a queue manager and a queue
About this task
All the following examples use a queue named TEST.Q for passing messages between applications. WebSphere MQ Advanced Message Security uses interceptors to sign and encrypt messages at the point they enter the WebSphere MQ infrastructure through the standard WebSphere MQ interface. The basic setup is done in WebSphere MQ and is configured in the following steps.
Procedure
- Create a queue manager
crtmqm QM_VERIFY_AMS
- Start the queue manager
strmqm QM_VERIFY_AMS
- Create and start a listener by entering the following commands into runmqsc for queue manager QM_VERIFY_AMS
 DEFINE LISTENER(AMS.LSTR) TRPTYPE(TCP) PORT(1414) CONTROL(QMGR)
START LISTENER(AMS.LSTR)
- Create a channel for our applications to connect in through
by entering the following command into runmqsc for queue manager QM_VERIFY_AMS
DEFINE CHANNEL(AMS.SVRCONN) CHLTYPE(SVRCONN)
- Create a queue called TEST.Q by entering the following command into runmqsc for queue manager QM_VERIFY_AMS
DEFINE QLOCAL(TEST.Q)
Results
If the procedure completed successfully, the following command entered into runmqsc will display details about TEST.Q:
DISPLAY Q(TEST.Q)
2. Creating and authorizing users
About this task
There are two users that appear in our scenario: alice, the sender, and bob, the receiver. To use the application queue, these users need to be granted authority to use it. Also to successfully use the protection policies that we will define these users must be granted access to some system queues. For more information about the setmqaut command refer to setmqaut .
Procedure
- Create the two users as described in the Quick Start
Guide ( Windows or UNIX ) for your platform.
- Authorize the users to connect to the queue manager and to work with the queue
 setmqaut -m QM_VERIFY_AMS -t qmgr -p alice -p bob +connect +inq
setmqaut -m QM_VERIFY_AMS -n TEST.Q -t queue -p alice +put
setmqaut -m QM_VERIFY_AMS -n TEST.Q -t queue -p bob +get +inq
- You must also allow the two users to browse the system policy queue and put messages on the error queue.
 setmqaut -m QM_VERIFY_AMS -t queue -n SYSTEM.PROTECTION.POLICY.QUEUE -p alice -p bob +browse
setmqaut -m QM_VERIFY_AMS -t queue -n SYSTEM.PROTECTION.ERROR.QUEUE -p alice -p bob +put
Results
Users are now created and the required authorities granted to them.
What to do next
To verify if the steps were carried out correctly, use the JmsProducer and JmsConsumer samples as described in section 7. Testing the setup .
3. Creating key database and certificates
About this task
To encrypt the message to interceptor requires the public key of the sending users. Thus, the key database of user identities mapped to public and private keys must be created. In the real system, where users and applications are dispersed over several computer, each user would have its own private keystore. Similarly, in this guide, we create key databases for alice and bob and share the user certificates between them.Note: In this guide, we use sample applications written in Java connecting using client bindings. If you plan to use Java applications using local bindings or C applications, you must create a CMS keystore and certificates using the runmqakm command. This is shown in the Quick Start Guide ( Windows or UNIX ).
Procedure
- Create a directory to create your keystore in. You may
wish to create it in the same directory as used by the Quick Start
Guide ( Windows or UNIX ) for your platform.
Note: This directory will be refered to as keystore-dir in the following steps
- Create a new keystore and certificate identifying the user alice for use in encryption
Note: The keytool command is part of the JRE.
 keytool -genkey -alias Alice_Java_Cert -keyalg RSA -keystore keystore-dir\keystore.jks -storepass passw0rd
-dname "CN=alice, O=IBM, C=GB" -keypass passw0rd
Note:
- If your keystore-dir contains spaces, you must put quotes round the full name of your keystore
- It is advisable to use a strong password to secure the keystore.
- For the purpose of this guide, we are using self-signed certificate which can be created without using a Certificate Authority. For production systems, it is advisable not to use self-signed certifcates but instead rely on certificates signed by a Certificate Authority.
- The alias parameter specifies the name for the certificate, which interceptors will look up to receive necessary information.
- The dname parameter specifies the details of the Distinguished Name (DN), which must be unique for each user.
- On UNIX, ensure the keystore is readable
chmod +r keystore-dir/keystore.jks
- Repeat step1-4 for the user bob
Results
The two users alice and bob each now have a self-signed certificate.
4. Creating keystore.conf
About this task
You must point WebSphere MQ Advanced Message Security interceptors to the directory where the key databases and certificates are located. This is done via the keystore.conf file, which hold that information in the plain text form. Each user must have a separate keystore.conf file. This step should be done for both alice and bob.
Example
For this scenario, the contents of the keystore.conf will be as follows:
 JKS.keystore = keystore-dir/keystore
JKS.certificate = Alice_Java_Cert
JKS.encrypted = no
JKS.keystore_pass = passw0rd
JKS.key_pass = passw0rd
JKS.provider = IBMJCE
Note:
- The path to the keystore file must be provided with no file extension.
- If you already have a keystore.conf because you have followed Quick Start Guide ( Windows or UNIX ), you can edit the existing one to add in the above lines.
5. Sharing Certificates
About this task
Share the certificates between the two keystores so that each user can successfully identify the other. This is done by exporting each user's certificate and importing it into the other user's keystore.
Procedure
- Export the certificate identifying alice.
 keytool -export -keystore alice-keystore-dir/keystore.jks -storepass passw0rd
-alias Alice_Java_Cert -file alice-keystore-dir/Alice_Java_Cert.cer
- Import the certificate identifying alice into
the keystore that bob will use. When prompted indicate
that you will trust this certificate.
 keytool -import -file alice-keystore-dir/Alice_Java_Cert.cer -alias Alice_Java_Cert
-keystore bob-keystore-dir/keystore.jks -storepass passw0rd
- Repeat the steps for bob
Results
The two users alice and bob are now able to successfully identify each other having created and shared self-signed certificates.
What to do next
Verify that a certificate is in the keystore by running the following commands which print out its details:
 keytool -list -keystore bob-keystore-dir/keystore.jks -storepass passw0rd -alias Alice_Java_Cert
keytool -list -keystore alice-keystore-dir/keystore.jks -storepass passw0rd -alias Bob_Java_Cert
6. Defining queue policy
About this task
With the queue manager created and interceptors prepared to intercept messages and access encryption keys, we can start defining protection policies on QM_VERIFY_AMS using the setmqspl command. Refer to setmqspl for more information on this command. Each policy name must be the same as the queue name it is to be applied to.
Example
This is an example of a policy defined on the TEST.Q queue, signed by the user alice using the SHA1 algorithm, and encrypted using the 256-bit AES algorithm for the user bob:
setmqspl -m QM_VERIFY_AMS -p TEST.Q -s SHA1 -a "CN=alice,O=IBM,C=GB" -e AES256 -r "CN=bob,O=IBM,C=GB"
Note: The DNs match exactly those specified in the receptive user's certificate from the key database.
What to do next
To verify the policy you have defined, issue the following command:
dspmqspl -m QM_VERIFY_AMSTo print the policy details as a set of setmqspl commands, the -export flag. This allows storing already defined policies:
dspmqspl -m QM_VERIFY_AMS -export >restore_my_policies.bat
7. Testing the setup
Before you begin
Ensure the version of java you are using has the unrestricted JCE policy files installed. The version of java supplied in the WebSphere MQ installation already has these policy files. It can be found in MQ_INSTALLATION_PATH/java/bin.
About this task
By running different programs under different users you can verify if the application has been properly configured. Refer to the Quick Start Guide ( Windows or UNIX ) for your platform, for details about running programs under different users.
Procedure
- To run these JMS sample applications, use the CLASSPATH
setting for your platform as shown in Environment variables used by WebSphere MQ classes for JMS to ensure the samples directory is included.
- As the user alice, put a message using a sample application, connecting as a client:
java JMSProducer -m QM_VERIFY_AMS -d TEST.Q -h localhost -p 1414 -l AMS.SVRCONN
- As the user bob, get a message using a sample application, connecting as a client:
java JMSConsumer -m QM_VERIFY_AMS -d TEST.Q -h localhost -p 1414 -l AMS.SVRCONN
Results
If the application has been configured properly for both users, the user alice's message is displayed when bob runs the getting application.Protecting remote queues
To fully protect remote queue connections, the same policy must be set on the remote queue and local queue to which messages are transmitted.
When a message is put into a remote queue, WebSphere MQ Advanced Message Security intercepts the operation and processes the message according to a policy set for the remote queue. For example, for an encryption policy, the message is encrypted before it is passed to the WebSphere MQ to handle it. After WebSphere MQ Advanced Message Security has processed the message put into a remote queue, WebSphere MQ puts it into associated transmission queue and forwards it to the target queue manager and target queue.
When a GET operation is performed on the local queue, WebSphere MQ Advanced Message Security tries to decode the message according to the policy set on the local queue. For the operation to succeed, the policy used to decrypt the message must be identical to the one used to encrypt it. Any discrepancy will cause the message to be rejected.
If for any reason both policies cannot be set at the same time, a staged roll-out support is provided. The policy can be set on a local queue with toleration flag on, which indicates that a policy associated with a queue can be ignored when an attempt to retrieve a message from the queue involves a message that does not have the security policy set. In this case, GET will try to decrypt the message, but will allow non-encrypted messages to be delivered. This way policies on remote queues can be set after the local queues has been protected (and tested).
Remember: Remove the toleration flag once the WebSphere MQ Advanced Message Security roll-out has been completed.
Routing protected messages using WebSphere Message Broker
IBM WebSphere MQ Advanced Message Security can protect messages in an infrastructure where WebSphere Message Broker version 8.0.0.1 (or later) is installed. You should understand the nature of both products before applying security in the WebSphere Message Broker environment. WebSphere MQ Advanced Message Security provides end-to-end security of the message payload. This means that only the parties specified as the valid senders and recipients of a message are capable of producing or receiving it. This implies that in order to secure messages flowing through WebSphere Message Broker, you can either allow WebSphere Message Broker to process messages without knowing their content ( Scenario 1 ) or make it an authorized user able to receive and send messages ( Scenario 2 ).
Scenario 1 - Message Broker cannot see message content
Before you begin
You should have your WebSphere Message Broker connected to an existing queue manager.. Replace QMgrName with this existing queue manager name in the commands that follow.
About this task
In this scenario, Alice puts a protected message into an input queue QIN. Based on the message property routeTo, the message is routed either to bob's (QBOB), 1 (QCECIL), or the default (QDEF) queue. The routing is possible because WebSphere MQ Advanced Message Security protects only the message payload and not its headers and properties which remain unprotected and can be read by WebSphere Message Broker. WebSphere MQ Advanced Message Security is used only by alice, bob and cecil. It is not necessary to install or configure it for the WebSphere Message Broker.WebSphere Message Broker receives the protected message from the unprotected alias queue in order to avoid any attempt to decrypt the message. If it were to use the protected queue directly, the message would be put onto the DEAD LETTER queue as impossible to decrypt. The message is routed by WebSphere Message Broker and arrives on the target queue unchanged. Therefore it is still signed by the original author (both bob and cecil only accept messages sent by alice) and protected as before (only bob and cecil can read it). WebSphere Message Broker puts the routed message to an unprotected alias. The recipients retrieve the message from a protected output queue where WebSphere MQ AMS will transparently decrypt the message.
Procedure
- Configure alice, bob and cecil to use WebSphere MQ Advanced Message Security as described in the Quick Start Guide ( Windows or UNIX ). Ensure the following steps are completed:
- Create and authorizing users
- Create Key Database and Certificates
- Create keystore.conf
- Provide alice's certificate to bob and cecil,
so alice can be identified by them when checking digital signatures
on messages.
 runmqakm -cert -export -db <location-of-alicekey.kdb> -pw passw0rd
-label Alice_Cert -target <location-of-bobkey.kdb> -target_pw passw0rd
- Provide bob and cecil's certificates to alice,
so alice can send messages encrypted for bob and cecil.
 runmqakm -cert -export -db <location-of-bobkey.kdb> -pw passw0rd
-label Bob_Cert -target <location-of-alicekey.kdb> -target_pw passw0rd
- On your queue manager, define local queues called QIN, QBOB, QCECIL and QDEF.
DEFINE QLOCAL(QIN)
- Setup the security policy for the QIN queue to an eligible configuration. Use the identical setup for the QBOB, QCECIL and QDEF queues.
 setmqspl -m QMgrName -p QIN -s SHA1 -a "CN=alice,O=IBM,C=GB"
-e AES256 -r "CN=bob,O=IBM,C=GB" -r "CN=cecil,O=IBM,C=GB"
This scenario assumes the security policy where alice is the only authorized sender and bob and cecil are the recipients. - Define alias queues AIN, ABOB and ACECIL referencing
local queues QIN, QBOB and QCECIL respectively.
DEFINE QALIAS(AIN) TARGET(QIN)
- Verify that the security configuration for the aliases
specified in the previous step is not present; otherwise set its policy
to NONE.
dspmqspl -m QMgrName -p AIN
- In WebSphere Message Broker create a message flow to route the messages arriving on the AIN alias
queue to the BOB, CECIL, or DEF node depending on the routeTo property
of the message. To do so:
- Create an MQInput node called IN and assign the AIN alias as its queue name.
- Create MQOutput nodes called BOB, CECIL and DEF and assign alias queues ABOB, ACECIL and ADEF as their respective queue names.
- Create a route node and call it TEST.
- Connect the IN node to the input terminal
of the TEST node.
- Create bob, and cecil output
terminals for the TEST node.
- Connect the bob output terminal to the BOB node.
- Connect the cecil output terminal to the CECIL node.
- Connect the DEF node to the default output terminal.
- Apply the following rules:
 $Root/MQRFH2/usr/routeTo/text()="bob"
$Root/MQRFH2/usr/routeTo/text()="cecil"
- Create an MQInput node called IN and assign the AIN alias as its queue name.
- Deploy the message flow to the WebSphere Message Broker runtime component.
- Running as the user Alice put a message that also contains a message property called routeTo with a value of either bob or cecil.
Running the sample application amqsstm will allow
you to do this.
 Sample AMQSSTMA start target queue is TEST.Q
Enter property name routeTo
Enter property value
bob
Enter property name
Enter message text
My Message to Bob
Sample AMQSSTMA end
- Running as user bob retrieve the message from the queue QBOB using the sample application amqsget.
Results
When alice puts a message on the QIN queue, the message is protected. It is retrieved in protected form by the WebSphere Message Broker from the AIN alias queue. WebSphere Message Broker decides where to route the message reading the routeTo property which is, as all properties, not encrypted. WebSphere Message Broker places the message on the appropriate unprotected alias avoiding its further protection. When received by bob or cecil from the queue, the message is decrypted and the digital signature is verified.
Scenario 2 - Message Broker can see message content
About this task
In this scenario, a group of individuals are allowed to send messages to WebSphere Message Broker. Another group are authorized to receive messages which are created by WebSphere Message Broker. The transmission between the parties and WebSphere Message Broker cannot be eavesdropped.Remember that WebSphere Message Broker reads protection policies and certificates only when a queue is opened, so you must reload the execution group after making any updates to protection policies for the changes to take effect.
mqsireload execution-group-name
If WebSphere Message is considered an authorized party allowed to read or sign the message payload, you must configure WebSphere MQ Advanced Message Security for the user starting the WebSphere Message Broker service. Be aware it is not necessarily the same user who puts/gets the messages onto queues nor the user creating and deploying the WebSphere Message Broker applications.
Procedure
- Configure alice, bob, cecil and dave and the WebSphere Message Broker service user, to use WebSphere MQ Advanced Message Security as described in the Quick Start Guide ( Windows or UNIX ). Ensure the following steps are completed:
- Create and authorizing users
- Create Key Database and Certificates
- Create keystore.conf
- Provide alice, bob, cecil and dave's certificate
to the WebSphere Message Broker service user.
 runmqakm -cert -export -db <location-of-alicekey.kdb> -pw passw0rd
-label Alice_Cert -target <location-of-Message-Broker-key-database> -target_pw passw0rd
- Provide the WebSphere Message Broker service user's certificate to alice, bob, cecil and dave.
 runmqakm -cert -export -db <location-of-Message-Broker-key-database> -pw passw0rd
-label Broker_Cert -target <location-of-alicekey.kdb> -target_pw passw0rd
Note: Alice and bob need the WebSphere Message Broker service user's certificate to encrypt the messages correctly. The WebSphere Message Broker service user needs alice's and bob's certificates to verify authors of the messages. The WebSphere Message Broker service user needs cecil's and dave's certificates to encrypt the messages for them. cecil and dave need the WebSphere Message Broker service user's certificate to verify if the message comes from WebSphere Message Broker.
- Define a local queue named IN and define
the security policy with alice and bob specified as authors and WebSphere Message Broker's service user specified as recipient:
 setmqspl -m QMgrName -p IN -s MD5 -a "CN=alice,O=IBM,C=GB" -a "CN=bob,O=IBM,C=GB"
-e AES256 -r "CN=broker,O=IBM,C=GB"
- Define a local queue named OUT and define
the security policy with WebSphere Message Broker's service user specified as author and cecil and dave specified as recipients:
 setmqspl -m QMgrName -p OUT -s MD5 -a "CN=broker,O=IBM,C=GB" -e AES256
-r "CN=cecil,O=IBM,C=GB" -r "CN=dave,O=IBM,C=GB"
- In WebSphere Message Broker create a message flow with an MQInput and MQOutput node.
Configure the MQInput node to use the IN queue and the MQOutput node to use the OUT queue.
- Deploy the message flow to the WebSphere Message Broker runtime component.
- Running as user alice or bob put a message on the queue IN using the sample application amqsput.
- Running as user cecil or dave retrieve the message from the queue OUT using the sample application amqsget.
Results
Messages sent by alice or bob to the input queue IN are encrypted allowing only WebSphere Message Broker to read it. WebSphere Message Broker will only accept messages from alice and bob and will reject any others. The accepted messages will be appropriately processed then signed and encrypted with cecil's and dave's keys before being put onto the output queue OUT. Only cecil and dave are capable of reading it, messages not signed by WebSphere Message Broker are rejected.Use WebSphere MQ AMS with WebSphere MQ Managed File Transfer
This scenario explains how to configure WebSphere MQ Advanced Message Security to provide message privacy for data being sent through a WebSphere MQ Managed File Transfer. Ensure that you have WebSphere MQ Advanced Message Security component installed on the WebSphere MQ installation hosting the queues used by WebSphere MQ Managed File Transfer that you wish to protect.
If your WebSphere MQ Managed File Transfer agents are connecting in bindings mode, ensure you also have the GSKit component installed on their local installation. When transfer of data between two WebSphere MQ Managed File Transfer agents is interrupted, possibly confidential data might remain unprotected on the underlying WebSphere MQ queues used to manage the transfer. This scenario explains how to configure and use WebSphere MQ Advanced Message Security to protect such data on the WebSphere MQ Managed File Transfer queues.
In this scenario we consider a simple topology comprising one machine with two WebSphere MQ Managed File Transfer queues. agents, AGENT1 and AGENT2 sharing a single queue manager, hubQM, as is described in the scenario Basic file transfer using the scripts . Both agents are connecting in the same way, either in bindings mode or client mode.
1. Creating certificates
Before you begin
This scenario uses a simple model where a user ftagent in a group FTAGENTS is used to run the WebSphere MQ Managed File Transfer agent processes, and a user ftuser in a group FTUSERS is used to initiate file transfers. Should you be using different users, convert the commands to refer to the correct file locations for your users.
About this task
WebSphere MQ Advanced Message Security uses public key cryptography to sign and/or encrypt messages on protected queues.Note:
- If your WebSphere MQ Managed File Transfer agents are running in bindings mode, the commands that you use to create a CMS (Cryptographic Message Syntax) keystore are detailed in the Quick Start Guide ( Windows or UNIX ) for your platform.
- If your WebSphere MQ Managed File Transfer agents are running in client mode, the commands you will need to create a JKS (Java Keystore) are detailed in the Quick Start Guide for Java clients .
Procedure
- Create a self-signed certificate to identify the user ftagent as detailed in the appropriate Quick Start Guide. Use a Distinguished Name (DN) as follows:
CN=ftagent, OU=MFT, O=IBM, L=Hursley, ST=Hampshire, C=GB
- Create a keystore.conf file to identify the location of the keystore and the certificate within it as detailed in the appropriate Quick Start Guide.
2. Configuring message protection
About this task
You should define a security policy for the data queue used by AGENT2, using the setmqspl command. In this scenario the same user is used to start both agents, and therefore the signer and receiver DN are the same and match the certificate we generated.
Procedure
- Shut down the WebSphere MQ Managed File Transfer agents in preparation for protection using the fteStopAgent command.
- Create a security policy to protect the SYSTEM.FTE.DATA.AGENT2 queue.
 setmqspl -m hubQM -p SYSTEM.FTE.DATA.AGENT2 -s SHA1 -a "CN=ftagent, OU=MFT, O=IBM, L=Hursley, ST=Hampshire, C=GB"
-e AES128 -r "CN=ftagent, OU=MFT, O=IBM, L=Hursley, ST=Hampshire, C=GB"
- Ensure the user running the WebSphere MQ Managed File Transfer agent process has access to browse the system policy queue and put messages on the error
queue.
 setmqaut -m hubQM -t queue -n SYSTEM.PROTECTION.POLICY.QUEUE -p ftagent +browse
setmqaut -m hubQM -t queue -n SYSTEM.PROTECTION.ERROR.QUEUE -p ftagent +put
- Restart your WebSphere MQ Managed File Transfer agents using the fteStartAgent command.
- Confirm that your agents restarted successfully by using the fteListAgents command and verifying that the agents are in READY status.
Results
You are now able to submit transfers from AGENT1 to AGENT2, and the file contents will be transmitted securely between the two agents.Install WebSphere MQ Advanced Message Security
Install IBM WebSphere MQ Advanced Message Security component on various platforms. For complete installation procedures, see Installing WebSphere MQ Advanced Message Security .
Use keystores and certificates
To provide transparent cryptographic protection to WebSphere MQ applications, WebSphere MQ Advanced Message Security uses the keystore file, where public key certificates and a private key are stored.
In WebSphere MQ Advanced Message Security, users and applications are represented by public key infrastructure (PKI) identities. This type of identity is used to sign and encrypt messages. The PKI identity is represented by the subject's distinguished name (DN) field in a certificate that is associated with signed and encrypted messages. For a user or application to encrypt their messages they require access to the keystore file where certificates and associated private and public keys are stored.
Location of the keystore is provided in the keystore configuration file, which is keystore.conf by default. Each WebSphere MQ Advanced Message Security user must have the keystore configuration file that points to a keystore file. WebSphere MQ Advanced Message Security accepts the following format of keystore files: .kdb, .jceks, .jks.
The default location of the keystore.conf file is:
- On UNIX platforms: $HOME/.mqs/
- On Windows platforms: %HOMEDRIVE%\%HOMEPATH%\.mqs\keystore.conf
If you are using a specified keystore filename and location, you should use the following commands
- For Java™: java -DMQS_KEYSTORE_CONF=<path>/<filename> <app_name>
- For C Client and Server:
- On UNIX platforms: export MQS_KEYSTORE_CONF=<path>/<filename>
- On Windows platforms: set MQS_KEYSTORE_CONF=<path>\<filename>
Structure of the configuration file
The configuration file points WebSphere MQ Advanced Message Security to the location of the appropriate keystore.
There are two types of configuration CMS and Java™ (JKS and JCEKS). CMS configuration entries are prefixed with cms. and Java are prefixed with jks. or jceks. depending on the type of a keystore.
The configuration file, depending on the type of the configuration file, can have one of the following structures:
 cms.keystore = /<dir>/<keystore_file>
cms.certificate = certificate_label

jceks.keystore = <dir>/Keystore
jceks.certificate = <certificate_label>
jceks.encrypted = no
jceks.keystore_pass = <password>
jceks.key_pass = <password>
jceks.provider = IBMJCE

jks.keystore = <dir>/Keystore
jks.certificate = <certificate_label>
jks.encrypted = no
jks.keystore_pass = <password>
jks.key_pass = <password>
jks.provider = IBMJCE
Configuration file parameters are defined as follows:
- keystore
- Path to the keystore file.
- The path to the keystore file must not include the file extension.
- For Java keystore files, WebSphere MQ AMS supports the following file formats: .jks, .jceks, .jck.
- certificate
- Certificate label.
- encrypted
- Status of the password.
- keystore_pass
- Password for the keystore file.
Note:
- For the CMS keystore, WebSphere MQ AMS relies on the stash files (.sth), whereas JKS and JCEKS might require a password for both the certificate and the user's private key.
- Storing passwords in plain text is a security risk.
- key_pass
- Password for the user's private key.
Storing passwords in plain text form can pose a security risk.
- provider
- The Java security provider
that implements cryptographic algorithms required by the keystore
certificate.
Note: Currently IBMJCE is the only provider that is supported by WebSphere MQ Advanced Message Security.
Information stored in the keystore is crucial for the secure flow of data sent using WebSphere MQ, which is why security administrators must pay particular attention when assigning file permissions to these files.
For more information about managing the keystore using GSKit commands, see GSKCapiCmd program users guide .
Here is an example of the keystore.conf file:
 cms.keystore = c:\Documents and Settings\Alice\AliceKeystore
cms.certificate = AliceCert

jceks.keystore = c:/Documents and Settings/Alice/AliceKeystore
jceks.certificate = AliceCert
jceks.encrypted = no
jceks.keystore_pass = <password>
jceks.key_pass = <password>
jceks.provider = IBMJCE
Related tasks :
Protecting passwords in Java
Message Channel Agent (MCA) interception
MCA interception feature enables a queue manager running under IBM WebSphere MQ with a licensed install of WebSphere MQ Advanced Message Security to selectively enable policies to be applied for server connection channels. MCA interception allows clients that remain outside WebSphere MQ AMS to still be connected to a queue manager and their messages to be encrypted and decrypted.
To enable MCA interception, you must provide the name of a channel that you want to use in the keystore configuration file. See the following example:
 cms.keystore=/home/mqm/keystore/mykeystore
cms.certificate.channel.ALICE.SVRCONN=ALICE_CERT
cms.certificate.channel.BOB.SVRCONN=BOB_CERT
In this example, when putting and getting messages on behalf of a client connected using the ALICE.SVRCONN channel WebSphere MQ AMS uses the certificate with the label ALICE_CERT in the keystore in /home/mqm/keystore/. If a client connects using the BOB.SVRCONN channel, WebSphere MQ AMS uses the certificate with the label BOB_CERT.
Client authentication and encryption should be completed on the selected channels, for example by using SSL and SSLPEER or CHLAUTH TYPE(SSLPEERMAP), to ensure that only authorized clients can connect and use this capability.
Key usage extensions
Key usage extensions place additional restrictions on the way a certificate can be used.
In WebSphere MQ Advanced Message Security, the key usage must be set as following: for certificates in X.509 V3 or later standard that are used for the quality of protection integrity, if the key usage extensions are set, they must include at least one of the two:
- nonRepudiation
- digitalSignature
For the quality of protection privacy, if the key usage extensions are set, they must also include the keyEncipherment extension.
Certificate validation methods in WebSphere MQ AMS
You can use WebSphere MQ Advanced Message Security to detect and reject revoked certificates so that messages on your queues are not protected using certificates that do not fulfill security standards.
WebSphere MQ AMS allows you to verify a certificate validity by using either Online Certificate Status Protocol (OCSP) or certificate revocation list (CRL).
WebSphere MQ AMS can be configured for either OCSP or CRL checking or both. If both methods are enabled, then, for performance reasons, WebSphere MQ AMS uses OCSP for revocation status first. If the revocation status of a certificate is undetermined after the OCSP checking, WebSphere MQ AMS uses the CRL checking.
Online Certificate Status Protocol (OCSP)
Online Certificate Status Protocol (OCSP) determines whether a certificate has been revoked, and therefore, helps to determine whether the certificate can be trusted.
Enabling OCSP checking in native interceptors
To enable Online Certificate Status Protocol (OCSP) checking in WebSphere MQ Advanced Message Security, you must modify the keystore configuration file.
Procedure
Add the following options to the keystore configuration file:
Note: Values for individual options provided in the table are default.
You must specify one of the following values:
- ocsp.enable=on
- ocsp.url=<reposnder_URL>
- ocsp.http.proxy.host=<OCSP_proxy>
| Option | Description |
|---|---|
| ocsp.enable=off | Enable the OCSP checking if the certificate
being checked has a Authority Info Access Extension with an PKIX_AD_OCSP
access method containing a URI of where the OCSP Responder is located.
Possible values: on/off. |
| ocsp.url=<reposnder_URL> | The URL address of OCSP responder. |
| ocsp.http.proxy.host=<OCSP_proxy> | The URL address of the OCSP proxy server. |
| ocsp.http.proxy.port=<port_number> | The OCSP proxy server's port number. |
| ocsp.nonce.generation=on/off | Generate nonce when querying OCSP.
The default value is off. |
| ocsp.nonce.check=on/off | Check nonce after receiving a response from OCSP.
The default value is off. |
| ocsp.nonce.size=8 | Nonce size in bytes. |
| ocsp.http.get=on/off | Specify HTTP GET as your request method. If this option is set to off, HTTP POST is used. |
| ocsp.max_response_size=20480 | Maximum size of response from the OCSP responder provided in bytes. |
| ocsp.cache_size=100 | Enable internal OCSP response caching and set the limit for the number of cache entries. |
| ocsp.timeout=30 | Waiting time for a server response, in seconds, after which WebSphere MQ Advanced Message Security times-out. |
Enabling OCSP checking in Java
To enable OCSP checkin for Java™ in WebSphere MQ Advanced Message Security, modify the java.security file or the keystore configuration file. There are two ways of enabling OCSP checking in WebSphere MQ Advanced Message Security:
Use java.security
Check whether your certificate has Authority Information Access (AIA) set up.
Procedure
- If AIA is not set up or you want to override your certificate,
edit the $JAVA_HOME/lib/security/java.security file with the following properties:
 ocsp.responderURL=http://url.to.responder:port
ocsp.responderCertSubjectName=CN=Example CA,O=IBM,C=US
and enable OCSP checking by editing the $JAVA_HOME/lib/security/java.security file with the following line:ocsp.enable=true
- If AIA is set up, enable OCSP checking by editing the $JAVA_HOME/lib/security/java.security file with the following line:
ocsp.enable=true
What to do next
If you are using Java Security Manager, too complete the configuration, add the following Java permission to lib/security/java.policy
permission java.security.SecurityPermission "getProperty.ocsp.enable";
Use keystore.conf
Procedure
Add the following attribute to the configuration file:
ocsp.enable=true
Setting this attribute in the configuration file overrides java.security settings.
What to do next
To complete the configuration, add the following Java permissions to lib/security/java.policy:
 permission java.security.SecurityPermission "getProperty.ocsp.enable";
permission java.security.SecurityPermission "setProperty.ocsp.enable";
Certificate revocation lists (CRLs)
CRLs holds a list of certificates that have been marked by Certificate Authority (CA) as no longer trusted for a variety of reasons, for example, the private key has been lost or compromised.
To validate certificates, WebSphere MQ Advanced Message Security constructs a certificate chain that consists of the signer's certificate and the certificate authority's (CA's) certificate chain up to a trust anchor. A trust anchor is a trusted keystore file that contains a trusted certificate or a trusted root certificate that is used to assert the trust of a certificate.WebSphere MQ AMS verifies the certificate path using a PKIX validation algorithm. When the chain is created and verified, WebSphere MQ AMS completes the certificate validation which includes validating the issue and expiry date of each certificate in the chain against the current date, checking if the key usage extension is present in the End Entity certificate. If the extension is appended to the certificate, WebSphere MQ AMS verifies whether digitalSignature or nonRepudiation are also set. If they are not, the MQRC_SECURITY_ERROR is reported and logged. Next, WebSphere MQ AMS downloads CRLs from files or from LDAP depending on what values were specified in the configuration file. Only CRLs that are encoded in DER format are supported by WebSphere MQ AMS. If no CRL related configuration is found in the keystore configuration file, WebSphere MQ AMS performs no CRL validity check. For each CA certificate, WebSphere MQ AMS queries LDAP for CRLs using Distinguished Names of a CA to find its CRL. The following attributes are included in the LDAP query:
 certificateRevocationList,
certificateRevocationList;binary,
authorityRevocationList,
authorityRevocationList;binary
deltaRevocationList
deltaRevocationList;binary,
Note: deltaRevocationList is supported only when it is specified as distribution points.
Enabling certificate validation and certificate revocation list support in native interceptors
You have to modify the keystore configuration file so that WebSphere MQ Advanced Message Security can download CLRs from the Lightweight Directory Access Protocol (LDAP) server.
Procedure
Add the following options to the configuration file:
Note: Values for individual options provided in the table are default.
| Option | Description |
|---|---|
| crl.ldap.host=<host_name> | LDAP server host name. |
| crl.ldap.port=<port_number> | LDAP server port number.
You can specify up to 11 servers. Multiple LDAP hosts are used to ensure transparent failover in case of LDAP connection failure. It is expected that all LDAP servers are replicas and contain the same data. When the WebSphere MQ AMS Java™ interceptor successfully connects to an LDAP server, it does not attempt to download CRLs from the remaining servers provided. |
| crl.cdp=off | Use this option to check or use CRLDistributionPoints extensions in certificates. |
| crl.ldap.version=3 | LDAP protocol version number. Possible values: 2 or 3. |
| crl.ldap.user=cn=<username> | Login to the LDAP server. If this value is not specified, CRL attributes in LDAP must be world-readable |
| crl.ldap.pass=<password> | Password for the LDAP server. |
| crl.ldap.cache_lifetime=0 | LDAP cache lifetime in seconds. Possible values: 0-86400. |
| crl.ldap.cache_size=50 | LDAP cache size. This option can be specified only if the crl.ldap.cache_lifetime value is larger than 0. |
| crl.http.proxy.host=some.host.com | Http proxy server port for CDP CRL retrieval. |
| crl.http.proxy.port=8080 | Http proxy server port number. |
| crl.http.max_response_size=204800 |
The maximum size of CRL, in bytes, that can be retrieved from a HTTP server that is accepted by GSKit. |
| crl.http.timeout=30 | Waiting time for a server response, in seconds, after which WebSphere MQ AMS time-outs. |
| crl.http.cache_size=0 | HTTP cache size, in bytes. |
Enabling certificate revocation list support in Java
To enable CRL support in WebSphere MQ Advanced Message Security, you must modify the keystore configuration file to allow WebSphere MQ AMS to download CRLs from the Lightweight Directory Access Protocol (LDAP) server and configure the java.security file.
Procedure
- Add the following options to the configuration file:
Header Description crl.ldap.host=<host_name> LDAP host name. crl.ldap.port=<port_number> LDAP server port number. You can specify up to 11 servers. Multiple LDAP hosts are used to ensure transparent failover in case of LDAP connection failure. It is expected that all LDAP servers are replicas and contain the same data. When the WebSphere MQ AMS Java™ interceptor successfully connects to an LDAP server, it does not attempt to download CRLs from the remaining servers provided.
Java does not use crl.ldap.user and crl.ldaworldp.pass values. It does not use a user and password when connecting to an LDAP server. As a consequence, CRL attributes in LDAP must be world-readable.
crl.cdp=on/off Use this option to check or use CRLDistributionPoints extensions in certificates. - Modify the JRE/lib/security/java.security file with the following properties:
Property Name Description com.ibm.security.enableCRLDP This property takes the following values: true, false. If it is set to true, when doing certificate revocation check, CRLs are located using the URL from CRL distribution points extension of the certificate.
If it is set to false or not set, checking CRL by using the CRL distribution points extension is disabled.
ibm.security.certpath.ldap.cache.lifetime This property can be used to set the lifetime of entries in the memory cache of LDAP CertStore to a value in seconds. A value of 0 disables the cache; -1 means unlimited lifetime. If not set, the default lifetime is 30 seconds. com.ibm.security.enableAIAEXT This property takes the following values: true, false. If it is set to true, any Authority Information Access extensions that are found within the certificates of the certificate path being built are examined to determine whether they contain LDAP URIs. For each LDAP URI found, an LDAPCertStore object is created and added to the collection of CertStores that is used to locate other certificates that are required to build the certificate path.
If it is set to false or not set, additional LDAPCertStore objects are not created.
Protecting passwords in Java™
Storing keystore and private key passwords as plain text poses a security risk so WebSphere MQ Advanced Message Security provides a tool that can scramble those passwords using a user's key, which is available in the keystore file. The keystore.conf file owner must ensure that only the file owner is entitled to read the file. The passwords protection described in this chapter is only an additional measure of protection.
Procedure
- Edit the keystore.conf files to include
path to the keystore and users label.
 jceks.keystore = c:/Documents and Setting/Alice/AliceKeystore
jceks.certificate = AliceCert
jceks.provider = IBMJCE
- To run the tool, issue:
java -cp com.ibm.mq.jmqi.jar com.ibm.mq.ese.config.KeyStoreConfigProtector keystore_password private_key_password
An output with encrypted passwords is generated and can be copied to the keystore.conf file.To copy the output to the keystore.conf file automatically, run:
java -cp com.ibm.mq.jmqi.jar com.ibm.mq.ese.config.KeyStoreConfigProtector keystore_password private_key_password >> ~/<path_to_keystore>/keystore.conf
Note:
For a list of default locations of keystore.conf on various platforms, see Using keystores and certificates .
Example
Here is an example of such output:
 #Fri Jul 30 15:20:29 CEST 2010
jceks.key_pass=MMXh997n5ZOr8uRlJmc5qity9MN2CggGBMKCDxdbn1AyPklvdgTsOLG6X3C1YT7oDzwaqZFlOR4t\r\nmZsc7JGAx8nqqxLnAucdGn0NWo6xnjZB1n501YGol2k/PhaQHhFXKMAU9dKg0f8djOtCAOlX4ETe\r\nfYl9LBUt2wk87uM7dSs\=
jceks.keystore_pass=OIdeayBnSCfLG4cFuxEVrk6SYyAsdSPpDqgPf16s9s1M04cqZjNbhgjoA2EXonudHZHH+4s2drvQ\r\nCUvQgu9GuaBMJK2F2OjtHJJ1Y4BVeLW2c2okgawo/W2J1AdUYKkJ0raYTkDouLaTYTQeulyG0xIl\r\niD2si1xUCxhYvvyhbbY\=
jceks.encrypted=yes
Security policies
WebSphere MQ Advanced Message Security uses security policies to specify the cryptographic encryption and signature algorithms for encrypting and authenticating messages that flow through the queues.
Security policies overview
IBM WebSphere MQ Advanced Message Security security policies are conceptual objects that describe the way a message is cryptographically encrypted and signed.
For details of the security policy attributes, see the following subtopics:
Policy name
The policy name is a unique name that identifies a specific WebSphere MQ Advanced Message Security policy and the queue to which it applies.
The policy name must be the same as the queue name to which it applies. There is a one-to-one mapping between a WebSphere MQ Advanced Message Security (WebSphere MQ AMS) policy and a queue.
By creating a policy with the same name as a queue, you activate the policy for that queue. Queues without matching policy names are not protected by WebSphere MQ AMS.
The scope of the policy is relevant to the local queue manager and its queues. Remote queue managers must have their own locally-defined policies for the queues they manage.
Signature algorithm
The signature algorithm indicates the algorithm that should be used when signing data messages.
Valid values include:
- MD5
- SHA-1
- SHA-2 family:
- SHA256
- SHA384 (minimum key length acceptable - 768 bits)
- SHA512 (minimum key length acceptable - 768 bits)
A policy that does not specify a signature algorithm, or specifies an algorithm of NONE, implies that messages placed on the queue associated with the policy are not signed.
Note: The quality of protection used for the message put and get functions must match. If there is a policy quality of protection mismatch between the queue and the message in the queue, the message is not accepted and is sent to the error handling queue. This rule applies for both local and remote queues.
Encryption algorithm
The encryption algorithm indicates the algorithm that should be used when encrypting data messages placed on the queue associated with the policy.
Valid values include:
- RC2
- DES
- 3DES
- AES128
- AES256
A policy that does not specify an encryption algorithm or specifies an algorithm of NONE implies that messages placed on the queue associated with the policy are not encrypted.
Note that a policy that specifies an encryption algorithm other than NONE must also specify at least one Recipient DN and a signature algorithm because WebSphere MQ Advanced Message Security encrypted messages are also signed.
The quality of protection used for the message put and get functions must match. If there is a policy quality of protection mismatch between the queue and the message in the queue, the message is not accepted and is sent to the error handling queue. This rule applies for both local and remote queues.
Toleration
The toleration attribute indicates whether IBM WebSphere MQ Advanced Message Security can accept messages with no security policy specified.
When retrieving a message from a queue with a policy to encrypt messages, if the message is not encrypted, it is returned to the calling application. Valid values include:
- 0
- No ( default ).
- 1
- Yes.
A policy that does not specify a toleration value or specifies 0, implies that messages placed on the queue associated with the policy must match the policy rules.
Toleration is optional and exists to facilitate configuration roll-out, where policies were applied to queues but those queues already contain messages that do not have a security policy specified.
Sender distinguished names
The sender distinguished names (DNs) identify users who are authorized to place messages on a queue.
IBM WebSphere MQ Advanced Message Security (WebSphere MQ AMS) does not check whether a message has been placed on a data-protected queue by a valid user until the message is retrieved. At this time, if the policy stipulates one or more valid senders, and the user that placed the message on the queue is not in the list of valid senders, WebSphere MQ AMS returns an error to the getting application, and place the message on its error queue.
A policy can have 0 or more sender DNs specified. If no sender DNs are specified for the policy, any user can put data-protected messages to the queue providing the user's certificate is trusted.
Sender distinguished names have the following form:
CN=Common Name,O=Organization,C=Country
- All DNs must be in uppercase and in the same order as listed in the table.
Component name Value CN The common name for the object of this DN, such as a full name or the intended purpose of a device. OU The unit within the organization with which the object of the DN is affiliated, such as a corporate division or a product name. O The organization with which the object of the DN is affiliated, such as a corporation. L The locality (city or municipality) where the object of the DN is located. ST The state or province name where the object of the DN is located. C The country where the object of the distinguished name (DN) is located. - If one or more sender DNs are specified for the policy, only those users can put messages to the queue associated with the policy.
- Sender DNs, when specified, must match exactly the DN contained in the digital certificate associated with user putting the message.
- WebSphere MQ AMS supports DNs with values only from Latin-1 character set. To create DNs with characters of the set, you must first create a certificate with a DN that is created in UTF-8 coding using UNIX platforms with UTF-8 coding turned on or with the iKeyman utility. Then you must create a policy from a UNIX platform with UTF-8 coding turned on or use the WebSphere MQ AMS plug-in to WebSphere MQ.
Recipient distinguished names
The recipient distinguished names (DN) identify users who are authorized to retrieve messages from a queue.
A policy can have zero or more recipient DNs specified. Recipient distinguished names have the following form:
CN=Common Name,O=Organization,C=Country
- All DNs must be in uppercase and in the same order as listed in the table.
Component name Value CN The common name for the object of this DN, such as a full name or the intended purpose of a device. OU The unit within the organization with which the object of the DN is affiliated, such as a corporate division or a product name. O The organization with which the object of the DN is affiliated, such as a corporation. L The locality (city or municipality) where the object of the DN is located. ST The state or province name where the object of the DN is located. C The country where the object of the distinguished name (DN) is located. - If no recipient DNs are specified for the policy, any user can get messages from the queue associated with the policy.
- If one or more recipient DNs are specified for the policy, only those users can get messages from the queue associated with the policy.
- Recipient DNs, when specified, must match exactly the DN contained in the digital certificate associated with user getting the message.
- WebSphere MQ Advanced Message Security supports DNs with values only from Latin-1 character set. To create DNs with characters of the set, you must first create a certificate with a DN that is created in UTF-8 coding using UNIX platforms with UTF-8 coding turned on or with the iKeyman utility. Then you must create a policy from a UNIX platform with UTF-8 coding turned on or use the WebSphere MQ Advanced Message Security plug-in to WebSphere MQ.
Security policy attributes
You can use WebSphere MQ Advanced Message Security to select a particular algorithm or method to protect the data.
A security policy is a conceptual object that describes the way a message is cryptographically encrypted and signed. The following table presents the security policy attributes in WebSphere MQ Advanced Message Security:
| Attributes | Description |
|---|---|
| Policy name | Unique name of the policy for a queue manager. |
| Signature algorithm | Cryptographic algorithm that is used to sign messages before sending. |
| Encryption algorithm | Cryptographic algorithm that is used to encrypt messages before sending. |
| Recipient list | List of certificate distinguished names (DNs) of potential receivers of a message. |
| Signature DN checklist | List of signature DNs to be validated during message retrieval. |
In WebSphere MQ Advanced Message Security, messages are encrypted with a symmetric key, and the symmetric key is encrypted with the public keys of the recipients. Public keys are encrypted with the RSA algorithm, with keys of an effective length up to 2048 bits. The actual asymmetric key encryption depends on the certificate key length.
The supported symmetric-key algorithms are as follows:
- RC2
- DES
- 3DES
- AES128
- AES256
WebSphere MQ Advanced Message Security also supports the following cryptographic hash functions:
- MD5
- SHA-1
- SHA-2 family:
- SHA256
- SHA384 (minimum key length acceptable - 768 bits)
- SHA512 (minimum key length acceptable - 768 bits)
Note: The quality of protection used for the message put and get functions must match. If there is a policy quality of protection mismatch between the queue and the message in the queue, the message is not accepted and is sent to the error handling queue. This rule applies for both local and remote queues.
Quality of protection
WebSphere MQ Advanced Message Security data-protection policies imply a quality of protection (QOP).
The three quality of protection levels in WebSphere MQ Advanced Message Security depend on cryptographic algorithms that are used to sign and encrypt the message:
- Privacy - messages placed on the queue must be signed and encrypted.
- Integrity - messages placed on the queue must be signed by the sender.
- None - no data protection is applicable.
A policy that stipulates that messages must be signed when placed on a queue has a QOP of INTEGRITY. A QOP of INTEGRITY means that a policy stipulates a signature algorithm, but does not stipulate an encryption algorithm. Integrity-protected messages are also referred to as "SIGNED".
A policy that stipulates that messages must be signed and encrypted when placed on a queue has a QOP of PRIVACY. A QOP of PRIVACY means that when a policy stipulates a signature algorithm and an encryption algorithm. Privacy-protected messages are also referred to as "SEALED".
A policy that does not stipulate a signature algorithm or an encryption algorithm has a QOP of NONE. WebSphere MQ Advanced Message Security provides no data-protection for queues that have a policy with a QOP of NONE.
Managing security policies
A security policy is a conceptual object that describes the way a message is cryptographically encrypted and signed.
All administrative tasks related to security policies are run from the following location:
- On UNIX platforms: <MQInstallRoot>/bin
- On Windows platforms administrative tasks can be run from any location as the PATH environment variable is updated at the installation.
Create security policies
Security policies define the way in which a message is protected when the message is put, or how a message must have been protected when a message is received. There are some entry conditions which must be met when creating security policies:
- The queue manager must be running.
- The name of a security policy must follow Rules for naming WebSphere MQ objects .
- You must have the necessary +connect +inq +chg authorities to create a security policy. For the complete syntax of authorization change command, see setmqaut .
- Make sure that you have necessary permissions to operate on WebSphere MQ queues and queue managers. For more information, see Granting OAM permissions
Example
Here is an example of creating a policy on queue manager QMGR. The policy specifies that messages be signed using the SHA1 algorithm and encrypted using the AES256 algorithm for certificates with DN: CN=joe,O=IBM,C=US and DN: CN=jane,O=IBM,C=US. This policy is attached to MY.QUEUE:
$ setmqspl -m QMGR -p MY.QUEUE -s SHA1 -e AES256 -r CN=joe,O=IBM,C=US -r CN=jane,O=IBM,C=US
Here is an example of creating policy on the queue manager QMGR. The policy specifies that messages be encrypted using the DES algorithm for certificates with DNs: CN=john,O=IBM,C=US and CN=jeff,O=IBM,C=US and signed with the MD5 algorithm for certificate with DN: CN=phil,O=IBM,C=US
$ setmqspl -m QMGR -p MY.OTHER.QUEUE -s MD5 -e DES -r CN=john,O=IBM,C=US -r CN=jeff,O=IBM,C=US -a CN=phil,O=IBM,C=US
Note:
- The quality of protection being used for the message put and get must match. If the policy quality of protection that is defined for the message is weaker than that defined for a queue, the message is sent to the error handling queue. This policy is valid for both local and remote queues.
Changing security policies
You can use WebSphere MQ Advanced Message Security to alter details of security policies that you have already defined.
- The queue manager on which you want to operate must be running.
- You must have necessary +connect +inq +chg authorities to create security policies. For the complete syntax of authorization change command, see setmqaut .
To change security policies, apply the setmqspl command to an already existing policy providing new attributes.
Example
Here is an example of creating a policy named MYQUEUE on a queue manager named QMGR specifying that messages will be encrypted using the RC2 algorithm for certificates with DN:CN=bob,O=IBM,C=US and signed with the SHA1 algorithm for certificates with DN:CN=jeff,O=IBM,C=US.
setmqspl -m QMGR -p MYQUEUE -e RC2 -s SHA1 -a CN=jeff,O=IBM,C=US -r CN=alice,O=IBM,C=USTo alter this policy, issue the setmqspl command with all attributes from the example changing only the values you want to modify. In this example, previously created policy is attached to a new queue and its encryption algorithm is changed to AES256:
setmqspl -m QMGR -p MYQUEUE -e AES256 -s SHA1 -a CN=jeff,O=IBM,C=US -r CN=alice,O=IBM,C=US
Display and dumping security policies
Use the dspmqspl command to display a list of all security policies or details of a named policy depending on the command-line parameters you supply.
- To display security policies details, the queue manager must exist, and be running.
- You must have necessary +connect +inq +dsp permissions applied to a queue manager to display and dump security policies. For the complete syntax of authorization change command, see setmqaut .
Here is the list of dspmqspl command flags:
| Command flag | Explanation |
|---|---|
| -m | Queue manager name ( mandatory ). |
| -p | Policy name. |
| -export | Adding this flag generates output which can easily be applied to a different queue manager. |
Example
In this example we will create two security policies for venus.queue.manager:
 setmqspl -m venus.queue.manager -p AMS_POL_04_ONE -s MD5 -a "CN=signer1,O=IBM,C=US" -e NONE
setmqspl -m venus.queue.manager -p AMS_POL_06_THREE -s MD5 -a "CN=another signer,O=IBM,C=US" -e NONE
This example shows a command that displays details of all policies defined for venus.queue.manager and the output it produces:
 dspmqspl -m  venus.queue.manager

Policy Details:
Policy name: AMS_POL_04_ONE
Quality of protection: INTEGRITY
Signature algorithm: MD5
Encryption algorithm: NONE
Signer DNs:
  CN=signer1,O=IBM,C=US
Recipient DNs: -
Toleration: 0
- - - - - - - - - - - - - - - - - - - - - - - - - - - - - - - - - - - - - - - -
Policy Details:
Policy name: AMS_POL_06_THREE
Quality of protection: INTEGRITY
Signature algorithm: MD5
Encryption algorithm: NONE
Signer DNs:
  CN=another signer,O=IBM,C=US
Recipient DNs: -
Toleration: 0
This example shows a command that displays details of a selected security policy defined for venus.queue.manager and the output it produces:
 dspmqspl -m venus.queue.manager -p AMS_POL_06_THREE

Policy Details:
Policy name: AMS_POL_06_THREE
Quality of protection: INTEGRITY
Signature algorithm: MD5
Encryption algorithm: NONE
Signer DNs:
  CN=another signer,O=IBM,C=US
Recipient DNs: -
Toleration: 0
In the next example, first, we create a security policy and then, we export the policy using the -export flag:
 setmqspl -m venus.queue.manager -p AMS_POL_04_ONE -s MD5 -a "CN=signer1,O=IBM,C=US" -e NONE

dspmqspl -m venus.queue.manager -export > policies.[bat|sh]
To import a security policy:
- On Windows platforms, run policies.bat
- On UNIX platforms:
- Log on as a user that belongs to the mqm WebSphere MQ administration group.
- Issue . policies.sh.
Removing security policies
To remove security policies in WebSphere MQ Advanced Message Security, you must use the setmqspl command. There are some entry conditions which must be met when managing security policies:
- The queue manager must be running.
- You must have necessary +connect +inq +chg authorities to create security policies. For the complete syntax of authorization change command, see setmqaut .
Use the setmqspl command with the -remove option.
Example
Here is an example of removing a policy:
$ setmqspl -m QMGR -remove -p MY.OTHER.QUEUE
System queue protection
System queues enable communication between WebSphere MQ and its ancillary applications. Whenever a queue manager is created, a system queue is also created to store WebSphere MQ internal messages and data. You can protect system queues with WebSphere MQ Advanced Message Security so that only authorized users can access or decrypt them.
System queue protection follows the same pattern as the protection of regular queues.
To use system queue protection on Windows platforms, copy the keystore.conf file to the following directory:
- c:\Documents and Settings\Default User\.mqs\keystore.conf
To provide protection for SYSTEM.ADMIN.COMMAND.QUEUE, the command server must have access to the keystore and the keystore.conf, which contain keys and a configuration so that the command server can access keys and certificates. All changes made to security policy of SYSTEM.ADMIN.COMMAND.QUEUE require the restart of the command server.
All messages that are sent and received from the command queue are signed or signed and encrypted depending on policy settings. If an administrator defines authorised signers, command messages that do not pass signer Distinguished Name (DN) check are not executed by the command server and are not routed to the WebSphere MQ Advanced Message Security error handling queue. Messages that are sent as replies to WebSphere MQ Explorer temporary dynamic queues are not protected by WebSphere MQ AMS.
Changes to WebSphere MQ Advanced Message Security security policies require you to restart the WebSphere MQ command server Security policies do not have an effect on the following SYSTEM queues:
- SYSTEM.ADMIN.ACCOUNTING.QUEUE
- SYSTEM.ADMIN.ACTIVITY.QUEUE
- SYSTEM.ADMIN.CHANNEL.EVENT
- SYSTEM.ADMIN.COMMAND.EVENT
- SYSTEM.ADMIN.CONFIG.EVENT
- SYSTEM.ADMIN.LOGGER.EVENT
- SYSTEM.ADMIN.PERFM.EVENT
- SYSTEM.ADMIN.PUBSUB.EVENT
- SYSTEM.ADMIN.QMGR.EVENT
- SYSTEM.ADMIN.STATISTICS.QUEUE
- SYSTEM.ADMIN.TRACE.ROUTE.QUEUE
- SYSTEM.AUTH.DATA.QUEUE
- SYSTEM.BROKER.ADMIN.STREAM
- SYSTEM.BROKER.CONTROL.QUEUE
- SYSTEM.BROKER.DEFAULT.STREAM
- SYSTEM.BROKER.INTER.BROKER.COMMUNICATIONS
- SYSTEM.CHANNEL.INITQ
- SYSTEM.CHANNEL.SYNCQ
- SYSTEM.CICS.INITIATION.QUEUE
- SYSTEM.CLUSTER.COMMAND.QUEUE
- SYSTEM.CLUSTER.HISTORY.QUEUE
- SYSTEM.CLUSTER.REPOSITORY.QUEUE
- SYSTEM.CLUSTER.TRANSMIT.QUEUE
- SYSTEM.DEAD.LETTER.QUEUE
- SYSTEM.DURABLE.SUBSCRIBER.QUEUE
- SYSTEM.HIERARCHY.STATE
- SYSTEM.INTER.QMGR.CONTROL
- SYSTEM.INTER.QMGR.FANREQ
- SYSTEM.INTER.QMGR.PUBS
- SYSTEM.INTERNAL.REPLY.QUEUE
- SYSTEM.PENDING.DATA.QUEUE
- SYSTEM.PROTECTION.ERROR.QUEUE
- SYSTEM.PROTECTION.POLICY.QUEUE
- SYSTEM.RETAINED.PUB.QUEUE
- SYSTEM.SELECTION.EVALUATION.QUEUE
- SYSTEM.SELECTION.VALIDATION.QUEUE
Granting OAM permissions
File permissions authorize all users to execute setmqspl and dspmqspl commands. However, IBM WebSphere MQ Advanced Message Security relies on the Object Authority Manager (OAM) and every attempt to execute these commands by a user who does not belong to the mqm group, which is the WebSphere MQ administration group, or does not have permissions to read security policy settings that are granted, results in an error.
Procedure
To grant necessary permissions to a user, run:
 setmqaut -m SOME.QUEUE.MANAGER -t qmgr -p SOME.USER  +connect +inq
setmqaut -m SOME.QUEUE.MANAGER -t queue -n SYSTEM.PROTECTION.POLICY.QUEUE -p SOME.USER +browse +put
setmqaut -m SOME.QUEUE.MANAGER -t queue -n SYSTEM.PROTECTION.ERROR.QUEUE -p SOME.USER +put
Command and configuration events
With WebSphere MQ Advanced Message Security, you can generate command and configuration event messages, which can be logged and serve as a record of policy changes for auditing.
Command and configuration events generated by WebSphere MQ are message of the PCF format sent to dedicated queues.
Configuration events messages are sent to the SYSTEM.ADMIN.CONFIG.EVENT queue on the queue manager where the event occurs.
Command events messages are sent to the SYSTEM.ADMIN.COMMAND.EVENT queue on the queue manager where the event occurs.
Events are generated regardless of tools you are using to manage WebSphere MQ Advanced Message Security security policies.
In WebSphere MQ Advanced Message Security, there are four types of events generated by different actions on security policies:
- Create security policies ,
which generate two WebSphere MQ event
messages:
- A configuration event
- A command event
- Changing security policies ,
which generates three WebSphere MQ event
messages:
- A configuration event that contains old security policy values
- A configuration event that contains new security policy values
- A command event
- Display and dumping security policies , which generates one WebSphere MQ event message:
- A command event
- Removing security policies ,
which generates two WebSphere MQ event
messages:
- A configuration event
- A command event
Enabling and disabling event logging
You control command and configuration events by using the queue manager attributes CONFIGEV and CMDEV. To enable these events, set the appropriate queue manager attribute to ENABLED. To disable these events, set the appropriate queue manager attribute to DISABLED.
Procedure
- Configuration events
- To enable configuration events, set CONFIGEV to ENABLED.
To disable configuration events, set CONFIGEV to DISABLED.
For example, you can enable configuration events by using the following MQSC command:
ALTER QMGR CONFIGEV (ENABLED)
- Command events
- To enable command events, set CMDEV to ENABLED.
To enable command events for commands except DISPLAY MQSC commands and Inquire PCF commands, set the CMDEV to NODISPLAY. To disable command events, set CMDEV to DISABLED. For example, you can enable command events by using the following MQSC command:
ALTER QMGR CMDEV (ENABLED)
Command event message format
Command event message consists of MQCFH structure and PCF parameters following it.
Here are selected MQCFH values:
 Type = MQCFT_EVENT;
Command = MQCMD_COMMAND_EVENT;
MsgSeqNumber = 1;
Control = MQCFC_LAST;
ParameterCount = 2;
CompCode = MQCC_WARNING;
Reason = MQRC_COMMAND_PCF;
Note: ParameterCount value is two because there are always two paramteters of MQCFGR type (group). Each group consists of appropriate parameters. The event data consists of two groups, CommandContext and CommandData. CommandContext contains:
- EventUserID
-
Description: The user ID that issued the command or call that generated the event. (This is the same user ID that is used to check the authority to issue the command or call; for commands received from a queue, this is also the user identifier (UserIdentifier) from the MD of the command message). Identifier: MQCACF_EVENT_USER_ID. Data type: MQCFST. Maximum length: MQ_USER_ID_LENGTH. Returned: Always. - EventOrigin
-
Description: The origin of the action causing the event. Identifier: MQIACF_EVENT_ORIGIN. Data type: MQCFIN. Values: - MQEVO_CONSOLE
- Console command - command line.
- MQEVO_MSG
- Command message from WebSphere MQ Explorer plugin.
Returned: Always. - EventQMgr
-
Description: The queue manager where the command or call was entered. (The queue manager where the command is executed and that generates the event is in the MD of the event message). Identifier: MQCACF_EVENT_Q_MGR. Data type: MQCFST. Maximum length: MQ_Q_MGR_NAME_LENGTH. Returned: Always. - EventAccountingToken
-
Description: For commands received as a message (MQEVO_MSG), the accounting token (AccountingToken) from the MD of the command message. Identifier: MQBACF_EVENT_ACCOUNTING_TOKEN. Data type: MQCFBS. Maximum length: MQ_ACCOUNTING_TOKEN_LENGTH. Returned: Only if EventOrigin is MQEVO_MSG. - EventIdentityData
-
Description: For commands received as a message (MQEVO_MSG), application identity data (ApplIdentityData) from the MD of the command message. Identifier: MQCACF_EVENT_APPL_IDENTITY. Data type: MQCFST. Maximum length: MQ_APPL_IDENTITY_DATA_LENGTH. Returned: Only if EventOrigin is MQEVO_MSG. - EventApplType
-
Description: For commands received as a message (MQEVO_MSG), the type of application (PutApplType) from the MD of the command message. Identifier: MQIACF_EVENT_APPL_TYPE. Data type: MQCFIN. Returned: Only if EventOrigin is MQEVO_MSG. - EventApplName
-
Description: For commands received as a message (MQEVO_MSG), the name of the application (PutApplName) from the MD of the command message. Identifier: MQCACF_EVENT_APPL_NAME. Data type: MQCFST. Maximum length: MQ_APPL_NAME_LENGTH. Returned: Only if EventOrigin is MQEVO_MSG. - EventApplOrigin
-
Description: For commands received as a message (MQEVO_MSG), the application origin data (ApplOriginData) from the MD of the command message. Identifier: MQCACF_EVENT_APPL_ORIGIN. Data type: MQCFST. Maximum length: MQ_APPL_ORIGIN_DATA_LENGTH. Returned: Only if EventOrigin is MQEVO_MSG. - Command
-
Description: The command code. Identifier: MQIACF_COMMAND. Data type: MQCFIN. Values: - MQCMD_INQUIRE_PROT_POLICY numeric value 205
- MQCMD_CREATE_PROT_POLICY numeric value 206
- MQCMD_DELETE_PROT_POLICY numeric value 207
- MQCMD_CHANGE_PROT_POLICY numeric value 208
Returned: Always.
Configuration event message format
Configuration events are PCF messages of standard WebSphere MQ Advanced Message Security format.
Possible values for the MQMD message descriptor can be found in the Event message MQMD (message descriptor) section of the WebSphere MQ information center.
Here are selected MQMD values:
 Format = MQFMT_EVENT
Peristence = MQPER_PERSISTENCE_AS_Q_DEF
PutApplType = MQAT_QMGR                      //for both CLI and command server
Message buffer consist of MQCFH structure and the parameter structure that follows it. Possible MQCFH values can be found in the Event message MQCFH (PCF header) section of the WebSphere MQ information center.
Here are selected MQCFH values:
 Type = MQCFT_EVENT
Command = MQCMD_CONFIG_EVENT
MsgSeqNumber = 1 or 2          // 2 will be in case of Change Object event
Control = MQCFC_LAST or MQCFC_NOT_LAST     //MQCFC_NOT_LAST will be in case of 1 Change Object event
ParameterCount = reflects number of PCF parameters following MQCFH
CompCode = MQCC_WARNING
Reason = one of {MQRC_CONFIG_CREATE_OBJECT, MQRC_CONFIG_CHANGE_OBJECT, MQRC_CONFIG_DELETE_OBJECT}
The parameters following MQCFH are:
- EventUserID
-
Description: The user ID that issued the command or call that generated the event. (This is the same user ID that is used to check the authority to issue the command or call; for commands received from a queue, this is also the user identifier (UserIdentifier) from the MD of the command message). Identifier: MQCACF_EVENT_USER_ID Data type: MQCFST. Maximum length: MQ_USER_ID_LENGTH. Returned: Always. - SecurityId
-
Description: Value of MQMD.AccountingToken in case of command server message or Windows SID for local command. Identifier: MQBACF_EVENT_SECURITY_ID Data type: MQCBS. Maximum length: MQ_SECURITY_ID_LENGTH. Returned: Always. - EventOrigin
-
Description: The origin of the action causing the event. Identifier: MQIACF_EVENT_ORIGIN Data type: MQCFIN. Values: - MQEVO_CONSOLE
- Console command - command line.
- MQEVO_MSG
- Command message from the WebSphere MQ Explorer plugin.
Returned: Always. - EventQMgr
-
Description: The queue manager where the command or call was entered. (The queue manager where the command is executed and that generates the event is in the MD of the event message). Identifier: MQCACF_EVENT_Q_MGR Data type: MQCFST Maximum length: MQ_Q_MGR_NAME_LENGTH Returned: Always. - ObjectType
-
Description: Object type. Identifier: MQIACF_OBJECT_TYPE Data type: MQCFIN Value: - MQOT_PROT_POLICY
- WebSphere MQ Advanced Message Security protection policy. 1019 - a numeric value defined in WebSphere MQ 7.5 or in the cmqc.h file.
Returned: Always. - PolicyName
-
Description: The WebSphere MQ Advanced Message Security policy name. Identifier: MQCA_POLICY_NAME . Data type: MQCFST. Value: 2112 - a numeric value defined in WebSphere MQ 7.5 or in the cmqc.h file. Maximum length: MQ_OBJECT_NAME_LENGTH. Returned: Always. - PolicyVersion
-
Description: The WebSphere MQ Advanced Message Security policy version. Identifier: MQIA_POLICY_VERSION Data type: MQCFIN Value 238 - a numeric value defined in WebSphere MQ 7.5 or in the cmqc.h file. Returned: Always - TolerateFlag
-
Description: The WebSphere MQ Advanced Message Security policy toleration flag. Identifier: MQIA_TOLERATE_UNPROTECTED Data type: MQCFIN Value 235 - a numeric value defined in WebSphere MQ 7.5 or in the cmqc.h file. Returned: Always. - SignatureAlgorithm
-
Description: The WebSphere MQ Advanced Message Security policy signature algorithm. Identifier: MQIA_SIGNATURE_ALGORITHM Data type: MQCFIN Value: 236 - a numeric value defined in WebSphere MQ 7.5 or in the cmqc.h file. Returned: Whenever there is a signature algorithm defined in the WebSphere MQ Advanced Message Security policy - EncryptionAlgorithm
-
Description: The WebSphere MQ Advanced Message Security policy encryption algorithm. Identifier: MQIA_ENCRYPTION_ALGORITHM Data type: MQCFIN Value: 237 - a numeric value defined in WebSphere MQ 7.5 or in the cmqc.h file. Returned: Whenever there is an encryption algorithm defined in the WebSphere MQ policy - SignerDNs
-
Description: Subject DistinguishedName of allowed signers. Identifier: MQCA_SIGNER_DN Data type: MQCFSL Value: 2113 - a numeric value defined in WebSphere MQ 7.5 or in the cmqc.h file. Maximum length: Longest signer DN in the policy, but no longer then MQ_DISTINGUISHED_NAME_LENGTH Returned: Whenever defined in WebSphere MQ policy. - RecipientDNs
-
Description: Subject DistinguishedName of allowed signers. Identifier: MQCA_RECIPIENT_DN Data type: MQCFSL Value: 2114 - a numeric value defined in WebSphere MQ 7.5 or in the cmqc.h file. Maximum length: Longest recipient DN in the policy, but no longer then MQ_DISTINGUISHED_NAME_LENGTH. Returned: Whenever defined in WebSphere MQ policy.
Problems and solutions
This section describes how to solve problems that might arise with any installation of IBM Use this information to identify and resolve any problems relating to WebSphere MQ Advanced Message Security.
com.ibm.security.pkcsutil.PKCSException: Error encrypting contents
Error com.ibm.security.pkcsutil.PKCSException: Error encrypting contents suggests that IBM WebSphere MQ Advanced Message Security has problems with accessing cryptographic algorithms.
If the following error is returned by WebSphere MQ Advanced Message Security:
 DRQJP0103E   The IBM WebSphere MQ Advanced Message Security Java interceptor failed to protect message.
  com.ibm.security.pkcsutil.PKCSException: Error encrypting contents (java.security.InvalidKeyException: Illegal key size or default parameters)
verify if the JCE security policy in JAVA_HOME/lib/security/local_policy.jar/*.policy grants access to the signature algorithms used in MQ AMS policy.
If the signature algorithm you want to use is not specified in your current security policy, download correct Java policy file from the following locations:
- IBM SDK Policy files for Java 1.4.2.
- IBM SDK Policy files for Java 5.0.
- IBM SDK Policy files for Java 6.0.
- IBM SDK Policy files for Java 7.0.
OSGi support
To use OSGi bundle with IBM WebSphere MQ Advanced Message Security additional parameters are required.
Run the following parameter during the OSGi bundle startup:
-Dorg.osgi.framework.system.packages.extra=com.ibm.security.pkcs7
When using encrypted password in your keystore.conf, the following statement must be added when OSGi bundle is running:
-Dorg.osgi.framework.system.packages.extra=com.ibm.security.pkcs7,com.ibm.misc
Restriction: WebSphere MQ AMS supports communication using only MQ Base Java Classes for queues protected from within the OSGi bundle.