Enable single sign-on for Tivoli Access Manager
Overview
Configure Lotus Connections to use single sign-on with Tivoli Access Manager.
Before you begin this task, ensure that the Realm Name field in the Federated repositories section of the WAS Integrated Solutions console uses the same value as the LDAP name, including the port number. For example, if the primary repository host name is ldapserver.example.com and the port number is 389, then you would enter ldapserver.example.com:389 in the Realm Name field.
You must first install Lotus Connections and successfully access the installed features from a Web browser before you can enable single sign-on. You must also have IBM Tivoli Access Manager for e-business, version 6.0, installed before you can perform this procedure.
The WAS single sign-on domain must be set to the same value as that of the Tivoli Access Manager server.
- This is an optional configuration.
- If you are enabling SSO between Lotus Connections and a product that is deployed on a pre-6.1 version of WAS, or if the product is using IBM Lotus Domino®, first complete the steps described in the Enabling SSO with stand-alone LDAP topic.
- The connectionsAdmin J2C alias that you specified during installation must correspond to a valid user in your LDAP or it cannot be authenticated for SSO. If you need to update the credentials for this alias, see the Changing references to administrative credentials topic.
Single sign-on (SSO) enables users to log into one feature of Lotus Connections and switch to other features and resources without having to authenticate again.
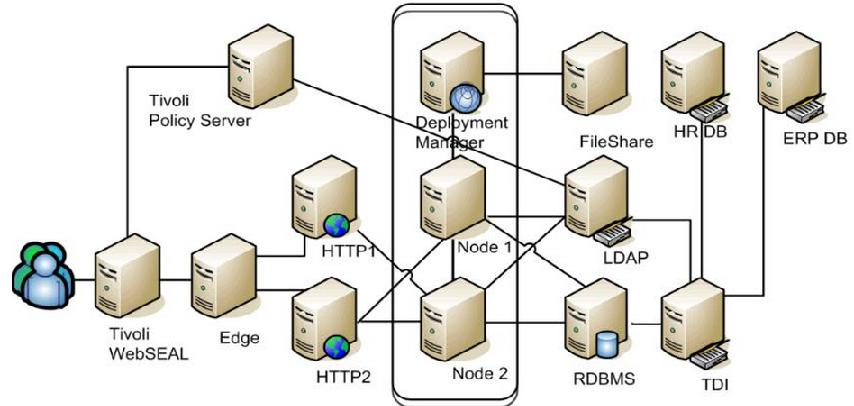
There are several different ways to configure SSO. This procedure describes one approach. It uses a WAS LTPA key and WebSEAL Transparent Junctions. For other configuration ideas and for more information about the IBM Tivoli Access Manager for e-business, go to the Tivoli Access Manager information center.
Set up SSO using TAM Form Based Authentication
- To support SSO with the LTPA key, the same keys and passwords must be shared by the Tivoli Access Manager and WAS. Export keys and passwords from the WAS key store and configure Tivoli Access Manager to use them. To export the key from WAS...
- Log into the WAS admin console as an administrator, expand Security, and then click Secure administration, applications, and infrastructure.
- Click Authentication mechanisms and expiration, and then in the Cross-cell single sign-on section, provide values for the following fields:
- Password – Type a secure password that you will remember. You will need to provide this password later
Confirm the password.
- Fully qualified key file name – Specify a valid path and a file name for the file that will hold the exported keys
- Password – Type a secure password that you will remember. You will need to provide this password later
- Click Export keys.
- Click OK to return to the Secure administration, applications, and infrastructure page, expand Web security, and then click General settings. Select Use available authentication data when an unprotected URI is accessed if it is not already selected, and then click Apply. Click OK.
- If you are using SSL junctions and IBM HTTP Server, import your IBM HTTP Server certificate into the TAM keystore. For more information, see the Configuring IBM HTTP Server topics.
- Optional: Use the exported LTPA key to configure the transparent path junctions in Tivoli Access Manager. To do so...
- Open the pdadmin command line utility, which is installed as part of the Tivoli Access Manager runtime package.
- Enter the following command once for each junction; set up one transparent path junction for each installed feature:
Do not include the carriage returns in the command. They were added for printing purposes.
server task <WebSEAL-instance-name> create -t ssl
-h <backend-server-name> -x -p <backend-server-port> -i -b ignore -f -A -2
-F <ltpa-token> -Z <ltpa-password> <transparent-path-jct>
where:
- <WebSEAL-instance-name> is the name of the WebSEAL server. Use the following syntax:
<WebSEAL_instance>-webseald-<tam_host_name>
where <WebSEAL_instance> is the name of the instance of the WebSEAL server set up to manage Lotus Connections, such as default, and <tam_host_name> is the host name of the Tivoli Access Manager server, such as server.name.example.com.
For example:
default-webseald-server.name.example.com
- <backend-server-name> – Domain name of the server for which Tivoli Access Manager is managing authentication. For example, the IBM HTTP Server
- <backend-server-port> is the port used by the backend server
- <ltpa-token> – The name of the file you created to hold the keys exported from WAS
- <ltpa-password> – The password defined and that was used to encrypt the key file
- <transparent-path-jct> – The transparent path junction for the feature. The <transparent path-jct> must match the URL pattern and must be created once for each URL pattern. The options are as follows:
-
/activities
-
/blogs
-
/communities
-
/dogear
-
/files
-
/homepage
-
/news
-
/mobile
-
/profiles
-
/search
-
/wikis
-
For example:
server task default-webseald-server.name.example.com create -t ssl
-h another.server.name.example.com -x -p 443 -i -b ignore -f -A -2
-F c:\jcts\was-sso-key -Z password /profiles
Notes
- The -2 parameter is needed only if you are using LTPA type 2. WAS allows both LTPA 1 and LTPA 2.
- If an invalid certificate error occurs, import your<backend-server-name> certificate into the WebSEAL certificate store before you create the junctions.
For more information about using the pdadmin command line utility, go to the Using pdadmin to create junctions Web page in the Tivoli Access Manager information center.
- <WebSEAL-instance-name> is the name of the WebSEAL server. Use the following syntax:
- Create a default Lotus Connections ACL to override the default WebSEAL ACL by running the following commands:
acl create <default-acl-name>
acl modify <default-acl-name> set user sec_master TcmdbsvaBRlrx
acl modify <default-acl-name> set any-other Tmdrx
acl modify <default-acl-name> set unauthenticated T
acl modify <default-acl-name> set group iv-admin TcmdbsvaBRrxl
acl modify <default-acl-name> set group webseal-servers Tgmdbsrxl
- Attach the ACL to the new junctions by running the following commands:
acl attach /WebSEAL/server.name.acme.com-default/activities <default-acl-name>
acl attach /WebSEAL/server.name.acme.com-default/blogs <default-acl-name>
acl attach /WebSEAL/server.name.acme.com-default/communities <default-acl-name>
acl attach /WebSEAL/server.name.acme.com-default/dogear <default-acl-name>
acl attach /WebSEAL/server.name.acme.com-default/files <default-acl-name>
acl attach /WebSEAL/server.name.acme.com-default/homepage <default-acl-name>
acl attach /WebSEAL/server.name.acme.com-default/mobile <default-acl-name>
acl attach /WebSEAL/server.name.acme.com-default/news <default-acl-name>
acl attach /WebSEAL/server.name.acme.com-default/profiles <default-acl-name>
acl attach /WebSEAL/server.name.acme.com-default/search <default-acl-name>
acl attach /WebSEAL/server.name.acme.com-default/wikis <default-acl-name>
- The Atom feeds from the Connections servers must be protected with Basic Authentication because most feed readers are unable to authenticate with Forms Based Authentication. In this step, instruct Tivoli Access Manager to pass the Atom HTTP requests through to WAS as unprotected resources, which, together with the Lotus Connections features, authenticates requests as needed. To do so, define the access control list
(acl) and then attach the request patterns to it using the pdadmin command line utility.
- To define the access control list, enter the following commands:
acl create <acl-name>
acl modify <acl-name> set user sec_master TcmdbsvaBRlrx
acl modify <acl-name> set any-other Tmdrx
acl modify <acl-name> set unauthenticated Tmdrx
acl modify <acl-name> set group iv-admin TcmdbsvaBRrxl
acl modify <acl-name> set group webseal-servers Tgmdbsrxl
where <acl-name> is a name that you define for the access control list. For example, connections-acl-default.
The any-other parameter refers to authenticated users who are not defined by other parameters such as sec_master or iv-admin.
- To attach the access control list to resources that do not require authentication, run the following command:
acl attach /WebSEAL/server.name.example.com-default/
<object-path> <acl-name>
where <acl-name> is the name defined for the access control list in the previous step.
Resources that do not require authentication
Feature Unprotected URL Activities /activities/email /activities/notify /activities/serviceconfigs Blogs /blogs/msg.jsp /blogs/approvedmsg.jsp /blogs/confirmflagged.jsp /blogs/notify.jsp /blogs/notifyedit.jsp /blogs/notifyflagged.jsp /blogs/notifyquarantined.jsp /blogs/ownermsg.jsp /blogs/roller-ui/images /blogs/nav/footer.html /blogs/serviceconfigs Communities /communities/mail /communities/images /communities/serviceconfigs Dogear /dogear/templates /dogear/serviceconfigs Files /files/basic/anonymous/atom /files/form/anonymous/atom Homepage /homepage/search /homepage/serviceconfigs News /news/serviceconfigs /news/atom/stories/public Profiles /profiles/mail /profiles/images /profiles/serviceconfigs Search /search/atom/search Wikis /wikis/basic/anonymous/api /wikis/form/anonymous/api - To attach the ACL to resources that are protected by basic authentication, run the following command:
acl attach /WebSEAL/server.name.example.com-default/<object-path> <acl-name>
Resources that require basic authentication
Feature Protected URL Activities /activities/service/atom /activities/service/atom2 /activities/service/getnonce /activities/service/html/autocompletemembers /activities/service/html/autocompleteactivityname /activities/service/html/autocompleteentryname Blogs /blogs/roller-ui/feed /blogs/roller-ui/rendering/api /blogs/services/atom /blogs/roller-ui/rendering/feed /blogs/api /blogs/atom /blogs/roller-ui/blog /blogs/services/xmlrpc Communities /communities/service/atom /communities/service/json /communities/forum/service/atom Dogear /dogear/api /dogear/atom /dogear/json /dogear/snippet /dogear/count /dogear/lisnippet /dogear/tagsets /dogear/tagslike /dogear/people /dogear/peoplelike /dogear/tags /dogear/xbel Files /files/basic/api Homepage /homepage/atom/mysearch News /news/atom/stories/top /news/atom/stories/saved /news/atom/service /news/atom/stories/container Profiles /profiles/atom /profiles/json /profiles/vcard /profiles/photo.do /profiles/audio.do /profiles/atom2 Wikis /wikis/basic/api - Attach the default Connections ACL (that you created earlier) to resources that are protected by forms authentication. To attach the ACL to resources that are protected by forms authentication, run the following command:
acl attach /WebSEAL/server.name.example.com-default/<object-path> <default-acl-name>
Resources that require forms authentication
Feature Protected URL Activities /activities/service/getnonce/forms /activities/service/atom2/forms Blogs /blogs/roller-ui/feed_form /blogs/roller-ui/rendering/api_form /blogs/services/atom_form /blogs/roller-ui/rendering/feed_form /blogs/api_form /blogs/atom_form Communities /communities/forum/service/atom/forms /communities/service/atom/forms Dogear /dogear/atom_fba /dogear/api_fba Home page /homepage/atomfba/mysearch News /news/atomfba/service /news/atomfba/stories/top /news/atomfba/stories/saved /news/atomfba/stories/container Profiles /profiles/atom/forms /profiles/atom2/forms Search search/atom/mysearch - If you are using the Lotus Connections plugin for SharePoint, set the rquired unprotected URLs by running the following command:
acl attach /WebSEAL/server.name.example.com-default/<object-path> <acl-name>
Realms for the SharePoint plugin.
Feature Unprotected URL resource /profiles/ibm_semantictagservlet/css/semantictagstyles.css /profiles/nav/common/styles/base/standalonevcard.css /profiles/resources/js-resources.js /profiles/resources/js-attr-resources.js /profiles/javascript/persontag.js /profiles/javascript/persontagui.js /profiles/ibm_semantictagservlet/rest/unsecure /profiles/ibm_semantictagservlet/javascript/semantictagservice.js /profiles/css/sametime/main.css /profiles/nav/common/styles/images
- To define the access control list, enter the following commands:
- Specify a dynamic URL pattern to support the Blogs feature and mail notification:
- Create a dynurl configuration file named dynurl.conf. The dynurl.conf file is a plain text file that contains mappings from objects to patterns. Using a text editor, create the file and add the following content to it:
/blogs/blogsfeed /blogs/*/feed/*
/blogs/blogsapi /blogs/*/api/*
Save the file in the <webseal-instance-docroot>/lib For example:
- AIX/usr/Tivoli/PDWeb/www-default/lib
- Linux/opt/Tivoli/PDWeb/www-default/lib
- WindowsC:\Program Files\Tivoli\PDWeb\www-default\lib
- To attach the ACL that you created earlier to the dynurl acl, open the pdadmin command line utility and enter the following commands:
Do not include the carriage returns in the commands. They were added for printing purposes.
acl attach /WebSEAL/<server.name.example.com>-default/blogs/blogsfeed <acl-name>
acl attach /WebSEAL/<server.name.example.com>-default/blogs/blogsapi <acl-name>
where:
- <server.name.example.com> is the host name of the Tivoli Access Manager server
- <acl-name> is the name of the access control list defined earlier
For example:
acl attach /default/server.name.example.com
-default/blogs/blogsfeed open
- To allow large Blogs posts, open the webseald.conf file and add (or modify) the following parameter:
dynurl-allow-large-posts = yes
- Stop and restart your WebSEAL instance.
- Create a dynurl configuration file named dynurl.conf. The dynurl.conf file is a plain text file that contains mappings from objects to patterns. Using a text editor, create the file and add the following content to it:
- Configure TAM to use forms-based authentication over https by updating the webseald-<server-name>.conf file with the following line in the [forms] stanza:
forms-auth = https
- Configure content filtering by adding the following lines to the webseald-<server-name>.conf file:
[filter-content-types]
type = text/xml
type = application/atom+xml
[script-filtering]
script-filter = yes
rewrite-absolute-with-absolute = yes
- Configure TAM as the reverse proxy for Lotus Connections by updating the webseald-<server-name>.conf file with the following lines:
Add the following line to the [server] stanza:
web-host-name = <fully-qualified-host-name>
Add the following line to the [session] stanza:
use-same-session = yes
- Update the LotusConnections-config.xml file and update the dynamicHosts configuration element with the following information:
<dynamicHosts enabled="true">
<host href="http://fully-qualified-host-name"
ssl_href="https://fully-qualified-host-name"/>
</dynamicHosts>
Notes
- You can also accomplish this task by running the connectionConfig.py script in wsadmin.
- The fully-qualified host name for the web-host-name and the dynamicHosts configuration must be identical.
- Determine how you want the system to behave when users log out of Lotus Connections. By default, when users click the Log out button in the SSO environment, they are not fully logged out of Lotus Connections. Edit the IBM HTTP Server configuration file to implement the post-log out behavior. The IBM HTTP Server configuration file is called httpd.conf and is stored by default in the following directory:
- AIX: /usr/IBM/HTTPServer/conf
- Linux: /opt/IBM/HTTPServer/conf
- Windows: C:\IBM\HTTPServer\conf
To capture requests to /ibm_security_logout and redirect them to /pkmslogout, add the following rewrite rules to the httpd.conf file:
RewriteEngine On
RewriteCond %{REQUEST_URI} /(.*)/ibm_security_logout(.*)
RewriteRule ^/(.*) /pkmslogout [noescape,L,R]
You must add these rules to both the HTTP and HTTPS entries.
- Add a TAM authenticator property to the Lotus Connections configuration by editing the LotusConnections-config.xml file.
- Use the following command to check out the configuration file:
- Stand-alone deployment:
execfile("connectionsConfig.py")
LCConfigService.checkOutConfig("<working_directory>","cell_name")
- Network deployment:
execfile("WAS_HOME/profiles/Dmgr01/config/bin_lc_admin/
connectionsConfig.py")
If you are prompted to specify which server to connect to, type 1.
LCConfigService.checkOutConfig("<working_directory>","cell_name")
where:
- <working_directory> is the temporary working directory to which the configuration XML and XSD files are copied and are stored while you make changes to them. Use forward slashes to separate directories in the file path, even if you are using the Microsoft Windows operating system.
- cell_name is the name of the WAS cell hosting the Lotus Connections feature. This argument is required even in stand-alone deployments. This argument is also case-sensitive. If you do not know the cell name, do one of the following commands to determine it:
- Stand-alone deployment: Look at the name in the following directory in the file system:
WAS_HOME\profiles\profile_name\config\cells\
- Network deployment: Type the following command while in wsadmin:
print AdminControl.getCell()
- Stand-alone deployment: Look at the name in the following directory in the file system:
For example:
LCConfigService.checkOutConfig("/temp","foo01Cell01")
or
LCConfigService.checkOutConfig("c:/temp","foo01Cell01")
- Stand-alone deployment:
- Update the custom authenticator values by running the following commands:
-
Configure the custom authenticator to support server-to-server authentication for TAM:
LCConfigService.updateConfig("customAuthenticator.name",
"TAMAuthenticator")
-
Set the value of the customAuthenticator.CookieTimeout parameter to be equal to or less than the maximum timeout and idle timeout values that you configured in TAM. Specify the timeout value in minutes.
LCConfigService.updateConfig
("customAuthenticator.CookieTimeout","<timeout>"
where <timeout> is a value in minutes that is less than or equal to the TAM timeout values.
-
- If you are using the Profiles database as the user directory,complete the steps in the Enabling Lotus Connections service extensions topic.
- Check the LotusConnections-config.xml file back in by running the following command:
LCConfigService.checkInConfig()
- Use the following command to check out the configuration file:
- The value of the cookie timeout attribute in the LotusConnections-config.xml file must be smaller than the values of the timeout and inactive-timeout attributes in the webseald-<server-name>.conf file. Check these values in the [session] stanza of the webseald-<server-name>.conf file and edit them if necessary.
The values of the timeout parameters in the TAM configuration file are given in seconds but the CookieTimeout value in the LotusConnections-config.xml file is given in minutes.
Use the following example as a guide:
# Maximum lifetime (in seconds) for an entry in the credential cache
# Setting this to zero allows entries in the cache to fill without expiry until the
# cache contains the number of entries specified by max-entries. After that
# point, entries are expired according to a least recently used algorithm.
timeout = 3600
# Lifetime (in seconds) of inactive entries in the credential cache.
# To disable, set to 0.
inactive-timeout = 600
- Optional: (Only required if you have enabled the Communities or Profiles directory service extensions.) Configure the Lotus Connections service extensions to point to the TAM server. Open the configuration file that is appropriate to your deployment and execute the command to change the web server, using the following example as a guide:
<sloc:serviceReference
communities_directory_service_extension_auth="DSX-Admin"
communities_directory_service_extension_auth_alias="connectionsAdmin"
communities_directory_service_extension_enabled="true"
communities_directory_service_extension_href=
"http://<your_tam_server>/communities/dsx/"
profiles_directory_service_extension_auth="DSX-Admin"
profiles_directory_service_extension_auth_alias="connectionsAdmin"
profiles_directory_service_extension_enabled="true"
profiles_directory_service_extension_href=
"http://<your_tam_server>/profiles/dsx/"
serviceName="directory"/>
For more information about editing configuration settings, see the Enabling Lotus Connections service extensions and Lotus Connections directory service extensions topics.