IBM BPM, V8.0.1, All platforms > Authoring services in Integration Designer > Testing modules > Unit testing
Get started with the integration test client
The integration test client is the designated IBM Integration Designer tool for testing modules and components. When you open the integration test client, a default test configuration is automatically generated. This default test configuration is often all you need to perform your test activities.
In this topic, you learn how to test an operation using the default test configuration. However, before you can run any test, you need to ensure that the module that contains the interface operation that you want to test has at least one component either with or without an implementation or implementation type.
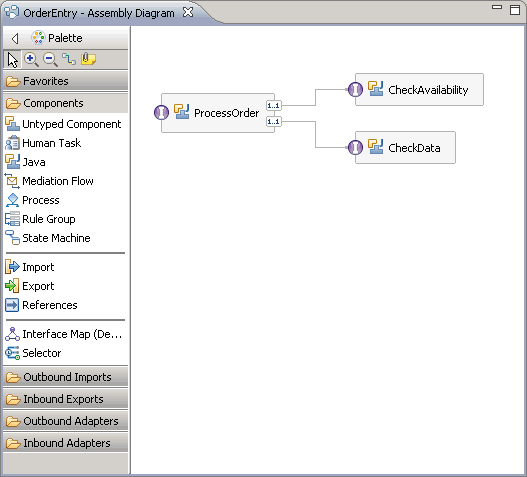
To illustrate how to work with the integration test client, an example module named OrderEntry is used. The OrderEntry module is a basic order processing application that has three components: ProcessOrder, CheckData, and CheckAvailability. The ProcessOrder component accepts your order and calls the CheckData component to determine whether the specified purchase order is valid. If the purchase order is valid, the CheckAvailability component creates the order and automatically adjusts the current availability of any ordered items.
To run a test with the default test configuration:
Procedure
- Open your module in the assembly editor. The example module OrderEntry is shown in the following figure of the assembly
editor:
- If you decide to make any changes to the module in the assembly editor, ensure that you press Ctrl-S to save your changes.
- In the assembly editor canvas, complete one of the following steps:
- If you want to test your entire module, right-click an empty portion of the canvas and select Test Module. (By default, any unimplemented components and unwired references in the module will be emulated.)
- If you want to test a subset of components in your module, use the Ctrl key to select the components in the set, then right-click one of the selected components and select Test Components in Isolation. (By default, any unselected components in the module will be emulated regardless of whether they are implemented or not.)
- If you want to test a single component in your module, right-click the component and select Test Component or Test Component in Isolation. (By default, if you select Test Component in Isolation, all other components in the module will be emulated regardless of whether they are implemented or not.)
For the purposes of this topic, we will assume that you have used the Ctrl key to select the ProcessOrder and CheckData components and that you selected Test Components in Isolation. The integration test client opens and displays an Invoke event in the Events area, as shown in the figure below:

An Invoke event is automatically generated whenever you start the integration test client. It is an interactive event, which means that you must manually select an operation and specify values for the operation before the test can continue, as described in the following steps.
- In the Detailed Properties area
of the integration test client:
- In the Configuration field, ensure that the correct test configuration is selected. A default test configuration is automatically created whenever you open the integration test client.
If you did not open the integration test client by loading a test configuration that you saved earlier, the default test configuration will already be selected in the Configuration field.
- In the Module field, ensure that the correct module is selected. If you opened the integration test client by selecting a module, this module will already be selected in the Module field.
- In the Component field, ensure that the component is selected that contains your interface operation.
- In the Interface field, ensure that the interface is selected that contains your operation.
- In the Operation field, ensure that the operation is selected that you want to test.
The figure shows the detailed properties that are selected in preparation for invoking the takeOrder operation, which is contained in the OrderProcessingInterface interface of the ProcessOrder component.
- In the Configuration field, ensure that the correct test configuration is selected. A default test configuration is automatically created whenever you open the integration test client.
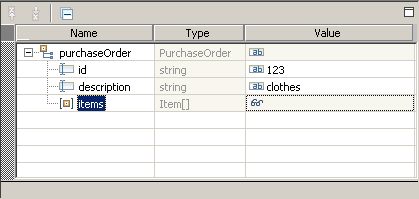
- In the value editor, specify values for the selected operation by clicking your cursor in the Value column for each attribute in the editor, then typing in a value in the text
field and pressing Enter.
For example, the figure below shows that the value clothes has been specified for the description attribute:
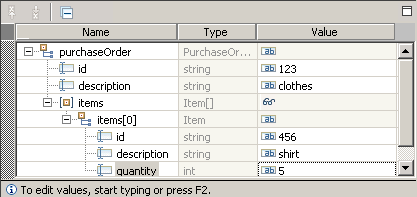
If you want to specify values for arrays, right-click the name of each array attribute in the Name column and select Add Elements to open the Add Element dialog box, then specify a value for the selected attribute in the Enter the number of new elements to add field and click OK.
For example, the figure below shows that the value 5 has been specified for the quantity attribute within the array element in the items array attribute:
- Click the Continue icon.
Depending on the current deployment state of your module, the Deployment Location wizard opens, as shown in the figure below:
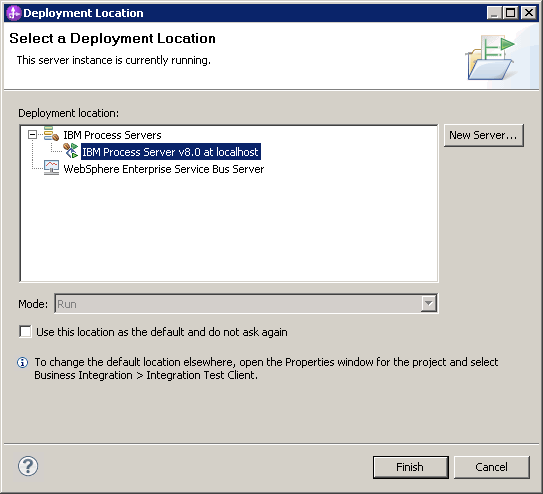
In the Deployment Location wizard, IBM Process Server appears as a selectable deployment location. However, if you are testing a mediation module, WebSphere Enterprise Service Bus Server will also appear as a selectable deployment location in the Deployment Location wizard. Similarly, if your module contains only Java™ components or it contains Java 2 Platform Enterprise Edition components that are all unimplemented, Eclipse JVM will appear as a selectable deployment location. If you are testing a module that is deployed as part of a process application or a toolkit, IBM Process Center Server appears as a selectable deployment location.
If you have more than one module in your test configuration, the Deployment Location wizard will be preceded by a different deployment wizard that asks you to select a specific server for each module.
- Complete one of the following steps:
- If your module contains at least one component that is not a Java component or if you want to test a set of interacting modules, ensure that IBM Process Server is selected in the Deployment location list box. (This is the designated server for running SCA applications, BPEL business processes, human tasks, transition tables, business rules, selectors, and other resources. You can also use this server for running mediation flows contained in mediation modules.)
- If your module is deployed as part of a process application or a toolkit, ensure that IBM Process Center Server is selected as the deployment location. If there are multiple modules in the process application or toolkit, all the modules are tested.
- If your module is a mediation module, you can select WebSphere Enterprise Service Bus Server. (Generally, if you intend to eventually deploy your mediation module to a WebSphere Enterprise Service Bus production server, then WebSphere Enterprise Service Bus Server is a good choice. However, if you intend to eventually deploy your mediation module to an IBM BPM production server, then you may want to select IBM Process Server.)
- If your module only contains Java components and you don't want to test a set of interacting modules, or if your module contains Java 2 Platform Enterprise Edition resources but none of the components are implemented, you can select Eclipse JVM. (The main advantage to choosing the Eclipse JVM is that it starts more quickly than IBM Process Server or WebSphere Enterprise Service Bus. However, once started, the Eclipse JVM, IBM Process Server, and WebSphere Enterprise Service Bus all provide similar test performance.)
- In the Mode drop-down list, select either Run or Debug to start the server in Run or Debug mode. (If the server is already running in one of these modes, the Mode drop-down list will show the current server mode and it will be disabled.)
- Click Finish. If server security
is enabled for your selected server, a User Login window opens. Type your administrative user ID and password and click OK.
(The default user ID and password is admin.)
The server is started (if it is not already running) and the module is deployed to the server, which enables the invocation of your operation to continue. In the integration test client, the Events area rapidly
displays several events that together form a test trace of your test.
If a manual emulator is encountered, the test pauses at a manual Emulate event. If no manual emulator is encountered, the test will complete and pause at a Return event. When a test is run on the takeOrder operation of the example module OrderEntry, the test pauses at a manual Emulate event (because the CheckData component has no implementation and is being emulated).
- Before you specify values for your manual Emulate event to familiarize yourself with the detailed properties for each event that was generated before the manual Emulate
event. The actual events generated before the manual Invoke event
will vary depending on the operation that you chose to test.
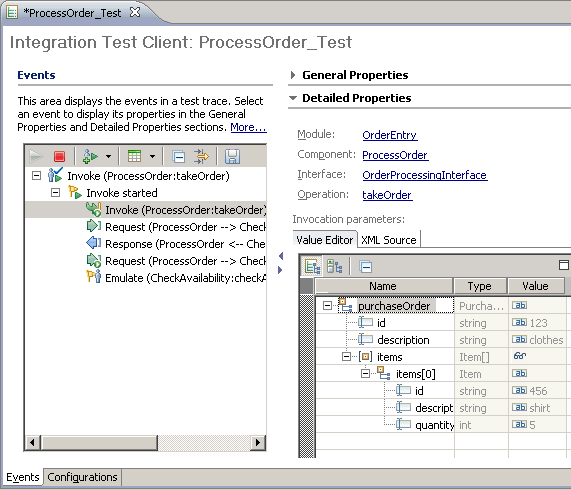
- In the Events area, select the Invoke event
under the Invoke started event. In the Detailed
Properties area, you can view the properties and the input parameter values that were passed to your operation.
For example, the input parameter values that were passed to the takeOrder operation are shown in the following figure:
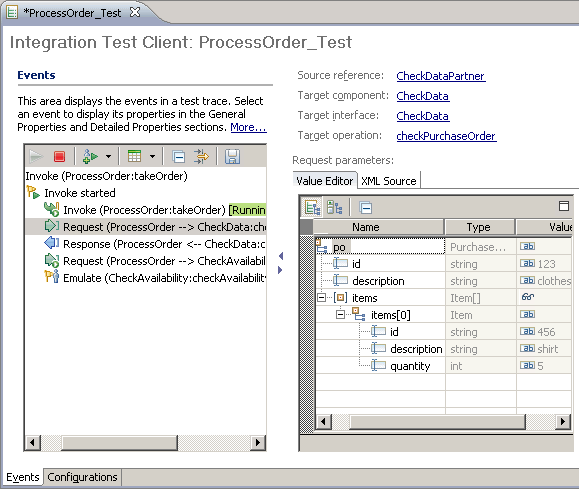
- In the Events area, select the monitor Request event
(if any exists). In the Detailed Properties area, you can view the request that was monitored as it flowed over the wire between components.
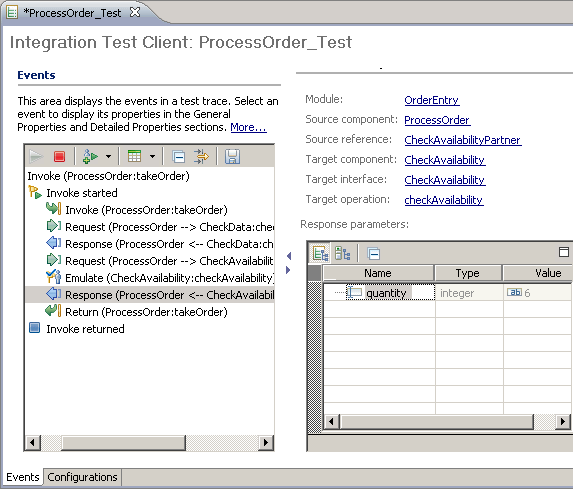
For example, the request that flowed over the wire from the ProcessOrder component to the CheckData component is shown in the following figure:
- In the Events area, select the Invoke event
under the Invoke started event. In the Detailed
Properties area, you can view the properties and the input parameter values that were passed to your operation.
- In the Events area, select the manual Emulate event
where the test is currently paused, as seen in the following figure:
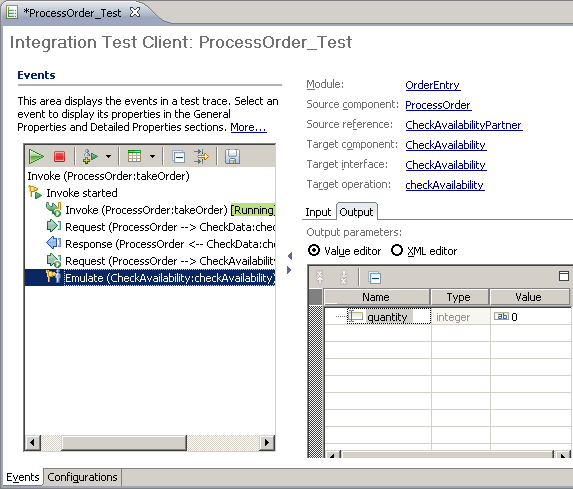
A manual emulation event is automatically generated in the following situations:
- You have chosen to test an entire module and the integration test client has encountered an unimplemented component.
- You have chosen to test a set of components or a single component in a module, which means that any other unselected components in the module are automatically emulated regardless of whether they are implemented or not.
Much like a manual Invoke event, a manual Emulate event is an interactive event that requires you to take some action before the test can continue. However, unlike a manual Invoke event, a manual emulation event requires you to either specify output parameter values or select an exception to throw.
The flow of control through an emulated component or reference may be contained in a transaction with a specific timeout value. If you do not specify the value in the allotted time, the transaction may time out and cause the invocation to fail with a timeout exception.
- Complete one of the following steps:
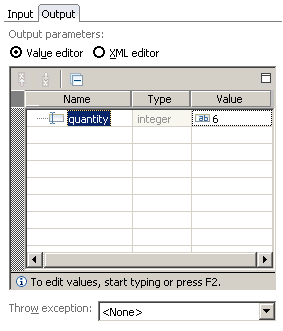
- If you want to pass output parameter values rather than throw an exception, specify the output values in the Value column of the Output value editor.
For example, the figure below shows the output value of 6:
- If you want to throw an exception, select the exception
that you want to throw from the Throw exception drop-down
list, then specify some values in the Output value editor. The Throw exception list box is shown
in the figure below:

If that the only exceptions that can be thrown are those that are specified as faults in the interface or in the throws clause of a Java interface.
- If you want to pass output parameter values rather than throw an exception, specify the output values in the Value column of the Output value editor.
- Click Continue to continue the invocation
of the operation. If you chose to pass some output parameter values rather than to throw an exception, the Events area displays a Return event
and the test completes. In the Detailed Properties area, the results of the operation are displayed.
For example, in the following figure, the value editor shows the results that were returned for the takeOrder operation:
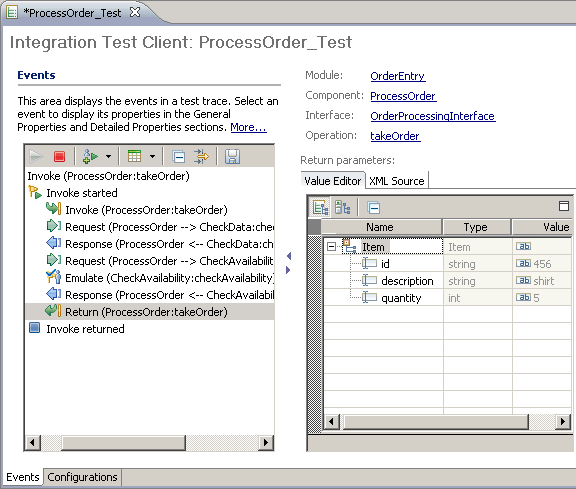
A Return event is automatically generated when the integration test client returns the results of the operation. A Return event is an informational event, which means that there is no action for you to take other than to view the results that were returned.
- To familiarize yourself with the detailed properties for a monitor Response event, select the monitor Response event
(if any exists). In the Detailed Properties area, you can view the response that was monitored as it flowed over the wire between components.
For example, the response that flowed over the wire from the CheckAvailability component to the ProcessOrder component is shown in the following figure:
- Complete one of the following steps:
- If you want to rerun the operation and either specify new output parameter values or select an exception to throw for the manual Emulate event, right-click the top-level Invoke event in the Events area and select Rerun.
- If you want to rerun the operation using the same output parameter values or exception that you used earlier for the manual emulator, right-click the top-level Invoke event in the Events area and select Rerun with Auto Emulate.
- If you want to select a different operation for testing, generate a manual Invoke event in the Events area by clicking the Invoke icon. Then select an operation, specify some input parameter values, and invoke the operation as described at the beginning of this topic.
- Press Ctrl-S at any time to save the current test trace to a test trace file. Information about working with a test trace is found in the topic "Managing test traces."