17.5 Binding the front end to the calculator
With the UI design completed, you can now hook it up to the CalculatorBean to perform the operations and display the result. Execute the following steps:
| 1.
| Import the CalculatorBean.
|
|
a.
Create a Java package named itso.jsf.calculator.
|
Figure 17-22 Creating a package
|
b.
Select the package and in the context menu, select Import....
|
|
c.
Select File System, locate and select the file CalculatorBean.java.
|
| 2.
| Open the calculate.jsp page in Page Designer and go to the Page Data view. In the context menu, select New | JavaBean (Figure 17-23).
|
Figure 17-23 Creating a new JavaBean in the page
|
a.
Enter calculator as the name.
|
|
b.
For the class click the Browse icon, then enter Calcu to locate the CalculatorBean. Click OK.
|
|
c.
Select Make this JavaBean reusable (this will create a new Managed Bean in faces-config.xml) and select session for the scope.
|
|
d.
Click Initialize Properties....
|
|
i.
In the dialog, click Add.
|
|
ii.
In the name column, select the operation property.
|
|
iii.
In the value column, enter Subtract and press Enter.
|
|
iv.
Click OK. When you run the code, the subtract operation will be preselected.
|
|
e.
Click Finish so the bean can be added to the Page Data view.
|
Figure 17-24 Defining the JavaBean
| 4.
| Open the faces-config.xml file and you will see the new managed bean.
|
| 5.
| The calculator bean is also added to the Calculate.java code with a getCalculator method.
|
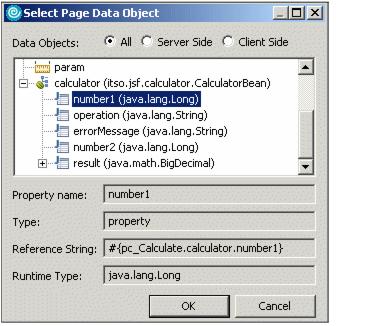
| 6.
| Select the first input field (number1).
|
a.
In the Properties view, for the Value field, click the  icon and select the number1 property of the calculator bean. icon and select the number1 property of the calculator bean.
|
|
b.
Notice the generated binding: #{pc_Calculate.calculator.number1} in the value field.
|
Figure 17-25 Page data objects
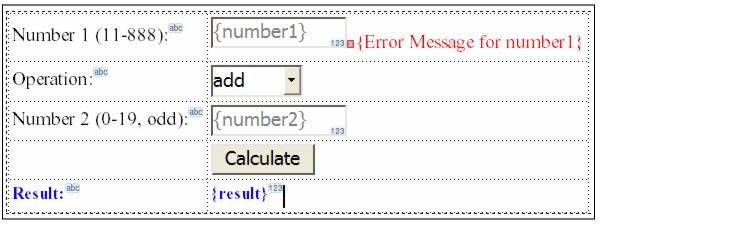
| 7.
| Repeat this for the number2 input field and bind it to the number2 property.
|
| 8.
| Expand the calculator bean in the Page Data view. Select the operation property and drag/drop it onto the combo box. This has the same effect. Select the result property and drag/drop it onto the output field in column 2.
|
| 10.
| The property names appear in the Design view for the input and output components, as shown in Figure 17-26.
|
Figure 17-26 Binding properties to the JSF components
|