17.3 Creating the page layout
Now you will create the basic JSP layout of the calculate.jsp.
| 1.
| In the Design view, select the text Place content here. and replace it with JSF Calculator.
|
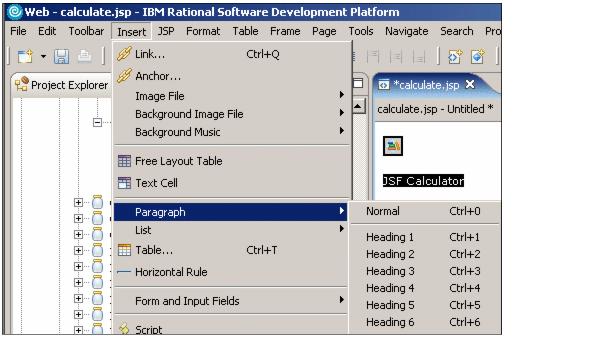
| 2.
| Select the text JSF Calculator, and on the top menu select Insert | Paragraph | Heading 1.
|
Figure 17-7 Portlet heading
| 3.
| Select the Output component in the Faces Components palette. Drag the cursor under the heading and drop the component.
|
Figure 17-8 Creating the page layout for the calculator
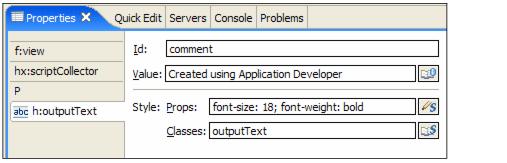
| 4.
| Select the outputText component in the Design view.
|
|
a.
In the Properties view, change the Id to comment.
|
|
b.
Change the Value to Created using Application Developer.
|
|
c.
Enter style properties: font-size: 18; font-weight: bold.
|
Figure 17-9 The comment component properties
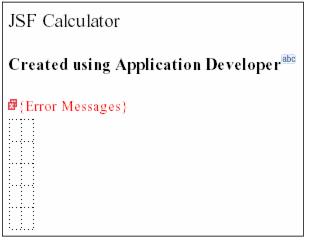
| 5.
| Position the cursor behind the output text and press Enter twice to add <BR>s.
|
| 6.
| From the palette, select the Display Errors component and drop it under the breaks. This is for validation error messages.
|
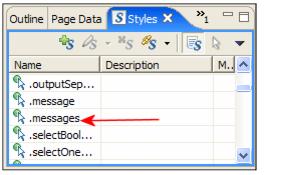
| 7.
| Select the new component and notice in the Properties view the messages style class (see Figure 17-10).
|
Figure 17-10 The messages component properties
| 8.
| Open the file stylesheet.css.
|
|
a.
In the Styles view (Figure 17-11), find the .messages class and open it (double-click it).
|
Figure 17-11 The Styles view
|
b.
In the Add Style --- .messages window, select Font and set the color to Red. Click OK and the code is inserted into the stylesheet.css file:
| .messages { color: red }
|
c.
Change the .message entry in the same way. This class will be used for error messages attached to one field. Save and close the stylesheet.css. The {Error Messages} component is now red.
|
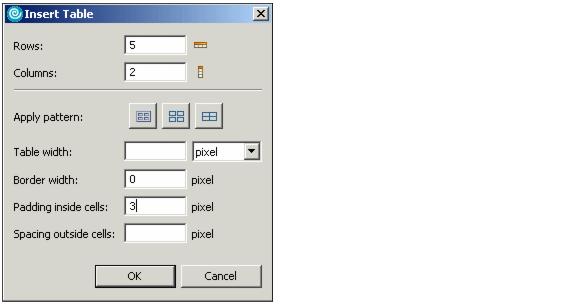
| 9.
| Insert a table with five rows and two columns under the error messages field. Select Insert | Table, change Rows to 5, Border width to 0, and Padding inside cells to 3.
|
Figure 17-12 Insert a table
| 10.
| Click OK. Your page now should look similar to Figure 17-13.
|
Figure 17-13 The page layout after inserting a table
| 11.
| Select File | Save All.
|
| 12.
| Open the Calculate.java file by selecting Edit Page Code from the context menu inside the JSP in Page Designer (right-click). You can also open the Java file directly, if you prefer. Notice the code that has been generated, for example:
| protected HtmlOutputText comment;
protected HtmlOutputText getComment() {
if (comment == null) {
comment = (HtmlOutputText) findComponentInRoot("comment");
}
return comment;
}
Notice also that each component is defined with a lazy getter method; therefore you will never use the variable in your own methods, but always in the associated getter method.
|
a.
Drop Output components into column 1, rows 1, 2, 3, and 5.
|
|
b.
Drop Input components into column 2, rows 1 and 3.
|
|
c.
Drop a Combo Box component into column 2 row 2.
|
|
d.
Drop a Command - Button component into column 2 row 4.
|
|
e.
Drop an Output component into column 2 row 5.
|
The table should now look as illustrated in Figure 17-14.
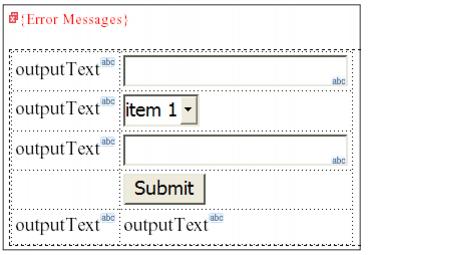
Figure 17-14 Inserting JSF components into the table
| 14.
| Change the Output components in column 1. Select each component and in the Properties view change the Value field (Figure 17-15):
|
|
a.
Column 1 row 1: Number 1 (11-888):
|
|
b.
Column 1 row 2: Operation:
|
|
c.
Column 1 row 3: Number 2 (0-19, odd):
|
|
d.
Column 1 row 5: Result:
|
The table should now look as illustrated in Figure 17-15.
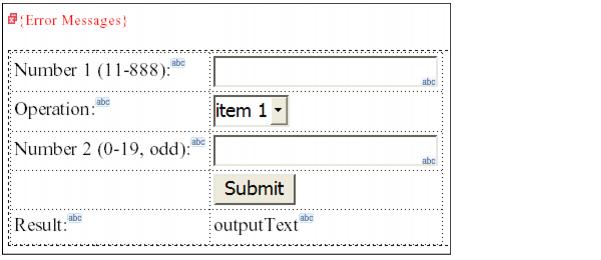
Figure 17-15 Changing the output components value property
| 15.
| Select File | Save All.
|
|