|
14.2.6 Adding support to Edit mode
To add support to Edit mode in our portlet, proceed as follows:
| 1.
| Edit the web.xml deployment descriptor.
|
|
a.
Expand Dynamic Web Projects | MyFirstStruts.
|
|
b.
Double-click Deployment Descriptor: MyFirstStruts.
|
|
c.
In the editor, go to the servlets page.
|
|
d.
Select myFirstStruts.MyFirstStrutsPortlet.
|
|
e.
In the Initialization section, click Add.
|
|
f.
Enter config/html/edit as the parameter name, and /WEB-INF/html/edit/struts-config.xml as the parameter value.
|
|
i.
Under the Welcome pages section, click Add.
|
|
j.
Enter html/edit/welcome.jsp as the new welcome page name. This will be the welcome page in Edit mode, for a html markup.
|
|
k.
Save the file and close the editor.
|
|
a.
Double-click Portlet Deployment Descriptor.
|
|
b.
Expand Portlet Application.
|
|
c.
Select myfirststruts.MyFirstStrutsPortlet.
|
|
d.
In the Markups section, click under Edit and select Fragment. (Figure 14-10).
|
Figure 14-10 Adding support to Edit mode
|
e.
Save the file and close the editor.
|
| 3.
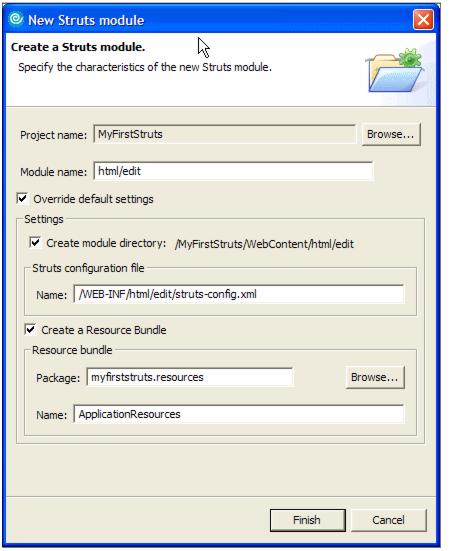
| Add a new struts module to support the Edit mode.
|
Note that you pointed to the same resources file that you had already created.
Figure 14-11 New Struts module wizard
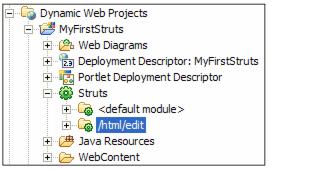
At this time, a new Struts module should appear under the Struts icon, as shown in Figure 14-12.
Figure 14-12 The new Struts module
| 4.
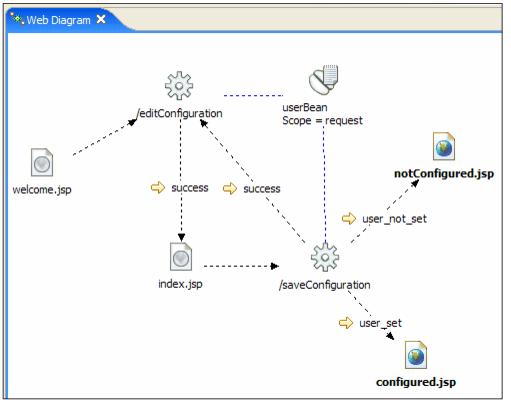
| Create a new Web diagram for the Edit mode.
|
|
a.
Right-click Web Diagram.
|
|
b.
Select New | Web Diagram.
|
|
c.
Enter editMode as the Web diagram file name.
|
|
d.
Place four Web pages in the diagram. Name them html/edit/welcome.jsp, html/edit/index.jsp, configured.jsp and notConfigured.jsp.
|
|
e.
Place two action mappings in the diagram. Name them saveConfiguration and editConfiguration.
|
|
f.
Place a form bean in the diagram. In the Form bean attributes window that appears, enter userBean as its name and request as the scope.
|
|
g.
Create the connections between the components; these are:
|
|
i.
welcome.jsp to editConfiguration.
|
|
ii.
editConfiguration to userBean.
|
|
iii.
saveConfiguration to userBean.
|
|
iv.
Local forward named success from editConfiguration to index.jsp.
|
|
v.
index.jsp to saveConfiguration.
|
|
vi.
Local forward named success from saveConfiguration to editConfiguration.
|
|
vii.
Local forward named user_not_set from saveConfiguration to notConfigured.jsp.
|
|
viii.
Local forward named user_set from saveConfiguration to configured.jsp.
|
|
h.
Right-click anywhere in the Web diagram. Select Change the Struts module association.
|
|
i.
Select /html/edit in the list. Click OK.
|
Figure 14-13 The Web diagram for Edit mode
|