7.6.3 Create the target portlet
In this section, you will use the wizard to create the target portlet to receive the message sent by ActionEventPortlet.java.
- Click...
File | New | Portlet
If you do not see this option, select File | New | Other and then select Portlet under Portal folder and click Next to continue.
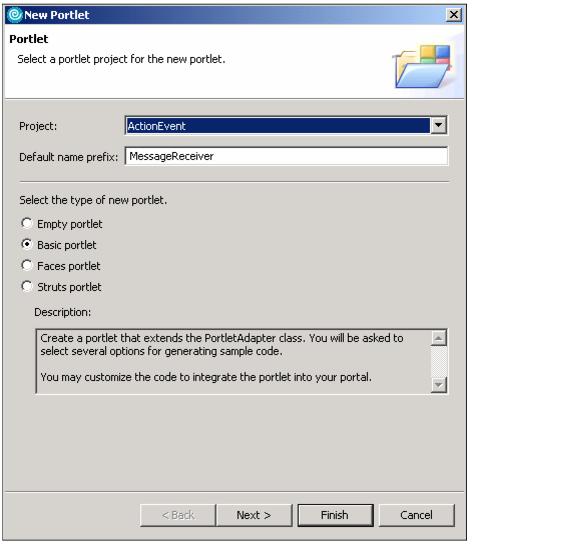
- In the next window, enter the following information:
Project: select ActionEvent from the list. Default name prefix: MessageReceiver Select the type of new portlet: Basic portlet 
- Click Next.
- Examine and accept the default values in the portlet settings window and click Next.
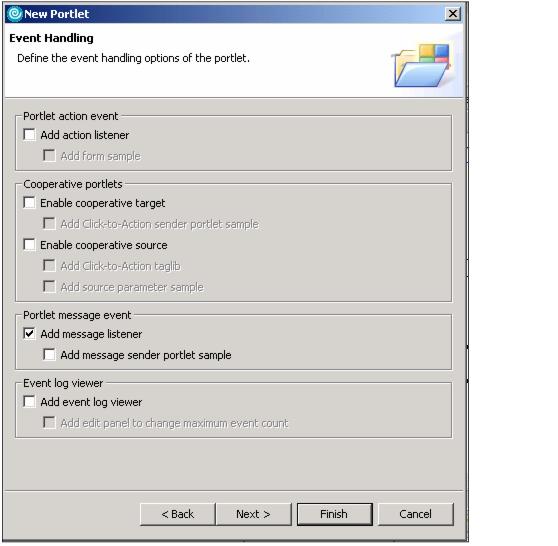
- Uncheck the Add form sample and the Add action listener boxes. Check the Add message listener box to add the messageReceived method. Click Next.

- Do not check the Add credential vault handling box (not required in this sample scenario). Click Next.
- Leave the options for markups and modes unchecked. Click Finish to add the portlet to your project.
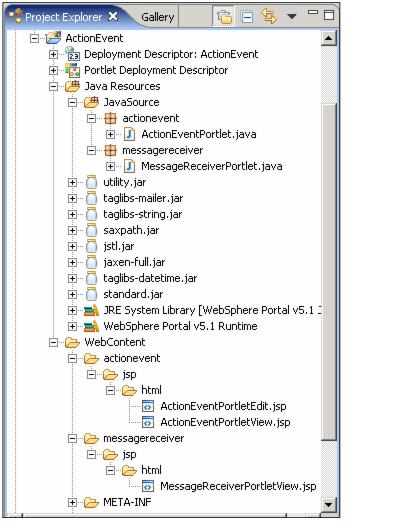
- You will now see the new portlet files in the Project Explorer panel.

- Open the MessageReceiverPortlet.java file located in the /Java Resources/JavaSource/messagereceiver/ folder by double-clicking it.
- Add the following highlighted code to this file to receive the broadcast Portlet Message in the messageReceived() method.
The messageReceived() method implements the logic to receive the PortletMessage. In this example, you only need to check for messages of type DefaultPortletMessage, which is the type of message sent by ActionEventPortlet. Then the message is extracted via the getMessage() method, and you set the text of this message into a portlet request as an attribute with name MyMessage.
... public void messageReceived(MessageEvent event) throws PortletException { if( getPortletLog().isDebugEnabled() ) getPortletLog().debug("MessageListener - messageReceived called"); // MessageEvent handler PortletMessage msg = event.getMessage(); // Add PortletMessage handler here if( msg instanceof DefaultPortletMessage ) { String messageText = ((DefaultPortletMessage)msg).getMessage(); // Add DefaultPortletMessage handler here PortletRequest request = event.getRequest(); request.setAttribute("MyMessage", messageText); } else { // Add general PortletMessage handler here } } ... - When you are done, save the file and exit.
- Now that you can receive the message, you will need to modify the MessageReceiverPortletView.jsp to display the message to the user. To edit this file, open the /WebContent/messagereceiver/jsp/html/ folder and double-click the file.
The Java code inside the scriptlet checks the value of the portlet request attribute MyMessage. If null, no message has been received yet, and it displays that it is ready to receive a message. If not null, the message is displayed with HTML markup. Make the following changes.
<%@ page session="false" contentType="text/html" import="java.util.*, messagereceiver.*"%> <%@ taglib uri="/WEB-INF/tld/portlet.tld" prefix="portletAPI" %> <portletAPI:init/> <DIV style="margin: 6px"> <H3 style="margin-bottom: 3px">Welcome!</H3> <p>This is a sample <B>view mode</B> page. <p>You have to edit this page to customize it for your own use.<BR> <p>The source file for this page is... <p><blockquote> "/Web Content/messagereceiver/jsp/html/MessageReceiverPortletView.jsp". </blockquote> <p> <% if (request.getAttribute("MyMessage") == null) { %> <B>Ready to receive message ... </B> <% } else { %> <B>Received a message:</B> <B><%= request.getAttribute("MyMessage") %></B> <% } %> </DIV> - When you are done, save the file and exit.
You have now implemented the code to receive and display a broadcast portlet message to the user.
Prev | Next