Tutorial: Create and publish content
Use pages, projects, and workflow to create and approve draft pages. Changes are syndicated to a delivery server.
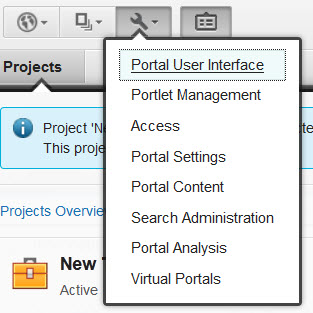
Most actions originate from the site toolbar.

1a Site menu
Switch between the sites hosted on a single portal server.
1b Application menu
Access content, collaboration, messaging, personalization, and unified task list.
1c Administration menu
Access the administration portlets.
2 Toolbar
Access to authoring tools such as Projects, Create, and Page.
From the Projects tab, content authors create new projects to manage multiple changes. The tab displays the content created or changed in the website for that project. Each content item can be managed individually. The content author can also create project templates.
From the Create tab, content authors can create pages, add applications to a page, or add content to a page.
The content shelf contains Web Content Viewer portlets preconfigured with content associations. When the content author drags content to the page, a copy of the associated content is added to the page. Then the content author can customize the content.
From the Page tab, content authors can view and modify page settings, such as layout, vanity URLs, and more.
3 Project indicator
Access to the project menu. Displays the currently active project. If there is no active project, then the indicator shows "Published Site" and we are viewing the currently published website.
4 Edit Mode
Turn editing capability on and off.
5 Information Mode
Turns inline user assistance on and off. Inline assistance includes descriptions and examples that appear in the user interface and hover help.
Currently this mode is only implemented in the site toolbar.
6 Menu
> Provide access to additional page and preview actions.
Page actions include: View Page Properties, Show Hidden Pages, Show Hidden Content, Move Page, and Delete Page.
Preview actions include: Preview as a specific user and preview as an unauthenticated user.
Create users and groups
The tutorial uses multiple user roles to demonstrate how content is created and flows through the system. To complete the steps in the tutorial as they are documented, create the groups and user IDs.This tutorial uses the following user roles, IDs, and group assignments.
| User Role | User ID | Group |
|---|---|---|
| Site administrator | SiteAdmin | wpsadmins
This group already exists and we do not need to create it. |
| Content author | Pohl | ContentEditors |
| Content reviewer | Halliwell | ContentReviewers |
| Content approver | Gernsback | ContentApprovers |
The tutorial highlights four user roles, the site administrator, content author, content reviewer, and content approver. Each user role performs specific tasks in the tutorial.
- Site administrator (SiteAdmin)
- The site administrator has administrator privileges in the portal and in WCM. SiteAdmin
is part of the user group wpsadmins, and does these tasks:
- Sets up workflow stages and creates a custom workflow.
- Creates a page template that uses the custom workflow.
- Specifies access control settings where needed.
- Sets up a syndication relationship between the authoring server and the delivery server.
- Publishes projects for syndication.
- Content author (Pohl)
- The content author is responsible for a certain portion of the site and can create pages. In addition the content author adds and edits content on those pages. Pohl is part of the user group ContentEditors.
- Content reviewer (Halliwell)
- Halliwell reviews changes submitted by content authors and either approves or rejects the individual changes. Upon approval, Halliwell submits the complete project for approval. Halliwell is part of the group ContentReviewers.
- Content approver (Gernsback)
- Gernsback oversees changes to the site and is responsible for approving projects for publishing. Gernsback is part of the group ContentApprovers.
Procedure
- Click...
-
Administration menu | Access | Users and Groups | All Portal User Groups | New Group
Set ContentEditors as the ID. Repeat this step to create ContentReviewers and ContentApprovers.
- Click...
-
ContentApprovers | New User
...and create Gernsback.
- Click All Portal User Groups in the breadcrumb.
- Click...
-
ContentEditors | New User
...and create Pohl.
- Click All Portal User Groups in the breadcrumb.
- Click...
-
ContentReviewers | New User
...and create Halliwell.
- Click All Portal User Groups in the breadcrumb.
- Click...
-
wpsadmins | New User
...and create SiteAdmin.
Step 1. Set up library access
The SiteAdmin must grant library access to content authors and approvers.
In this step, access is defined for the following libraries:
- Portal Site
- Page objects and content for pages are stored in the Portal Site library. Contributor access is required for the ContentEditors group.
- Web Content
- The custom workflow and workflow stages are stored in the Web Content library. Contributor access is required for the ContentEditors, ContentReviewers, and ContentApprovers groups.
- As user SiteAdmin, click...
-
Administration menu | Portal Content | Web Content Libraries
- Set permissions for the Portal Site library.
- Click the Set permissions icon for the Portal Site library.
- Click the Edit Role icon for the Editor role.
- Click Add. Then, click Search to show all groups.
- Select the ContentEditors group.
- Click the Set permissions icon for the Portal Site library.
- Click...
-
Portal Content | Web Content Libraries
- Set permissions for the Web Content library.
- Click the Set permissions icon for the Web Content library.
- Click the Edit Role icon for the Contributor role.
- Click Add. Click Search to show all groups.
- Select the ContentEditors, ContentReviewers, and ContentApprovers group.
- Click the Set permissions icon for the Web Content library.
What to do next
In addition to appropriate access to libraries, content authors require Editor access to any pages and portlets involved. This access enables authors to create pages and add portlets to pages. This tutorial relies on sample content with predefined access. However, if we use our own content, ensure specified sufficient access on these resources in the portal so authors can work with them.
Step 2. Set up syndication
Updates to pages and content are transferred from the authoring server to the delivery server with syndication. The SiteAdmin sets up syndication between the required web content libraries of the two servers.
The delivery server is the subscriber. The authoring server is the syndicator.
- Log in to the delivery server as an administrator.
- Create a shared credential vault slot for accessing the syndicator.
- Click...
-
Toolbar | Administration | Access | Credential Vault | Add a vault slot
- Enter a name for the vault slot. For example, syndication-slot.
- Click new, and enter a vault resource to associate with the slot. For example, syndication-resource
- Click Vault slot is shared, and enter the user ID and password to access the slot from the authoring server. This user ID and password must be defined on the authoring server. This tutorial uses the credentials for SiteAdmin.
- Click OK.
- Click...
- Then, click...
-
Portal Content | Subscribers | Subscribe Now
- Specify the details for the syndicator and subscriber.
- In the Syndicator URL field, enter the URL to access the authoring server.
This URL takes the form...
-
http://hostname:port/wcm_context_root
The default context root for WCM is wps/wcm. For example:
- http://www.example.com:10039/wps/wcm
- In the Syndicator Name field, enter a name to identify the authoring server in the syndication relationship.
This name is used for the syndicator item created on the authoring server.
- In the Subscriber Name field, enter a name to identify the delivery server in the syndication relationship.
This name is used for the subscriber item created on the delivery server.
- In the Credential Vault Slot field, select the credential vault slot created previously. For example, syndication-slot
- Click Next, and select the libraries to syndicate.
The following libraries are needed for this tutorial:
- Portal Site: Contains page artifacts and related content.
- Web Content: Contains workflow items.
- Web Content Templates 3.0: Required for sample web content items.
- Template Page Content 3.0: Required for sample web content items.
For each library, select Live items in the Scope field.
- Portal Site: Contains page artifacts and related content.
- Click Finish.
- To verify the syndication connection, click the Test connection icon.
- In the Syndicator URL field, enter the URL to access the authoring server.
Step 3. Create workflow
Pages created in this tutorial are subject to custom workflow attached to a page template. Before creating the page template on the authoring server, the SiteAdmin creates the custom workflow. The custom workflow is stored in the Web Content library, and contains the following stages:
| Workflow stage | Access | Group | Description |
|---|---|---|---|
| Draft | Grant Manager Access | ContentEditors | Already exists. Enable authors to edit content in the draft state. |
| Grant Reviewer Access | ContentEditors | Enable authors to move items to the next stage in the workflow. | |
| Publish | Grant Draft Creator Access | ContentEditors | Already exists. Enable authors to create drafts of published content. |
| Review | Grant User Access | ContentEditors | Enable authors to view the status of content in the review stage. |
| Grant Reviewer Access | ContentReviewers | Only reviewers can submit draft content for approval. |
Draft and Publish stage are available for immediate use.
Create the Review stage...
- Log in to the authoring server as SiteAdmin.
- Create the Review workflow stage.
- Click...
-
Applications menu | Content | Web Content Authoring tab | Web Content | Workflow Items | Workflow Stages | New | Workflow Stage
- Enter "Review Stage" for the workflow stage name.
- Click Save and Close.
- Click...
- Edit the access for Draft workflow stage.
- Click...
-
Draft workflow stage | Edit | Workflow Defined Access | Grant Manager Access
- Type Co in the search field and click Search.
- Select...
-
ContentEditors | Add | OK | Grant Reviewer Access
- Type Co in the search field and click Search.
- Select...
-
ContentReviewers | Add | OK | Save | Close.
- Click...
- Edit the access for Publish workflow stage.
- Click...
-
Publish workflow stage | Edit | Workflow Defined Access | Grant Draft Creator Access
- Type Co in the search field and click Search.
- Select ContentEditors and click Add. Click OK..
- Click Save and Close.
- Click...
- Edit the access for Review workflow stage.
- Click...
-
Review workflow stage | Edit | Workflow Defined Access | Grant User Access
- Type Co in the search field and click Search.
- Select ContentEditors and click Add. Click OK..
- Click Grant Reviewer Access.
- Type Co in the search field and click Search.
- Select ContentReviewers and click Add. Click OK..
- Click Save and Close.
In the following example screen capture shows the access settings for Review workflow stage. The ContentEditors group is listed with User access, and the ContentReviewers group is listed with Approver access.

- Click...
- Create the custom workflow named Workflow1.
- Click...
-
Web Content (breadcrumb) | Workflow Items | Workflows | New | Workflow
- Enter Workflow1 for the workflow name.
- In the Workflow Properties section, click...
-
Add Workflow Stages
...and add the following stages, in the following order...
- Draft Stage
- Review Stage
- Publish Stage

- Save the changes.
- Click...
Step 4. Create page template
Because page changes need to be approved before they are published, we specify a custom workflow (Workflow1) in page template properties. Changes to the page will be subject to the Workflow1 workflow.
- From the Site menu, click Home to go to the default site.
- Click the Site menu drop down click New Project
We can set a workflow only on items in a draft state. Because of this behavior, create the template as a draft in the context of a project. By working in a project, we can also verify the workflow to verify the stages behave as expected.
- Type SyFyTemplate and click Create.
The new project is shown as the active project.
- Create the page template.
- Turn on Edit Mode.
- Click...
- Administration menu icon | Portal User Interface
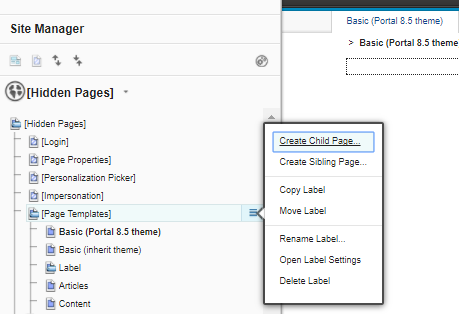
- Click Page Templates
- Right-click "Page Templates", then from context menu, select "Create Child Page".
- Use the Basic template and type SyFyTemplate as the page title of the new page template. We must be in Edit mode.
- Click Create Page.
Parentheses around the page name indicate the page is in a draft state. Close the toolbar to view the page.
- Turn on Edit Mode.
- Add the custom workflow to the page template.
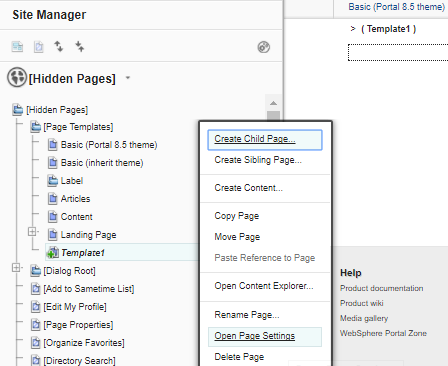
- Right-click "SyFyTemplate", then from context menu, select "Open Page Settings".
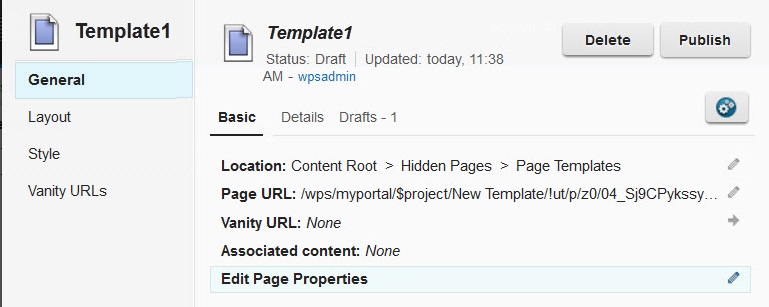
- Select: "Edit Page Properties"
- Click...
-
Security tab | Workflow, | Select | Web Content library | Workflow1 | OK
The page draft enters the selected workflow. Confirm the current workflow stage by clicking the Details tab, and examining the workflow properties. In this case, Draft is the current stage and Review is the next stage.
- Close the Manage Page Properties dialog.
- Right-click "SyFyTemplate", then from context menu, select "Open Page Settings".
- Complete the workflow for the draft template.
Before we can publish the project and make the new page template available to users, we must move the template through the workflow.
- On the General page, click Submit for Review.
The Submit for Review button is only available to users that have Approver access on the current workflow stage.
When we click Submit for Review, the draft item progresses to the next stage in the current workflow. The template moves to the Review Stage of the Workflow1 workflow. The General view displays the current workflow stage.
- Click Publish to move the template into the publish state.
- On the General page, click Submit for Review.
- Click Projects.
With the SyFyTemplate project as the current project, click Publish.

- After the project is published, we are taken out of the project context and restored to the published site.
SyFyTemplate is listed with the other page templates on the Create Page tab.
Workflow changes are not dynamically applied to any page templates that use the workflow. If we change the workflow, or its stages, after publishing the project containing the template, set the workflow again:
- Create a project.
- Edit the page template, and specify the workflow again on the Security tab in the page properties.
- Move the template through the workflow, and publish the project.
Step 5. Create News page from template, and submit changes for review
The News page itself is created by SiteAdmin, and is based on SyFyTemplate.
- Create a project to manage updates.
- Open the toolbar, and click Site Menu > New Project
- Enter "SyFy News Section" as the project name.
- Click...
-
Create | Manage Project | Edit | Approval | Add
- Search for Gernsback and add the user.
When the project changes are reviewed and submitted, Gernsback can do the final approval of the complete project. This review step is a separate review from the review of individual items in the project. Even if item workflow is complete for all items in the project, the updates cannot be published until the project is approved.
- On the Properties tab, expand the Access section.
- For the Editor access level, click...
-
Grant Editor Access
- Search for the ContentReviewer group and add it.
This access is needed to enable the reviewer to view the items in the project and do the approval steps.
- Click Save and Close.
We use access settings on the Publish stage of the workflow to enable authors to create drafts of published content by granting authors Approver access. This approach ensures that authors cannot directly edit published content. The ContentEditors group has Approver access on the Publish stage of the Workflow1 workflow. Because Pohl is a member of the ContentEditors group, Pohl is able to create a draft of the News page.
To return to the Manage Project page after closing the "SyFy News Section" page, click...
-
Site Menu > SyFy News Section > Open overview
- Open the toolbar, and click Site Menu > New Project
- Add the News page to the project.
- From the open project, SyFy News Section, click...
-
More | Add to Project | Portal Site | Content | Content Root | Home | News | Finish
- Close the Projects.
- From the open project, SyFy News Section, click...
- Go to the News page.
- From the toolbar, click Create > Page.
Because Pohl has access only to the News page, the Page tab only lets we create a child page.
- Select SyFyTemplate, and type Business for the name of the page.
- Click Create Page.
Pages created in the portal are stored in the Portal Site library. For example, in this tutorial, when Pohl creates the Business page, a corresponding site area is created in the Portal Site library. The path to the portal page site area includes the entire page hierarchy up to the content root:
- Content > Content Root > Home > News > Business
- From the toolbar, click Create > Page.
- Add content to the Business page.
- Click Content.
- Click Web Content from the list of categories. The site toolbar shows a list of preconfigured Web Content Viewer portlets we can add to the page.
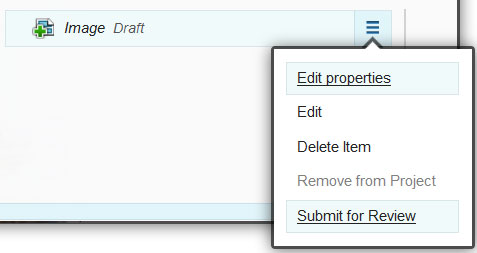
- Add Rich Text and an Image to the page. Close the toolbar to see the new content on the page.
- Click Content.
- Click Projects.

- When content changes are complete, submit each item in the project for review.
Step 6. Approve changes in the SyFy News Section project
General flow...
- Halliwell reviews the changes and submits the project for approval.
- Gernsback accesses the project and approves the updates for publishing
- SiteAdmin publishes the project changes to authoring server.
Procedure
- Halliwell opens the SyFy News Section project in edit mode.
- Open the site toolbar, and click Projects.
- Select SyFy News Section from the list of projects.
The list of projects includes only those projects to which we have access.
- For each item, click Publish.

- Open the site toolbar, and click Projects.
- Then Gernsback, can open the SyFy News Section project and approve the project.

- When the project changes are approved, SiteAdmin publishes the project by making the News Update project the current project and clicking Publish from the project menu.
Related tasks:
Preview as another user
Step 7. Syndicate changes to delivery server
After SiteAdmin publishes the project, the updates are ready for syndication to the delivery server. Although syndication runs at scheduled intervals, SiteAdmin accesses the delivery server and manually starts the syndication process.
- Log in to the delivery server as an administrator.
- Click...
-
Administration menu icon | Portal Content | Subscribers | Update subscriber icon
Results
After syndication completes, the delivery server is automatically updated with the Business page and its associated content.
