Creating a Struts Web connection
A connection is typically used to connect two nodes in a Web diagram. In a Struts context, when a connection is dragged from a Struts action, a pop-up connection wizard is displayed, enabling the user to create the connection. When any of these connections are realized, the corresponding Struts action mapping entry in the Struts configuration file struts-config.xml is modified appropriately. As in prior sections, after the connections are dragged and defined on the palette, the realization occurs automatically.
When you select Connection from the palette and drag it from a Struts action to any other node, you are able to create the following actions:

| Action Input: When the Struts validation framework is used, the action has to forward the control back to the page that invoked the action in case of validation failures. This is specified by specifying an action input mapping.
|

| Include Action Mapping: The action in the action mapping entry is configured as an include.
|

| Forward Action Mapping: The action in the action mapping entry is configured as a forward.
|

| Global Forward: When Global Forward is selected, a global forward entry is added in the configuration file.
|

| Local Forward: When Local Forward is selected, a local forward entry is added in the configuration file.
|

| Local Exception: When Local Exception is selected, the handler class that is created is invoked when the Struts action throws the local exception.
|

| Global Exception: When Global Exception is selected, a global exception entry is added in the configuration file.
|
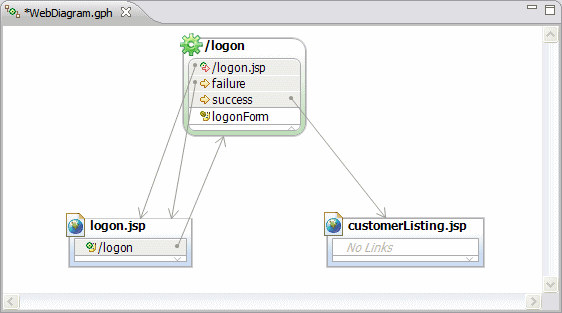
In our sample, when a user enters an invalid customer ID (SSN), the logon action fails and then forwards the user back to the logon page to enable the user to re-enter this information. Likewise, if the logon action succeeds, the customer has to be forwarded to the customerListing.jsp that displays the customer's account information.
To create the local forwards for success and failures for the logon action, do these steps:

| Select Connection in the Palette. Click the logon.jsp and drag the cursor to the /logon action. Select Struts Form when prompted.
|

| Select Connection in the Palette. Click the /logon action and drag the cursor to the logon.jsp. Select Action Input when prompted.
|

| Select Connection in the Palette. Click the /logon action and drag the cursor to the customerListing.jsp. Select Local Forward when prompted. Accept the generated forward name of success.
|

| Select Connection in the Palette. Click the /logon action and drag the cursor to the logon.jsp. Select Local Forward when prompted. Accept the generated forward name of failure. Note that you can select the forward name and overtype it.
|

| Save the Web Diagram.
|
|
Tip: You can select a component in the Web diagram and overtype the name and the forward names.
To improve the layout of the application flow, you can drag components to another spot. You can rearrange connections by dragging their middle point.
|

Figure 15-10 Struts components: Creating connections


