WebSphere Lombardi Edition 7.2 > Modeling processes > Advanced modeling tasks > Build Coaches
Add documents and reports to Coaches
Lombardi Coaches enable you to attach documents and reports to aid end
users as they perform the tasks generated by Lombardi activities. Read the
following topics to learn more:
- Choose the type of documents to attach to a Coach
- Attaching Lombardi documents to a Coach
- Attaching ECM documents to a Coach
- Embedding documents in a Coach
- Embedding Lombardi reports in a Coach
Choose the type of documents to attach to a Coach
The Document Attachment control works with Lombardi documents or documents stored in an Enterprise Content Management (ECM) repository. Lombardi documents are any documents that your end users can access by browsing their file system or via a URL. To use the Document Attachment Coach control to access documents from an ECM repository, you can configure the control to work with IBM Content Integrator Enterprise Edition, enabling end users to access documents from FileNet P8 Content Manager and Content Manger Enterprise Edition. (See WebSphere Lombardi Edition Release Notes for the versions of supported IBM ECM products.)
Before you can access documents from an ECM repository using the Document Attachment control, IBM Content Integrator SOA Web services must be deployed on an application server. The IBM Content Integrator Information Center provides information about the WAR file that you can use for deployment and instructions for configuring the WAR file. See Deploying > Deploy SOA Web Services in the IBM Content Integrator Information Center
The following steps describe how to establish which type of documents
you want to display and upload using the Document Attachment control:
- Open the service that contains the Coach that you want to work with and then click the Coaches tab.
- Drag a Document Attachment control from the palette onto the design area.
- While the Document Attachment control is selected, click the Document Attachment option in the properties if not already selected.
-
In the Behavior section, select the Connection Type from the drop-down list: Lombardi documents or IBM Content Integrator
If you select Lombardi documents, you can configure the control to display and upload documents
If you select IBM Content Integrator, complete the remaining steps in this procedure.
-
Click the Connection option in the properties.
-
Provide the following information:
IBM Content Integrator (ICI) Web Service URL The root URL of the deployed application (SOA Web services). Repository ID The name of the IBM Content Integrator connector that you want to use to access the ECM repository. User name User name required to log in to the ECM repository. Password Password required to log in to ECM repository. - Configure the control to display and upload documents as described in Attaching ECM documents to a Coach.
Attaching Lombardi documents to a Coach
When you add the Document Attachment control to a Coach, documents that were previously uploaded during completion of a Lombardi task are displayed. You can configure the control to display only those documents that match properties that you set. For example, you can configure the control to display only those documents associated with a specific client or customer. Plus, you can limit the displayed documents to only those documents uploaded during the execution of the current process instance. In addition to displaying documents, you can also configure the Document Attachment control to enable end users to upload additional documents.
The following procedure describes how to display a list of Lombardi
documents in your Coach using the Document Attachment control:
- Open the service that contains the Coach that you want to work with and then click the Coaches tab.
- Drag a Document Attachment control from the palette onto the design area or click to select an existing control.
- While the Document Attachment control is selected, click the Presentation option in the properties.
-
By default, the Associated Process Instance check box under Display Documents is enabled. This setting causes the control to display only those documents uploaded in previous steps of the running process instance. If you disable this check box, the control displays all documents, regardless of the instance, BPD, or process application from which they originated. Therefore, if you disable this check box, be sure to set properties that clearly identify the documents to display. If you don't, the number of displayed documents could be much larger than expected or than is useful.
-
If you want this control to display documents according to properties that you set, click the All Properties or Any Properties radio button under Display Documents. Then click the Add button to add the properties that will determine which documents are displayed. Each property should have a name and a value. For example, you might add a property with a name of client and a value of smith.
If you select All Properties, documents must match all properties that you add. If you select Any Properties, if documents match any one of the properties that you specify, the control displays them.
The document properties that you add should match the properties set for uploaded documents. For example, if you want to display documents that end users uploaded in an earlier step, examine the Coach for the earlier step to see the properties established for those uploaded documents. If you want to display documents from a different process, open the BPD and its services and then examine the properties established for those uploaded documents.
- Save the Coach and then run the service or BPD to test your configuration. If the same service enables users to upload documents in a preceding step, you can run the service to test the configuration. If not, you must run the BPD so that the current control has access to documents to display.
- To configure the same Document Attachment control to enable document uploads, see the following procedure. If you don't want to configure this control for document uploads clear the Enabled check box under Upload Documents.
The following procedure describes how to enable end users to upload
Lombardi documents using the Document Attachment control:
- Open the service that contains the Coach that you want to work with and then click the Coaches tab.
- Drag a Document Attachment control from the palette onto the design area or click on a preexisting Document Attachment control to select it.
- While the Document Attachment control is selected, click the Presentation option in the properties.
- By default, the Enabled check box under Upload Documents is enabled. This setting causes the control to display an Add Document button. When the service runs, the end user can click the Add Document button and then use the fields provided to browse for the URL or file that they want to upload, provide a title for the document, and then click OK to upload the document. The end user can upload multiple documents using the control.
-
To supply a default name for all documents that the end user uploads, type the JavaScript for the default in the Default Name text box. For example, type <#= tw.system.user_fullName #> to make the current user name the default name for uploaded documents.
If you supply a default name, but want the end user to be able to change the default, click the User Editable check box to enable it.
-
Click the Add Properties check box to enable it if you want to add properties to uploaded documents. Then click the Add button to add the properties that you want. Each property should have a name and a value. For example, you might add a property with a name of client and a value of smith.
The properties that you add to uploaded documents enhance the Display Documents capability of the control. All properties that you add to uploaded documents can be used to select the documents to display. See the preceding procedure for more information about using properties to display particular documents.
- Save the Coach and then run the service or BPD to test your configuration.
To see an example of how these controls appear to end users, see the Work with documents section in theLombardi Process Portal User Guide or online help.
Attaching ECM documents to a Coach
Before you can attach documents stored in an Enterprise Content Management (ECM) repository to a Coach, you need to establish a connection to the repository After the connection is established, you can use the Document Attachment Coach control.
When you add the Document Attachment control to a Coach, documents from the connected ECM repository can be displayed. You should configure the control to display only those documents that match properties that you set. For example, you can configure the control to display only those documents associated with a specific client or customer. In addition to displaying documents, you can also configure the Document Attachment control to enable end users to upload additional documents to the ECM repository.
The following procedure describes how to display a list of ECM documents in your Coach using the Document Attachment control:
- Open the service that contains the Coach that you want to work with and then click the Coaches tab.
- Drag a Document Attachment control from the palette onto the design area or click to select an existing Document Attachment control.
- While the Document Attachment control is selected, click the Presentation option in the properties.
-
In the Item Class Name field, enter the name of the document type that you want to retrieve from the ECM repository and click the Add button.
The dialog displays all properties that exist for the document type that you specify. This enables you to choose the properties to use to determine the documents to display.
- To remove unwanted properties, click the property name and then click the Remove button.
-
You can also establish a filter for particular properties.
For example, if one of the properties for a document type is ClientIndustry, you could limit the results to a specific industry by entering the following text in the Filter Value column: automotive. You can also use an * (asterisk) as a wildcard when establishing filters. For example, enter the following text to filter for all properties that begin with auto: auto*. Or, simply enter an asterisk to retrieve documents for all properties: *.
The filters that you specify must match the actual property values in the ECM repository.
-
Click the All Properties or Any Properties radio button.
If you select All Properties, documents must match all properties that you add to be displayed. If you select Any Properties, if documents match any one of the properties that you specify, the control displays them.
-
In the Display table, enter the value that you want the Coach interface to use as the label for each property. Enter a value in the Display Value column for each property.
- Save the Coach and then run the service or BPD to test your configuration.
- To configure the same Document Attachment control to enable document uploads, see the following procedure. If you don't want to configure this control for document uploads clear the Enabled check box under Upload Documents.
The following procedure describes how to enable end users to upload
documents to the connected ECM repository using the Document Attachment
control:
- Open the service that contains the Coach that you want to work with and then click the Coaches tab.
- Drag a Document Attachment control from the palette onto the design area or click on a preexisting Document Attachment control to select it.
- While the Document Attachment control is selected, click the Presentation option in the properties.
- By default, the Enabled check box under Upload Documents is enabled. This setting causes the control to display an Add Document button. When the service runs, the end user can click the Add Document button and then use the fields provided to browse for the file that they want to upload to the ECM repository, provide a title for the document, and then click OK to upload the document. The end user can upload multiple documents to the connected ECM repository using the control.
-
To supply a default name for all documents that the end user uploads, type the JavaScript for the default in the Default Name text box. For example, type <#= tw.system.user_fullName #> to make the current user name the default name for uploaded documents.
If you supply a default name, but want the end user to be able to change the default, click the User Editable check box to enable it.
-
Click the Add Properties check box to enable it if you want to add properties to uploaded documents. Then click the Add button to add the properties that you want. Each property should have a name and a value.
- Save the Coach and then run the service or BPD to test your configuration.
To see an example of how these controls appear to end users, see the Work with documents section in theLombardi Process Portal User Guide or online help.
Embedding documents in a Coach
The Document Viewer Coach control enables you to display the contents of an Enterprise Content Management (ECM) or Lombardi document in a separate frame directly within a Coach. You can configure the Document Viewer Coach control to display one of several documents that the end user chooses from a list, or to display a single document. The Coach control works with IBM Content Integrator Enterprise Edition, enabling end users to access documents from FileNet P8 Content Manager and Content Manger Enterprise Edition. (See WebSphere Lombardi Edition Release Notes for the versions of supported IBM ECM products.)
The following procedure describes how to configure the Document Viewer Coach control to enable end users to display a document from a list:
- Open the service that contains the Coach that you want to work with and then click the Coaches tab.
- Drag a Document Viewer control from the palette onto the design area or click on a preexisting Document Viewer control to select it.
- Click the Document Viewer option in the properties.
- For the Association field, choose Document Attachment from the drop-down list.
-
For the Control field, choose the Document Attachment control currently included in your Coach that you want to associate with this Document Viewer control.
The Document Attachment control establishes the list of documents from which the end user can choose. When an end user selects one of the documents, it is displayed in the viewer.
See Attaching Lombardi documents to a Coach and Attaching ECM documents to a Coach to learn how to configure a Document Attachment Coach control.
- Save the Coach and then run the service or BPD to test your configuration.
The following procedures describe how to configure the Document Viewer Coach control to display a single document. First choose your connection type...
- Open the service that contains the Coach that you want to work with and then click the Coaches tab.
- Drag a Document Viewer control from the palette onto the design area or click on a preexisting Document Viewer control to select it.
- Click the Document Viewer option in the properties.
- For the Association field, choose None from the drop-down list.
- Click the Presentation option in the properties.
- Select the Connection Type from the drop-down list: Lombardi documents, IBM Content Integrator, or URL
For an IBM Content Integrator connection, complete the following
steps:
- If not already selected, click the Presentation option in the properties.
-
Provide the following information for the IBM Content Integrator connection:
Before you can access documents from an ECM repository using the Document Viewer control, IBM Content Integrator SOA Web services must be deployed on an application server. The IBM Content Integrator Information Center provides information about the WAR file that you can use for deployment and instructions for configuring the WAR file. See Deploying > Deploy SOA Web Services in the IBM Content Integrator Information Center (http://www-01.ibm.com/software/data/content-management/content-integrator/).
IBM Content Integrator (ICI) Web Service URL The root URL of the deployed application (SOA Web services). Repository ID The name of the IBM Content Integrator connector that you want to use to access the ECM repository. User name User name required to log in to the ECM repository. Password Password required to log in to ECM repository. -
In the Item Class Name field, enter the name of the document type that you want to retrieve from the ECM repository and click the Add button.
The dialog displays all properties that exist for the document type that you specify. This enables you to choose the properties to use to determine the document to display. The control displays the first document that matches the properties that you choose.
- To remove unwanted properties, click the property name and then click the Remove button.
-
You can also establish a filter for particular properties.
For example, if one of the properties for a document type is ClientIndustry, you could limit the results to a specific industry by entering the following text in the Filter Value column: automotive.
The filters that you specify must match the actual property values in the ECM repository.
-
For the First Document Matching field, click the All Properties or Any Properties radio button.
If you select All Properties, the document must match all properties that you add to be displayed. If you select Any Properties, if a document matches any one of the properties that you specify, the control displays it.
- Save the Coach and then run the service or BPD to test your configuration.
For Lombardi documents, complete the following steps:
- If not already selected, click the Presentation option in the properties.
-
By default, the Associated Process Instance check box is enabled. This setting causes the control to search only those documents uploaded in previous steps of the running process instance. If you disable this check box, the control searches all previously added Lombardi documents, regardless of the instance, BPD, or process application from which they originated.
-
For the First Document Matching field, click the All Properties or Any Properties radio button. The Document Viewer control displays the first document that matches the properties that you choose.
If you select All Properties, the document must match all properties that you add. If you select Any Properties, if a document matches any one of the properties that you specify, the control displays it.
-
Click the Add button to add the properties that will determine which document is displayed. Each property should have a name and a value. For example, you might add a property with a name of client and a value of smith.
The document properties that you add should match the properties set for uploaded documents. For example, if you want to display a document that end users uploaded in an earlier step, examine the Coach for the earlier step to see the properties established for those uploaded documents. If you want to display a document from a different process, open the BPD and its services and then examine the properties established for those uploaded documents.
- Save the Coach and then run the service or BPD to test your configuration. If the same service enables users to upload documents in a preceding step, you can run the service to test the configuration. If not, you must run the BPD so that the current control has access to documents to display.
If you chose URL as the connection type for the Document Viewer
control, complete the following steps:
- If not already selected, click the Presentation option in the properties.
-
In the URL field, type the location of the document that you want to display.
- Save the Coach and then run the service or BPD to test your configuration.
Embedding Lombardi reports in a Coach
Lombardi reports provide valuable information about your business processes. (See Create reports for more information.) The data available in a Lombardi report can help process participants make decisions regarding tasks and task assignments. For this reason, you may want to embed Lombardi reports in your Coaches so that end users can make informed decisions with the business data that they need directly available.
To embed a Lombardi report in a Coach:
- Open the service that contains the Coach that you want to work with and then click the Coaches tab.
- Drag a Report control from the palette onto the design area.
- While the Report control is selected, click the Presentation option in the properties.
-
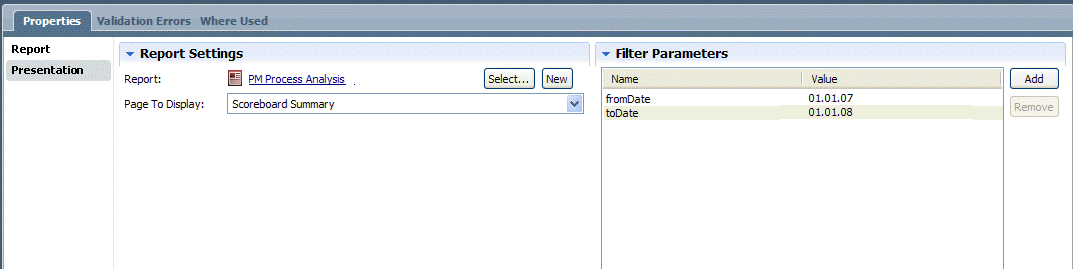
Under Report Settings, click the Select button to choose the Lombardi report that you want to embed.
You can click the New button to create a new report
- In the Page to Display field, use the drop-down list to choose the report page that you want to display in your Coach.
-
In the Filter Parameters area, click the Add button to choose parameters by which you want to filter the report results. Provide the appropriate value in the Value column as shown in the following example:
- Click the Report option in the properties. In the Common area, you can provide documentation for the report and add a label.
- In the Behavior area, you can provide an unique control ID for the report and adjust the number of rows and columns that the report spans within the Coach.
- Save the Coach and the run the service to ensure the report is displayed properly.
Parent topic: Build Coaches