Create a simple portlet
Before you begin developing portlets, you should setup an environment that makes the tasks of writing, compiling, and testing portlets easier. Portal Toolkit includes a test environment that you can use to run and debug your portlets without having to manually deploy them to the server. Setup the runtime environment for debugging portlets on the local development machine or on a remote server. See Install for development for complete setup instructions.
Portal Toolkit provides wizards to help you build, test, and deploy portlets using all of the APIs and related classes and interfaces available in the portlet runtime environment. You can also build portlets using your own development environment and tools. If you are not using wizards to develop portlets, the following topics describe the mechanics of building a simple portlet.
- Writing the portlet code
- Compiling Java source
- Writing the portlet descriptors
- Set up the WAR file directory structure
- Packaging and deploying a portlet
- Packaging a portlet and resources into a WAR file
- Loading classes for portlets
Writing the portlet code
The Hello World portlet provides an introduction to writing your first portlet. The portlet is provided along with the source in the wp_root/dev/samples directory in the file HelloWorld.war. Hello World extends the PortletAdapter helper class and provides the fewest methods required for a portlet. It uses the PortletResponse to write simple output directly to the portal page.
package com.ibm.wps.samples;

import org.apache.jetspeed.portlet.*;
import java.io.*;

public class HelloWorld extends PortletAdapter {

   public void init(PortletConfig portletConfig) throws UnavailableException
   {
      super.init( portletConfig );
   }

   public void doView( PortletRequest portletRequest, PortletResponse portletResponse )
               throws PortletException, IOException
   {
      PrintWriter writer = portletResponse.getWriter();
      writer.println("<p class='wpsPortletText'>Hello Portal World!</p>");
   }

}
Compiling Java source
Use the JDK provided by WebSphere Application Server to compile your Java source files. Before you compile your Java source, set the CLASSPATH for the compiler to find the JAR files for any portlet packages that your portlet uses. The following JAR files should always be set in the CLASSPATH to compile:
   wp_root/shared/app/portlet-api.jar;
   wp_root/shared/app/wpsportlets.jar;
   wp_root/shared/app/wps.jar;
where was_root is the directory where WebSphere Application Server is installed. Additionally, if you require any classes for servlet functionality, add the following:
   was_root/lib/j2ee.jar;
   was_root/lib/dynacache.jar;
Then, compile the portlet using the fully-qualified path to the Java portlet source.
javac -classpath %CLASSPATH% com.ibm.wps.samples.HelloWorld.java
Be aware that portal server class loading follows the WebSphere Application Server hierarchy for classpaths and search orders. Classes that are needed by the portlet must be loaded by either the portlet's classloader or one of its parent classloaders. See Loading classes for portlets for more information.
Create the JAR file
Next, the portlet must be packaged in the JAR file format. To create a JAR file with the name HelloWorld.jar, enter the following command:
jar -cf HelloWorld.jar HelloWorld.class
Refer to the JDK documentation for more information about the JAR command.
Writing the portlet descriptors
The following samples can be packaged with the Hello World portlet. See Deployment descriptors for complete information about this topic.
Web application deployment descriptor:
<?xml version="1.0" encoding="UTF-8"?>
<!DOCTYPE web-app PUBLIC "-//Sun Microsystems, Inc.//DTD Web Application 2.3//EN"
                         "http://java.sun.com/dtd/web-app_2_3.dtd">
<web-app id="WebApp">
 <display-name>HelloWorld</display-name>
 <servlet id="com.ibm.wps.samples.HelloWorld.a0ae41f2d3c1001710b7b313e1a97">
        <servlet-name>HelloWorld</servlet-name>
        <servlet-class>com.ibm.wps.samples.HelloWorld</servlet-class>
 </servlet>
    <servlet-mapping id="ServletMapping_com.ibm.wps.samples.HelloWorld.a0ae41f2d3c1001710b7b313e1a97">
        <servlet-name>HelloWorld</servlet-name>
        <url-pattern>/HelloWorld/*</url-pattern>
    </servlet-mapping>
</web-app>
Portlet deployment descriptor:
As described in Linking the servlet, portlet, and concrete portlet, the href attribute of the <portlet/> element references the servlet ID from Web deployment descriptor.
The portlet deployment descriptor references the portlet_1.1.dtd, which portal server finds in the was_root/installedApps/hostname/wps.ear/wps.war/dtd directory. Do not package the DTD with the portlet application WAR file.
<?xml version="1.0" encoding="UTF-8"?>
<!DOCTYPE portlet-app-def PUBLIC "-//IBM//DTD Portlet Application 1.1//EN"
                                 "portlet_1.1.dtd">
<portlet-app-def>
   <portlet-app uid="com.ibm.wps.samples.HelloWorld.a0ae41f2d3c1001710b7b313e1a97"
                major-version="1" minor-version="0">
      <portlet-app-name>HelloWorld application</portlet-app-name>
      <portlet id="com.ibm.wps.samples.HelloWorld"
               href="WEB-INF/web.xml#com.ibm.wps.samples.HelloWorld.a0ae41f2d3c1001710b7b313e1a97"
               major-version="1" minor-version="0">
         <portlet-name>HelloWorld portlet</portlet-name>
         <cache>
            <expires>0</expires>
            <shared>NO</shared>
         </cache>
         <allows>
            <maximized/>
            <minimized/>
         </allows>
         <supports>
            <markup name="html">
               <view/>
            </markup>
         </supports>
      </portlet>
   </portlet-app>
   <concrete-portlet-app uid="com.ibm.wps.samples.HelloWorld.313e1a97f47.2">
      <portlet-app-name>HelloWorld application</portlet-app-name>
      <concrete-portlet href="#com.ibm.wps.samples.HelloWorld">
         <portlet-name>HelloWorld portlet</portlet-name>
         <default-locale>en</default-locale>
         <language locale="en">
            <title>HelloWorld portlet</title>
            <title-short></title-short>
            <description></description>
            <keywords></keywords>
         </language>
      </concrete-portlet>
   </concrete-portlet-app>
</portlet-app-def>
Set up the WAR file directory structure
Before you package your portlet, the class files and resources must be arranged in the WAR file directory structure described here. A portlet application exists as a structured hierarchy of directories.
Do not package the portlet_1.1.dtd or the portlet.tld with the portlet application WAR file.
- /
- The root directory of the portlet file structure.
- /images
- Location for any images the required by the portlet.
- /WEB-INF
- Location for all protected resources.
The /WEB-INF directory stores the portlet descriptor
document and all of the runtime executable
JAR files and classes that the packaged portlet requires.
The portlet information directory is not part of the public document tree of the application. Files that reside in /WEB-INF are not served directly to a client.
- /WEB-INF/lib
- Location for storing portlet JAR files.
- /jsp
- Location for JSP files. This is a suggested path name. Your JSPs can be packaged in any location outside of the /WEB-INF directory.
- /WEB-INF/classes
- Location for portlet class files.
Individual class files should be stored in a directory structure
within /WEB-INF/classes that reflects the class package.
For example, the class HelloWorld.class,
in package com.ibm.wps.samples, would be stored in
/WEB-INF/classes/com/ibm/wps/samples/HelloWorld.class . - /META-INF
- Location for the manifest file, manifest.mf. The manifest is in the standard JAR file format as defined by the Java 1.3 specification. The contents of the /META-INF directory is not served to clients.
Packaging and deploying portlets
To deploy a portlet and run it on the server, it must be packaged in the form of a Web application ARchive or WAR file. The WAR file format contains the Java classes and resources that make up one or more portlets in a portlet application. The resources can be images, JSP files, portlet descriptors, and property files containing translated message text. Packaging portlet classes, resources, and descriptive information in a single file makes distribution and deployment of portlets easier.
WebSphere Portal includes an administrative portlet for installing, uninstalling, and updating portlets. Portlets contained in WAR files have the advantage of being dynamically downloaded and installed. The portal administrator can download a WAR file from the Internet and then use the portal administration interface to install the portlet to WebSphere Portal. After installation, the portlet is ready for use and does not require the server to be restarted. To package your portlet in a WAR file, you can use the JAR utility to package the files .
Because Windows limits the maximum path length to 260 characters, the name of the WAR file must be less than 25 characters. On a portal server running on Windows, installing a WAR file with a name that is more than 25 characters will result in an error.
Packaging a portlet and resources into a WAR file
Any JAR utility may be used to build a WAR file. Below are examples of how
to use the JAR utility provided by WebSphere Application Server.
- To create a WAR file with the name HelloWorld.war and include
all of the files in the /WEB-INF and
/imagesdirectories:jar -cf HelloWorld.war images WEB-INF
- To update an existing WAR file, HelloWorld.war with a revised
portlet descriptor:
jar -uf HelloWorld.war WEB-INF/portlet.xml
- To extract the portlet descriptor from the WAR file, HelloWorld.war
:
jar -xf HelloWorld.war WEB-INF/portlet.xml
- To extract all files from an existing WAR file, HelloWorld.war:
jar -xf HelloWorld.war
After the WAR file is created, it can be installed to WebSphere Portal as described in portal administration .
Loading classes for portlets
WebSphere Portal classloading follows the WebSphere Application Server hierarchy for classpaths and search orders. A particular classloader can reference other classes as long as the other classes can be loaded by the same classloader or any of its ancestors, but not its children. The graphic illustrates where WebSphere Portal and portlet applications fit into the classloading hierarchy.
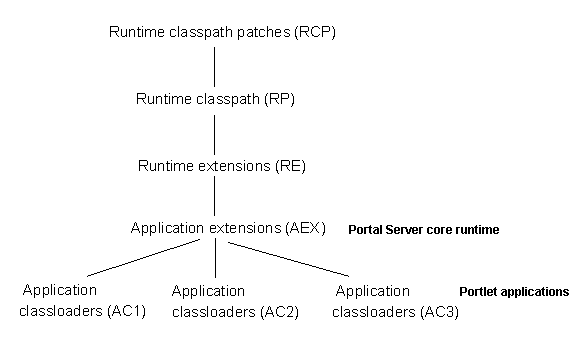
As illustrated, WebSphere Portal is an application extension (AEX) under WebSphere Application Server. Consequently, the WebSphere Portal core classes are in the classpath wp_root/shared/app. If an installed portlet application includes a classloader, the portlet application classloader is an application classloader (ACx) under the WebSphere Portal.
If you suspect a classloading problem, ensure that the required classes are in the appropriate classpath according to the classloading hierarchy.
See also