Setting up Domino Directory
- Example of the Domino Directory directory structure
- Specifying Server Configuration Settings for LDAP
- Adding portal administrators to the Domino Directory
- Update the Access Control List of the Domino Directory
Use the IBM Web Administration for iSeries tool when configuring WebSphere Portal instances. The wizard creates the necessary servers (HTTP and WAS), configures the server for Portal, configures the database for Portal, configures security (LDAP) for Portal, and deploys the portlets installed with the WebSphere Portal product. You can edit the Portal instance configuration manually after you have used the WebSphere Portal wizard.
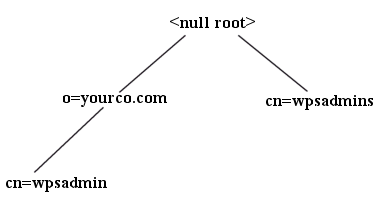
Example of the Domino Directory directory structure
The following schema is an example for Domino Directory and is referenced throughout the documentation for consistency. The example below is designed to help you determine the appropriate values when configuring WebSphere Portal to work with the specific directory layout. The values shown match the default values for this LDAP. If you have an existing schema that varies from this example, replace the example values with the values. For instance, cn is shown as the group prefix; replace cn with the group prefix for the schema.
|
|
It is recommended that Domino be used as the LDAP server if no existing directory is already in place. Also, if you intend to make use of Lotus Collaborative Components, it is recommended that you use Domino as the LDAP server. If there is already a non-Domino directory server in place, you might want to use Domino's Directory Assistance feature to incorporate the existing directory with Domino. If you intend to use Domino as the LDAP server for WebSphere Portal, configure Domino Directory in Domino Administrator or the Notes client before you install WebSphere Portal.
Specifying Server Configuration Settings for LDAP
LDAP configuration settings for Domino 5.0.12
The following instructions are specific to Lotus Domino 5.0.12, which is shipped with some versions of WebSphere Portal. To specify the Configuration Settings for Domino Directory, follow these steps:
- In the Domino Administration or the Notes client, open the server's Domino Directory, names.nsf, and navigate to the view Server - Configurations.
- Open the global configuration Configuration Settings document. If a global configuration document does not exist, click Add Configuration to create a new configuration document and display Configuration Settings.
- On the Basics tab, for the option Use these settings as the default settings for all servers, click Yes.
You must select Yes to cause the LDAP tab to appear for use in the next step.
- On the LDAP tab, click the << >> button to Choose fields that anonymous users can query via LDAP. The LDAP Field List dialog box appears for you to specify the Person and Server fields.
- From the Form dropdown list, select Person and click Show Fields.
- From the Fields in Form, select the following fields to add them to the Person form:
MailFile
Mail Server
SametimeServer - From the Form drop-down list, select Server\Server and click Show Fields.
- From the Fields in Form, select the following fields to add them to the Server form:
HTTP_HostName
NetAddresses - Click OK to close the LDAP Field List dialog box and return to the Configuration Settings document, the LDAP tab.
- Ensure that the Anonymous users can query field displays the following attributes:
AltFullName
Certificate
FirstName
FullName
HTTP_HostName
InternetAddress
LastName
ListName
Location
MailAddress
MailDomain
MailFile
MailServer
Members
NetAddresses
PublicKey
SametimeServer
ShortName
userCertificate - For the option Allow LDAP users write access, click Yes. This setting ensures that portal users can use the self-care and self-registration features of WebSphere Portal.
- Keep all other default LDAP settings in Configuration Settings.
- Click Save and Close to close Configuration Settings.
- If you are using an existing user as the portal administrator, go to Update the Access Control List of the Domino Directory. If you are adding a new user to act as the portal administrator, go to Adding portal administrators to the Domino Directory.
LDAP configuration settings for Domino 6.0.x and 6.5.x
Features of the portal require that LDAP users access specific attritube types in Domino. For example, within the edit mode of some collaborative portlets, a picker list of available servers displays if the user has access to the attributes shown in the steps below.
You can configure Domino to allow anonymous access for the LDAP users, or you can set up a bind user to LDAP by modifying settings in the CSEnvironment.properties file. Setting this bind user enables authenticated LDAP. The following instructions provide steps that enable anonymous LDAP users to access these attributes.
If you want to set up authenticated LDAP, see the topic Reference: Additional configuration for Lotus Collaborative Components.
To configure anonymous access for LDAP users, include all the attributes shown in the following steps, including the attribute HTTP-HostName. Because the attribute HTTP-HostName does not display for the default LDAP schema of Domino 6.x, extend the schema to add the attribute.
For complete information, refer to the Domino documentation on the Lotus Web site at: http://www.lotus.com/ldd/doc. The guide, Lotus Domino 6 Administering the Domino System, Volume 1 provides details about setting up the LDAP service and methods for extending the schema.
To allow anonymous users to query LDAP
Step 1: Add the HTTP-HostName attribute to the schema.
- Make sure that you have Manager access to the Schema database (SCHEMA.NSF).
- Open the Schema database on any server in the domain that runs the LDAP service.
- Select the All Schema Documents view, then click New Document - Add Attribute Type.
- Complete these fields on the Basics tab:
Field Action LDAP name Enter HTTP-HostName for the attribute. OID Enter the object identifier: 2.16.840.1.113678.2.2.2.2.461 Syntax name Select Directory String Description (Optional) Enter a description for the attribute. Equality match (Optional) Select a matching rule to apply when the equality operator is used to search for this attribute. Ordering match (Optional) Select a matching rule to apply when an ordering operator is used to search for this attribute. Substrings match (Optional) Select a matching rule to apply when a substring operator is used to search for this attribute. Single valued Choose one: Choose one: - Yes to allow more than one value for the attribute (default)
- No to allow only one value
Collective Choose one: - Yes to allow the values for this attribute to be shared
- No to prevent values from being shared (default)
No user modification Choose one: - Yes to prevent users from modifying the values
- No to allow users to modify values (default)
- Click Save & Close. A draft document for the HTTP-HostName attribute appears in the Draft Documents - Draft Attribute Types view.
- Select the HTTP-HostName draft documents, and click Approve - Approve Selected Drafts.
Step 2: Complete the configuration
- Use the Domino Administrator interface to open the Domino Directory, names.nsf, for the server.
- Navigate to the view Configuration - Servers.
- Highlight Configurations and then open the Configuration Settings document. If a global configuration document does not exist, click Add Configuration to create a new configuration document and display Configuration Settings.
- On the Basics tab, for the option Use
these settings as the default settings for all servers, click Yes.
You must select Yes to cause the LDAP tab to appear for use in the next step.
- On the LDAP tab, click the button next to Select Attribute Types to open the LDAP Attribute Type Selection dialog box.
- From the Object Classes drop-down list, select *, and then click Display Attributes.
- From Selectable Attribute Types box, select the following fields, and then
click Add to add them the Queriable Attribute Types box.
AltFullName
dominoCertificate
givenName
HTTP-HostName
Location
mail
MailAddress
MailDomain
MailFile
MailServer
member
NetAddresses
PublicKey
Sametime
sn
uid
userCertificate - Click OK to close the LDAP Attribute Type Selection dialog box, and return to the Configuration Settings document.
- Ensure that the Anonymous users can query field displays the following attributes:
AltFullName
dominoCertificate
givenName
HTTP-HostName
Location
mail
MailAddress
MailDomain
MailFile
MailServer
member
NetAddresses
PublicKey
Sametime
sn
uid
userCertificate - For the option Allow LDAP users write access, click Yes. This setting ensures that portal users can use the self-care and self-registration features of WebSphere Portal.
- Keep all other default LDAP settings in Configuration Settings.
- Click Save and Close to close Configuration Settings.
- If you are using an existing user as the portal administrator, go to Update the Access Control List of the Domino Directory. If you are adding a new user to act as the portal administrator, go to Adding portal administrators to the Domino Directory.
Adding portal administrators to the Domino Directory
If you do not have a user to administer the portal or you do not have an existing LDAP, create a new user to act as the portal administrator. The following steps should be followed if the portal administrative user does not exist in the directory.
- Navigate to the People view of the Domino Directory and, from the action bar, click Add Person.
- In the New Person form, enter the following values in the fields shown:
Last Name: wpsbind User name: wpsbind/<DominoDomain>, where DominoDomain is the Domino Domain Short name/UserID: wpsbind Internet password: wpsbind
Make sure that you enter two values in the User name field, where the first value includes the Domino Domain.
- Click Save and Close to save the new person record for wpsbind and return to the People view of the Domino Directory.
- From the action bar, click Add Person and complete the New Person form to add the portal administrator ID as follows:
Last name: wpsadmin, where wpsadmin is the user ID for the portal administrator. User name: wpsadmin/<DominoDomain>, where wpsadmin is the user ID for the portal administrator and DominoDomain is the Domino Domain Short name/UserID: wpsadmin, where wpsadmin is the user ID for the portal administrator Internet password: wpsadmin, where wpsadmin is the password for the portal administrator
Make sure that you enter two values in the User Name field, where the first value includes the Domino Domain.
- Click Save and Close to save the new person record for the new administrative user and return to the People view of the Domino Directory.
- Navigate to the Groups view of the Domino Directory and, from the action bar, click Add Group.
- In the New Group form, on the Basics tab, enter the following values in the fields shown to create the portal administrators group wpsadmins and add the wpsbind, and the portal administrative user. You can add additional users to administer the portal, if desired.
- Group name: wpsadmins
- Group type: Multi-purpose
- Members: wpsbind
- wpsadmin, where wpsadmin is the user ID for the portal administrator.
- Click Save and Close to save the wpsadmins group.
- See Update the Access Control List of the Domino Directory to assign the necessary permissions to the new administrative group and users.
Update the Access Control List of the Domino Directory
You must ensure that the administrator group, wpsadmins, has the proper permissions and roles in the Domino Directory.
- In the Domino Administration or in the Lotus Notes client, open the server's Domino Directory (names.nsf), and from the main menu, choose File - Database - Access Control to open names.nsf.
- In the Access Control List - Basics, ensure that the portal administrators group wpsadmins has either Author access or Editor access for all roles available.
- For the wpsadmins group, add and assign the following Role Types:
- GroupCreator
- GroupModifier
- UserCreator
- UserModifier
- Click OK to save these changes to the Access Control List of the Domino Directory.
- Select Exit in the Domino Administrator or Notes client.
Next steps
You have completed this step. Continue to the next step by choosing one of the following topics:
See also