Configure a trust association interceptor
For more information about trust association interceptors, see Trust associations.
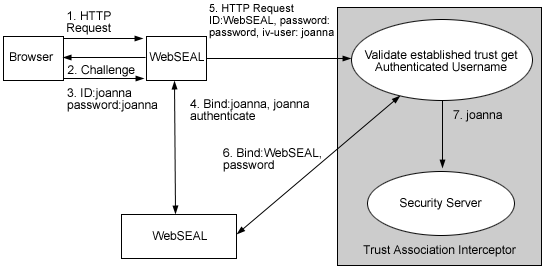
A typical scenario where the trust association interceptor (TAI) is used is better understood based on an environment where IBM Tivoli WebSeal product is deployed and used with WebSphere Application Server. For WebSeal, there is an implementation of the TAI already provided with the product. These steps outline the typical flow of an HTTP request for a secured WebSphere Application Server resource authenticated by WebSeal, through a Web trust association.
- The browser makes a request for a secured WebSphere resource.
- WebSeal sends back a challenge, either an HTTP Basic authentication or form-based challenge.
- User name and password are supplied.
- WebSeal authenticates the user.
- The modified request is forwarded by WebSeal to the WebSphere Application Server.
- The plug-in (TAI) uses the validateEstablishedTrust method to establish that WebSphere Application Server trusts the WebSeal server.
- The plug-in extracts the end-user name from the iv-user header field and passes it to the WebSphere Application Server to handle authorization.
Note: Versions 3.9 and higher of WebSeal do not send the user ID and password to the server. Trust is based on a mutual secure sockets layer connection established between WebSeal and the WebSphere Application Server. As a result, steps 6 and 7 do not apply to versions 3.9 and higher of WebSeal.

When you set up security for the first time, you need to complete the following steps if you want to use WebSeal Trust Association Interceptor or your own trust association interceptor with a reverse proxy security server.
Perform these steps in the WebSphere administrative console:
-
In the topology tree, expand Security --> Authentication mechanisms and click LTPA.
-
Click Trust Association.
-
Select Enable Trust Association.
-
Click Interceptors.
-
Select the interceptor that you want to configure. For additional information, see Trust association interceptor settings.

- If you are using WebSeal Interceptor, select com.ibm.ws.security.web.WebSealTrustAssociationInterceptor.
- To set up additional interceptors, perform these steps:
- Click New.
- Specify the classname for the interceptor.
- Click Apply.
-
To configure an interceptor, click the interceptor classname.
-
Click Custom Properties.
-
On the Custom Properties page, click New.
-
Specify the property name and value pairs. These are the name and value pairs for WebSeal:
Property name Value com.ibm.websphere.security.trustassociation.types Webseal com.ibm.websphere.security.webseal.loginID (The ID of the WebSeal server) com.ibm.websphere.security.webseal.id iv-user. This is a special header field that is sent by WebSeal with the request to WebSphere Application Server. It is not necessary to specify the host name of the machine where your WebSeal server is running or the port where WebSeal receives the user requests. If you want to restrict the hostname and or the port where a user can send requests, add these properties:
Property name Value com.ibm.websphere.security.webseal.hostnames (The host name of the machine where the WebSeal server runs) com.ibm.websphere.security.webseal.ports (The port where the WebSeal server receives user requests) -
Click OK.