Scenario (Typical): Local debug development environment for
WebSphere Portal V5.0 on Windows
This scenario sets up the "WebSphere Portal V5.0 Test
Environment" configuration. WebSphere Studio V5.1.2, WebSphere Application
Server V5.0.2, Portal Toolkit V5.0.2.3, and WebSphere Portal V5.0.2.1
for portlet development will be installed on a single machine. WebSphere
Portal will be installed as part of Portal Toolkit.
WebSphere Studio V5.1.2 is as follows:
- WebSphere Studio Site Developer (WSSD) V5.1.2
- WebSphere Studio Enterprise Developer (WSED) V5.1.2
- WebSphere Studio Application Developer Integration Edition (WSAD IE) V5.1.1
- Creating the WebSphere Studio V5.1.2
Installation image
- Installing WebSphere Studio
- Creating the Portal Toolkit V5.0.2.3
Installable image
- Preparing the required products and fixes
- Installing Portal Toolkit V5.0.2.3 and
WebSphere Portal V5.0
- Verifying the installation
If you have the WebSphere Studio V5.1.2 CD or the network installation image, you can skip this step.
The following step is only for WSSD V5.1.2. For WSED V5.1.2 and WSAD IE V5.1.1 users, please refer to their installation guides.
Prerequisites:
- Your environment variable TEMP or TMP must point to a valid
temporary directory with at least 167 MB free. This is in addition to
the space required to install the product.
- You must have approximately 4 GB of disk space to store the full
set of downloadable images plus another 4 GB of disk space to unpack
the images.
To download and create the installation image:
- Download the following 3 parts at a minimum. The rest are optional.
- Part 1 (C57HMML.exe, wsextract.exe) - Contains core installation
files.
- Part 2 (C57HNML.bin, Required.bin) - Contains core installation
files.
- Part 4 (C57HQML.bin, WAS50.bin) - Contains the WebSphere Application
Server V5.0 Integrated Test Environment.
- Launch the wsextract.exe file that is located in this temporary
directory. This starts the wizard that creates the installation image.
- Follow the instructions in the wizard to specify where you want to
create the image.
- Select the following 2 features at a minimum.
- Core Installation files
- WebSphere Application Server V5.0.2 Integrated Test Environment
- After the image is created, deselect Start the installation wizard now before you
click Finish.
Return to top
Install either of the following:
- WebSphere Studio Site Developer V5.1.2
- WebSphere Studio Enterprise Developer V5.1.2
- WebSphere Studio Application Developer Integration Edition V5.1.1
If Portal Toolkit or WebSphere Portal has been already installed on
the system, you will have to plan and decide which course of action
suits your requirements best. Refer to Migrating
Portal Toolkit and portlet projects for instructions.
Installation steps
- Run launchpad.exe of WebSphere Studio
- Click "Install IBM WebSphere Studio".
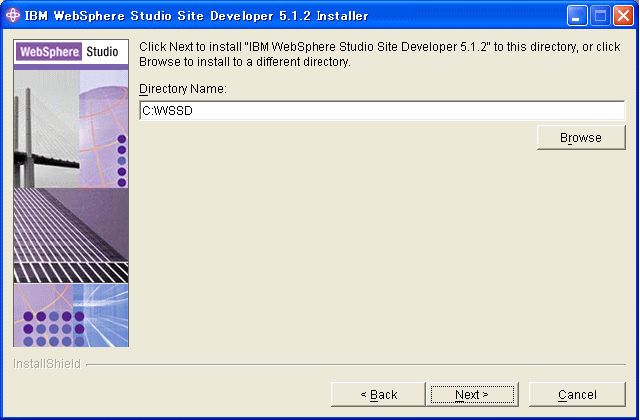
- Change the default Directory Name. Please note the
following:
- Specify a short directory name such as c:\WSSD.
- Do not use double-byte characters or special characters
such as periods (".") or dollar signs ("$").
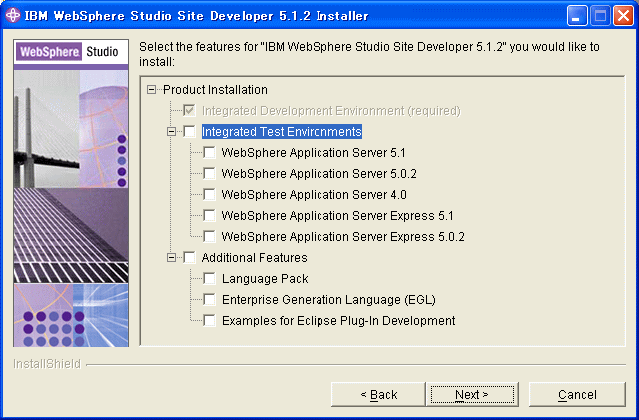
- Ensure the required features are checked.
- You do not have to select the WebSphere
Application Server 5.0.2 checkbox for the WebSphere Portal V5.0
Test Environment.
- Verify that the installation was completed successfully by starting
the application.
- Select Start > Programs > IBM WebSphere
Studio > Site Developer 5.1.2, Enterprise Developer 5.1.2
or Application Developer Integration Edition 5.1.1 to start the application.
- Change the default workspace directory name to a shorter one (one
with a short path length such as c:\wssdwork).
Return to top
Prerequisites:
- Your environment variable TEMP or TMP must point to a valid
temporary directory with at least 130 MB free. This is in addition to
the space required to install the product.
- You must have approximately 2.5 GB of disk space to store the full
set of downloadable images, to unpack the images and to store the
required products and fixes.
To create the installable image:
- Download Portal Toolkit V5.0.2.3: ptk5023Win.exe
and RequiredWin.bin from the Portal
Toolkit web site.
- Launch the ptk5023Win.exe file. This starts the wizard that creates the installation image.
- Specify where you want to create the image.
Important: Do not use special characters.
- Leave the Core installation files feature checkbox selected.
- After the image is created, click Finish.
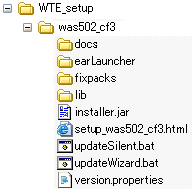
You will find the PortalToolkit5023\WTE_setup directory under
the directory that you have created this installable image. You will use
this directory to prepare the required files in the following
instructions.
Return to top
Prerequisites:
In this step, you will prepare the following files:
| Required products and fixes |
Target directory |
| WebSphere Application Server
5.0.2 |
ptkimg\WTE_setup\was_image |
| WebSphere Application Server 5.0.2 Cumulative Fix 3 |
ptkimg\WTE_setup\was502_cf3 |
| WebSphere Application Server 5.0.2.3 Fixes |
ptkimg\WTE_setup\was5023_fixes |
| WebSphere Portal V5.0 CD #2 |
ptkimg\WTE_setup\wps |
| WebSphere Portal 5.0 Fix Pack 2 |
ptkimg\WTE_setup\wp_ptf_502 |
WebSphere Portal 5.0.2 Cumulative Fix 1
WebSphere Portal for Multiplatforms Update Installer
|
ptkimg\WTE_setup\wp_ptf_5021 |
| 1.3.1 Java SDK, Java Tech Edition for WebSphere Application
Server V5 |
ptkimg\WTE_setup\j9_fix |
where ptkimg is the PortalToolkit5023
directory that you have created the installable image of Portal Toolkit
V5.0.2.3.
To prepare these files, carry out the following.
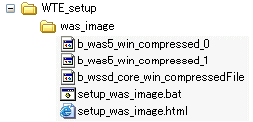
- WebSphere Application Server 5.0.2
where:
- ptkimg is the PortalToolkit5023
directory that you have created the installable image of Portal Toolkit
V5.0.2.3
- D: is the CD drive. Note: "D:\" is invalid. It should be "D:".
- E:\wssdimg is the directory that the installation image exists. For example, you will specify "E:\wssdimg" when the "E:\wssdimg\IBMWSSiteDev-5.1.2\disk1" directory exists.
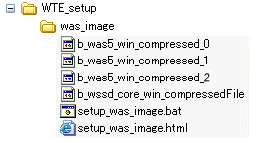
It results in:WSSD case:
WSED case:
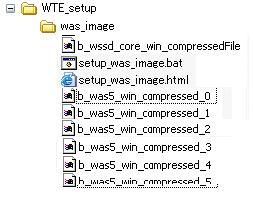
WSAD IE case:
- WebSphere Portal V5.0 CD #2
- Copy contents under the 'wps' directory to the WTE_setup\wps
directory.
It results in: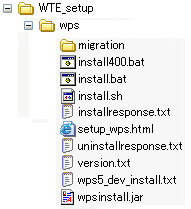
- Fixes from the WebSphere Application Server support site.
- Download the following files:
Note: If you cannot find any files, search them on the WebSphere Application Server support site
- Fixes from the WebSphere Portal support site.
- Open WebSphere Portal 5.0 Fix Pack 2.
Note: If you cannot find the page, search for WebSphere
Portal 5.0 Fix Pack 2 on the WebSphere Portal support site.
- Select the Portal Server 5.0 Fix Pack 2 download package.
- In the Downloads page, download the following files.
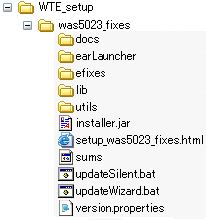
- WAS 5.0.2.3 Fixes:
WAS5023CumulativeWindows.zip
Download and extract this to the WTE_setup\was5023_fixes
directory.
It results in:
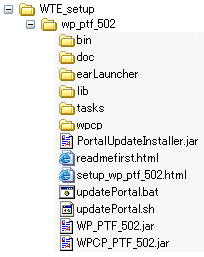
- Portal 5.0 Fix Pack 2:
Fixpack2.zip.
Download and extract this to the WTE_setup\wp_ptf_502
directory.
Alternatively, you can use the WebSphere Portal V5.0.2 for
Multiplatforms Fixpack CD. Copy contents of the CD to this directory.
It results in:
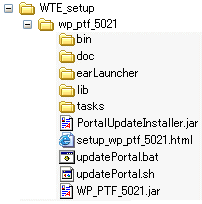
- Portal 5.0.2 Cumulative
Fix 1: WP_PTF_5021.jar
Download and copy this to the WTE_setup\wp_ptf_5021 directory.
- WebSphere Portal for Multiplatforms Update Installer:
PortalUpdateInstaller.zip
Download and extract this to the WTE_setup\wp_ptf_5021
directory.
These result in:
Return to top
Prerequisites:
Carry out the following steps:
- Make sure that WebSphere Studio is not running.
- Stop the HTTP server if it has been started.
- Run the installation
program by launching ptkimg\PortalToolkit5023\setup.exe,
where ptkimg is the directory that you have created the
installation image.
- Click Next on the welcome panel, read and accept the license
agreement, and click Next.
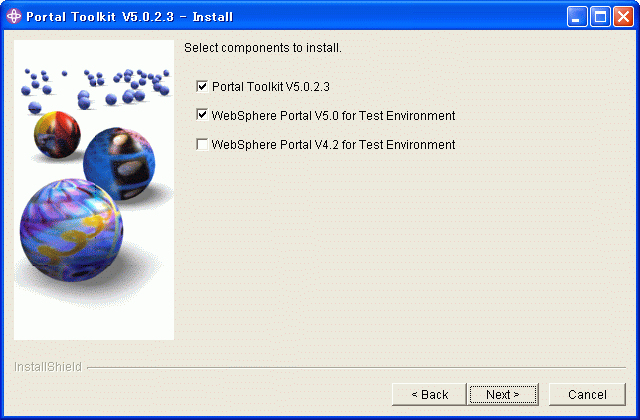
- Select the WebSphere Portal V5.0 for Test Environment and click Next.
- Make sure the install location displayed is the installation
directory of WebSphere Studio.
- Click Next. Portal Toolkit will be installed.
- Click Next. WebSphere Portal V5.0 for Test Environment will
be installed.
- When the installation is completed, click Finish.
- Launch WebSphere Studio.
- Select Start > Programs > IBM WebSphere
Studio > Site Developer 5.1.2, Enterprise Developer 5.1.2
or Application Developer Integration Edition 5.1.1 to start the application.
- Change the default workspace directory name to a shorter one (one
with a short path length such as c:\wssdwork).
- You will see the Configuration Changes panel.
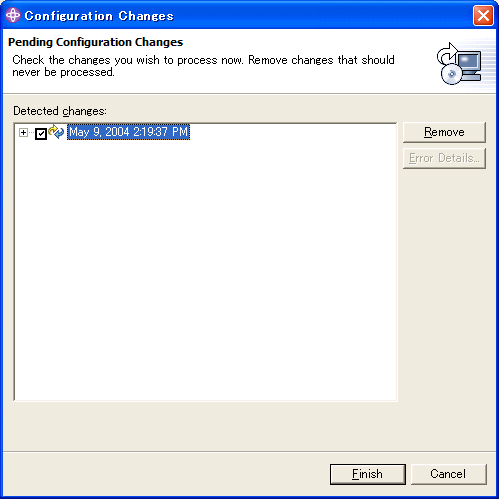
- Select the pending
configuration change that is displayed.
- Click Finish.
- When the update is completed, you will be prompted to restart the
workbench. Click Yes to restart.
- Portal Toolkit installation is completed.
Return to top
The installation is completed. To verify the local debug
configuration, carry out the following steps:
- Launch WebSphere Studio.
- Select Start > Programs > IBM
WebSphere Studio > Site Developer 5.1.2, Enterprise Developer 5.1.2
or Application Developer Integration Edition 5.1.1 to start the application.
- Change the default workspace directory name to a shorter
one (one with a short path length such as c:\wssdwork).
- From the menu, select File > New > Other
> Server > Server and Server Configuration. A
wizard will start.
- Enter the server name.
- In the Server type, expand WebSphere Portal version 5.0.
- Select Test Environment and click Finish.
- In the Servers view, right-click on the server and select Start.
- Verify that the server starts successfully. In the Servers view,
its status should be "Started".
Return to top


