Macro structure
This chapter has two purposes, first to describe the general structure of a macro as it can be seen in an XML macro script, and second to show some of the connections between the Macro Editor and specific XML elements in the macro script.
- Macro script describes the <HAScript> element and its connections with the Macro tab of the Macro Editor.
- The macro screen and its subcomponents describes the <screen> element and its connections with the Screens tab of the Macro Editor.
Macro script
A macro script is an XML script used to store a macro. You can view and edit the XML text of a macro script by using the source view.
Learning a little about the XML elements of the macro language will greatly increase your understanding of important topics, including the following:
- How to use the Macro Editor.
- How macro playback works.
- How to build effective macros.
Therefore this book frequently refers not only to the input fields, buttons, and listboxes of the Macro Editor but also to the corresponding XML elements in which the same information is stored.
XML elements
To understand macro scripts you do not need to learn a great deal about XML, just the basics of the syntax. If your knowledge of XML syntax needs brushing up, you can learn more about it in XML syntax in the Host On-Demand macro language. However, almost all of what you need to know is covered in this subsection.
As you probably know already, an XML script consists of a collection of XML elements, some of which contain other XML elements, in much the same way that some HTML elements contain other HTML elements. However, unlike HTML, XML allows a program developer to define new XML elements that reflect the structure of the information that the developer wishes to store. The Host On-Demand macro language contains approximately 35 different types of XML elements for storing the information needed to describe a macro. This macro language is described at length in The macro language.
This book, when referring to an XML macro element, uses the element name enclosed in angle brackets. Examples: <HAScript> element, <screen> element.
Figure 2 shows an example of an XML element:
<SampleElement attribute1="value1" attribute2="value2">
...
</SampleElement>
The <SampleElement> element shown in the figure above contains the key components of every macro element. The first line is the begin tag. It consists of a left angle bracket (<), followed by the name of the XML element (SampleElement), followed by attribute definitions, followed by a right angle bracket (>). The second line consists of an ellipsis (...) that is not part of XML syntax but is used in the figure above to indicate the possible presence of other elements inside the <SampleElement> element. The third line is the end tag. It contains the name of the element enclosed in angle brackets with a forward slash after the first angle bracket (</Sample Element>).
In the begin tag, the attributes are specified by using the attribute name (such as attribute1), followed by an equals sign (=), followed by an attribute value enclosed in quotation marks (such as "value1"). Any number of attributes can occur in the begin tag.
If the macro element does not contain other XML elements then it can be written in the shorthand fashion shown in Figure 3:
<SampleElement attribute1="value1" attribute2="value2" />
In the figure above the <SampleElement> element is written with a left angle bracket (<) followed by the name (SampleElement), followed by the attributes, followed by a forward slash and a right angle bracket (/>). Thus the entire XML element is written within a single pair of angle brackets.
Conceptual view of a macro script
A macro script consists of a single <HAScript> element that can contain up to three major types of subelements:
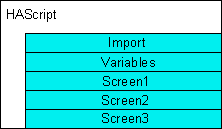
Figure 4 shows a conceptual view of a sample macro script containing three <screen> elements.

The figure above shows an <HAScript> element (HAScript) that contains instances of the major types of subelements: an <import> element (Import), a <vars> element (Variables), and three <screen> elements (Screen1, Screen2, and Screen3).
All macro scripts are structured like this, except that most have more screens. If there were 50 screens in the above macro, then the diagram above would look much the same, except that after Screen3 there would be additional screens: Screen4, Screen5, and so on, up to Screen50. (However, the order in which the screens are stored does not necessarily represent the order in which the screens are executed when the macro is played.)
The <HAScript> element is the master element of a macro script. (HAScript stands for Host Access Script.) It encloses the entire macro and also contains, in its begin tag, attributes that contain information applicable to the entire macro, such as the macro's name. For an example of an <HAScript> element see Figure 6.
The <import> element is used to import Java classes and is optional. Importing Java classes is an advanced topic that is not discussed until Create an imported type for a Java class.
The <vars> element is used to declare and initialize variables belonging to one of the standard data types (boolean, integer, double, string, or field). Using standard variables is an advanced topic that is not discussed until Variables and imported Java classes.
The <screen> element is used to define a macro screen. The <screen> element is the most important of the elements that occur inside the <HAScript>. As you can see in Figure 4 above, a macro script is composed mostly of <screen> elements (such as Screen1, Screen2, and Screen3 in the figure). Also, most of the other kinds of XML elements in a macro script occur somewhere inside a <screen> element.
Introduction to the Macro tab
For the purpose of getting you acquainted with the Macro Editor, this section consists of a very simple comparison between the Macro tab of the Macro Editor and the <HAScript> element described in the previous section.
The Macro Editor has four tabs: Macro, Screens, Links, and Variables. The first tab, the Macro tab, corresponds very closely to the <HAScript> element. In fact, the Macro tab is the graphical user interface for some of the information that is stored in the attributes of the begin tag of the <HAScript> element.
Therefore, as the <HAScript> element is the master element of a macro script and contains in its attributes information that applies to the entire macro (such as the macro name), similarly the Macro tab is the first tab of the Macro Editor and provides access to some of the same global information.
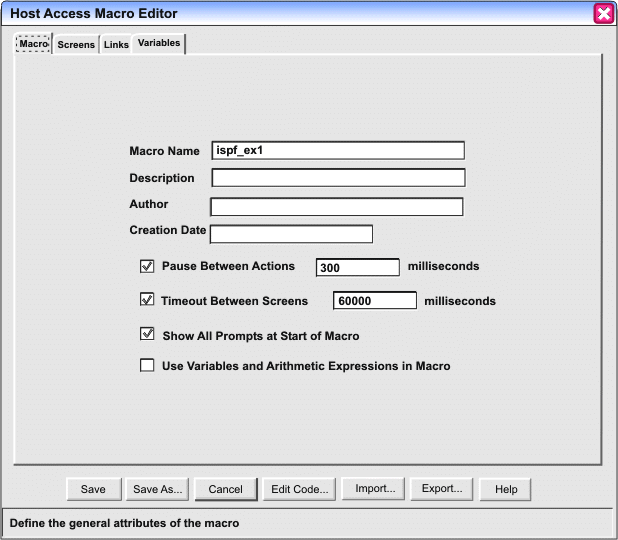
Figure 5 shows the Macro Editor with the Macro tab selected.

In the figure above you can see that the Macro tab has input fields for Macro Name, Description, and other information, along with several checkboxes. You should notice two fields:
- The Macro Name field contains the name that you assign to the macro. This is the same name that you will select when you want to edit the macro or run the macro.
- The Use Variables and Arithmetic Expressions In Macro checkbox determines whether the Macro object uses the basic macro format or the advanced macro format for this macro. In the figure above this checkbox is not selected, indicating that the basic macro format will be used (see Basic and advanced macro format).
Figure 6 shows a sample <HAScript> element that contains the same information as is shown on the Macro tab in Figure 5 , as well as some additional information. In the source view an <HAScript> element is written on a single line, but here the element is written on multiple lines so that you can see the attributes.
<HAScript
     name="ispf_ex1"
     description=" "
     timeout="60000"
     pausetime="300"
     promptall="true"
     author=""
     creationdate=""
     supressclearevents="false"
     usevars="false"
     ignorepauseforenhancedtn="false"
     delayifnotenhancedtn="0">

...

</HAScript>
In the <HAScript> element in the figure above notice that there is an attribute corresponding to each input field of the Macro tab shown in Figure 5. For example, the name attribute in the <HAScript> element (name="ispf_ex1") corresponds to the Macro Name field on the Macro tab. Similarly, the usevars attribute in the <HAScript> element (usevars="false") corresponds to the Use Variables and Arithmetic Expressions checkbox on the Macro tab.
The macro screen and its subcomponents
This section describes the macro screen and its major subcomponents. The definition of macro screen depends on another term that needs defining, application screen.
Application screen
An application screen is a meaningful arrangement of characters displayed on the host terminal by a host application.
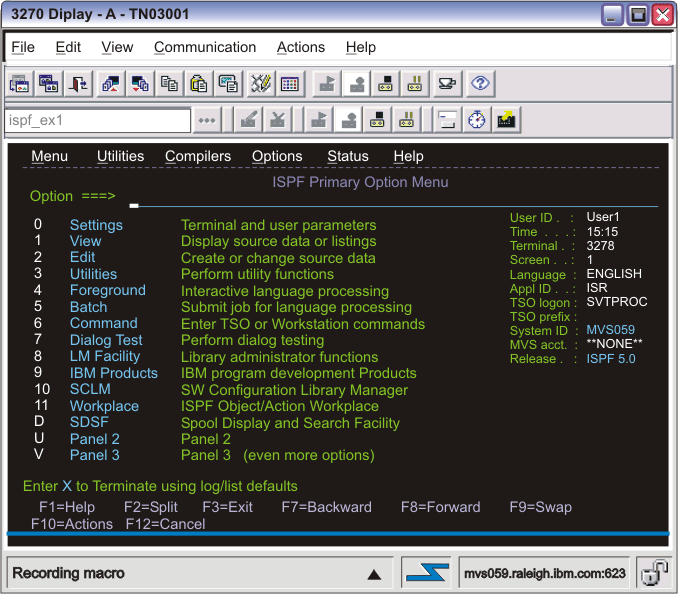
As you probably realize, you are already very familiar with the concept of an application screen. An example of an application screen is the ISPF Primary Option Menu, which is displayed in Figure 7.
 application screen, the
ISPF Primary Option Menu" />
application screen, the
ISPF Primary Option Menu" />In the figure above you can see that this application screen has menu selections displayed in a row across the top (Menu, Utilities, Compilers, Options, and so on), function key assignments displayed in a row across the bottom (F1=Help, F2=Split, and so on), a title near the top (ISPF Primary Option Menu), a list of options along the left side (0 through V), and an input field in which to type an option number or letter (Option ===>). When the user provides input, for example by typing a 3 (for Utilities) followed by the enter key, the ISPF application removes all these visible items from the host terminal and displays a different application screen.
Macro screen
A macro screen is a set of instructions that tell the macro runtime how to manage a visit to a particular application screen. A macro screen includes:
- A description of a particular application screen.
- The actions to take when visiting this particular application screen.
- A list of the macro screens that can validly occur after this particular application screen.
Although the concept is not very intuitive at this point, there might be in the same macro several macro screens that refer to the same application screen. Because of the way macro screens are linked to one another, the macro runtime might visit the same application screen several times during macro playback, processing a different macro screen at each visit.
Also, one macro screen might refer to more than one application screen. When several application screens are similar to each other, a macro developer might build a macro screen that handles all of the similar application screens.
Nevertheless, each macro screen corresponds to some application screen. When you record a macro, the Macro object creates and stores a macro screen for each application screen that you visit during the course of the recording. If you visit the same application screen more than once, the Macro object creates and stores a macro screen for each visit. Similarly, when you play back a recorded macro, the macro runtime processes a single macro screen for each application screen that it visits during the course of the playback.
Conceptual view of a macro screen
A macro screen consists of a single <screen> element that contains three required subelements:
- One <description> element. (Required)
- One <actions> element. (Required)
- One <nextscreens> element. (Required, except in an Exit Screen)
Each of the subelements is required, and only one of each can occur.
Figure 8 shows a conceptual view of a <screen> element:

The figure above shows a <screen> element (Screen1) that contains the three required subelements: a <description> element (Description), an <actions> element (Actions), and a <nextscreens> element (Valid Next Screens).
All <screen> elements are structured in this way, with these three subelements. (A fourth and optional type of subelement, the <recolimit> element, is discussed later in this book.)
The <screen> element is the master element of a macro screen. It contains all the other elements that belong to that particular macro screen, and it also contains, in its begin tag, attributes that contain information applicable to the macro screen as a whole, such as the macro screen's name.
The <description> element contains descriptors that enable the macro runtime to recognize that the <screen> element to which the <description> element belongs is associated with a particular application screen. The descriptors and the <description> element are described in Screen description and recognition.
The <actions> element contains various actions that the macro runtime performs on the application screen, such as reading data from the application screen or entering keystrokes. The actions and the <actions> element are described in Macro actions.
The <nextscreens> element (Valid Next Screens in Figure 8) contains a list of the screen names of all the <screen> elements that might validly occur after the current macro screen. The <nextscreens> element and the elements that it encloses are described in Screen Recognition, Part 2.
Introduction to the Screens tab
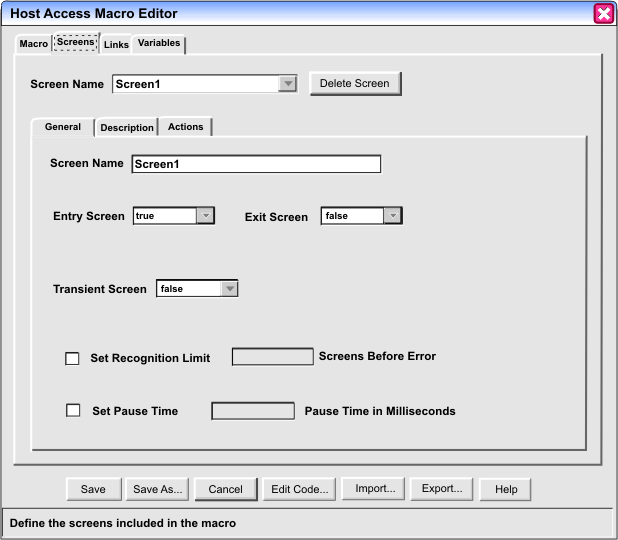
This section shows some of the ways in which the Screens tab of the Macro Editor is related to the XML <screen> element described in the previous section. Figure 9 shows the Macro Editor with the Screens tab selected:

In the figure above, notice that the Screens tab contains:
- A Screen Name listbox at the top of the tab.
- Three subordinate tabs, labeled General, Descriptions, and Actions.
Currently the General tab is selected.
You should notice that there are two Screen Name fields on the Screens tab:
- The Screen Name field at the top of the Screens tab is a listbox that contains the names of all the macro screens in the macro.
- The Screen Name field at the top of the General subtab is an input field in which you can type the name that you want to assign to the currently selected screen.
In the Screen Name listbox at the top of the Screens tab, you click the name of the macro screen that you want to work on (such as Screen1), and the Macro Editor displays in the subtabs the information belonging to that macro screen. For example, in Figure 9 the listbox displays the macro screen name Screen1 and the subtabs display the information belonging to Screen1. If the user selected another macro screen name in the listbox, perhaps Screen10, then the Macro Editor would display in the subtabs the information belonging to macro screen Screen10.
In the Screen Name input field under the General tab, you type the name that you want to assign to the currently selected macro screen. A screen name such as Screenx, where x stands for some integer (for example, Screen1), is a temporary name that the Macro object gives to the macro screen when it creates the macro screen. You can retain this name, or you can replace it with a more descriptive name that is easier to remember. (When all your macro screens have names such as Screen3, Screen10, Screen24, and so on, it is difficult to remember which macro screen does what.)
You have probably already noticed that the subtabs General, Description, and Actions on the Screens tab correspond to the main parts of the XML <screen> element described in the previous section. Specifically,
- The General subtab presents the information stored in the attributes of a <screen> element.
- The Description subtab presents the information stored in the <description> subelement of a <screen> element.
- The Actions subtab presents the information stored in the <actions> subelement of a <screen> element.
But what about the <nextscreens> subelement? For usability reasons the information belonging to the <nextscreens> element is presented in a higher-level tab, the Links tab. You can see the Links tab immediately to the right of the Screens tab in Figure 9.
Figure 10 shows the XML begin tag and end tag of a sample <screen> element named Screen1:
tag of a <screen> element<screen name="Screen1" entryscreen="true" exitscreen="false" transient="false"> ... </screen>
In the figure above, the ellipsis (...) is not part of the XML text but indicates that the required elements contained inside the <screen> element have been omitted for simplicity. You should notice that the attributes in the begin tag correspond to fields on the General tab in Figure 9. For example, the name attribute (name="Screen1" ) corresponds to the Screen Name input field on the General tab, and the entryscreen attribute (entryscreen="true") corresponds to the Entry Screen listbox on the General tab.
Figure 11 shows the XML text for the entire <screen> element including the enclosed elements:
element
   <screen name="Screen1" entryscreen="true" exitscreen="false" transient="false">
      <description>
         <oia status="NOTINHIBITED" optional="false" invertmatch="false" />
      </description>
      <actions>
         <mouseclick row="4" col="15" />
         <input value="3[enter]" row="0" col="0" movecursor="true"
                   xlatehostkeys="true" encrypted="false" />
      </actions>
      <nextscreens timeout="0" >
         <nextscreen name="Screen2" />
      </nextscreens>
   </screen>
In the figure above notice that the <screen> element contains the required <description>, <actions>, and <nextscreens> elements.
Home