Using the Synonym Editor
Describes the Synonym Editor and how you may use it to view and edit synonyms.
This chapter describes the Synonym Editor and how you may use it to view and edit synonyms.
The Synonym Editor is accessible only through the DB2® Web Query Developer Workbench.
Parent topic:
IBM DB2 Web Query for System i Overview
Accessing the Synonym Editor
The following image is an example of how to access the Synonym Editor from Developer StudioWorkbench.

A synonym consists of a set of attributes that describe the data source. It provides the metadata for a data source, which enables an adapter to access and interpret the corresponding data.
Synonym Editor Layout
The Synonym Editor occupies the Developer StudioWorkbench workspace and displays Tree View, Modeling View, Synonym Text View, and Access File Text View tabs.
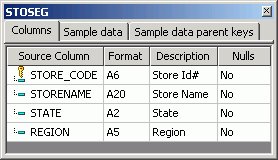
Synonym Editor - Tree View Tab
The Tree View tab shows a hierarchy of segments and columns on the left, with the attributes and values of the selected item on the right.
The attributes available depend on the type of synonym.
The image below is an example of an SQL data source with a key column selected.

Information about the attribute that has focus is displayed at the bottom of the attribute list. In this case, an explanation of the FIELDNAME attribute appears.
The following objects may appear on the Tree View tab.
|
Object |
Function |
|---|---|
|
|
Synonym. General icon used to indicate synonyms, visible on top of the Tree View tab. It provides information about the file name used and the application it resides in. |
|
|
Segment. Indicates a segment in a synonym. The root or parent segment appears first in the tree. |
|
|
Key Column. Indicates a key column. |
|
|
Column. Indicates a general column. |
|
|
Virtual Column (Define). Indicates a virtual or defined column. For more information about virtual columns. |
|
|
Index Column. Indicates the native DBMS has an index for quick retrieval of values for this field. |
|
|
Filter. Indicates a Master File filter. |
|
|
Compute field. Indicates a computed field. |


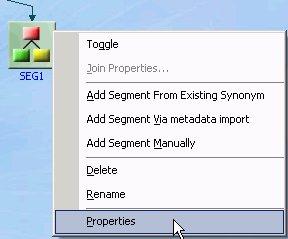
Synonym Editor - Segment Pop-up Menu
When you right-click a segment in the Synonym Editor, the following pop-up menu appears in the Tree View tab.
The image below is an example of an SQL data source with the root segment selected.
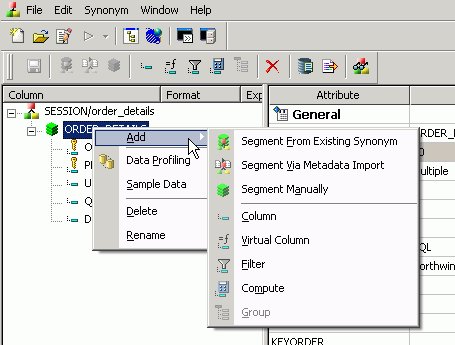
The following options are available:
- Add
- Enables you to add one of the following:
- Segment From Existing Synonym
-
Adds an existing synonym to the current synonym.
- Segment Via Metadata Import
-
Enables you to create and add a new synonym to the current synonym through the Create Synonym tool.
- Segment Manually
-
Adds a synonym that must by coded manually.
- Column
-
Adds a column to the segment.
- Virtual Column
-
Adds a virtual column to the segment.
- Filter
-
Adds a filter to the segment.
- Compute
-
Adds a calculated value to the file.
- Group
-
Adds a group column to the segment.
- Data Profiling
-
Provides the characteristics of the data for a segment.
Data Profiling is available from the right-click context menu for all columns in the Master File hierarchy tree.
- Sample Data
-
Displays sample data in the workspace.
Sample data is available from the Synonym Editor toolbar, the right-click context menu for all columns in the Master File hierarchy tree, and from the Modeling View.
The following image is an example of the sample data that appears for a segment:
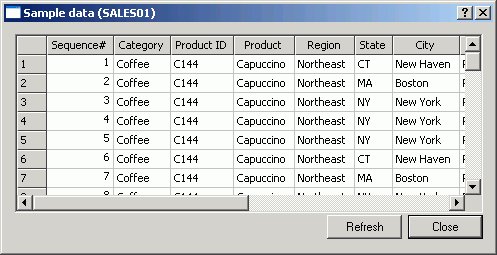
Sample Data is a great way to test the synonym for field data and to view the type of records returned. This can assist when performing Joins, testing connectivity to data sources, and so on.
- Delete
-
Deletes the segment.
- Rename
-
Enables you to rename the segment.
Synonym Editor - Column/Field Pop-up Menu
When you right-click a column in the Synonym Editor, the following pop-up menu appears in the Tree View tab.
The image below is an example of an SQL data source with a column selected.

The following options are available:
- Add
- Enables you to add one of the following:
- Column
-
Adds a column to the synonym.
- Virtual Column
-
Adds a virtual column to the synonym.
- Filter
-
Adds a filter to the segment.
- Compute
-
Adds a calculated value to the file.
- Group
-
Adds a group column to the synonym.
- Impact Analysis
-
Displays an Impact Analysis report for the particular column in the workspace. An Impact Analysis report identifies the procedures that access a Master File or field within a Master File. For detailed information on Impact Analysis, see Analyzing Metadata and Procedures.
- Data Profiling
-
Provides the characteristics of the data for a column. Data Profiling is available from the right-click context menu for all columns in the Master File hierarchy tree.
- Sample Data
-
Displays sample data in the workspace.
Sample data is available from the Synonym Editor toolbar, the right-click context menu for all columns in the Master File hierarchy tree, and from the Modeling View.
The following image is an example of the sample data that appears for a column:

Sample Data is a great way to test the synonym for field data and to view the type of records returned. This can assist when performing Joins, testing connectivity to data sources, and so on.
- Decompose Date
-
Decomposes date fields into virtual columns representing Year, Month, Day, and Quarter fields.
Decompose date is visible for date fields.
- Delete
-
Deletes the column.
- Rename
-
Allows you to rename the column.
Synonym Editor - Modeling View Tab
The Modeling View tab shows a graphical representation of the synonym. Use the Modeling View to define dimensions for OLAP analysis, view join properties, create cluster joins, and add or edit segments.
The image below is an example of an SQL data source in the Modeling View.

For more information about the Modeling View, see Enhancing Synonyms Using the Modeling View.
Synonym Editor - Synonym Text View Tab
The Synonym Text View tab shows the description of the underlying table.
You can print the Master File code by selecting Print from the File menu.
Synonym Editor - Access File Text View Tab
The Access File Text View tab shows the description of a synonym's Access File, which is used to access the database.
You can print the Master File code by selecting Print from the File menu.
The image below is an example of an SQL data source in the Access File Text View tab.

The text views are read-only. You cannot edit the underlying description from these tabs.
Synonym Editor Toolbar
The Synonym Editor toolbar contains buttons that provide quick access to commonly performed functions. The behavior of the button is determined by the selected object. Therefore, certain toolbar buttons may be inactive.
|
Button |
Definition |
|---|---|
|
|
Saves the edits made to the synonym. |
|
|
Enables you to add segments from an existing synonym by using the Select Synonym dialog box. |
|
|
Enables you to add segments via metadata import by using the Create Synonym tool. This tool creates a synonym and includes it as a segment in the synonym from which the tool was launched. |
|
|
Enables you to add segments manually, assigning values to segment attribute fields in the Synonym Editor.
You would only use this approach if you are coding a Master File from scratch, as you would for a FOCUS data source. |
|
|
Adds a column field. |
|
|
Adds a virtual column (DEFINE) field. For more information about virtual columns, see Adding Virtual Columns (DEFINE) in a Synonym. |
|
|
Adds a Master File filter. For more information about filters, see Creating Filters in a Synonym. |
|
|
Adds a COMPUTE field. For more information about computed fields, see Adding Computed Fields (COMPUTE) in a Synonym. |
|
|
Adds a group. For more information about groups, see Adding Group Fields in a Synonym. |
|
|
Deletes the selected item. |
|
|
Adds field/value security DBA. For more information about DBA security, see Applying Database Administrator Security. |
|
|
Enables you to view and refresh sample data for the object. |
|
|
Enables you to create a business view and create a custom Master File that can use selected fields from the original synonym. In addition, you may customize field names, titles, and descriptions. For more information about business views, see Creating Business Views in Developer Studio. |


Viewing and Editing Synonym Attributes
The Synonym Editor enables you to view and edit a synonym's attributes.
View and Edit Synonym Attributes
To view and edit synonym attributes:
- From the Data Servers area, open a synonym by double-clicking a Master File from the Master Files folder.
The Synonym Editor opens to the Tree View tab, which shows a hierarchy of segments and columns on the left, with the attributes and values of the selected item on the right.
The attributes available depend on the type of synonym.
The image below is an example of an SQL data source with a key column selected.

The Format, Expression, Description, and Nulls values are viewable in the hierarchy with the columns. To edit these values, use the corresponding attribute fields on the right-hand side of the Synonym Editor.
- You can change the attribute values by typing in new values or by using the drop-down menus and check boxes.
The Synonym Editor does not let you make any changes that would render the Master File unusable. Therefore, you cannot edit any value field that is highlighted gray. In addition, if a change does not have proper syntax/format applied, the field may appear in red text. Messages and warnings appear if trying to save a file with an error.
- Save changes by clicking Save from the File menu.
- To close the Synonym Editor, select Close from the File menu or click the control button in the upper right corner.
If you close the Synonym Editor without saving your changes, you are prompted to do so.
File Attributes Summary
The image below is an example of an SQL data source with the synonym file name selected.

Information about the attribute that has focus is displayed at the bottom of the attribute list. In this case, an explanation of the SUFFIX attribute appears.
Synonyms can have the following file attributes:
- General
-
- SUFFIX
-
Identifies the type of synonym or data source.
- FDEFCENT
-
Defines the default century value, specifying a century number for handling cross-century dates.
Use the default setting (0) unless you wish to retrieve data from a earlier century. For example, 19xx.
- FYRTHRESH
-
Defines the base years—to represent the lowest year to which the century value applies (FDEFCENT).
Use the default setting (0) unless you wish to retrieve data from a earlier century. For example, 19xx.
- REMARKS
-
Enables you to include descriptive information at the file level and specify multiple language descriptions for the synonym. Remarks are displayed along with the file name during reporting.
For more information about multilingual descriptions, see Setting Up Multilingual Titles and Descriptions.
- DATASET
-
Identifies the physical location of the data source to be used in the file name, including the extension and the location of the data file.
The attributes available depend on the type of synonym.
Segment Attributes Summary
The image below is an example of an SQL data source with a segment selected.

Information about the attribute that has focus is displayed at the bottom of the attribute list. In this case, an explanation of the SEGMENT attribute appears.
Segments in a synonym can have the following attributes:
- General
-
- SEGMENT
-
Is the name of the segment.
- ENCRYPT
-
Check this box to scramble field values in the current segment in order to protect it from unauthorized examination.
You must assign a DBA password to the file before setting the Encrypt option on. For details, see Encrypting and Decrypting a Master File. You must then turn the Encrypt option on before adding any records. If you add a record to a segment before setting the Encrypt option on, that value will not be encrypted.
Once a segment is encrypted, you can remove encryption only if you remove the segment and recreate it without turning on the Encrypt option.
Tip: Because there is a loss of processing efficiency when data is encrypted, encryption should be used selectively.
- SEGTYPE
-
Specifies the type or relationship that a segment has to its parent and indicates which of the segment’s fields are key fields, and in what order they are sorted.
Type - Identify the segment type and sorting options from the Type drop-down list.
Keys - Records are sorted in a data source by key fields. Enter the number of key fields that you want to use for sorting. For example, no two employees can have the same employee ID number, so you can use that field as the key. A segment instance can have more than one field that makes up the key; that is, two or more field values may be used to distinguish records.
- SEGSUF
-
SEGSUF is used when part of the data source being described by the Master File is of a different data source type than that declared for the entire structure.
SEGSUF is the data source type of a segment and any descendants it might have, where that type differs from the SUFFIX value.
- Miscellaneous
-
- DESCRIPTION
-
Contains a description or comments about the segment.
For more information about multilingual descriptions, see Setting Up Multilingual Titles and Descriptions.
- CRFILENAME
-
Is the name of the cross-referenced data source.
- CRSEGNAME
-
Is the name of the cross-referenced segment.
- CRKEY
-
Identifies the common join field for the cross-referenced segment.
These cross-referenced values (CRFilename, CRSegname, CRKey) are available for FOCUS data sources.
- Adapter Specific
-
Adapter Specific fields are shown if an Access File component has been generated with the synonym.
- CONNECTION
-
Indicates the host server or data source for synonyms.
- TABLENAME
-
Identifies the table or view. It may contain the owner ID, as well as the table name. For some synonyms, it must also contain the data source name.
- KEYS
-
Identifies how many columns constitute the primary key.
- KEYORDER
-
Identifies the logical sort sequence of data by the primary key.
- WRITE
-
Specifies whether write operations are allowed against the table.
- CARDINALITY
-
Defines the number of records that are found in the original data source when the synonym was created.
- DBSPACE
-
Identifies the storage area in which the table resides.
The attributes available depend on the type of synonym.
Column/Field Attribute Summary
The image below is an example of an SQL data source with a key column selected.
The attributes available depend on the type of synonym.
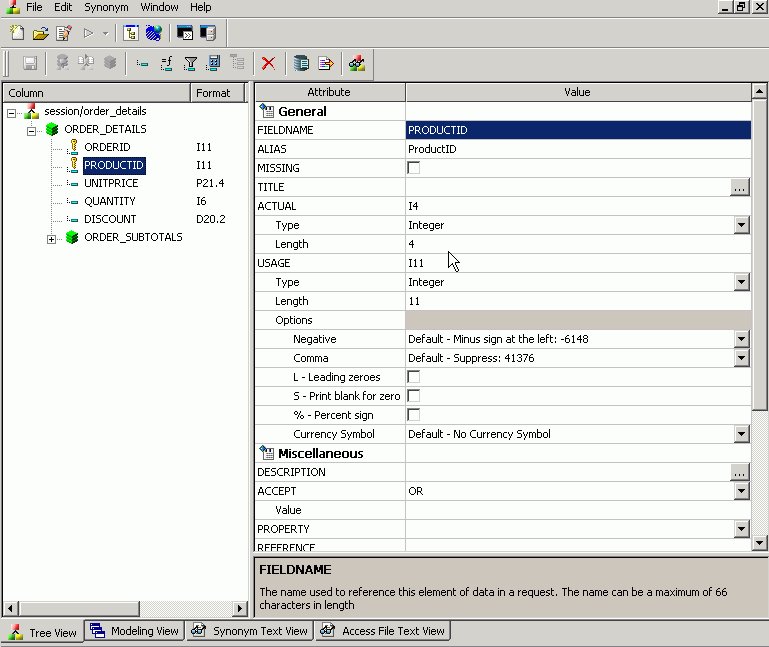
Information about the attribute that has focus is displayed at the bottom of the attribute list. In this case, an explanation of the FIELDNAME attribute appears.
Columns in a synonym can have the following attributes:
- General
-
- FIELDNAME
-
Is the name of the column.
- ALIAS
-
Assigns an alternative name for a column, or the real column name for a DBMS synonym.
- MISSING
-
Controls how null data is handled, that is, if no transaction value is supplied.
- TITLE
-
Supplies a title to replace the column name that is normally used in reports and enables you to specify multiple language titles for the column or field.
For more information about multilingual titles, see Setting Up Multilingual Titles and Descriptions.
- USAGE
-
Describes the data type and format for the column for usage or display.
Additional attributes, DEFCENT and YRTHRESH, are available if the Usage field is set to Date, Time, or DateTime (Timestamp) format. Use these attributes to enter the century and year threshold values for the column/field.
- Miscellaneous
-
- DESCRIPTION
-
Contains a description or comments about the column or field.
For more information about multilingual descriptions, see Setting Up Multilingual Titles and Descriptions.
- ACCEPT
-
Specifies criteria for validating data.
OR enables you to specify an acceptable value.
FROM-TO enables you to specify a range of acceptable value fields.
FIND enables you to supply file and field names to instruct DB2 Web Query where to search for a data source and for a list of acceptable values. You supply the field name of the data field for which the validation criteria are being assigned, the file name of the target FOCUS data source where the field can be found, and the field name of the target data field that contains the validation criteria.
Find is only available for FOCUS data sources and does not apply to OLAP-enabled Master Files. Note also that, in the Maintain environment, Find is not supported when developing a Master File.
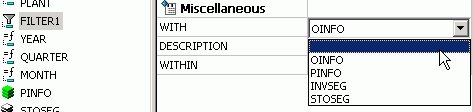
- WITHIN
-
Contains the name of a field to be included in a dimension.
These WITHIN statements are added to the synonym through the Dimension Builder to OLAP enable FOCUS files and relational tables. This enables you to perform OLAP analysis using the OLAP Control Panel, or to use it with the FML Painter.
- FIELDTYPE
-
Identifies an indexed column.
FIELDTYPE=R indicates a read-only column, which will not be updated by DM flows. This setting is useful for columns are that automatically assigned a value by the RDBMS.
- ACCESS_PROPERTY
-
Specifies access options for the column's data.
INTERNAL defines a column that does not appear in sample data or in the list of available columns. Restricts the field from showing in any of the Field Lists in the reporting tools.
NEED_VALUE defines a column that requires a value to access the data.
Select By defines a column by value, range, or multivalues.
AUTHRESP defines a column that describes the result of an authentication operation. Correct response values must be provided in the ACCEPT attribute (using the OR predicate if more than one value is acceptable).
AUTHTOKEN defines a column that contains a response token to be passed as an input value to the operation to be executed.
- HELPMESSAGE
-
Appends a help message to a column.
The attributes available depend on the type of synonym.
Setting Up Multilingual Titles and Descriptions
You can open a synonym in the Synonym Editor and provide text for the title, caption, and description in multiple languages. These descriptions appear in the specified language in reports generated against the synonym.
The Multilingual Titles dialog box is available from the Remarks, Title, and Description attribute value fields in the Synonym Editor.
The attributes available depend on the type of synonym.
Set Up Multilingual Titles and Descriptions
- From the Data Servers area, double-click the Master File or select Edit in Synonym Editor from the File menu.
The Master File opens to the Tree View tab in the Synonym Editor.
- To add multilingual text:
- For Title, click a column from the Master File hierarchy of columns on the left.
- For Remarks, click the root level of the Master File (application/filename) on the left.
- For Descriptions, click a column, segment, or custom field from the Master File hierarchy of fields on the left.
The corresponding attributes and values appear on the right.
- For Title, click a column from the Master File hierarchy of columns on the left.
- Click the ellipsis (...)
at the end of the value field for either Remarks, Title, or Description.
The Multilingual dialog box opens.
- From the Specify Titles/Descriptions for different languages drop down list, choose the language in which you want the remarks (descriptions) and/or titles to be displayed.
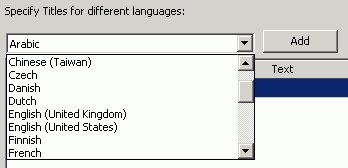
- Click Add.
The selected language is added below the default language (which is determined by your code page selection).

- Type in a description/title in the Text field.
- Required: You may add, edit or delete additional titles/descriptions:
To add an additional language:
- Required: Select another language from the drop-down list.
- Required: Click Add.
- Required: Type in a title/description for the field.
To edit an existing specified title/description:
- Select the title/description and click Edit.
You may also double-click the title.
- Manually type a title/description name.
- Required: Select another language from the drop-down list.
- Required: Click OK to close the Multilingual Titles dialog box.
- Required: Click Save from the File menu to save the synonym.
- To close the synonym, select Close from the File menu or click the control button in the upper right corner.
Enhancing Synonyms Using the Modeling View
The Synonym Editor Modeling View tab provides a visual presentation for the synonym for which positioning is preserved and stored in the Access file. Use the Modeling View to define dimensions for OLAP analysis, view join properties, create cluster joins, and add or edit segments. For more information about using the Dimension Builder in the Modeling View, see Defining Dimensions for OLAP Analysis.
The Modeling View is not available for Cube data sources.
Enhance Synonyms Using the Modeling View
Use the Modeling View to enhance a synonym by adding a segment.
- From the Data Servers area, open a synonym by double-clicking a Master File from the Master Files folder.
The Synonym Editor opens.
- Click the Modeling View tab.
The Synonym Editor Modeling View tab opens in the workspace.
- Right-click a segment in the workspace.
The following pop-up menu appears.

- Add segment through one of the methods listed:
- Add Segment From existing synonym adds an existing synonym as a segment to the current synonym.
- Adding Segment Via metadata import enables you to add segments by using the Create Synonym tool. This tool creates a synonym and includes it as a segment in the synonym from which the tool was launched.
- Add Segment Manually enables you to add segments manually to the current synonym.
You would only use this approach if you are coding a Master File from scratch, as you would for a FOCUS data source.
- Add Segment From existing synonym adds an existing synonym as a segment to the current synonym.
- Required: Optionally,
you can double-click the arrowed lines between tables to open the Join Properties dialog box and determine how the tables are linked.
Tip: You may also right-click a file icon and select Join Properties from the context menu.
In addition, when creating a Cluster Join, there are two additional options for linking tables: Join All (default) is shown by a double arrow and Join Unique is shown as a single arrow.

Join options are not available for FOCUS files.
Edit Synonyms Using the Modeling View
To edit synonyms using Modeling View:
- From the Data Servers area, open a synonym by double-clicking a Master File from the Master Files folder.
The Synonym Editor opens.
- Click the Modeling View tab.
- Right-click a segment icon.
A pop-up menu appears, providing options for adding segments.
Options for adding segments are also available from the icons above the workspace.

To Add a Segment From an Existing Synonym:
- Required: Select Add Segment From Existing Synonym from the pop-up menu.
The Select Synonym dialog box opens.

- Click a synonym and click Select.
The segment is added to the synonym.
To Add a Segment Via Metadata import:
- Select Add Segment Via metadata import from the pop-up menu.
This method enables you to launch the Create Synonym tool, create a synonym, and incorporate it as a new segment in the synonym from which you initiate the import.
The Create Synonym dialog box opens.
- Create a synonym.
The segment is added to the synonym.
- Select Add Segment Manually.
The segment is added to the Modeling View and a default field is created, using a default name SEG name.
- Right-click the segment and select Properties.
The Segment Properties dialog box opens.

- Required: Edit the segment's properties, if needed, and click OK.
- Switch to the tree view to add or change attributes for the new segment(s).
- Required: Select Add Segment From Existing Synonym from the pop-up menu.
The following image shows a synonym which has had several segments added in the Modeling View tab.

You can select the Synonym Text View or Access File Text View tab to see the resulting segment attributes.
Modeling View Pop-up Menu
When you right-click a synonym or segment in the Synonym Editor Modeling View tab, the following pop-up menu appears.
The following pop-up menu appears.
The pop-up menu has the following options:
- Toggle
-
Changes the view from a file icon to a table view, which enables you to see columns, sample data, and sample data parent keys.
Tip: You may also double-click a file icon to open the table view. Double-click the table to close the table view, or click the X button from the toggle toolbar to close.
- Join Properties
-
Provides access to the Join Properties window.
Join options are not available for FOCUS files.
- Add Segment From Existing Synonym
- Enables you to add an existing synonym as a segment to the current synonym.
- Add Segment Via metadata import
-
Enables you to create a new synonym through the Create Synonym tool and add it to the current synonym.
- Add Segment Manually
-
Adds a segment to the current synonym, that must by coded manually.
- Delete
-
Deletes the segment.
- Rename
-
Enables you to rename the segment.
- Properties
-
Launches the Segment Properties dialog box where you can edit the segment.
Join Properties Dialog Box
When you select Join Properties from a segment in the Synonym Editor Modeling View tab, the Join Properties dialog box appears.
The Join Properties dialog box contains Left and Right Source Columns, Join Type, and Join Condition options. Use the left and right source columns to create join maps and view sample data.
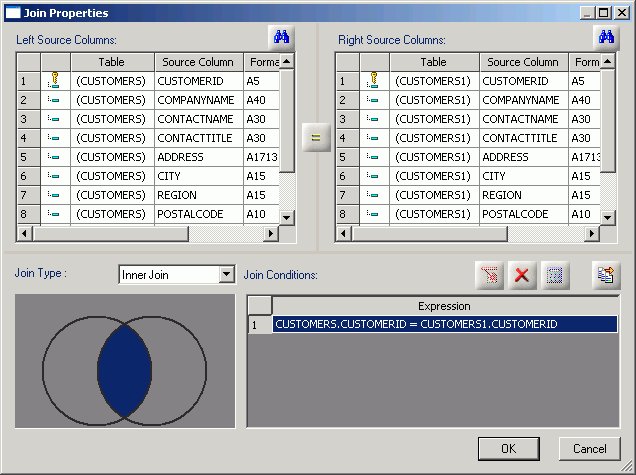
Join options are not available for FOCUS files.
Creating Cluster Joins
Cluster Joins enable you to create a new file structure by linking existing synonyms of two or more relational tables using the same or mixed data sources. For example, you may join a DB2 table and an Oracle table, and so on. Use Cluster Joins to create new views in the metadata by linking together physical tables and easily report against the new view/structure. You can create cluster joins by using the Modeling View of the Synonym Editor.
The Master File description that is created combines the fields of the joined tables within a single file. The Access File from the combined file contains information about the actual location of the data sources, the Join information, and shows how the tables are linked.
The total number of tables that you can add to the tool is 64 (using 63 joins) that results in a new Master File that has a maximum of 64 segments.
Create a Cluster Join by Enhancing Existing Synonyms
Use the Modeling View to enhance an existing synonym by adding a segment.
- From the Projects or Data Servers area, open a synonym by double-clicking a Master File from the Master Files folder.
The Synonym Editor opens.
- Click the Modeling View tab.
The Synonym Editor Modeling View tab opens in the workspace.
- Right-click a segment in the workspace.
The following pop-up menu appears.

- Add tables (segments) through one of the methods listed:
- Add Segment From Existing synonym.
Select a synonym to be added and click Select.
Use this method if you are creating a cluster join with an existing table/synonym.
Tip: Click Save As from the Modeling View File menu if you do want to modify the original synonym.
- Required: Adding Segment Via metadata import enables you to add segments by using the Create Synonym tool. This tool creates a synonym and includes it as a segment in the synonym from which the tool was launched.
Use this method if you are creating a cluster join and need to use a synonym that does not exist. This option enables you to create the synonym and continue to create the cluster join.
- Add Segment Manually enables you to add segments manually, assigning values to segment attribute fields in the Synonym Editor.

Use this method if you are coding a Master File from scratch, as you would for a FOCUS data source.
The segment is added in the Modeling View.
- Add Segment From Existing synonym.
- Right-click the arrowed lines between tables to view the join options.
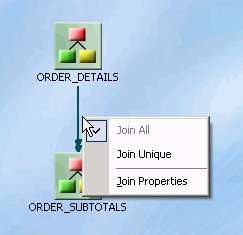
These join options are not available, and do not appear, for FOCUS tables. The only way to view these options are by using Relational tables.
- Join All indicates a multiple instance (one-to-many) type of join. At run time, each host record can have many matching records in the cross-referenced file.
Join all is the default option.
- Join Unique indicates a single instance (one-to-one) type of join. At run time, each host record has, at most, one matching record in the cross-referenced file.
- Join Properties opens the Join Properties dialog box, from which you can determine how the tables are linked. You may:
- Create Inner,
Outer, or Cross Joins.
Outer joins are subdivided into Left Outer Joins, Right Outer Joins, or Full Outer Joins.
- Combine records from the selected tables by mapping source columns.

- Create Inner,
Outer, or Cross Joins.
Use the Tree and Text View tabs of the Synonym Editor to view or edit the details of these tables (segments).
Tip: Click Save As from the Modeling View File menu if you do want to modify the original synonym.
- Join All indicates a multiple instance (one-to-many) type of join. At run time, each host record can have many matching records in the cross-referenced file.
Create a Cluster Join Using a New Synonym
Another way to create a cluster join is to start with an empty synonym:
- Right-click a Master Files folder, select New, then Synonym via Synonym Editor. The Add Master File dialog box opens.
- Enter a unique file name in the File name field.
- Click Open.
The Synonym Editor opens to the Modeling View tab.
- Right-click in the workspace and select from one of the available options to start building the new view.

Defining Dimensions for OLAP Analysis
Synonyms can be modified to support Online Analytical Processing (OLAP). The Synonym Editor provides tools to create OLAP hierarchies and dimensions. OLAP enables you to drill down or roll up on hierarchical data, pivot fields from columns to rows (or vice versa), and slice-and-dice information by filtering or querying data sources based on specified criteria thresholds.
You OLAP-enable the Master File by using the Synonym Editor to create dimension(s) at the field level and associate fields with each dimension.
OLAP is a reporting facility; it is not relevant to data maintenance projects.
Using the Dimension Builder in the Synonym Editor Modeling View
The Dimension Builder enables you to create logical views based on enterprise data (relational or legacy data sources) for multi-dimensional analysis without manually editing metadata. The Dimension Builder works with relational and FOCUS data sources.
Add a Parent/Child Hierarchy
- From the Synonym Editor, click the Modeling View tab.
The Dimension Builder appears on the right side of the window.

If the Dimension Builder is not visible, ensure that Dimension Builder is selected from the Synonym menu.
- Right-click the dimension and select Parent/Child from the Add Hierarchy submenu.

You may also select this option by clicking the Add Parent/Child Hierarchy button from the Dimension Builder toolbar.
The Mandatory Properties for Parent/Child Hierarchy dialog box appears.
- Select a field from the Field Tree and click Assign to assign a Unique ID for the hierarchy.
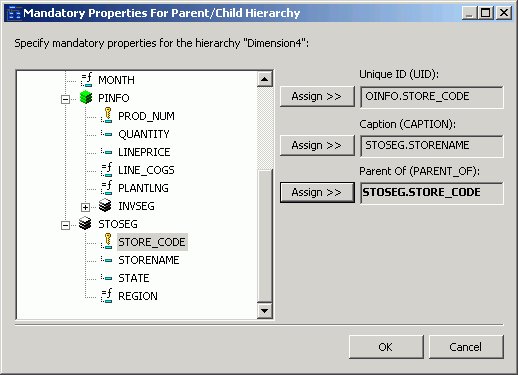
- Repeat Step 3 for the Caption and Parent hierarchy properties.
- Required: Click OK to close the Mandatory Properties for Parent/Child Hierarchy dialog box.
The Mandatory Properties are added to the Dimension Builder.
- Use the right-click menu to rename the dimension,
view properties, or view sample data for the dimension.
- Click Save from the File menu to save the dimension.
Delete a Dimension
To delete a dimension, right-click a dimension and select Delete, or click the Delete button from the Dimension Builder toolbar.
Add Levels to the Hierarchy
This process enables you to edit an existing Master File, add tables (for non-FOCUS Master Files), and create and modify dimensions.
- From the Synonym Editor, click the Modeling View tab.
- Select the Add Levels Hierarchy button from the Dimension Builder toolbar.
A level is added to the hierarchy. Use the right-click menu to rename the dimension or keep the default name.
- Right-click the file icon in the Modeling View to toggle to the table view, which enables you to see columns, sample data, and sample data parent keys.

The table view appears in the Modeling View.
Tip: You may also double-click a file icon to open the table view.
- Using the Columns tab of the table view,
drag and drop selected fields to the Dimension Builder hierarchy folder.

You may also drag and drop fields to and from other hierarchies using the Dimension Builder.
- Click Save from the File menu to save the dimension.
The dimension is saved and store in the Master File.
Dimension Builder Toolbar
You can access the following commands from the Dimension Builder toolbar:
|
Button |
Definition |
|---|---|
|
|
Adds a level hierarchy. |
|
|
Enables you to create a parent/child hierarchy and assign mandatory properties for the hierarchy. |
|
|
Deletes the selected item. |
|
|
Enables you to view and refresh sample data for the selected field. |
|
|
Enables you to switch back to properties in the Tree View tab of the Synonym Editor. |


Creating Business Views
By defining a Business View of a Master File, you can limit the fields available or create a subset of fields from the original Master File. Fields can be grouped into meaningful folders and field names, titles, and descriptions can be customized for each Business View. The Business View points to its underlying Master File, and all of the actual field and security information comes from the original Master File when the Business View is used in DB2 Web Query tools (such as Joins and Defines) and in reports.
Fields in a Business View are organized into folders. Each folder contains a group of fields. The fields in a folder can come from different segments in the original Master File. The Business View may contain existing fields and can include existing custom fields (DEFINEs), COMPUTES, and Filters. Custom fields are associated with a specific segment in the original Master File and are subject to the same rules as real fields. A report can reference fields from multiple folders if they all lie along a single path in the original Master File.
The Business View Master File is stored as if it were a real Master File. However, it has no SUFFIX attribute. Instead, it contains a VIEW_OF attribute that identifies it as a Business View. It can be saved to a different application from the original Master File.
Impact Analysis searches Business Views in addition to FOCUS procedures. This enables you to see if changes in the original Master File will impact fields used in the Business View. For detailed information on Impact Analysis, see Analyzing Metadata and Procedures.
You may create a Business View for an existing Master File by using the Synonym Editor.
Create a Business View Using the Synonym Editor
- From the Data Servers area, navigate to the Master Files folder where you wish to create the Business View and highlight the Master File to be altered.
You may create a Business View anywhere where you can select a Master File.
- Required: Double-click the Master File or select Edit in Synonym Editor from the File menu.
The Master File opens to the Tree View tab in the Synonym Editor.
- Select Create Business View from the Synonym menu.
The Business View window opens to the Business View Tree tab.
A default File name and folder appears. Additional folders may be created for grouping fields.
A Business View Master File may contain only one root folder.

The Properties Bar on the bottom of the Business View window shows information for the selected fields and folders.
Tip: Use the Properties bar to change the title and descriptions for the field names. Items that cannot be edited are grayed out.
- To add additional folders for the Business View, select New Folder from the BusinessView menu.
Multiple sub-folders can be created and folder may be empty for organizational purposes.
- Required: Select fields from the Master File listed on the right and drag to the appropriate folder on the left. Use Shift-click and Ctrl-click to select multiple fields.
If needed, fields may be duplicated and placed under multiple folders.
The selected fields appear in the Business View Tree tab.
- Select Save As from the File menu to save the Business View as a Business View Master file.
The Business View Master File may be saved in a different application then the main files.
- Select Close from the File menu to return to the Synonym Editor.
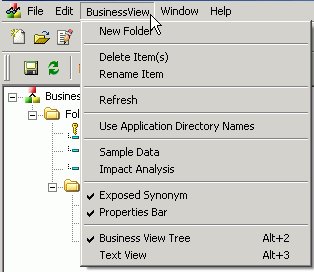
Business View Menu Options
The following menu items are available from the Business View window.
- New Folder
-
Adds a new folder to the Business View. You may also access this option from the right-click context menu and from the new folder icon, located on the Business View toolbar.
- Delete Items
-
Deletes the selected item.
- Rename Item
-
Enables you to rename a selected field or folder. You may also rename items from the Properties bar and the from the right-click context menu.
- Refresh
-
Refreshes the Business View. A Refresh icon is also available on the Business View toolbar.
- Use Application Directory Names
-
Specifies the application name where the original file exists. Information is written in the new master file. The following image is an example of the application directory name for the business view.

This option is turned off by default and is only available during the creation of the business view.
- Sample Data
-
Test the business view for field data and view the type of records returned.
- Impact Analysis
-
Opens the Impact Analysis tool which enables you to analyze data, control search criteria, save reports, and interactively open and edit procedures based on search results. For detailed information on Impact Analysis, see Analyzing Metadata and Procedures.
- Exposed Synonym
-
Shows the Synonym referenced by the Business View.
- Properties Bar
-
Shows the Properties Bar where you may edit properties for the selected fields and folders. Items that cannot be edited are grayed out.
The Properties Bar may be moved or docked anywhere on the Business View window.
- Business View Tree
-
Shows the contents of the Business View in the Business View Tree. This is the default option.
- Text View
-
Shows the contents of the Business View in the Text View. You may also select this option by clicking the Text View tab from the bottom of the Business View window.
The text view is read-only. You cannot edit the underlying description from this tab.
Usage Notes for Business Views
- The detailed information about fields, such as USAGE and ACTUAL formats or indexes remain in the original Master File.
- All information about Cluster Master Files remain in the original Master File.
- DBA attributes are only allowed in the original Master File and are respected by the business view.
- When a Master File description contains more than one field with the same name,
as can occur when files are joined, the BELONGS_TO_SEGMENT attribute identifies which instance of the field name is being referenced in the Business View.
- Folders can be empty for organizational purposed. For example, Region can have empty folders called North, South, East, and West.
- You can issue an SQL SELECT command against a Business View. However, a Direct SQL Passthru request is not supported against a Business View.
- Business Views support alternate file views and fully qualified field names.
- The SEG. operator against a Business View folder displays all of the fields in that folder, not all of the fields in the real segment.
- Requests against a Business View cannot reference any fields or segments not in the Business View.
- All HOLD formats are supported against a Business View.
- All adapters for non-FOCUS data sources support retrieval requests against a Business View.
- Business Views are not supported with data source maintenance commands such as Maintain or REBUILD.
- Business Views are not available for Cube Data Sources.
- For OLAP enabled Master Files, dimensions are not visible while creating a business view. Only fields from the original Master File will be visible.
- When using Business Views, the following SET command must be specified: SET FOCTRANSFORM=ON.
This SET command can be placed in a procedure or can be set in the global server profile or specified in a user profile and can be set while using the Business View or regular Master Files. For thin client tools (Power Painter, HTML tools, and so on), it needs to be in the profile as end-users do not have access to the SET tool or ability to access an editor and manually enter the required command.
Adding this SET command in the profile is a good practice as it will avoid errors during reporting in case command is missing and users will not need to be concerned about what type of file they are using during reporting (Business View or existing master file).
Using a Business View Master File
When you use the Business View Master File in the DB2 Web Query tools and reports, the Field formats, descriptions and titles will be retrieved from the original Master File, unless they are customized and a title and description is available through the Business View.
You may access the Business View Master Files from all development areas of Developer Workbench.Studio:
The Table list shows all available Master Files including the Business Views that are available. The Remarks column shows a description from original Master File unless the Business View file contains it own remarks.
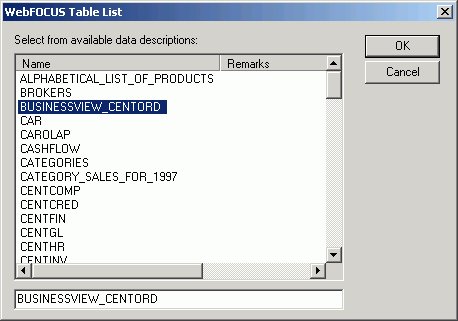
The following image is an example of a Business View Master File in the DB2 Web Query Table List, that appears when creating a report in the Data Servers area.
In the Report Assistant, when using a Business View Master File with the Report Assistant, only fields from the Business View are shown in the Fields list.
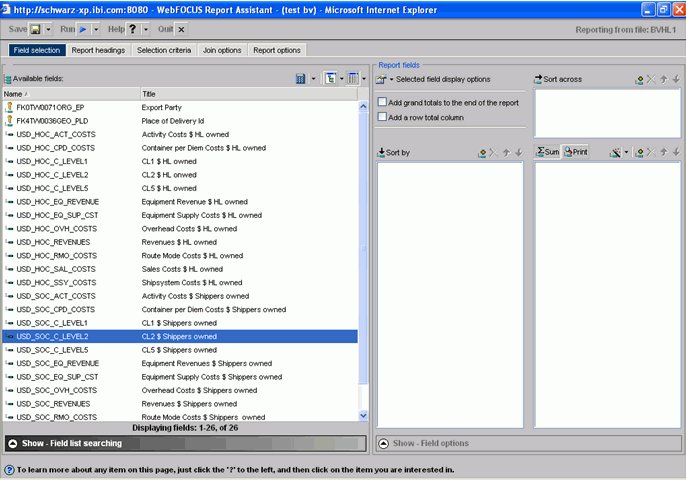
The following image is an example of a Business View Master File in the Report Assistant.
Adding Virtual Columns (DEFINE) in a Synonym
You may create a DEFINE field as a custom field in the Synonym Editor. A custom field can be used in a request as though it is a real data source field. Virtual columns (DEFINES) are available when the data source is used for reporting.
A virtual column can contain an expression, a constant, or a column name.
- If the virtual column is a complex expression, you can create the expression with the Virtual Column Calculator or just type it into the Expression field.
- If the virtual column is a simple expression, like a constant value, you can type the value in the Expression field.
Virtual columns are designated by the following icon:
![]()
After creating a virtual column, you can test it by right-clicking the synonym and selecting Sample Data. Sample Data appears in a separate dialog box.
Create a Virtual Column in a Synonym
To create a virtual column in a synonym:
- From the Data Servers area, open a synonym by double-clicking a Master File from the Master Files folder.
The Synonym Editor opens.
- Right-click a segment (or column) and click Add.
- Select Virtual Column from the Add submenu.
The Virtual Column Calculator opens.

- From the Virtual Column Calculator, type a name for the column in the Column input field, or use the default define name.
- Required: You may enter a descriptive title for the virtual column (DEFINE) in the Title input field.
Tip: From the Synonym Editor, click the browse (...) button at the right of the TITLE and DESCRIPTION value fields to specify multiple language titles.
- Use the Expression tab and the calculator buttons to build the expression for the virtual column (DEFINE).
or
Use the Filter Builder tab to build the expression.
- From the Filter Builder tab, use the drop-down lists to select the filter Column, Relation, and Type.
Parameters are not supported.
- Click the browse (...) button at the right of the Value input field.
The Value Selection dialog box opens.

- Select from the available value(s) and use the arrows to add or remove values.
- Click OK to close the Value Selection dialog box and return to the Filter Builder tab.
The expression is added to the value field.

- To add another filter, double-click a column or variable from the Columns/Variables tab on the right side of the Virtual Column Calculator. The filter is added to the Filter Builder. Add the expression value.
- To delete an expression from the Filter Builder, click the red X in the row of the filter that you are deleting. The filter is removed from the Filter Builder.
- From the Filter Builder tab, use the drop-down lists to select the filter Column, Relation, and Type.
- You may select the Check expression and Sample Data buttons, located on the top right of the Virtual Column Calculator,
to verify that the expression is valid and to view sample data for the filter.
- Click OK to close the Virtual Column Calculator and return to the Synonym Editor.
To edit the DEFINE, Title, or Expression, you may do so directly from the Synonym Editor or you may click the browse (...) button at the right of the EXPRESSION value field to relaunch the Virtual Column Calculator.
- If no columns from the synonym are used in the expression or have been defined, you can use the WITH option to identify the logical home of the defined calculation. You can also use the WITH option to move the logical home for the virtual column to a lower segment than it would otherwise be assigned to (for example, to count instances in a lower segment).
Tip: You can click and drag the DEFINE field and move it to a different segment in the Tree View tab, which also changes the segment association.
- Specify the Missing Data options for columns that allow null data. You can allow all missing data.
- Click Save from the File menu to save the synonym.
- To close the Synonym Editor, select Close from the File menu or click the control button in the upper right corner.
For more information about expressions and virtual column (DEFINE) attributes, see Defining Attributes and Creating Expressions for Custom Fields.
Creating Filters in a Synonym
Filters are created in the Master File through the Synonym Editor and can be used in a Business View file or in reporting tools such as Power Painter, HTML Report Assistant, and so on. You can also use filters to perform other data checking and validation, and sort data based on the conditions that you create.
Filters are created under a specific segment and by default they have association with the selected segment. Filters can also be created without segment association.
Create Filters in a Synonym
- Required: From the Data Servers area, double-click a synonym from the Master Files folder, or right-click the synonym and select Edit in Synonym Editor.
The Synonym Editor opens.
- Required: Right-click a segment or field and select Filter from the Add submenu. The Filter Calculator opens.
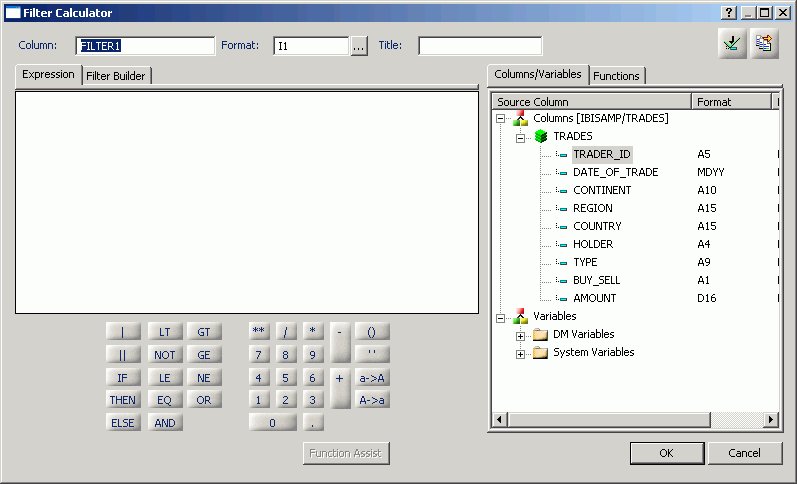
- From the Filter Calculator, type a name for the filter in the Column input field, or use the default Filter name.
IBM recommends that filters have a descriptive name to help identify the filter action during reporting.
- The Format field shows a default value of I1.
The format field cannot be changed. Values for filters return 0 for false and 1 for true.
- You may enter a descriptive title for the filter in the Title input field.
Tip: From the Synonym Editor, click the browse (...) button at the right of the TITLE and DESCRIPTION value fields to specify multiple language titles.
- Use the Expression tab and the calculator buttons to build the expression for the filter. or Use the Filter Builder tab to build the expression.
- From the Filter Builder tab, use the drop-down lists to select the filter Column, Relation, and Type.
Parameters are not supported with Master File Filters.
- Click the browse (...) button at the right of the Value input field.
The Value Selection dialog box opens.
- Select from the available value(s) and use the arrows to add or remove values.
- Click OK to close the Value Selection dialog box and return to the Filter Builder tab. The expression is added to the value field.
- To add another filter, double-click a column or variable from the Columns/Variables tab on the right side of the Filter Calculator. The filter is added to the Filter Builder. Add the expression value.
- To delete an expression from the Filter Builder, click the red X in the row of the filter that you are deleting. The filter is removed from the Filter Builder.
- From the Filter Builder tab, use the drop-down lists to select the filter Column, Relation, and Type.
- You may select the Check expression and Sample Data buttons, located on the top right of the Filter Calculator, to verify that the expression is valid and to view sample data for the filter.
- Click OK to close the Filter Calculator dialog box to return to the Synonym Editor.
To edit the Filter, Title, or Expression, you may do so directly from the Synonym Editor or you may click the browse (...) button at the right of the EXPRESSION value field to relaunch the Filter Calculator.
- Required: To create a Filter without segment association, use the WITH drop-down list to select a blank segment.
Filters are created under a specific segment and by default they have association with the selected segment. Filters can also be created without segment association.
If using a field that appears in multiple segments, the WITH segment associated should be the lowest level segment, or it should be left empty to prevent errors.
In addition, If no fields from the synonym are used in the expression or have not been computed, you can use the WITH option to identify the logical home of the Filter calculation. You can also use the WITH option to move the logical home for the Filter field to a lower segment than it would otherwise be assigned to (for example, to count instances in a lower segment).
- Click Save from the File menu to save the synonym. The filter is saved as part of the synonym.
- To close the Synonym Editor, select Close from the File menu or click the control button in the upper right corner.
Adding Computed Fields (COMPUTE) in a Synonym
You may create a Computed field as a custom field in the Synonym Editor. The procedure for adding a custom field is similar to the procedure used to add a Defined field. The Computed field is identified as the Master File Computed Field and is differentiated from the Defined fields and the other Computed Fields.
Computed fields from the Master File appear in the Windows® versions of the Graph Assistant and in the Report Assistant fields list.
Create a Computed Field in the Synonym Editor
To create a computed column in a synonym:
- Required: From the Data Servers area, open a synonym by double-clicking a Master File from the Master Files folder.
The Synonym Editor opens.
- Required: Right-click a segment (or column) and click Add.
- Required: Select Compute
 from the Add submenu.

- From the Compute Calculator, type a name for the column in the Column input field, or use the default compute name.
- You may enter a descriptive title for the computed field (COMPUTE) in the Title input field.
Tip: From the Synonym Editor, click the browse (...) button at the right of the TITLE and DESCRIPTION value fields to specify multiple language titles.
- Use the Expression tab and the calculator buttons to build the expression for the computed field (COMPUTE). or
Use the Filter Builder tab to build the expression.
- From the Filter Builder tab, use the drop-down lists to select the filter Column, Relation, and Type.
Parameters are not supported.
- Click the browse (...) button at the right of the Value input field.
The Value Selection dialog box opens.
- Select from the available value(s) and use the arrows to add or remove values.
- Click OK to close the Value Selection dialog box and return to the Filter Builder tab.
The expression is added to the value field.
- To add another filter, double-click a column or variable from the Columns/Variables tab on the right side of the Compute Calculator. The filter is added to the Filter Builder. Add the expression value.
- To delete an expression from the Filter Builder, click the red X in the row of the filter that you are deleting. The filter is removed from the Filter Builder.
- From the Filter Builder tab, use the drop-down lists to select the filter Column, Relation, and Type.
- You may select the Check expression and Sample Data buttons, located on the top right of the Compute Calculator, to verify that the expression is valid and to view sample data for the filter.
- Click OK to close the Compute Calculator and return to the Synonym Editor.
To edit the Compute, Title, or Expression, you may do so directly from the Synonym Editor or you may click the browse (...) button at the right of the EXPRESSION value field to relaunch the Compute Calculator.
- Specify the Missing Data options for columns that allow null data. You can allow all missing data.
- Click Save from the File menu to save the synonym.
- To close the Synonym Editor, select Close from the File menu or click the control button in the upper right corner.
For more information about expressions and COMPUTE attributes, see Defining Attributes and Creating Expressions for Custom Fields.
Defining Attributes and Creating Expressions for Custom Fields
A custom field is a field whose value is not stored in the data source but can be calculated from the data that is there. You can create a custom field in your synonym by adding a virtual column (DEFINE), Master File filter (FILTER) and a Computed Field (COMPUTE). The fields are available whenever you access the corresponding data source in a reporting tool.
You can define attribute values and create expressions for custom fields by using the Synonym Editor.
Custom Field Attributes
The following attributes may be available for custom fields (DEFINE, FILTERS, and COMPUTE) in the Synonym Editor.
The attributes available depend on the type of synonym and the type of custom field selected. The image below is an example of an SQL data source with the virtual column (DEFINE) selected.

Custom fields (DEFINE, FILTER, COMPUTE) typically have the following attributes:
- General
-
- DEFINE
-
Is the name of the virtual column.
This attribute only appears when a virtual column (DEFINE) is selected.
- FILTER
-
Is the name of the Master File filter field.
This attribute only appears when a virtual Filter field is selected.
- COMPUTE
-
Is the name of the computed field.
This attribute only appears when a virtual computed field is selected.
- EXPRESSION
-
Is the calculation that creates the virtual column.
- TITLE
-
Supplies a title to replace the column name that is normally used in reports and enables you to specify multiple language titles for the virtual column.
- FORMAT
-
Describes the data type and format for the virtual column.
This attribute only appears for DEFINE and COMPUTE custom fields.
- Allow Missing Data
-
Allows missing data if not, transaction value is supplied.
This attribute only appears for DEFINE and COMPUTE custom fields.
- All
-
Allows all missing data if not transaction value is supplied.
This attribute only appears for DEFINE and COMPUTE custom fields.
- Miscellaneous
-
- WITH
-
If no columns from the synonym are used in the expression or have been defined, you can use the WITH option to identify the logical home of the defined calculation. You can also use the WITH option to move the logical home for the virtual column to a lower segment than it would otherwise be assigned to (for example, to count instances in a lower segment).
This attribute only appears for DEFINE and FILTER custom fields.
- DESCRIPTION
-
Contains a description or comments about the virtual column.
- WITHIN
-
Contains the name of a field to be included in a dimension.
These WITHIN statements are added to the synonym through the Dimension Builder to OLAP enable FOCUS files and relational tables. This enables you to perform OLAP analysis using the OLAP Control Panel, or to use it with the FML Painter.
This attribute only appears for DEFINE and FILTER custom fields.
- SCD Type
-
Sets slowly changing dimensions. This option is only available for existing relational targets.
A surrogate key is the first column in the table and has an SCD type of blank. Other columns with a blank SCD type have no SCD processing done to them.
Logical Key Field is the database key.
Activation Flag indicates that the row is current.
Begin Date/End Date indicates date range for the row values. A null end date indicates the row is current.
Type I (overwriting history) designates columns whose database values are overwritten with new values.
Type II (preserving history) designates columns that whose database rows are flagged as inactive or assigned an end date; new rows are inserted with the new values.
blank (non-key columns) indicates that database values are not changed.
The attributes available depend on the type of synonym.
Calculators for Custom Fields
To launch the Virtual Column Calculator, Filter Calculator, or Compute Calculator, click the browse (...) button at the right of the EXPRESSION value field in the Synonym Editor.

The selected calculator opens., depending on the type of custom field that you are creating.

The calculator has the following fields/options:
- Column
-
The name of the object being created (virtual field, filter, computed field).
- Format
-
Is the fields format.
- Expressions tab
-
Location for typing an expression. You can add data source fields from the Columns/Variables tab, functions from the Functions tab, and numbers and operators from the calculator as you type.
- Filter Builder tab
-
Displays the filter building window from which you can add and delete columns, choose the relation, type, and select values for your filter.
- Columns/Variables tab
-
Displays a hierarchical list of available source columns, and System Variables folders that you can use in creating an expression.
- Functions tab
-
A function is a program that returns a value. This tab lists the built-in functions that you can use to derive the value of a temporary field.
- Function Assist button
-
Enables you to specify parameters for the function through a dialog box when creating or editing a transformation.
- Calculator buttons
-
Insert numbers and operators.
The following operators are available:
- | (single concatenation bar)
-
Concatenates two values, retaining any trailing blanks after the first one. For example, if FIRST_NAME and LAST_NAME were both in A15 format, the expression
FULL_NAME = FIRST_NAME | LAST_NAME
would produce a column like the following:
MICHAEL      SMITHSONJANE         JONES .
.
.
- || (double concatenation bar)
-
Concatenates two values, suppressing any trailing blanks in the first. For example, to construct the full name and insert a comma, the syntax
FULL_NAME = LAST_NAME || (', ' | FIRST_NAME)would produce a column like the following:
SMITHSON, MICHAEL JONES, JANE .
.
.
The concatenation in the parentheses is done first (preserving the blank space after the comma), and the result is then concatenated to LAST_NAME, suppressing the trailing blanks of LAST_NAME.
- IF
-
Establishes a conditional test.
- THEN
-
Specifies the action to perform if the result of a conditional test is TRUE.
- ELSE
-
Specifies the action to perform if the result of a conditional test is FALSE.
- LT
-
Returns the value TRUE if the value on the left is less than the value on the right.
- NOT
-
Returns the value TRUE if the operand is false.
- LE
-
Returns the value TRUE if the value on the left is less than or equal to the value on the right.
- EQ
-
Returns the value TRUE if the value on the left is equal to the value on the right.
- AND
-
Returns the value TRUE if both operands are true.
- GT
-
Returns the value TRUE if the value on the left is greater than the value on the right.
- GE
-
Returns the value TRUE if the value on the left is greater than or equal to the value on the right.
- NE
-
Returns the value TRUE if the value on the left is not equal to the value on the right.
- OR
-
Returns the value TRUE if either operand is true.
- **
-
Raises a value to the specified power.
- ( )
-
Adds parentheses.
- ''
-
Inserts two single quotation marks. Enter alphanumeric test values between these.
- a->A
-
Converts selected text to uppercase.
- A->a
-
Converts selected text to lowercase.
- Check expression button
-
Verifies the validity of the expression.
- Sample data button
-
Produces sample data for the expression.
Adding Group Fields in a Synonym
For data sources that support groups, you can assign a unique name to multiple fields to create a group field. A group field is created by two or more alphanumeric fields, physically next to each other. A group field provides an efficient means for grouping similar or logically connected fields that will be accessed as a single unit, but do not warrant a separate segment.
In the Maintain environment group fields are supported in a Master File as long as they are not group keys, that is groups that are actual fields, as supported by VSAM. If you create a group field in the Maintain environment, the group will not be visible, only the fields that make up the group will be visible.
Add a Group Field to a Segment
- Required: From the Data Servers area, open a synonym by double-clicking a Master File from the Master Files folder.
The Synonym Editor opens.
- Required: Right-click a segment (or column) and click Add.
- Required: Select Group
 from the Add submenu.
The groups option may not be available for some data sources.
A group is added to the synonym and its attributes and values appear on the right.
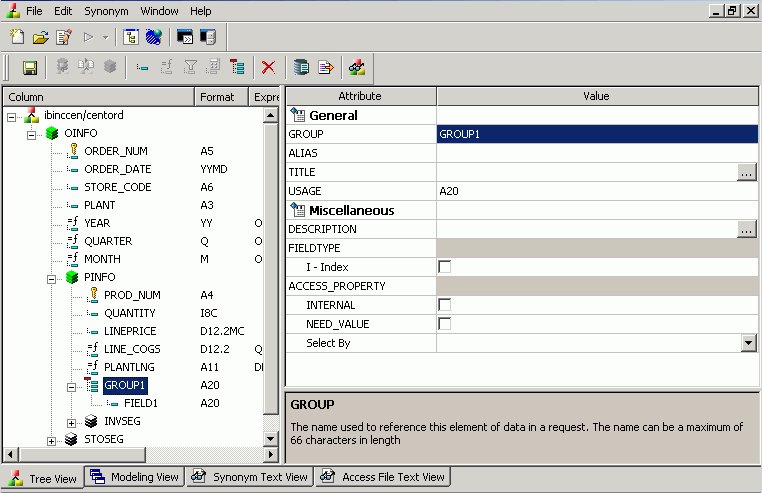
- Type a name for the group in the GROUP field.
- Select the USAGE Type value for the group. Specify the length, the decimal places (if applicable) and any display options for the group.
- Click the I - Index box if you want the group to be indexed.
- Select the ACCESS_PROPERTY values to specify access options for the group's data.
- Optionally, you can specify the TITLE and DESCRIPTION display options.
- Click Save from the File menu to save the synonym.
- To close the Synonym Editor, select Close from the File menu or click the control button in the upper right corner.
Add a New Field to a Group Field
- Required: Right-click the group field to which you want to add a new field and select Add.
- Required: Select Column
 from the Add submenu.
A field is added to the group and its attributes and values appear on the right.

- Supply the required information for the group field. For more information about field attributes, see Viewing and Editing Synonym Attributes.
Add an Existing Field to a Group Field
- Click the field you want to add to the group field.
- While holding the left mouse button down,
drag the field and drop it on the group field name.
The field is added to the group field.
Delete a Group Field From a Segment
- Required: Right-click the group and select Delete.
A confirmation appears stating that all fields \ columns within the group will be deleted.
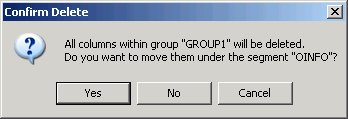
- Required: Click Yes to delete the group and move the fields (within the group) under the root segment of the synonym.
Click No to delete the group and all of the fields within the group.
Click Cancel to close the Confirmation Delete dialog box and return to the Synonym Editor.
Delete a Field From a Group Field
Right-click the field, then select Delete.
Group Field Attributes
Group fields in a synonym can have the following attributes:
- General
-
- GROUP
-
Is the name of the group.
- ALIAS
-
Assigns an alternative name for a group.
If you create a report, the group name appears as a column heading unless you have specified an alternate title for the group. Aliases cannot be used as column titles.
- TITLE
-
Supplies a title to replace the group name that is normally used in reports and enables you to specify multiple language titles for the group.
- USAGE
-
Contains the format for the group field. Since the group field is made by concatenating together several other fields, the Synonym Editor determines what this format needs to be. For example, if the group field has two alphanumeric fields in it, each 20 characters long (A20), then the group field must be alphanumeric and 40 characters long (A40). The group field is always alphanumeric, regardless of what the fields that make it up are.
- Miscellaneous
-
- DESCRIPTION
-
Contains a description or comments about the group. The description displays in Field lists and on the status bar.
Field descriptions also appear as bubble help in OLAP-enabled reports. If you do not include a description, bubble help shows the field name (column title).
- FIELDTYPE
-
Identifies an indexed group. You can index the values of a field to enhance data retrieval performance. To do so, select the Index check box when you add a field and before you add the data. An index is an internally stored and maintained table of data values and locations that enhance the performance of data retrieval. A Master File can have several associated indexes, but the combined total of indices and segments cannot exceed 64.
FIELDTYPE=R indicates a read-only column. This setting is useful for columns are that automatically assigned a value by the RDBMS.
Tip: You can turn on the index after adding data to a field, however, you will have to use the Rebuild Index option to create the index.
- ACCESS_PROPERTY
-
Specifies access options for the column's data.
INTERNAL defines a column that does not appear in sample data or in the list of available columns. Restricts the field from showing in any of the Field Lists in the reporting tools.
NEED_VALUE defines a column that requires a value to access the data. Indicates that a selection is needed in the Report Request (WHERE condition).
The attributes available depend on the type of synonym.
Applying Database Administrator Security
You can secure Master Files on a file-by-file basis. For each data source, security can be maintained at two different levels.
- Database Administrator Level. You specify the Database Administrator (DBA) password for the data source. The DBA has unlimited access to the Master File and data source and can set up or change security restrictions for individual users. Only the Database Administrator can encrypt (scramble) or decrypt (unscramble) a data source. For more information, see Encrypting and Decrypting a Master File.
- User Level. You specify the DBA and user passwords for the data source. The user password represents a user who has access to that data source. When you specify a user password, also set at least the type of file access: read, write, read/write, update. Each user's security can be further limited by restricting access to segments, fields, or field values. For more information, see Restricting Access to Segments, Fields, and Field Values. Once a user password has been established, you can apply the same restrictions to multiple users. For more information, see Applying Security Restrictions for Multiple Users.
You cannot specify a Database Administrator (DBA) password during the create synonym process. You must use the Synonym Editor.
When security is specified, the Database Administrator, or user, must enter a password to get access to the data source. When the DBA or user no longer has access to the data source, you can delete their security.
Before adding any type of security to a data source, the Database Administrator must be aware of certain DBA guidelines. See DBA Guidelines.
Set Up Security for the Database Administrator
- Required: In the Synonym Editor, click DBA from the Synonym menu or click the DBA
 button from the Synonym toolbar.
The DBA Properties dialog box opens.

- Type the DBA password in the DBA Password box.
When the password is created and the cursor is in that field, you can right-click and use the edit options to undo, select all, cut, copy, paste, or delete the password.
- Click OK to save the Master File with the DBA password.
Set Up Security for the User
- Required: In the DBA Properties dialog box, click Add Users.
The Add Users button is not active until you enter a DBA password.
The User in File, File Access, and Access Restrictions options are activated.
- Select the type of file access from the File Access group.
When the password is created and the cursor is in that field, you can right-click and use the edit options to undo, select all, cut, copy, paste, or delete the password.
- Select the type of restriction—segment,
field, and/or field value—from the Access Restrictions group, then select the type of access for each. For details, see Restricting Access to Segments,
Fields, and Field Values.
- To apply the same security restrictions as another user, select the Same Restriction check box and select another user from the drop-down list.
The Same Restriction option is activated when there are multiple users.
- You may select the User in File browse button to select a Master File to which the user security will be applied.
The User in File option is activated when a user is selected.
- Click OK to save the Master File with the user password and restrictions.
DBA Guidelines
You can ensure that the security restrictions you place on Master Files are correct by adhering to these guidelines.
- Every file with access limits must have a DBA password.
- No segment, field, or field value restrictions may be specified at the Database Administrator level. The Database Administrator should have unlimited access to the data source and all cross-referenced data sources.
- Once security restrictions have been applied, the Database Administrator should conduct thorough testing of every restriction before the data source is used.
It is particularly important to check field values to make sure they do not contain errors. If they are in error, user access to the field data will be unnecessarily restricted.
- All groups of cross-referenced data sources must have the same security restrictions.
- You must have a DBA password to encrypt and decrypt or restrict existing data sources.
- The Database Administrator can change any type of security restriction.
- Access levels effect what fields users can access. The Database Administrator must consider what commands each user will need. If a user does not have access rights, that user will receive an error message.
DBA Properties Dialog Box

The following options are available from the DBA Properties dialog box.
- DBA Password
-
Enter your DBA password of up to 8 characters. This is the password of the DBA who will be creating and maintaining the current data source. The DBA has full access to the data source and the corresponding Master File, controls the access rights of other users, and has encryption privileges. See Encrypting and Decrypting a Master File.
- DBA File
-
Select the name of the Master File that contains your DBA security restrictions. Other Master Files can use the DBA security restrictions in this Master File.
- User in File
-
Select the name of the Master File to which a user security will be applied. This option is used to add data source-specific restrictions to the current data source. It includes a FILENAME attribute for the selected Master File. The FILENAME attribute in the referenced Master File must be the same as the FILENAME attribute in the DBA section of the current data source.
- Users
-
Enter the names (up to eight characters) of users to whose access rights will be granted for the current data source.
- Same Restriction: User Same as
-
If multiple users require the same access rights, indicate the user whose access profile you wish to apply and the new user to whom you wish to apply it. See Applying Security Restrictions for Multiple Users.
- File access
-
Choose Read access for full viewing rights.
Choose Write access to permit additions/changes to the data source.
Choose Read/Write for both of the above.
Choose Update access to make changes to field values.
- Access Restrictions
-
Name - Name of the Master File component selected (for example, the segment or field name).
Access - Type of access restriction.
Value - Value to restrict access to.
- Segment, Field, Value
-
Choose Segment to grant access to all or individual segments.
Choose Field to grant access to all or individual fields.
Choose Value to limit access to values that meet a test condition. See Restricting Access to Segments, Fields, and Field Values.
Encrypting and Decrypting a Master File
You may use the Encrypt and Decrypt attributes from the Synonym Editor to scramble and unscramble some or all of the contents of a data source. When you encrypt Master Files, they are secure from unauthorized examination.
Encryption at the data source level scrambles the entire contents of that Master File so it is unreadable. When you encrypt a Master File, you can decrypt it. Decrypting unscrambles the contents to its readable state.
Before you can encrypt or decrypt any Master File, specify the DBA password. If you do not specify a DBA password, you will not be able to encrypt or decrypt.
Encrypt a Master File
- In the Synonym Editor, click DBA from the Synonym menu or click the DBA
button from the Synonym toolbar.
The DBA Properties dialog box opens.
- Create and save the Master File with the DBA password.
- From the Synonym Editor Tree View tab, select a segment from the Master File hierarchy (left pane).
The values for the selected segment appear in the right pane.
- Select the Encrypt check box.

- Click Save from the File menu to encrypt the Master File.
Decrypt a Master File
- At the encrypted segment level in the Master File hierarchy (left pane), click the Encrypt attribute.
- De-select the Encrypted check box.
- Click Save from the File menu to decrypt the Master File.
Selecting the Type of Access
When you assign a user password, the type of file access and access restrictions options are available. You must specify at least the type of access the user is permitted to have for the data source. The type of file access can be specified in the File Access group on the DBA Properties dialog box. In this group, there are four file access options:
- Read. Allows the user only to read (to view)
the data source.
- Write. Allows the user only to write (to add or to make changes) to the data source.
- Read/Write. Allows the user to read and write to the data source.
- Update. Allows the user to update (to make changes to) existing field values.
The type of file access determines what a user can do to the entire data source:
- If you specify only the type of file access, the user will have the specified access to the entire data source.
- If you want to impose additional limitations you can restrict access to segments, fields, and/or field values. See Restricting Access to Segments, Fields, and Field Values.
Restricting Access to Segments, Fields, and Field Values
You can restrict access to segments, fields, and field values in a Master File by specifying Access Restrictions for a user. When you specify what is to be restricted—segment, field, and/or value—you can then specify the type of access that will be restricted. For fields, you can also specify whether or not you want the field to be displayed. For field values, you are required to enter a test condition.
Select the Segment/Field/Value button from the Access Restrictions area in the DBA Properties dialog box and specify the restriction.
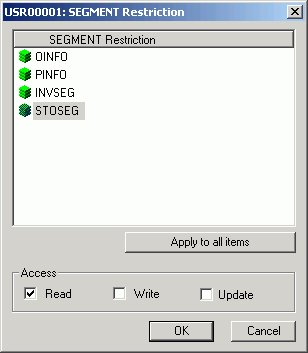
- Fields. You specify the type of access for individual fields or all fields. You can also specify not to display the data in that field using NoPrint. If you specify NoPrint for a field, the data will appear as blanks for alphanumeric format or zeros for numeric format whenever the user tries to retrieve it.

- Values. You specify the type of access (read or write) and the test condition. The user is restricted to using only those values that satisfy the test condition.

Applying Security Restrictions for Multiple Users
You can specify restrictions for one user and apply the same restrictions to other users. This helps when you want to set the same restrictions for a group of users.
Apply Previously Defined Restrictions to Another User
- In the DBA Properties dialog box, click Add Users.
The Add Users button is not active until you enter a DBA password.
The Same Restrictions group is activated.
The Same Restriction option is activated when there are multiple users.
- In the Same Restriction group, click the User Same as check box.
- Required: Click the arrow on the drop-down combo box, then select the user with the security restrictions that would apply to the new user. Security restrictions from the user in the User Same as box are applied to the new user. You can apply the security restrictions to other users by repeating steps 1 to 3.
You must have created at least one user security restriction to apply security restrictions to multiple users.
Deleting a DBA or User's Password
You can delete a DBA or user's security when it is no longer needed.
Delete a User's Password
- On the DBA Properties dialog box, select the user name in the Add Users box.
- Right-click and select Delete or press Delete on the keyboard. A confirmation message appears asking if you want to delete the security information for the selected user.
- Select Yes.
If you delete the user based upon whom you have assigned security restrictions for other users, reset security restrictions for all users attached to the user you deleted.
Delete a DBA Password
Deleting a DBA's security will delete all users' security for that data source.