Portal Express, Version 6.0
Operating systems: i5/OS, Linux, Windows
Customize pages
The page customizer contains portlets for editing the layout, content, and appearance of pages. It also provides the Wires portlet, which allows users to set up connections between cooperative portlets on a page, and the Locks portlet, which allows users to lock and unlock containers and container content. You can configure the settings for these portlets to show a certain set of functions, restricting basic users from performing more advanced tasks.
Editing a shared page can have different results, depending on the role assigned to the user editing the page.
- Users with the Editor role for a page can make changes that affect all users of the page.
- Users with the Privileged User role for a page can only make changes to a private copy, or layer, of the page. The changes do not affect the other users of the page. The page must have an initial layout with at least one container before users with the Privileged User role can make any changes to the page.
- Users with the User role for a page cannot edit the page at all.
See Access rights for more information.
The following sections describe how to customize pages.
- Access the Page Customizer
- Edit layout and content
- Set Permissions
- Set appearance of portlets
- Set up wires
- Choose themes and skins
A page is deactivated when you start making changes to it. While editing the page, all changes are effective immediately and cannot be undone or cancelled.
Other users will not be able to access the page and icons that launch the edit mode of portlets on the page are deactivated until you commit the changes by clicking Done.
Access the Page Customizer
Users can access the portlets in the Page Customizer through one of the following methods.
- Navigate to the page you want to change and select Edit Page Layout from the drop-down menu. The drop-down menu for a page is located on the tab for that page. The Edit Layout portlet opens the current page for editing.
Other portlets in the Page Customizer are available if you have appropriate access.
- After creating a new page, you are directed to the Edit Layout portlet to edit the layout and content of the new page. Other portlets in the Page Customizer are available if you have appropriate access. To create a new page, select New Page from the drop-down menu. The drop-down menu for a page is located on the tab for that page.
- Navigate to the Manage Pages portlet and click on the Edit Page Layout icon in the appropriate row.
Edit layout and content
The Edit Layout portlet allows you to define the layout and content of a portal page. This portlet is located in the Page Customizer. Some of the options you can select on the page include:
Layout template: You can select from one of several preconfigured page layouts. Add portlets: Allows you to select portlets from a list that you can add to containers on the page. This might require that you enter search criteria for portlets rather than listing all available portlets. You can also drag portlets from the Portlet Palette to add portlets to the page.
Show layout tools: Shows advanced layout tools for creating and editing page containers. This options overrides the preconfigured layout templates. If the Show layout tools option is not displayed by the Edit Layout portlet, you can display it by clicking the edit icon and checking the option,
Show toggle link for "Show layout tools/hide layout tools"
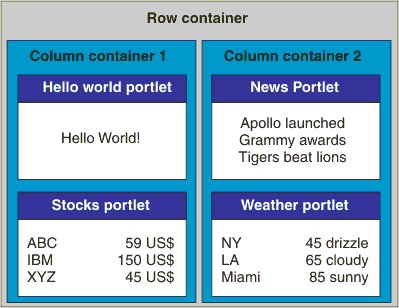
The sample page below has the following layout:
- A Row Container that contains:
- Two Column Containers, each containing:
- Two portlet containers (controls), with a portlet in each.
- Two Column Containers, each containing:
The structure of an example page might look like this:
For more information, see the help for the Edit Layout portlet.
Set Permissions
Use the Locks portlet to set permissions for moving containers or content, or for deleting portlets.
This allows you to lock content to certain locations on a page. If a user has appropriate access rights, the user can determine what other users are able to do with a page. Any element on the page, such as a row container, a column container, or a portlet, can be locked or unlocked for many variations that give a user control of what can be modified. On a page where content and layout should be preserved, both can be locked, preventing other users from altering the arrangement of containers or portlets on the page.
To lock or unlock content on a page, access the Page Customizer and select the Locks portlet.
Notes:
- If you want to lock a portlet so that a user cannot delete it from the page, also lock the parent container and the content of the parent container.
- In order to modify the locks for a certain page, a user must have Editor role on that page.
- Be aware of the effect that locks and access permissions can have on pages that inherit content from a shared page. See Overview of managing pages for more information.
For additional information, see the help for Locks.
Set appearance of portlets
Skins represent the border around a portlet, including its title bar. Users with appropriate access can select skins for individual portlets using the Appearance portlet of the page customizer.
To set a skin for portlets, access the Page Customizer and select the Appearance portlet. See the portlet help for further information.
Set up wires
The Portlet Wiring Tool allows you to configure connections, or wires, between cooperative portlets. Cooperative portlets can exchange information, or properties, with each other through the property broker. Properties are exchanged either by prompting the user with a Click-to-Action menu or automatically using preconfigured wires. As a result, portlets on the page can react in an integrated and unified manner to the user's actions.
Setting up a wire between portlets allows the user's transfer selection choices to be saved. The wire may be used to automatically transfer properties to target portlets when specific interactions are performed without displaying the pop-up menu prompting the user for more information. The Portlet Wiring Tool allows you to view the properties that portlets on the page can send or receive. If a match is available between two portlets, you can create a wire between the two portlets. Existing wires may also be deleted using the tool.
The Portlet Wiring Tool also provides the functionality to implement cross-page portlet communication. Cross-page wires allow portlets to exchange properties across pages. Before creating a cross-page wire, the target page must have receiving actions defined as global on its portlets.
Setting an action as global will also make that action available to Click-to-Action menus. To set an action as global, navigate to the target page and select Edit Page Layout from the drop-down menu on the title bar. Then select the Wires tab and click on Manage Actions. This will bring up a listing of the portlets on a page and their corresponding receiving actions.
As an alternative to the Portlet Wiring Tool, wires can also be created interactively in the portlet. Depending on the browser, users with sufficient permissions can create wires by holding either the CTRL or ALT keys and clicking an icon or hotspot in the portlet that is already associated with a Click-to-Action function. A dialog is displayed that allows the user to create a wire to other portlets on the page.
The wiring tool allows wires to be created in situations which are not handled by the interactive approach. For example, the tool does not require the existence of Click-to-Action menus to initiate wire creation, and can be used to create multiple wires from a single source property (using the interactive approach, a single source can be wired to a single target or all targets, not an arbitrary subset). Wire creation or deletion is subject to the access control checks as described below.
In order to view the tool itself, users must possess at least "User" role permissions on the page and the portlet. Further access checks are performed before allowing the user to view, create, or delete wires between portlets. The user must possess at least "User" role permissions on a page and the wired portlets on it to be able to view wires for the page. Users may also be able to create or delete personal wires, which affect their view of the page, or create or delete public wires, which affect all users' view of the page. Users must possess at least "Privileged User" role permissions on the page and "User" permissions on the portlets to be able to create or delete personal wires, while at least "Editor" role permissions are required on the page and "User" permissions on the portlets to be able to create or delete public wires.
Choose themes and skins
A theme determines the global appearance of a page. The purpose of this is to ensure visual consistency. Themes affect the navigational structure, the banner, the colors and fonts, the available portlet skins, and other visual elements of a page. A skin determines the frame that is displayed around a portlet.
Use the Themes and Skins portlet to do the following:
- Set the portal default theme
- Set the portal default skin
- Associate skins with a theme
- Set the default skin for a theme
- Add new themes and skins to the portal
- Delete themes and skins from the portal.
You find this portlet under Administration, Portal User Interface.
See the respective portlet helps for additional instructions.
For more details about themes and skins see Layout of the portal page.
When a theme is removed, all references from pages that have previously been set to this theme are deleted. When a skin is removed, all references to a page or portlet that have previously been set to this skin are deleted.
Notes:
- If you remove a theme, the references to that theme and the links between that theme and the related skins are also deleted. If you want to remove the skins related to the removed theme as well, apply special care to remove only skins that are related to no other theme than the deleted one. The skins are associated to the portlets. Therefore, if you have a skin related to several themes, and you delete one of those themes, then the skin will still show under the other themes.
- Deleting a theme or skin does not remove the /theme or /skin directory from the server.
- Some of the theme and skin titles might not appear correctly if your language preference uses DBCS characters. To correct the display of these titles, change the character set used by your language preference for HTML markup to UTF-8. See Changing the character set for a language for more information.
Related information
- Users and groups
- Managing Access Control
- Working with portal navigation
- Language support
- Portal administration portlets
- Cooperative portlets
- Configuration levels for portlets
- Preference layers and portlet modes