Portal Express, Version 6.0
Operating systems: i5/OS, Linux, Windows
Step 3.4: Adding a portlet to the Work page
Step 4 of this tutorial walks you through adding a portlet to the Work page of the Intranet JumpStart site. This portlet will display the Lunch menu created in earlier steps of this tutorial.
Now that you have created a new site area, a copy of the announcements list template, and content, you are ready to display the new content on the Work page.
To add a portlet to the page:
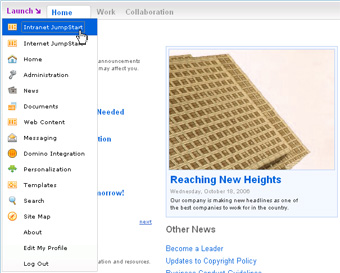
- Select Intranet JumpStart from the main menu.
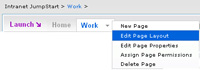
- Select the Work tab to navigate to the Work page of the site.

- Hover over the work tab and select Edit page layout from the drop down menu.
- Click Add portlet in the column where you want the new portlet to render. For this tutorial, add the portlet to the left column.
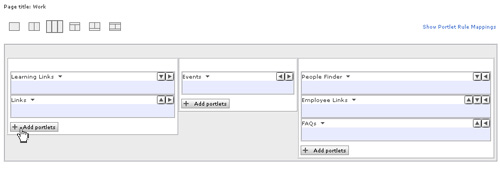
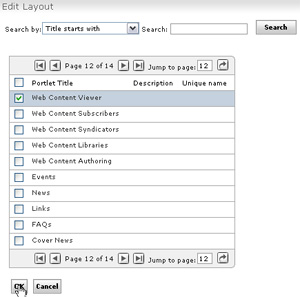
- From the portlet list, select the Web Content Viewer and click OK. Then click Done to return to the Work page. Tip: Search for Web Content Viewer using the search field to quickly locate the portlet in the list.
 The Web Content Viewer portlet will appear in the left column of the Work page.
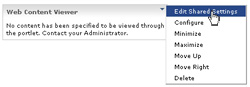
- Hover over the portlet title bar and select Edit shared settings.
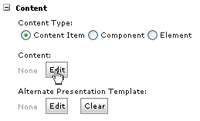
- In the Content section, under Content click Edit .
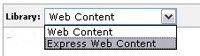
- In the Library drop down, select the Library where your site area is stored. For this tutorial, choose the Express Web Content Library.
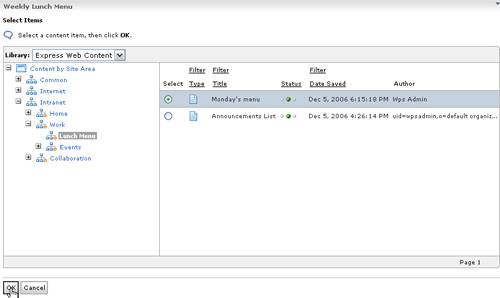
- Expand Content by Site Areas > Intranet > Work > Lunch Menu, select Announcements List from the list and click OK.
- In the Edit preferences window, under settings, you can optionally type a title for the portlet and click OK.
Click Apply to save your changes, and OK to return to the Work page. For this tutorial, type Weekly Lunch Menu for the title.
The title field only supports ASCII characters.


Lesson checkpoint
During this segment of the tutorial, you have learned the following:
- How to add a portlet to a portal page.
- How to configure a Web Content Viewer portlet to point to a site area.
< Previous