Operate > WebSphere Commerce Accelerator > Order management > Order flow process > B2B order flow process
Order flow process - extended site store
The order flow process in the extended sites business model is similar to that of the direct sales business model, in that...
- an order is placed
- payment is approved
- order is released to fulfillment
The primary difference is the type of catalog that is used in the extended site business model.
For example, partitioned catalogs are used by independent stores. In contrast, stores can also use a shared catalog that is loaded as a master catalog by the site administrator.
Merchants can select the products from the shared catalog and optionally create store-specific products for sale in their own stores.
To illustrate, this is an example of the order flow process for stores in the extended site business model using the ATP inventory model. For non ATP stores steps 4-11 do not apply.
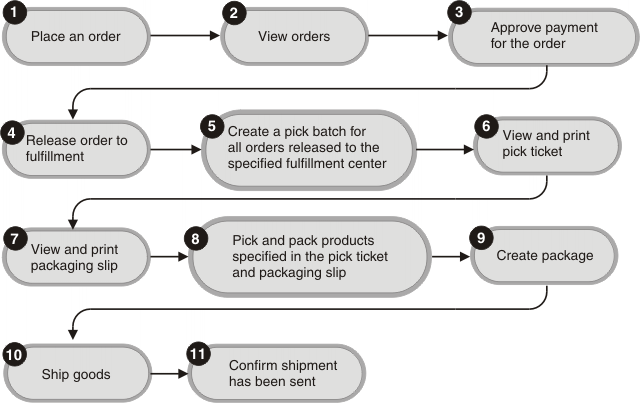
Some tasks that can be completed using the WebSphere Commerce Accelerator are indicated in the steps below. More likely, however, applications are written to call WebSphere MQ messages to accomplish the same function (such as pick batch creation) in a more automated fashion.
- Place an order.
A shopper places an order on an extended site storefront Web site and selects one or more products to purchase. After the shopper completes the order checkout sequence, the order moves from a Pending state (P) to M state (pending payment approval). Here the order can also go into the state of M or C (for some payment method) or L (no inventory and no back order) or B (some backordered orderitems).
- View orders.
An extended site store administrator, such as a Seller or Operations Manager, logs on to the extended sites hub and uses the manage store link to access the WebSphere Commerce Accelerator to view recently placed orders.
- Approve payment for the order.
Payment authorization and capture are handled by the merchant.
- Release the order to fulfillment. (This
step is transparent to the merchant.)
The Site Administrator sets up a scheduled job to take care of releasing the orders for fulfillment for related stores. The Site Administrator must use the Administration Console to schedule the job:
- Open the Administration Console.
- Select...
Manage the site | Configuration | Scheduler New | ExecuteSpecifiedCommandForHostedStores
This job accepts a parameter called commandName. The purpose of this job is to execute the command that is specified for all of the hosted stores in the site. The actual command being passed in as commandName should be able to execute by only requiring the storeId parameter.
- In the Job parameters field, type:
commandName=ReleaseToFulfillment&storeType_i=storeType
where &storeType_i is an array of store types and the value of i is 1, 2, 3, and so on. For example...
commandName=ReleaseToFulfillment&storeType_1=B2C&storeType_2=B2B
storeType is the type of store on which to run the command. If this parameter is not specified, the command only runs on stores of...
- MHS
- RHS
- SHS
- Complete the fields for the scheduled job. Click OK.
- Open the Administration Console.
- Create a pick batch for all orders released to the specified fulfillment center.
Pick batches must be created for all fulfillment centers. The WebSphere Commerce Accelerator can be used to generate the pick slips, or more likely, MQ messages can be used to automate the generation of the pick slips. For more information about MQ messages, see the topic "Inbound fulfillment integration messages" in the WebSphere Commerce Development online help.
- View and print pick ticket.
Using the WebSphere Commerce Accelerator, for each fulfillment center, you can work with pick batches and print pick tickets.
- View and print packaging slip.
Using the WebSphere Commerce Accelerator, for each fulfillment center, you can work with and print packing slips.
- Pick and pack products specified in the pick ticket and packaging slip.
Products specified in the pick ticket are then manually picked from the fulfillment center, and products are packed according to the instructions in the packing slips.
- Create package.
WebSphere Commerce Accelerator can be used to create package information.
- Ship goods.
The merchant completes the shipment confirmation and the order is shipped to the customer.
- Confirm shipment has been sent.
The shipment of the order can be confirmed by an order status message.