Tutorials > Sales Center > Customize the appearance of the IBM Sales Center
Deploy the assets
This section refers to deploying the assets.
You have now customized the appearance of the IBM Sales Center client logon user interface. The customized assets remain within the context of the development environment.
To run a test to deploy the assets directly into the client application, this section will provide an example of how you might perform a manual deployment directly to a single client.
This type of deployment does not take into account an automated deployment or update strategy. It quickly deploys customizations to a small number of clients (or a single client).
Procedure
- Prepare the plug-in for packaging.
Prepare the plug-in for packaging
Return to the client development environment and package the customized assets for deployment...
- Open the IBM Sales Center development environment if it is not already open.
- In the Package Explorer view, navigate to the logonLookAndFeelExtension project.
- In the logonLookAndFeelExtension project, locate the plugin.xml file. Double-click the file to open it for editing.
- Click the Build tab.
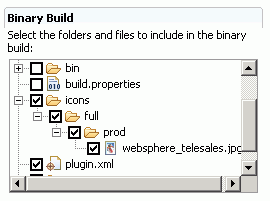
- In the Binary Build section of the Build Configuration editor, keep all default selections and select the icons directory.
You need to include this directory in the build because it contains the updated image. The other assets are automatically included from the default build selections.
- Save the changes.
- Open the IBM Sales Center development environment if it is not already open.
- Create a feature project.
- Click File > New > Feature Project.
- In the Project name field, enter logonLookAndFeelFeature.
- Click Next.
- In the Feature Properties window, in the Feature Provider field, enter MyCompany.
- Click Next.
- From the Referenced Plug-ins and Fragments list, select the lookAndFieldExtension.
- Click Finish. The feature.xml file opens for editing in the Feature Manifest editor.
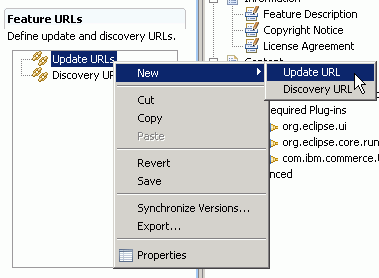
- In the Feature URLs pane, right-click Update URLs and select New >
Update URL as in the following screen capture:
- Click the Properties view:
- Set the Label property's value to logonLookAndFeelExtension update site.
- Set the URL property's value to http://logonLookAndFeelExtensionURL. If we will host this update on a real update site, set this value to the server URL from which the updates can be found.
- Set the Label property's value to logonLookAndFeelExtension update site.
- Save the changes.
- Click File > New > Feature Project.
- Create an update site project.
- Click File > New > Other.
- Select Plug-in Development > Update Site Project.
- Click Next.
- In the Project name field, enter logonLookAndFeelUpdateSite and click Finish.
- In the site.xml editor, in the Features tab, click Add.
- From the Available Features list select logonLookAndFeelFeature (1.0.0) and click Finish.
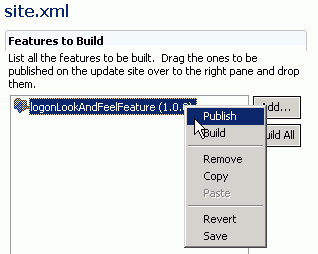
- Right-click logonLookAndFeelFeature (1.0.0) and select Publish as in the following screen capture:
- Click Build All.
- Save the changes.
- In the Package Explorer, right-click the logonLookAndFeelUpdateSite project and select Export.
- Select File System and click Next.
- In the To directory field, enter a directory on the file system, for example drive :/logonLookAndFeelExtension.
- Click Finish.
- Click File > New > Other.
- Update the IBM Sales Center client.
To apply the logonLookAndFeelExtension code to the IBM Sales Center client:
- If the IBM Sales Center client is on a different machine than the directory to which you exported the logonLookAndFeelExtension, copy the logonLookAndfeelExtension directory to the machine that runs the IBM Sales Center client.
- Open the IBM Sales Center.
- From the Application menu, select Install.
Note: If you do not see the Install menu, then open the Sales Center in administrator mode
- In the Application Installations window, click Add Folder Location.
- Navigate to the folder that contains the logonLookAndFeelExtension, for example drive :/logonLookAndFeelExtension/logonLookAndFeelAndUpdateSite.
- From the Location List, select only logonLookAndFeelExtension/logonLookAndFeelAndUpdateSite.
- Click Next.
- In the Search Results window, select logonLookAndFeelFeature.
- Click Next.
- Select I accept the terms in the license agreements and click Next.
- Accept the default value and click Finish.
- Click Install.
- When prompted, restart the IBM Sales Center client.
- When the client restarts, select Application > Open > IBM Sales Center - Order Management.
- Click File > Logon to see the modified logon dialog:

- If the IBM Sales Center client is on a different machine than the directory to which you exported the logonLookAndFeelExtension, copy the logonLookAndfeelExtension directory to the machine that runs the IBM Sales Center client.