Tutorials > Sales Center > Add an editable column to the Order Items table by creating a new widget manager
Determine the ID of the user interface widget to modify
In this step, you determine which user interface element of the IBM Sales Center to extend, and you gather the necessary information about the extension point.
Enable widget hover logging
- In the IBM Sales Center development environment, import all of
the plug-ins with the name com.ibm.commerce.telesales.ui.impl* into
the workspace as binary projects. By importing the projects, you can
search for the ID of the user interface element that corresponds to
the Order Items table.
To import the plug-ins:
- Click the Plug-ins view and select all
of the plug-ins that begin with com.ibm.commerce.telesales.ui.impl.
By default, the Plug-ins view is displayed
in the Plug-in Development perspective in the left pane.
- Right-click the selected plug-ins and select Import > As Binary Project. The imported projects are displayed in the Package Explorer view.
- Click the Plug-ins view and select all
of the plug-ins that begin with com.ibm.commerce.telesales.ui.impl.
By default, the Plug-ins view is displayed
in the Plug-in Development perspective in the left pane.
- Enable widget hover logging. When widget hover logging is enabled
you can hover the mouse pointer over the user interface widget to
be modified and its ID gets displayed in the console of the IBM Sales
Center development environment. This is an efficient method for locating
the widget ID.
- In the IBM Sales Center development environment, from the main
menu, click Run > Run.
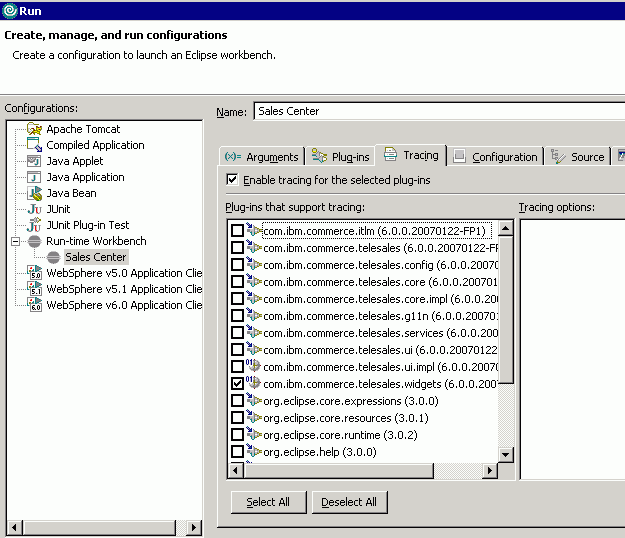
- On the Run dialog, select the Tracing tab.
- Select Enable tracing for the selected plug-ins.
- In the Plug-ins that support tracing pane, select the check box
for com.ibm.commerce.telesales.widgets. The screen should appear as
shown in the following screen capture:

6.Click Run to open the IBM Sales Center client.
- In the IBM Sales Center development environment, from the main
menu, click Run > Run.
Hover over the user interface widget to modify
In this section, you hover the mouse pointer over the Order Items table to find its ID.
- To determine the user interface widget that corresponds to the
Order Items table:
- Open
the order you created before.
- Click the Order Items tab to display the
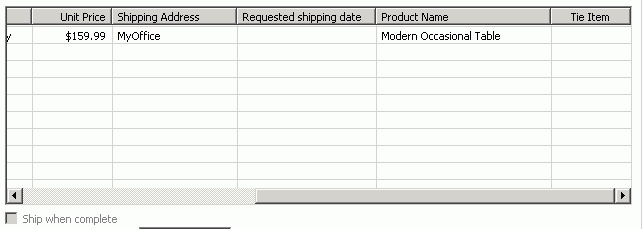
Order Items table in the editor. Notice that the table headings are
displayed as follows, without the Fulfillment Centers column:

- Open
the order you created before.
- Notice how the trace changes as the mouse is moved over the user
interface. Hover the mouse pointer over the Order Items table and
note the user interface widget names that are displayed in the console
view of the IBM Sales Center development environment. The trace indicates
that the ID of the Order Items table definition is com.ibm.commerce.telesales.ui.impl.orderItemPageItemTable.orderitempage.
Tip: To determine the widget ID, be able to view the Console output within the Sales Center plug-in development environment while navigating the Sales Center screens. Therefore you might need to reduce the size of the IBM Sales Center window so that the Console is also visible. You might also have to resize the Console trace window.
- Close the IBM Sales Center client.
- In the IBM Sales Center development environment, click Search > File.
- In the Containing text field, enter orderItemPageItemTable.orderitempage.
- In the File name patterns field, enter *.xml.
- Click Search.
- In the Search view, two search results are displayed. For the result in com.ibm.commerce.telesales.ui.impl.order, open the fragment.xml file to view the following text:
<control
                tableDefinitionId="orderItemPageTableDefinition"

                multi="true" type="table"
managerType="salesContainerItemPageManager"
                modelPath="salescontainer.items">

<property name="tableType"
value="orderItemPageItemTable"/>

</control>
- The previous text indicates that the ID of the control is orderItemPageItemTable.orderitempage, and the definition of the control is a table with the ID orderItemPageTableDefinition.
If you search for orderItemPageTableDefinition in
this same fragment.xml file, you can find the definition of the table, including definitions for each column in the table. If you look closely, there are two different definitions for the table, with slightly different
names. The orderItemPageTableDefinition.B2B definition
is used for B2B-type stores and contains columns required only in
B2B scenarios such as contract information. The orderItemPageTableDefinition.default definition
is used when the store is not of B2B type. This is the definition
you are extending in this tutorial.
- The other search result is in com.ibm.commerce.telesales.ui.impl.return. If you examine the fragment.xml file in that plug-in, you can see that it is just a reference to the definition you already found in com.ibm.commerce.telesales.ui.impl.order.
At this point, you know that the user interface widget that to modify is the Order Items table, and it is defined in the com.ibm.commerce.telesales.ui.impl.order plug-in, with the tableDefinitionId orderItemPageTableDefinition.default.
Disable
the previously enabled hover logging
- In the Sales Center plug-in development environment, from the
main menu, select Run > Run.
- In the Run window, select the Tracing tab
and clear Enable tracing for the selected plug-ins.
- Click Apply and then click Close.