Tutorials > Sales Center > Add an editable column to the Order Items table by creating a new widget manager
Deploy the changes
In this step, you deploy the changes you made in the previous steps.
Deploy the changes involves the following high-level steps:
Procedure
- Export the code for the client from the IBM Sales Center development environment.
- Install the client code on an IBM Sales Center client.
Export the code for the client from the IBM Sales Center development environment
Prepare the plug-in for packaging
Return to the client development environment and package the customized assets for deployment...
- Open the IBM Sales Center development environment if it is not already open.
- In the Package Explorer view, navigate to the com.example.commerce.telesales.myNewPracticePlugin project.
- In the com.example.commerce.telesales.myNewPracticePlugin project, locate the plugin.xml file. Double-click the file to open it for editing.
- Click the Build tab.
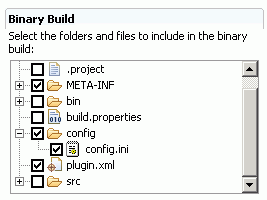
- In the Binary Build section of the Build Configuration editor:
- Select the config directory to also save the config.ini file in the exported plug-in.
- Keep all default selections.
Your Binary Build list should be similar to the following screen capture:

- Select the config directory to also save the config.ini file in the exported plug-in.
- Save the changes.
Create a feature project
- Click File > New > Feature Project.
- In the Project name field, enter com.example.commerce.telesales.myNewPracticePluginFeature.
- Click Next.
- In the Feature Properties window, in the Feature Provider field, enter MyCompany.
- Click Next.
- From the Referenced Plug-ins and Fragments list, select com.example.commerce.telesales.myNewPracticePluginExtension.
- Click Finish. The feature.xmlfile opens for editing in the Feature Manifest editor.
- In the General Information pane, modify the Update Site URL to http://com.example.commerce.telesales.myNewPracticePluginURL and modify the Update Site Name to com.example.commerce.telesales.myNewPracticePluginFeature

- In the Properties view:
- Set the Label property's value to com.example.commerce.telesales.myNewPracticePluginFeature.
- Set the URL property's value to http://com.example.commerce.telesales.myNewPracticePluginURL. If you plan to host this update on a real update site, set this value to the server URL from which the updates can be found.
- Set the Label property's value to com.example.commerce.telesales.myNewPracticePluginFeature.
- Save the changes.
Create an update site project
- Click File > New > Other.
- Select Plug-in Development > Update Site Project.
- Click Next.
- In the Project name field, enter com.example.commerce.telesales.myNewPracticePluginUpdateSite and click Finish.
- In the site.xml editor, in the Features tab, click Add.
- In the Available Features list, select com.example.commerce.telesales.myNewPracticePluginFeature (1.0.0) and click Finish.
- Right-click com.example.commerce.telesales.myNewPracticePluginFeature (1.0.0) and select Publish.
- Click Build All.
- Save the changes.
- In the Package Explorer view, hold down the Ctrl key and select both the com.example.commerce.telesales.myNewPracticePluginFeature project and the com.example.commerce.telesales.myNewPracticePluginUpdateSite project.
Right-click and select Export.
- Select File System and click Next.
- In the To directory field, type a directory on the file system, such as drive:\com.example.commerce.telesales.myNewPracticePluginExtension.
- Click Finish.
Update the IBM Sales Center client
To apply the customization code for adding the new Fulfillment Centers column to the IBM Sales Center client:
- If the IBM Sales Center client is on a different machine than the directory to which you exported the com.example.commerce.telesales.myNewPracticePluginExtension, copy the com.example.commerce.telesales.myNewPracticePluginExtension directory to the machine that runs the IBM Sales Center client.
- Open the IBM Sales Center.
- In the Application menu, select Install.
If you do not see the Install option, then open the Sales Center in administrator mode.
- In the Application Installations window, click Add Folder Location.
- Navigate to the folder that contains the myNewPracticePluginExtension, such as drive :/ com.example.commerce.telesales.myNewPracticePlugin Extension/ com.example.commerce.telesales.myNewPracticePlugin UpdateSite.
- From the Location List, select only com.example.commerce.telesales.myNewPracticePluginExtension/com.example.commerce.telesales.myNewPracticePluginUpdateSite.
- If the Edit Locale window displays, click OK.
- In the Search Results window, select com.example.commerce.telesales.myNewPracticePluginFeature.
- Click Next.
- Select I accept the terms in the license agreements and click Next.
- Accept the default value and click Finish.
- Click Install.
- When prompted, restart the IBM Sales Center client.
- When the client restarts, select Application > Open > Sales Center - Order Management.
- Click File > Logon and connect to the WebSphere Commerce Server.