Tutorials > Sales Center > Add a column to the order items table
Deploy the changes
This step refers to deploying the changes you made in the earlier steps.
Deploy the changes involves the following high-level steps:
Procedure
- Export the code for the client from the IBM Sales Center
development environment.
- Export the code for the WebSphere Commerce Server from
the WebSphere Commerce development environment.
- Install the client code on an IBM Sales Center client.
- Install the WebSphere Commerce Server code on a target server.
Export the code for the client from the IBM Sales Center
development environment
Prepare the plug-in for packaging
Return to the client development environment and package the customized assets for deployment...
- Open the IBM Sales Center development environment if it is not
already open.
- In the Package Explorer view, navigate to the availabilityDate project.
- In the availabilityDate project, locate the plugin.xml file. Double-click the file to open it for editing.
- Click the Build tab.
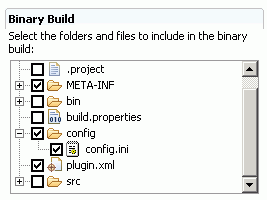
- In the Binary Build section of the Build Configuration editor, keep all default selections and select the config directory
to include the config/config.ini file in the exported plug-in. The
other assets are automatically included from the default build selections:

- Save the changes.
Create a feature project
- Click File > New > Feature Project.
- In the Project name field, enter availabilityDateFeature.
- Click Next.
- In the Feature Properties window, in the Feature Provider field, enter MyCompany.
- Click Next.
- From the Referenced Plug-ins and Fragments list, select
the availabilityDate plug-in.
- Click Finish. The feature.xml file opens for editing in
the Feature Manifest editor.
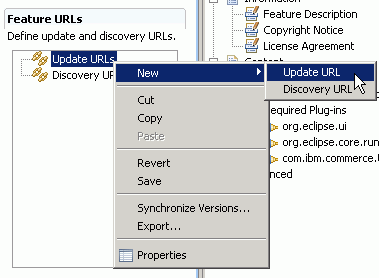
- In the Feature URLs pane, right-click Update URLs and select New >
Update URL as in the following screen capture:

- Click the Properties view:
- Set the Label property's value to Availability
date update site.
- Set the URL property's value to http://availabilityDateURL. If we will host this update on a real update site, set this value to the server URL from which the updates can be found.
- Set the Label property's value to Availability
date update site.
- Save the changes.
Create an update site project
- Click File > New > Other.
- Select Plug-in Development > Update Site Project.
- Click Next.
- In the Project name field, enter availabilityDateUpdateSite and
click Finish.
- In the site.xml editor, in the Features tab, click Add.
- From the Available Features list select availabilityDateFeature
(1.0.0) and click Finish.
- Right-click availabilityDateFeature (1.0.0) and select
Publish as in the following screen capture:

- Click Build All.
- In the Package Explorer, hold down the Ctrl key and select
both the availabilityDateFeature project and the availabilityDateUpdateSite project.
Right-click and select Export.
- Select File System and click Next.
- In the To directory field, enter a directory on the file
system, for example drive :/availabilityDateExtension.
- Click Finish.
Export the code for the WebSphere Commerce Server from
the WebSphere Commerce development environment
- Open WebSphere Commerce Developer if it is not already open.
- In the Java EE perspective, in the Enterprise Explorer view, navigate to Other Projects > WebSphereCommerceServerExtensionsLogic.
- Inside the WebSphereCommerceServerExtensionsLogic project, navigate to the src folder then to com.mynewextensions.availabilitydate package.
- From the com.mynewextensions.availabilitydate package's
pop-up menu, select Export.
- Select JAR file and click Next.
- In the JAR Package Specification window:
- Select Export generated class files and resources.
- Clear Export all output folders for checked projects.
- Clear Export java source files and resources.
- In the Jar file field enter a temporary directory for
your exported code, for example, drive:/exportTemp/WebSphereCommerceServerExtensionsLogic.jar.
The file name must be WebSphereCommerceServerExtensionsLogic.jar.
- Click Next.
- Select Export generated class files and resources.
- Click Finish.
- Copy the customized Telesales Registry file to the temporary
directory.
- Navigate to WC_EAR/xml/messaging
- Copy the TelesalesRegistry-ext.xml file to drive:/exportTemp/
- Navigate to WC_EAR/xml/messaging
Update the WebSphere Commerce application
Transfer
assets to the target WebSphere Commerce Server
In this step, we will create a temporary directory on the target WebSphere Commerce Server and then copy the customization assets into this directory. In subsequent steps, we will place the different types of code into the appropriate place within the WebSphere Commerce application.
To copy the files from the development machine to the target WebSphere Commerce Server:
- On the target WebSphere Commerce Server, create a temporary directory
called drive:\ImportTemp.
- Determine how we will copy the files from one computer to another.
You can do this by mapping a drive on the target WebSphere Commerce Server to the development machine, or by using an FTP application.
- From the development machine, copy the contents of drive:\ExportTemp into drive:\ImportTemp on the target WebSphere Commerce Server.
Stop the target WebSphere Commerce application
Open the WebSphere Application Server administration console and stop the WebSphere Commerce application:
- Open the WebSphere Application Server administrative console by
entering the following URL in a Web browser: http:// host: portNumber/ibm/console
, where host is
the name of the target machine and portNumber is
the port number used to access the Admin Console is defined during
profile creation. The default port number is 9060.
- Login to the WebSphere Application Server administrative console.
- Click Applications > Enterprise Applications to see a
list of installed applications.
- Select the WebSphere Commerce application, for example WC_demo, and click Stop.
Export a backup copy the EAR
Export a backup copy of the EAR, so that you can revert to the old version in the future if necessary:
- In the WebSphere Application Server administrative console, click
Applications > Enterprise Applications to see a list of installed
applications.
- Select the WebSphere Commerce application, for example WC_demo, and click Export.
- Follow the wizard and save the EAR file in a backup directory.
Update TelesalesRegistry-ext.xml file on the target
WebSphere Commerce Server
Update the store with the modified store assets using the WebSphere Application Server administrative console:
- In the WebSphere Application Server administrative console, click
Applications > Enterprise Applications.
- Select the application name, for example WC_demo, and click Update.
- Select Single File.
- In the Relative path to file field, enter xml\messaging\TelesalesRegistry-ext.xml.
- Select Local file system and specify the path to drive:\ImportTemp\TelesalesRegistry-ext.xml.
- Click Next.
- Click OK.
- When the update completes click Manage Applications. Leave the WebSphere Application Server administrative console open.
Update the command JAR file on the target WebSphere
Commerce Server
In this section we will update the target WebSphere Commerce Server to use the new command JAR file,...
- In the WebSphere Application Server administrative console, select
your application name, for example WC_demo, and click Update.
- Select Single File.
- In the Relative path to file field, enter WebSphereCommerceServerExtensionsLogic.jar.
- Select Local file system and specify the path to drive:\ImportTemp\WebSphereCommerceServerExtensionsLogic.jar.
- Click Next.
- Click OK.
- When the update completes successfully, click Save to Master
Configuration.
- On the Enterprise Applications screen, click Save to save your changes to the master configuration.
Note: It is possible to update both the store assets and the WebSphereCommerceServerExtensionsLogic.jar in one partial application update. In this tutorial the updates are separated for clarity. However in a production environment it is likely more efficient to combine the two updates into one update.
Update the WebSphere
Commerce configuration file
In WebSphere Commerce Developer, you made changes to the wc-server.xml file. You must make the same changes on the target machine in the WebSphere Commerce configuration file.
To update the WebSphere Commerce configuration file:
- Open the WebSphere Commerce configuration file
in a text editor.
- Locate the following text:
<property baseRegistryFileName="TelesalesRegistry.xml" baseRegistryFilePath="messaging" customRegistryFileName="" customRegistryPath="" display="false" enableBaseRegistryOverride="false" /> - Modify the preceeding text to include the new registry file and
set enableBaseRegistryOverride property
to true. Your text should match the following:
<property baseRegistryFileName="TelesalesRegistry.xml" baseRegistryFilePath="messaging" customRegistryFileName="TelesalesRegistry-ext.xml" customRegistryPath="messaging" display="false" enableBaseRegistryOverride="true" /> - Save the changes.
- On the file system, navigate to WC_INSTALL /bin
- Run the following ANT task: WC_INSTALL /bin/config_ant -DinstanceName= instance UpdateEAR where instance is the name of the instance.
Start the target WebSphere Commerce application
Open the WebSphere Application Server administration console and start the WebSphere Commerce application:
- In the WebSphere Application Server administrative console click
Applications > Enterprise Applications to see a list of installed
applications.
- Select the WebSphere Commerce application, for example WC_demo, and click Start.
Update the IBM Sales Center client
To apply the new search option code to the IBM Sales Center client:
- If the IBM Sales Center client is on a different machine than
the directory to which you exported the availabilityDateExtension, copy the availabilityDateExtension directory to the machine that runs
the IBM Sales Center client.
- Open the IBM Sales Center.
- From the Application menu, select Install.
If you do not see the Install option, then open
the Sales Center in administrator mode.
- In the Application Installations window, click Add
Folder Location.
- Navigate to the folder that contains the availabilityDateUpdateSite, for example drive :/availabilityDateExtension/availabilityDateUpdateSite.
- From the Location List, select only availabilityDateExtension/availabilityDateUpdateSite.
- If the Edit Locale window displays, click OK.
- Click Next.
- In the Search Results window, select availabilityDateFeature.
- Click Next.
- Select I accept the terms in the license agreements and
click Next.
- Accept the default value and click Finish.
- Click Install.
- When prompted, restart the IBM Sales Center client.
- When the client restarts, select Application > Open > Sales
Center - Order Management.
- Click File > Logon and connect to the WebSphere Commerce Server.
- Test the customization as described in the Verify the customization is successful step.