Tutorials > Sales Center > Extend a page in an editor
Add infopop help to the new page
In this part of the tutorial, you add an infopop to the extended Order Summary page of the IBM Sales Center client. An infopop is a context-sensitive window that opens when the user interface element has focus and the user presses F1.
In this step, you update the infopop for the Order Summary page to include information about capturing gift message information.
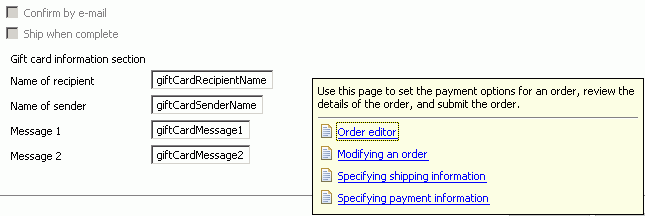
The following screen capture shows the default infopop for the Order Summary page. To display the infopop, select one of the gift message input boxes and press F1:

To change the text in the Order Summary page infopop:
Procedure
- Determine the context ID of the Order Summary infopop:
- In the Plug-ins view, expand the com.ibm.commerce.telesales.ui.infopop package.
- Right-click the order-f1_contexts.xml file and select Open
With > Text Editor.
- Within the XML file, find the following section:
<!--Order
Payment editor page-->
<context
>
- Make note of the context ID and keep this file open for reference.
- In the Plug-ins view, expand the com.ibm.commerce.telesales.ui.infopop package.
- Extend the org.eclipse.help.contexts extension point:
- In the orderEditorExtension plug-in, open the plugin.xml file
for editing.
- In the Extensions tab, click Add.
- From the Available Extension Points list, select org.eclipse.help.contexts.
If you do not see this extension point, clear the Show only extension
points from the required plug-ins check box and look again.
- Click Finish.
- Click the plugin.xml tab.
- Locate the following text:
<extension point="org.eclipse.help.contexts">
</extension>
- Add the following line within the extension tag:
<contexts
file="ExtendedHelpContents.xml"/>. The resulting code follows:
<extension point="org.eclipse.help.contexts">
<contexts
file="ExtendedHelpContents.xml"/>
</extension
- Save the changes and keep the file open.
- In the orderEditorExtension plug-in, open the plugin.xml file
for editing.
- Create the new infopop definition:
- Right-click on the orderEditorExtension plug-in, and select
New > File.
- In the file name field, enter ExtendedHelpContents.xml.
- Click Finish. The ExtendedHelpContents.xml file opens
for editing. Note that the file is directly under the plug-in and in the same
directory as the plugin.xml file and not in the src directory.
- Add the following text to the ExtendedHelpContents.xml file.
Note how this text is similar to the definition you examined in the order-f1_contexts.xml
file, with additional information about the gift message information:
<?xml version="1.0" encoding="UTF-8"?> <?NLS type="org.eclipse.help.contexts"?> <contexts> <context > <description>Use this page to set the payment options for an order, review the details of the order, submit the order, and collect gift message information.</description> <topic label="Order editor" href="../com.ibm.commerce.telesales.tsr.doc/concepts/ctreditororder.htm"/> <topic label="Modifying an order" href="../com.ibm.commerce.telesales.tsr.doc/tasks/ttrmodord.htm"/> <topic label="Specifying shipping information" href="../com.ibm.commerce.telesales.tsr.doc/tasks/ttrshippingord.htm"/> <topic label="Specifying payment information" href="../com.ibm.commerce.telesales.tsr.doc/tasks/ttrpayinfo.htm"/> </context> </contexts> - Save the changes.
- Right-click on the orderEditorExtension plug-in, and select
New > File.
- Point to the new infopop definition:
- In the orderEditorExtension plug-in, navigate to the config directory.
- Open the config.ini file for editing.
- Add the following line to the end of the file: com.ibm.commerce.telesales.ui.editor_page_order_summary=orderEditorExtension.editor_page_order_summary. This line indicates
that instead of the default editor_page_order_summary definition, the IBM
Sales Center should use the definition in the orderEditorExtension plug-in.
You examined the editor_page_order_summary definition in a previous step.
- Save the changes and close the file.
- In the orderEditorExtension plug-in, navigate to the config directory.
Test your new infopop to ensure it displays properly.
- Run the IBM Sales Center client by clicking Run > Run.
- Click Application > Open > IBM Sales Center - Order Management.
- Click File > Logon.
- Find and select a store by clicking Store > Select and finding
a valid store.
- Create an order by clicking Order > Create.
- Click the Payment tab.
- Click in one of the new fields and then press the F1 key. The user interface
is displayed as follows, with the new text:
