Tutorials > Management Center > Add new fields in the Catalogs tool > Customize the Catalogs tool to upload data from custom tables


Test the customization
In this step of the tutorial, you add the warranty information and care instruction data as part of the catalog entry comma-separated value (CSV) file. You then load the categories CSV file and catalog entry CSV file using the Catalog Upload feature.
You are provided with two CSV files.
- CatalogGroup.csv
- This file creates three categories (Men's Fashion, Pants, and Shirts). Pants and Shirts are subcategories of Men's Fashion.
- CatalogEntries.csv
- This file creates catalog entries under the Pants and Shirts categories.
You add the warranty and care instruction column headers and data that you specified in the customized business object configuration file.
Procedure
- Edit the sample file CatalogEntries.csv, and add the warranty and care instruction column headers and data into the CSV file as shown in the screen capture:
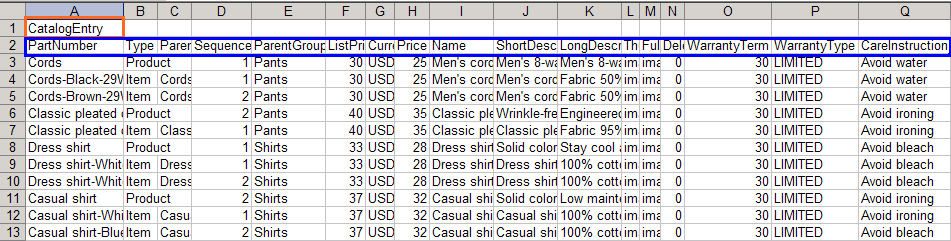
- The first cell in the CSV is the business object load item name as defined in the customized version of the wc-dataload.xml file.
- The second row is the CSV column headers for the catalog entry business object. You can now include the WarrantyTerm, WarrantyType, and CareInstruction column headers when loading a catalog entry data using the Catalog Upload feature.
For more information about creating catalog data CSV files, see Create catalog data in CSV format.
- The first cell in the CSV is the business object load item name as defined in the customized version of the wc-dataload.xml file.
- Before loading the catalog entries, create the categories for the catalog entries. Upload the sample file CatalogGroups.csv using the Catalog Upload feature.
- Open the Catalogs tool and select Madisons store from the store list.
- From the toolbar, click the

Create New icon; then select Catalog Upload.
- In the New Catalog Upload page:
- In the File name field, browse for the CatalogGroups.csv file
- In the Character set field, select UTF-8 encoding because the sample CSV file is in English.
- In the Target catalog field, select the target master catalog or sales catalog to upload data to.
- In the File name field, browse for the CatalogGroups.csv file
- Click Save and Close.
- From the explorer tree, click Catalog Uploads to check the uploads.
- Open the Catalogs tool and select Madisons store from the store list.
- Upload the CatalogEntries.csv file using the Catalog Upload feature.
- View the warranty and care instruction data in the Catalogs tool.
- From the explorer tree, navigate to Madisons > Mens Fashion > Pants > Cords. You can view the warranty and care instruction data that you uploaded on one of the product property page.
Summary: Customizing the Catalogs tool to upload data from custom tables
This tutorial demonstrated how to customize the Catalog Upload feature in the Catalogs tool to upload data into custom tables.
Lessons learned
After completing this tutorial, you should be able to:
- Create a custom version of the wc-loader-catalog-entry.xml business object configuration file.
- Create a custom version of the wc-dataload.xml data load order configuration file.
- Create a CSV file to load data from custom tables.
- Use the Catalog Upload feature to import catalog data from a CSV file.