Tutorial: Creating new business logic
 Attention: This tutorial is currently under revision. The content might contain errors or inaccuracies. Subscribe to this page to be notified when an updated version is available.
In this tutorial, you create new business logic. New business logic is required when a change is made to the default business logic behavior of WebSphere Commerce.
In this tutorial, the change is the ability to keep track of a customer's bonus points.
The types of assets created include...
- views
- controller commands
- task commands
- data beans
- entity beans
This tutorial is for demonstration purposes only and does not reflect all the logic required to build a loyalty program application. Instead, from this tutorial, we will learn the development steps that are common to creating each of the previously listed types of code assets.
Learning objectives
- Create new business logic:
- a new view
- a new controller command
- a new data bean
- a new entity bean
Time required
Expect this tutorial to take about 3 hours to complete, not including the step that includes deploying the bonus points logic to a target WebSphere Commerce Server.
You can load the completed tutorial code instead of performing each step. After loading the completed tutorial code into the workspace, you can run the code as if you performed each step in the tutorial. However, in order to fully attain the learning objectives, it is recommended that you perform the tutorial step by step.
Audience
This tutorial is intended for WebSphere Commerce Store developers who are responsible for creating new business logic.
Prerequisites
Saving the sample code
Before beginning this tutorial, download the WCSample.zip package that contains the starting point for these programming tutorials. Save this file onto the development machine. As an example, you might save the file into the WCDE_INSTALL/ directory.
Preparing the workspace
Before beginning this tutorial, prepare the workspace .
Ensure you enable Struts Development in WebSphere Commerce Developer, if it is currently disabled:
- Select Window > Preferences.
- Select General > Capabilities.
- Click Advanced... and select Web Developer (advanced) > Struts Development, if it is currently disabled.
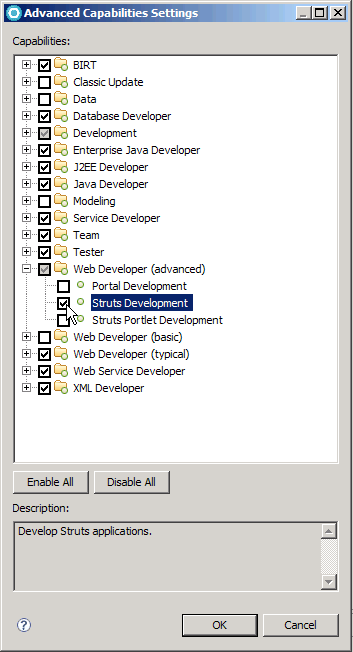
- Click OK to accept the changes and close the Advanced Capabilities Settings window.
- Click OK to accept the changes and close the Preferences window.
Knowledge prerequisites
Before beginning this tutorial ensure that you have:
- An understanding of the Java programming language.
- A basic understanding of the database type, Apache Derby, DB2, or Oracle, used in the WebSphere Commerce development environment.
- A basic understanding of JSP pages.
- A basic understanding of EJBs.
Resources
The following pages contain the source code for this tutorial:
- MyNewControllerCmd source code
- MyNewControllerCmdImpl source code
- MyNewTaskCmd source code
- MyNewTaskCmdImpl source code
- BonusDataBean source code
- MyNewDataBean source code
Lessons in this tutorial
- Prepare the workspace
In this step, we will import sample code into the WebSphere Commerce workspace. This sample code is the starting point for the tutorial. - Create a new view
In this step, we will create a new view and its corresponding JSP page. - Create a new controller command
In this step, we will create a new controller command, called MyNewControllerCmd. Initially, this command returns only the MyNewView view. - Use a TypedProperties object to pass information from MyNewControllerCmd to
In this step, we will use a TypedProperties object for response properties and how to extract information from this object onto the JSP page. - Use a data bean to pass information from MyNewControllerCmd to MyNewView
In this step, we will learn how to create a new data bean that passes information to the JSP page. You will add code to determine if the view was called directly, or if it was called by the controller command. In the latter case, the JSP page should also display the name of the command that called it. - Parse and validate URL parameters in MyNewControllerCmd
In this step, we will modify the controller command to use parameters that are passed in through the URL that calls the controller command. The command includes validation logic to ensure all required parameters are supplied and that the parameter values are appropriate. - Create a new task command
In this step, we will create a new task command interface and its associated implementation class. Initially, the new task command does very little except handle view parameters. It only has fields for defaultCommandClassName, URL parameters, and the current value of bonus points. It has a method for getting the current value of bonus points. - Modify MyNewTaskCmd
In this step of the tutorial, you modify MyNewTaskCmd to determine if the user name included in the URL is that of a registered user. You also modify MyNewDataBean to handle fields from the task command, for example, the user name. Correspondingly, you modify MyNewJSPTemplate to display whether or not the user is registered. - Create a new entity bean
In this step we will create a new entity bean. In this example scenario, you have a business requirement to include a tally of bonus points for each user in WebSphere Commerce. The WebSphere Commerce database schema does not contain a table to store this information, so create a new database table. In accordance with the WebSphere Commerce programming model, once the database table is created, create an entity bean to access the data. - Integrate the Bonus entity bean with MyNewControllerCmd
In this step, we will integrate the Bonus entity bean with the MyNewControllerCmd logic. Once the bean is integrated, the MyNewJSPTemplate.jsp file allows updates of a customer's balance of bonus points. - Deploy the bonus points logic
This step describes how to deploy the new business logic into a store running on a remote WebSphere Commerce Server. You must have created a store, based upon the consumer direct sample store, on the remote WebSphere Commerce Server before starting these deployment steps. - Create new business logic summary
This section summarizes the tutorial. - Load the completed tutorial code
You can load the completed tutorial code into the WebSphere Commerce development environment instead of completing each step in the tutorial.