Tutorials > Program model > Web services > Customize Web 2.0 and Web services to support personalization
Update the order shopping flow
This section explains how to update the order shopping flow..
Register the the new commands
Procedure
- Open abrowser and type the following URL: http://localhost/webapp/wcs/admin/servlet/db.jsp.
- In the input box, enter the following SQL statement to
register the new commands:
INSERT INTO CMDREG(STOREENT_ID, INTERFACENAME, CLASSNAME, TARGET)
VALUES
(0,'com.ibm.commerce.orderitems.commands.ExtendOrderItemProcessCmd','com.mycompany.commerce.customization.order.MyExtendOrderItemProcessCmdImpl','Local');
UPDATE CMDREG SET CLASSNAME =
'com.mycompany.commerce.customization.order.ExtComposeOrderDetailsCmdImpl'
WHERE
INTERFACENAME='com.ibm.commerce.order.facade.server.commands.ComposeOrderCmd+IBM_Admin_Details';
IBM_Admin_ prefixes all services intended to be used by admin/CMC based services calls. Access profiles which do not follow the new naming conventions continue to function correctly, as compatibility is maintained with earlier versions. It is recommended, however, that they are followed for existing access profiles, and when making changes to future access profiles. See Access profile naming conventions for more information.
Register the the new Client API
- Use explorer to navigate to WCDE_INSTALL\workspace\Stores\WebContent\WEB-INF
- Find the struts-config-ext.xml file and click the Source tab.
- Open the file with an editor and paste the below text into the
bottom of the file, but above the
</struts-config> tag, save and
close the file.
<plug-in className="com.ibm.commerce.struts.ComponentPlugIn">

<set-property property="componentId" value="order"/>

<set-property property="clientFacadeClassName"
value="com.mycompany.commerce.customization.order.MyOrderFacadeClient"/>
</plug-in>
Add the overlay engraving objects to the mapping files
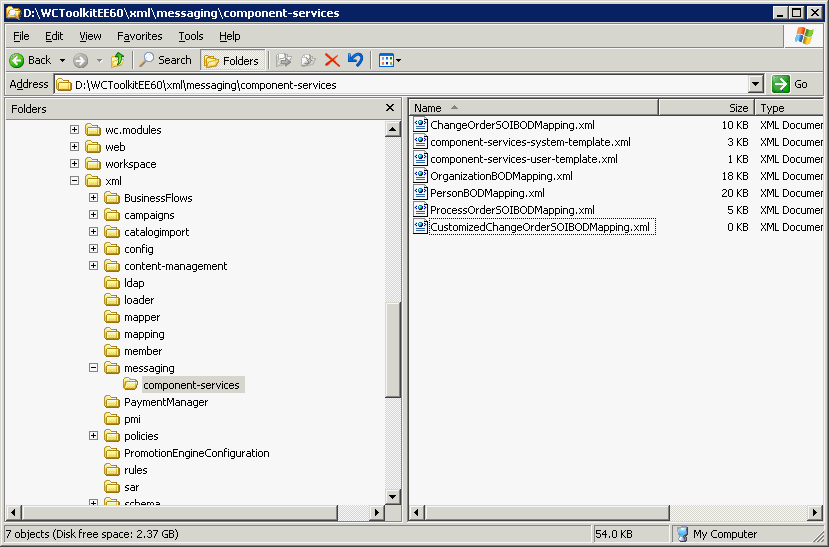
- Navigate to WC_EAR\xml\messaging\component-services
folder. Create a copy of the ChangeOrderSOIBODMapping.xml file and
rename it CustomizedChangeOrderSOIBODMapping.xml.

- Open CustomizedChangeOrderSOIBODMapping.xml inside an editor and
add the following text to the bottom of the file but before the
</TemplateTag>.
Save and close the file.
<Tag XPath="DataArea/Order/OrderItem/EngravingText" Field="engravingText"/> <Tag XPath="DataArea/Order/OrderItem/EngravingText@font" Field="engravingFont"/> <Tag XPath="DataArea/Order/OrderItem/EngravingText@size" Field="engravingSize"/> -
Open the file component-services-user-template.xml inside of an editor. Copy the text below and replace the entire contents of the file. This will add the entry for the new CustomizedChangeOrderSOIBODMapping.xml. The component-services-user-template.xml should look like this:
<?xml version="1.0"?>
<!--
 *===================================================================
 * Licensed Materials - Property of IBM
 *
 * WebSphere Commerce  *
 * (c) Copyright IBM Corp. 2000, 2004
 * US Government Users Restricted Rights - Use, duplication or
 * disclosure restricted by GSA ADP Schedule Contract with IBM
Corp.
 *===================================================================
-->
<!-- If you are viewing with browser (IE for example), select
View Source to see actual source of file -->
<!DOCTYPE ECTemplate SYSTEM '../ec_template.dtd' [
<!--
Source comment: this [ is required, do not remove -->

<!ENTITY CustomizedChangeOrderSOIBODMappingDefinition
SYSTEM 'CustomizedChangeOrderSOIBODMapping.xml'>
]>
<!-- Source comment: this ]> is required, do not
remove -->

<ECTemplate>
        &CustomizedChangeOrderSOIBODMappingDefinition;
</ECTemplate>