Procedure to use SilkPerformer to run performance test
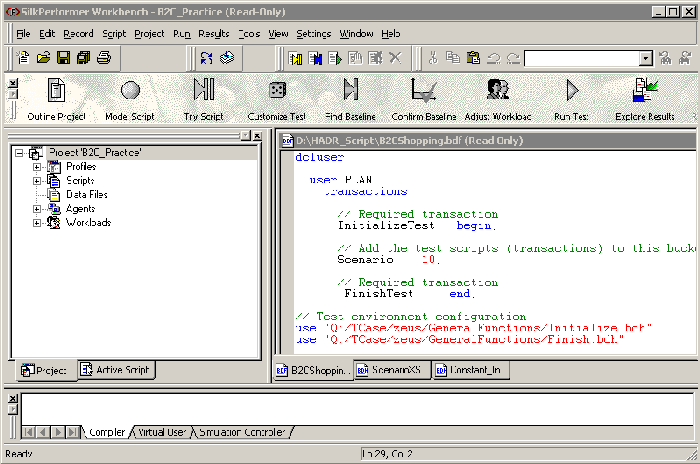
Figure 22-7 shows the main interface to SilkPerformer.
For conducting a SilkPerformer performance test,:
- Define a project outline.
The first step in conducting a SilkPerformer load test is to define the basic settings for the load-testing project. The project is given a name and, optionally, a brief description can be added.
The settings that are specified are associated with a particular load-testing project. It is easy to switch between different projects, to edit projects, and to save projects so that they can later be modified and reused.
In general, a project contains all the resources needed to complete a load test.
- Create a test script.
The second step in conducting a SilkPerformer load test is to create the test script that will prescribe the actions of the simulated users who will be run during the test. The script is written in SilkPerformer's proprietary scripting language, the Benchmark Description Language (BDL).
Scripts can be created in two ways. The easiest way is to use the SilkPerformer Recorder, which can automate much of the process for you. Alternatively, you can create a test script manually.
- Test script generation with the SilkPerformer Recorder
The standard method of creating a test script is to use the SilkPerformer Recorder to first capture and then record a representative amount of real traffic of the kind that you need to simulate in your test. The SilkPerformer Recorder then automatically generates the BDL test script from the recorded traffic.
- Manual test script generation
A second method of creating a test script is to manually create a new script from scratch in BDL.
- Sample script reuse
A variant on the second method of creating a test script is to base the new script on one of the sample BDL scripts provided with SilkPerformer.
- Test script generation with the SilkPerformer Recorder
- Try-out test script.
The third step in conducting a SilkPerformer load test is to do a trial run of the test script that was created in the previous step. The object of the trial run is to ensure that the test script is free from errors, and that it will reproduce accurately the interaction needed between the client application and the server. Normally, this will be the traffic that was recorded by the SilkPerformer Recorder in the previous step.
For this try-out of the test script, options are automatically selected so that you can see a live display of the actual data downloaded. Log files and a report file are created so that you can also check later that the script is working properly. Only one user is run, and the stress test option is enabled so that there is no think time and no delay between transactions.
SilkPerformer's TrueLog Explorer helps you to find replay errors quickly, to customize session handling, and to add verifications to the script. Figure 22-8 shows a sample display of TrueLog Explorer.

- Test customization.
The fourth step in conducting a SilkPerformer load test is to customize the test with random data. In order to run the script without any replay errors, Segue's TrueLog Explorer helps you to customize the session handling and to add verifications to the script.
If a test script is used that has not been customized, the load tests will repeatedly reproduce the behavior recorded on one particular occasion, and this will not provide very accurate results. To realistically emulate the varied traffic of a large number of different users, the transactions in the test script need to be modified and, where necessary, randomized.
- Establish baseline.
The fifth step in conducting a SilkPerformer load test is to ascertain the baseline performance, that is, the basic, ideal performance of the application being tested. The now-customized test is run with just one user per user type, and the results from this unstressed performance of the application form the basis for calculating the number of concurrent users and the setting of thresholds for page and transaction times. The measurements typical for a real load test (of response times and throughput, for example) are performed.
A secondary reason for determining the baseline test is to serve as a trial run of the customized test that was created in the previous step. Here the objective is to ensure that the customization has not introduced new errors into the script, and that the script will accurately and fully reproduce the interaction that is intended between the client application and the server.
After that, we should confirm that the test baseline established by the test in the sixth step actually reflects the desired performance of the application under test. This is done by inspecting the results from that test in a baseline report.
- Specify the performance test workload.
Prior to the execution of a load test, select the workload model that you want to use for your load test.
You can choose between the following six different workload models
- Increasing
- Steady State
- Dynamic
- All Day
- Queuing
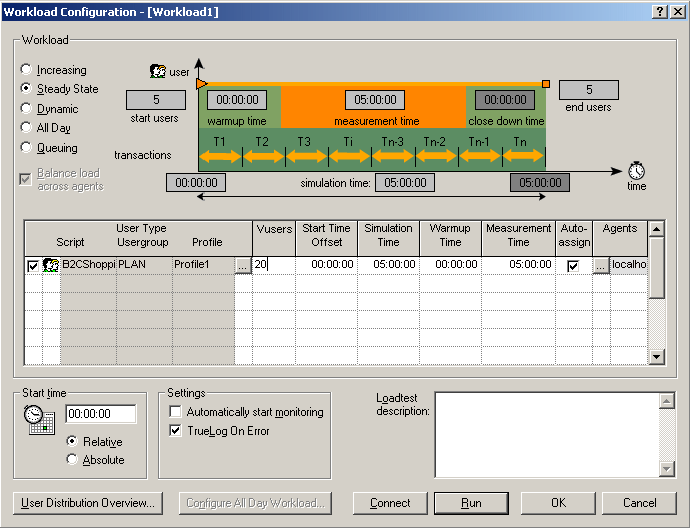
Note: Additionally, the number of concurrent virtual users per user type, the duration, and the involved agents must be adjusted accordingly.
- Execute the performance test.
To start the execution of the performance test:
- Click the Run Test button in the SilkPerformer Workflow bar. The Workload Configuration dialog appears.
- Check and, if necessary, change the workload configuration for your load test. Then run the test.
- While the test is in progress, you can monitor its progress and also monitor activity on the server by viewing the tabular monitor view of SilkPerformer and the graphical monitor view of the Performance Explorer.
Before the execution, make sure that you have enabled the generation of the kinds of test results that will be needed to assess the performance of the server. You can configure this information from the project profile. Note that each project has a specific profile to work with itself. Figure 22-10 shows is the profile configuration interface.

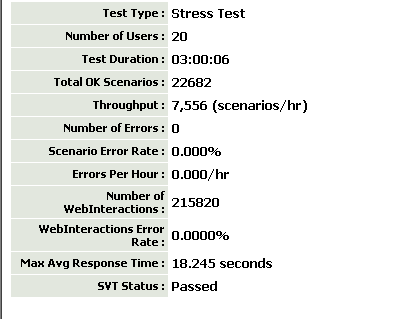
- Evaluate and analyze the test result.
After the test execution, first of all, you can see a summarized result for the test from SilkPerformer's baseline report, as shown in Figure 22-11.
At the same time, SilkPerformer provides an abundant statistics chart about the execution result. Testers and developers can get a more comprehensive view of the behavior of the system under test with:
- Transaction Status Report, which depicts the number of SilkPerformer transactions per second, as shown in Figure 22-12.

- Throughput Report, as shown in Figure 22-13.The amount of data sent to and received from the server. This includes header and body content information, all TCP/IP-related traffic (HTTP, native TCP/IP, IIOP, POP3, SMTP, FTP, LDAP, and WAP), and secure traffic over SSL/TLS.

- Response Time Report, as shown in Figure 22-14. The response time of successful transactions, excluding the think times within those transactions. A transaction response time is reported in this type of measurement if all API function calls within the transaction succeed.

- Error Report, as shown in Figure 22-15. This chart shows the number of API errors per second, including Internet, database, and middleware APIs. A problem is considered an error if its severity is defined as an error or worse, that is, of higher severity (transaction exit or process exit). A problem is ignored if its severity is defined as informational or warning.
