Install Connections 5.0 for migration
- Complete prerequisite tasks.
- Download IBM Connections 5.0
- On each node, stop any running application servers and node agents
- Back up the dmgr profile
- Install Installation Manager version 1.7.1 on dmgr host
-
### We install in console mode
cd /media/installmgr
./installc -acceptLicense
cd /opt/IBM/InstallationManager/eclipse - Start WAS dmgr.
- Copy the downloaded installation files to the system hosting the dmgr.
- Run either Installation Manager or Connections launchpad...
- Installation Manager console mode
- Installation Manager GUI
-
cd /opt/IBM/InstallationManager/eclipse
IBMIM - Launchpad
-
CONNECTIONS_SETUP/launchpad.sh
The launchpad needs a web browser to run.
- Installation Manager console mode
- Add Connections repository file...
-
connections_root/Connections/repository.config
...to Installation Manager configuration repository via the Installation Manager preferences option.
- On the Installation Manager main screen click Install
- In the window...
-
Select packages to install
...select the Connections packages to install and click Next to continue.
- Accept the default setting for...
-
Show all versions
- For an earlier version of Installation Manager than 1.7.1, the 1.7.1 package is selected in this window.
- To search for updates to Installation Manager. click...
-
Check for Other Versions and Extensions
- Review and accept the license agreement by clicking I accept the terms in the license agreements. Click Next.
- Specify locations for...
- Shared Resources Directory
- Installation Manager Directory
The Shared Resources directory stores resources that can be shared by multiple packages. If we used Installation Manager before, the wizard automatically enters this value. The Installation Manager directory stores resources that are unique to the packages that we are installing. For shared and remote network file system requirements, review footnotes in the system requirements.
- Choose to Use the existing package group or Create a new package group.
For the wizard for the first time, the Use the existing package group option is not available.
- Specify the location of the install directory for Connections. We can accept the default directory location, enter a new directory name, or click Browse to select an existing directory. Click Next.
The path only can consist of letters (a-z, A-Z), numbers (0-9), and an underscore (_).
- Confirm the applications to install and click Next.
The wizard always installs the Home page, News, and Search applications.
To use media gallery widgets in the Communities application, install the Files application. Media gallery widgets store photo and video files in the Files database.
Even if we are not planning to configure Cognos later, install Metrics now so the application data is captured from the moment that IBM Connections is deployed. Metrics captures the deployment data whereas Cognos is used for viewing data reports. If we install Metrics at a later stage, you will not have any data reports for the period before installing Metrics.
To install all Connecctions applications, select...
-
Install all Connections applications.
...or select individuals apps to install...
- Activities
- Blogs
- Communities
- Bookmarks
- Files
- Forums
- Connections Content Manager (Appears under Add-on. If choosen Communities selected automatically)
- Metrics
- Mobile
- Moderation
- Profiles
- Wikis
- Enter the details of the WAS environment:
- Select the WAS installation location containing the dmgr.
Note the default path to the WAS installation:
-
/usr/IBM/WebSphere/AppServer
- Properties of the WAS dmgr:
dmgr profile Name of the dmgr to use for Connections. The wizard automatically detects any available dmgrs. Host name Name of the host dmgr server. Administrator ID The administrative ID of the dmgr. This ID is set to the connectionsAdmin J2C authentication alias, which is mapped to the following Java EE roles:
- dsx-admin
- widget-admin
- search-admin
It is also used by the service integration bus. To use security management software such as Tivoli Access Manager or SiteMinder, the ID specified here must exist in the LDAP directory.
This user account can be an LDAP or local repository user.
Administrator Password The password for the administrative ID of the dmgr. SOAP port number The SOAP port number of the dmgr. The wizard automatically detects this value. - Click Validate to verify the dmgr information.and that application security is enabled on WAS. If the verification fails, Installation Manager displays an error message.
(AIX and Linux) The validation process checks the number of open files supported by the system. If the value for the Open File Descriptor limit is too low, a file open error, memory allocation failure, or connection establishment error could occur. If one of these errors occurs, exit the installation wizard and increase the limit before restarting the wizard. To set the file limit, refer to the Installation error messages.and search for error code CLFRP0042E. The recommended value for Connections is 8192. For more information about the Open File Descriptor limit, see the documentation for the operating system.
- When the verification test is successful, click Next.
The wizard creates file...
- WAS_HOME/dmInfo.properties
...to record details of the cell, node, and server.
- Select the WAS installation location containing the dmgr.
- Configure Connections Content Manager deployment option.
This panel displays if you chose to install the Connections Content Manager feature.
- Select Existing Deployment only if you intend to install the FileNet servers (JVMs and clusters) manually:
- Enter FileNet Object Store administrator username and password
- Enter the HTTP URL for the FileNet Collaboration Services server:
-
http://fncs.myco.com:80/dm
- Enter the HTTPS URL for the FileNet Collaboration Services server:
-
https://fncs.myco.com:443/dm
- Enter FileNet Object Store administrator username and password
- Select New Deployment even if you previously installed a new deployment of Connections Content Manager for the 4.5 release.
We do not need to reinstall the FileNet domain and the object store; only the new server infrastructure (JVMs and WebSphere clusters):
- Specify an anonymous user name and password account. This account can be a system-type account that is not used by an actual person and should not have any special privileges beyond what is specified in Set up anonymous access for a new FileNet deployment.
If this account is not specified, then anonymous access is disabled
- Enter FileNet installer packages location.
The four FileNet installers: Content Platform Engine, FileNet Collaboration Services, the FileNet fix pack, and Content Platform Engine Client need to be placed into the same folder. The package names are :
Platform: Content Platform Engine FileNet Fix pack Content Platform Engine Client FileNet Collaboration Services AIX: 5.2.0-P8CE-AIX.BIN 5.2.0.3-P8CPE-AIX-FP003.BIN 5.2.0.3-P8CPE-CLIENT-AIX-FP003.BIN 2.0.0.1-FNCS-IF001-AIX.bin Linux: 5.2.0-P8CE-LINUX.BIN 5.2.0.3-P8CPE-LINUX-FP003.BIN 5.2.0.3-P8CPE-CLIENT-LINUX-FP003.BIN 2.0.0.1-FNCS-IF001-Linux.bin Windows: 5.2.0-P8CE-WIN.EXE 5.2.0.3-P8CPE-WIN-FP003.EXE 5.2.0.3-P8CPE-CLIENT-WIN-FP003.EXE 2.0.0.1-FNCS-IF001-WIN.exe zLinux: 5.2.0-P8CE-ZLINUX.BIN 5.2.0.3-P8CPE-ZLINUX-FP003.BIN 5.2.0.3-P8CPE-CLIENT-ZLINUX-FP003.BIN 2.0.0.1-FNCS-IF001-zLinux.bin For the Linux platform, at least 3 GB of free disk space is needed under the /tmp folder for the Connections 5.0 CCM installation, or else there will be an installation failure.
We can set up the environment variable IATEMPDIR so the FileNet installer uses that location instead of the system temp directory (/tmp on AIX/Linux, %TEMP% on Windows).
- Click Validate to ensure the user account and package locations are configured correctly.
- Specify an anonymous user name and password account. This account can be a system-type account that is not used by an actual person and should not have any special privileges beyond what is specified in Set up anonymous access for a new FileNet deployment.
If this account is not specified, then anonymous access is disabled
Refer to Configure IBM Connections Content Manager to find the post-installations tasks perform to get CCM up and running.
- Select Existing Deployment only if you intend to install the FileNet servers (JVMs and clusters) manually:
- Configure the topology.

If we return to this page from a later page in the installation wizard, the settings are still present but not visible.
To change any settings, we must enter all of the information again. To not change the initial settings, click Next.
The applications for Connections Content Manager will not be shown if you have chosen to use an existing FileNet deployment.
- Small deployment:
- Select the Small deployment topology.
- Enter a Cluster name for the topology.
- Select a Node.
- Click Next.
- Select the Small deployment topology.
- Medium deployment:
- Select the Medium deployment topology.
- Select the default value or enter a Cluster name for each application or for groups of applications. For example, use Cluster1 for Activities, Communities, and Forums.
Installation Manager creates servers and clusters when required.
- Select a Node for each cluster. Accept the predefined node or select a different node.
These nodes host application server instances that serve Connections applications. We can assign multiple nodes to a cluster, where each node is a server member of that cluster.
- Enter a Server member name for the selected node.
The name must be unique across all nodes in the deployment.
- Click Next.
- Select the Medium deployment topology.
- Large deployment:
- Select the Large deployment topology.
- Enter a Cluster name for each application.
Installation Manager creates servers and clusters when required.
- Select a Node for each cluster. Accept the predefined node or select a different node.
These nodes host application server instances that serve Connections applications. We can assign multiple nodes to a cluster, where each node is a server member of that cluster.
- Enter a Server member name for the selected node.
The name must be unique across all nodes in the deployment.
- Click Next.
- Select the Large deployment topology.
- Small deployment:
- Enter the database information:
If we return to this page from a later page in the installation wizard, the settings are still present but not visible.
To change any settings, we must enter all of the information again. To not change the initial settings, click Next.
The IBM Connections Content Manager databases will not be shown if you have chosen to use an existing FileNet deployment.
Database information for Global Configuration Data and Object Store must be set correctly, otherwise installation will fail.
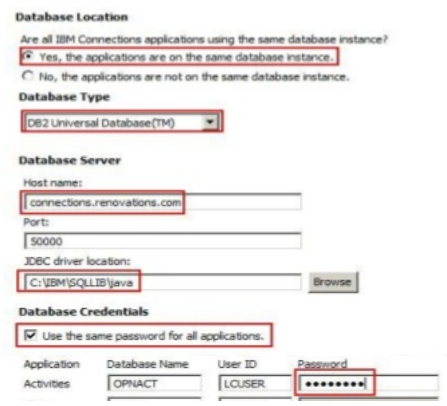
- Specify whether the installed applications use the same database server or instance: Select Yes or No.
If allowed by the database configuration, we can select multiple database instances as well as different database servers.
- Select a Database type from one of the following options:
- IBM DB2 Universal Database
- Oracle Enterprise Edition
- Microsoft SQL Server Enterprise Edition
- Enter the Database server host name. For example: appserver.enterprise.myco.com
If the installed applications use different database servers, enter the database host name for each application.
- Enter the Port number of the database server. The default values are: 50000 for DB2 , 1521 for Oracle, and 1433 for SQL Server.
If wer installed applications use different database servers or instances, enter the port number for each database server or instance.
- Enter the JDBC driver location. For example:
-
/opt/IBM/WebSphere/AppServer/lib
- Ensure the following JDBC driver libraries are present in the JDBC directory:
DB2 db2jcc4.jar and db2jcc_license_cu.jar. Ensure the user account has the necessary permissions to access the DB2 JDBC files. Oracle ojdbc6.jar SQL Server Download the SQL Server JDBC 4 driver from the Microsoft website to a local directory, and enter that directory name in the JDBC driver library field. The directory must not contain the sqljdbc.jar file, only the sqljdbc4.jar file. Even though the data source is configured to use the sqljdbc4.jar file, an exception occurs if both files are present in the same directory. - Enter the User ID and Password for each database.
If each database uses the same user credentials, select the check box...
-
Use the same password for all applications
...and then enter the user ID and password for the first database in the list.
If the database type is Oracle, connect to the database with the user ID used when the application database was created.
- Click Validate to verify the database settings.
If the validation fails, check the database settings. When the validation succeeds, click Next.
Installation Manager tests the database connection with the database values that you supplied. We can change the database configuration later in the WAS console.
Usually we can continue even if the validation failed because we can change the database settings from WAS console afterwards. However, we cannot continue if you have entered incorrect information for the Connections Content Manager database, because there are database operations during installation. Incorrect database information will cause installation to fail.
- Specify whether the installed applications use the same database server or instance: Select Yes or No.
- Select the Do Later option, and configure Cognos later using the Cognos Wizard.
- Specify the locations of the content stores.
All nodes in a cluster must have read-write access to shared content. Both shared and local content stores must be accessible using the same path from all nodes and from the dmgr. Each content store is represented by a corresponding WebSphere variable that is further defined as shared or local. Local content is node-specific.
For migrations from IBM Connections 4.5, reuse the existing content stores in 5.0 in order to maintain data integrity. See Content store migration topic.
- Enter the location of the Shared content store.
The shared content store usually resides in a shared repository that grants read-write access to the dmgr and all the nodes. Use one of the following methods to create a shared data directory:
- Network-based file shares (for example: NFS, SMB/Samba, and so on)
- Storage area network drives (SAN)
- For a shared-file system on Windows, specify the file location using the Universal Naming Convention (UNC)
format. For example:
-
\\server_name\share_name
(Windows only) If we use Remote Desktop Connection to map shared folder drives, use the same session to start the node agents. Otherwise, the shared drives might be invisible to the nodes.
- Network-based file shares (for example: NFS, SMB/Samba, and so on)
- Enter the location of the Local content store.
- Click Validate to verify the account that we are using to install Connections has write access to the content store.
- Click Next.
- Enter the location of the Shared content store.
- Select a Notification solution.
Notifications are email messages to users about new information and events in the Connections deployment.
- Enable Notification only.
Use notifications but without the ReplyTo capability.
- Enable Notification and ReplyTo.
Use notifications and the ReplyTo capability. To use ReplyTo, the mail server must be able to receive all the replies and funnel these replies into a single inbox. IBM Connections connects to the mail server using the IMAP protocol.
- None.
Do not use a notification solution in the Connections deployment. We can configure notifications after installation. Refer to Configure notifications for more information.
- Enable Notification only.
- Select and specify a mail server solution and then click Next.
- WebSphere Java Mail Session
Use a single mail server for all notifications. Select this option if we can access an SMTP server directly using the host name.
Complete the following fields to identify the mail server to use for sending email:
Host name of SMTP messaging server Host name or IP address of the preferred SMTP mail server. This SMTP server requires authentication Select to force authentication when mail is sent from this server. User ID If the SMTP server requires authentication, enter the user ID. Password If the SMTP server requires authentication, enter the user password. Encrypt outgoing mail traffic to the SMTP messaging server using SSL Select this check box to encrypt outgoing mail to the SMTP server. Port Accept the default port of 25, or enter port 465 if we are using SSL. - DNS MX Records
Use information from DNS to determine which mail servers to use. Select this option if you use a DNS server to access the SMTP messaging server.
Messaging domain name Name or IP address of the messaging domain. Choose a specific DNS server Select to specify a unique SMTP server. DNS server for the messaging servers query Host name or IP address of the DNS server. DNS port used for the messaging servers query Port number used for sending queries using the messaging server. This SMTP server requires authentication Select to force authentication when notification mail is sent from this server. User ID If SMTP authentication is required, enter the administrator user ID for the SMTP server. Password If SMTP authentication is required, enter the password for the administrator user of the SMTP server. Encrypt outgoing mail traffic to the SMTP messaging server using SSL Select to use SSL when connecting to the SMTP server. Port Port number to use for the SMTP server connection. The default port number for the SMTP protocol is 25. The default port number for SMTP over SSL is 465. - If we click Do not enable Notification, Installation Manager skips the rest of this step. We can configure notification later.
- WebSphere Java Mail Session
- If we selected the Notification and ReplyTo option, configure the ReplyTo email settings. IBM Connections uses a unique ReplyTo address to identify both the person who replied to a notification and the event or item that triggered the notification.
- Enter a domain name. For example: mail.myco.com.
This domain name is used to build the ReplyTo address. The address consists of the suffix or prefix, a unique key, and the domain name.
- The reply email address is given a unique ID by the system. We can customize the address by adding a prefix or suffix, using a maximum of 28 characters.
This extra information is useful if the domain name is already in use for other purposes. Select one of the following options:
None Use the ID generated by system. Prefix Enter a prefix in the Example field. Suffix Enter a suffix in the Example field. As you select an option, the wizard creates an example of the address, combining the selection with the ID generated by system.
For example:
- unique_id@domain
- prefix_unique_id@domain
- unique_id_suffix@domain
- Specify the details of the mail file to which ReplyTo emails are sent:
Server The domain where the mail server is located. For example: replyTo.mail.myco.com. User ID The user account for the mail server. The user ID and password are credentials that IBM Connections will use to poll the inbox on the mail server to retrieve the replies and process the content. IBM Connections connects to the mail server using IMAP. Password Password for the user account. The user ID and password are credentials that IBM Connections will use to poll the inbox on the mail server to retrieve the replies and process the content. IBM Connections connects to the mail server using IMAP. - Click Next.
We can modify the ReplyTo settings after installation. To edit the domain name and prefix or suffix, edit the news-config.xml file. See Post-migration step for status updates topic. To edit the server and authentication details, log in to the WAS console and navigate to the Mail Sessions page, where we can edit the configuration.
- Enter a domain name. For example: mail.myco.com.
- Review the information you have entered. To revise your selections, click Back. To finalize the installation, click Next.
- Review the result of the installation. Click Finish to exit the installation wizard.
- Restart the dmgr:
- AIX or Linux: cd app_server_root/profiles/Dmgr01/bin directory.
Enter the ./stopManager.sh command and then enter the ./startManager.sh command.
- Windows: Stop and restart the dmgr service.
- AIX or Linux: cd app_server_root/profiles/Dmgr01/bin directory.
Enter the ./stopManager.sh command and then enter the ./startManager.sh command.
- Start all the federated nodes and enter the startNode command.
Repeat these steps for each node:
- Log in to a node.
- From a command line, change to the profile_root/bin directory.
- Enter the startNode command for your operating system:
-
./startNode.sh
- Log in to a node.
- Log in to the WAS console on the dmgr to perform a full synchronization of all nodes.
- Go to System administration > Nodes.
- Select the nodes and click Full Resynchronize.
Wait until the dmgr copies all the application EAR files to the installedApps directory on each of the nodes. This process can take up to 30 minutes.
To verify the dmgr has distributed the application EAR files to the nodes, check SystemOut.log of each node agent. The default path to SystemOut.log on a node is profile_root/logs/nodeagent.
Look for a message such as the following example:
-
ADMA7021I: Distribution of application application_name completed successfully. where application_name is the name of a Connections application.
- Go to System administration > Nodes.
- Restart the dmgr.
- Start all the Connections clusters:
- Log in to the WAS console on the dmgr
- Go to Servers > Clusters > WebSphere Application server clusters.
- Select the Connections clusters and click Start.
- If we installed a cluster with multiple Search nodes, create the initial index.
- If we are installing a non-English language deployment, enable Search dictionaries. See Enabling Search dictionaries topic.
- The index is ready when the INDEX.READY and CRAWLING_VERSION files are present in the index directory.
- If we are installing a non-English language deployment, enable Search dictionaries. See Enabling Search dictionaries topic.
- If some applications do not start, the file-copying process might not have completed. Wait a few minutes and start the applications.
Start order
If Connections applications are installed on different clusters, the cluster start order should be :
- News cluster
- Profiles cluster
- Search cluster
- Dogear cluster
- Communities cluster
- Activities cluster
- Blogs cluster
- Files cluster
- Forums cluster
- Wikis cluster
- Hompage cluster
- Metrics cluster
- Mobile cluster
- Moderation cluster
- Connections Content Manager cluster
- Log in to the WAS console on the dmgr
Results
The installation wizard has installed IBM Connections in a network deployment.
To confirm the installation was successful, open the log files in the connections_root/logs directory. Each Connections application that you installed has a log file, using the following naming format: application_nameInstall.log, where application_name is the name of a Connections application. Search for the words error or exception to check whether any errors or exceptions occurred during installation.
To view the log file for system events that occurred during the installation, open the date_time.xml file, where date_time represents the date and time of the installation. The file is located by default in...
- AIX or Linux (root user): /var/ibm/InstallationManager/logs
- AIX or Linux (non-root user): /home/user/var/ibm/Installation
Manager/logs where user is the non-root
user name
- Windows Server 2008 64-bit: C:\ProgramData\IBM\Installation Manager\logs
What to do next
Complete the post-installation tasks.
Accessing network shares:
If we installed WebSphere Application Server on Windows and configured it to run as a service, ensure that we can access network shares.
Parent topic:
Upgrade Connections v4.x to Connections v5.0
Related:
Deployment options
Pre-installation tasks
Install Cognos Business Intelligence
Access Windows network shares
Recreate the search index
Post-installation tasks
IBM Connections system requirements
Installation error messages