Install supplementary WebSphere software
The WAS V8.5 package comes with supplemental software...
- IBM WebSphere HTTP Server V8.5
- WebSphere Plug-ins
- WebSphere Customization Toolbox V8.5
- Application Client for WAS 8.5
The WebSphere Customization Toolbox (WCT) can be configured embedded or stand-alone.
- Embedded
- Stand-alone WCT
To install from command-line...
- Get version ID of WebSphere Customization Toolbox (WCT)
# ./imcl listAvailablePackages -repositories /media/WAS855_supp/repository.config
com.ibm.websphere.APPCLIENT.v85_8.5.5000.20130514_1044
com.ibm.websphere.IHS.v85_8.5.5000.20130514_1044
com.ibm.websphere.PLG.v85_8.5.5000.20130514_1044
com.ibm.websphere.PLUGCLIENT.v85_8.5.5000.20130514_1044
com.ibm.websphere.WCT.v85_8.5.5000.20130514_1044
- Install WCT
cd /opt/IBM/InstallationManager/eclipse/tools
./imcl install com.ibm.websphere.WCT.v85_8.5.5000.20130514_1044 \
      -repositories  /media/WAS855_supp/repository.config \
      -installationDirectory /opt/IBM/Portal/Toolbox \
      -sharedResourcesDirectory /usr/IBM/Portal/IMShared \
      -log /tmp/imcl.log  \
      -acceptLicense
The embedded WCT
Comes as a part of the WAS V8.5 package. Tools included in the embedded version are:
- Profile Management Tool (PMT)
- Configuration Migration Tool (CMT)
With the embedded WCT offering, both of the included tools are automatically installed. They are not listed for selection in Installation Manager.
In WAS V8 and later versions, IBM AIX 64-bit systems can use GUI-based tools. However, AIX requires the GNU Toolkit (GTK) be installed to run the GUI. If we do not have the GTK installed, you receive an Eclipse error when trying to launch the GUI.
Other supported platforms include HPUX 64-bit, Windows 2000 (32-bit and 64-bit), Linux on x86 (32-bit and 64-bit), Linux on Power (32-bit and 64-bit), Linux on s390 (32-bit and 64-bit), Solaris Sparc, and AIX (32-bit and 64-bit).
Stand-alone WCT
The stand-alone WCT comes as its own product offering. It can be found in the WAS V8.5 supplements package and is installed using Installation Manager.
Tools included in the stand-alone WCT are the following:
- Web Server Plug-ins Configuration Tool
- z/OS Profile Management Tool (zPMT)
- z/OS Migration Management Tool (zMMT)
- Remote Installation Tool for IBM i
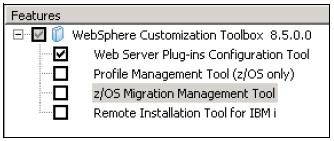
When installing the stand-alone WCT, you select the tools to install. However, zPMT and zMMT must be installed together because they have dependencies that Installation Manager recognizes.
Supported platforms include HPUX, Windows, Linux on x86, Linux on Power, Linux on s390, Solaris (Sparc and x86), and AIX. Regardless of whether it is installed on a 32-bit or 64-bit operating system, the stand-alone toolbox operates as a 32-bit component on a 32-bit JDK.
Toolbox tools
Tools in the two WCT offerings include:
| Profile Management Tool (PMT) | User interface for profile creation and augmentation. |
| Configuration Migration Tool (CMT) | Graphical interface to the migration tools included in WAS. |
| Web Server Plug-ins Configuration Tool (PCT) | Configure your web server plug-ins on distributed systems for communicating with the application server. If possible, it creates a web server configuration definition in the application server. |
| Remote Installation Tool for IBM i | Used on an Intel-based operating system only to install Installation Manager or a WAS component from a Windows machine to a target IBM i system. |
| z/OS Profile Management Tool (zPMT) | Used on an Intel-based or Linux operating system to generate jobs and instructions for creating profiles for WAS on z/OS systems. The jobs are then uploaded and run on a target z/OS system. |
| z/OS Migration Management Tool (zMMT) | Used on an Intel-based or Linux operating system to create migration definitions used to migrate a WAS on z/OS node. Each migration definition is a set of jobs and instructions that can then be uploaded and run on a target z/OS system. |
Installing the stand-alone WCT
Use Installation Manager to install the stand-alone WCT offering. Verify the Installation Manager preferences point to a repository containing the WCT.
We can install the toolbox using the GUI, command-line, or silent modes. For silent mode installations, Installation Manager supports the creation of the necessary response file.
Installing WCT is similar to installing other packages using Installation Manager, including the option of selecting the tools to install in the stand-alone offering. If we do not install all of the available tools during the initial installation process, we can later modify the installation to add the other tools.
To install the stand-alone WCT:
- Start Installation Manger.
- Add the repository to the WebSphere supplements package.
- In the main Installation Manager window, click Install.
- From the listed offerings, choose WCT
- Accept the license agreement, and click Next.
- Provide the installation directory for the package, and ensure that you used the Create a new package group option.
- Choose from among the features shipped with the WCT. Click Next. For this example, only
the tools for managing web servers are needed.

- Review the summary, and click Install.
- When the installation successfully finishes, we can choose to start the WCT or close the window. Choose your preferred option, and click Finish.
Using the WCT
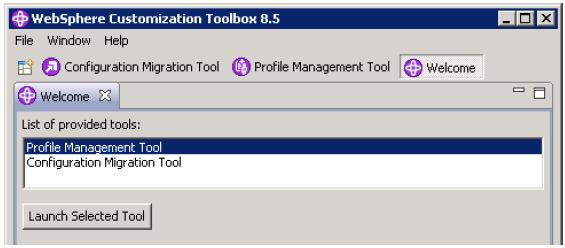
There are different ways to start the WCT, depending on the offering that was installed and the operating system. On Windows and Linux platforms, a start menu shortcut is created for both the embedded and stand-alone offering. Other options for starting the toolbox are:
- Embedded offering
Launch wct from <was_install>\bin\ProfileManagement\WCT\
- Stand-alone offering
Launch wct from <wct_install>\WCT\

Note that only the Web Server Plug-ins Configuration Tool is available because it is all that was installed in this example. We can modify this package at any time to add or remove additional features when needed.
The stand-alone WCT also includes a command-line utility that launches a command-line version of the Web Server Plug-ins Configuration Tool (PCT).
Application Client for WAS V8.5
The Application Client for WAS V8.5 package allows you to create applications that run separately from the application server. A client application uses the framework provided by an underlying client to access the resources provided by WAS.
The Application Client for WAS is packaged with the following components:
- JRE (or an optional full Software Development Kit) that IBM i provides.
- The runtime environment for Java EE client applications (Uses services provided by the Java EE Client Container)
- The runtime environment for Java thin client applications (Java SE applications that do not use services provided by the Java EE Client Container)
- An ActiveX to EJB Bridge for ActiveX programs to access enterprise beans through a set of ActiveX automation objects (Windows only)
- IBM plug-in for Java platforms for Applet client applications (Windows only)
- A variety of stand-alone thin clients, provided as embeddable JAR files
Installing the Application Client package
To install the Application Client for WAS V8.5:
- Start Installation Manger.
- Add the repository to the WebSphere supplements package.
- In the main Installation Manager window, click Install.
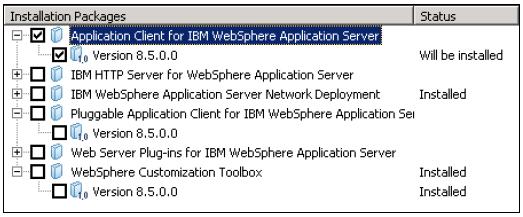
- From the list of offerings. choose the Application Client for WAS V8.5, and click Next.

Deprecated feature: The Pluggable Application Client is deprecated. It is replaced by the stand-alone, thin client, IBM Thin Client for EJB.
The Pluggable Application Client runs only on the Windows platform and requires that you previously installed the Sun JRE files. In all other aspects, the Pluggable Application Client and the Java thin application client are similar.
- Accept the license agreement, and click Next.
- Provide the installation directory for the package, and ensure that you chose the Create a new package group option.
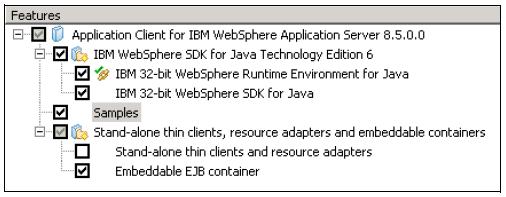
- In the Features window, select the features to install from the lists of available features. For this example installation, Samples features are used.
Samples features contain source code and executable files that can be helpful when working with Application Client for WAS.

- Specify the host name and bootstrap port of the WAS to which to connect using the Application Client.

- Review the summary, and then click Install.
- Click Finish when the installation process ends.