WebSphere eXtreme Scale Liberty profile Airport sample
- Overview
- Requirements
- Sample files
- Before beginning
- Run the sample (quick start)
- Import the sample into RAD
- Use the sample
- Troubleshoot
- More information
Overview
The Airport sample is provided as an introduction to eXtreme Scale installed in the WAS v8.5 Liberty profile environment. The Liberty profile server runs simple create, read, update, and delete functions in the eXtreme Scale grid in milliseconds. The sample shows how large amounts of data (in this case, information about thousands of airports worldwide) can be stored using the WebSphere Liberty profile along with WXS. When using the sample, the time taken to complete any create, read, update, or delete operation is displayed, demonstrating the speed of accessing the grid.
Software requirements
- WXS v8.5 or later
- WAS v8.5 Liberty Profile
- Eclipse IDE for Java EE Developers, Indigo or later with the WAS Developer Tools
Sample files
All files are in airportAgentLibertyWXS.zip, which can be downloaded from the DeveloperWorks Samples Gallery.| airportAllInOneServer/ | All code required to run sample. Includes agent code |
| airportContainerServer/ | Start grid in a separate JVM. |
| airportDevelopmentServer/ | Start embedded grid. |
| airportWebServer/ | Stand-alone web application. |
| defaultCatalogServer/ | Start a catalog server. |
| LibertyWXSSample/ | Directory that includes the source code. We can browse the following files: |
| com.ibm.websphere.xs.sample.airport/ | Application with .project file. |
| com.ibm.websphere.xs.sample.airport.agent/ | Source for agent bundle (.classpath and .project files.) |
| com.ibm.websphere.xs.sample.airport.app/ | Source for app bundle (.classpath and .project files.) |
| com.ibm.websphere.xs.sample.airport.client/ | Source for client bundle (.classpath and .project files.) |
| com.ibm.websphere.xs.sample.airport.grid/ | Source for grid bundle (.classpath and .project files.) |
| readme.html | Sample documentation . |
Before beginning
Perform a full installation of WebSphere eXtreme Scale v8.5. Install to the same directory WAS v8.5 Liberty profile is installed.
If we choose to install by running JAR files instead of using the IBM Installation Manager, use these JAR files:
Run the sample (quick start)
- Copy the airportAllInOneServer folder and paste to ...
-
<liberty_installation>/usr/servers
- Start the server...
-
cd <liberty_installation>/bin
server.bat start airportAllInOneServer
- From web browser go to...
-
http://yourhost:9080/airport/
- Check log...
-
<liberty_installation>/usr/servers/server/logs/console.log
You are ready to start using the sample.
To stop the server, run...
-
server.bat stop airportAllInOneServer
Import the sample into Rational Application Developer (alternate start, best practice)
The provided project has been tested with Rational Application Developer 7.5.5.3 and later. This section guides you through the setup of your eXtreme Scale development environment for applications deployed to a WAS Liberty profile. Upon completing these steps, you will have used the tooling to set up a Liberty profile server, import the project, and resolve build errors. In the quick start approach, the server is ready to go when we download it. You only have to start it. This approach to running the sample is called 'best practice' because you will modify your server on our own, and the end product will match the pre-configured quick start server. The skills you learn while modifying the server can be applied when developing other projects.
- Open Rational Application Developer to a new or existing workspace.
- Install the tooling.
- Create a Liberty profile server using the developer tools.
-
Servers (right-click) | New | Server | IBM | WAS V8.5 Liberty Profile | configure runtime environments
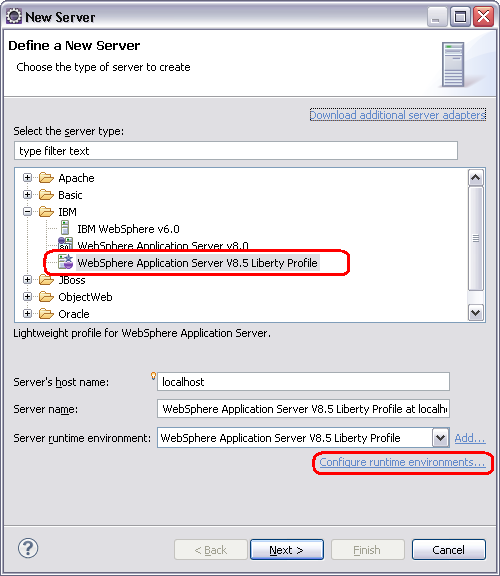
- Edit the WAS V8.5 Liberty Profile environment so the Installation folder points to your
Liberty profile installation and you are using the appropriate JRE.
- Once the runtime environment is configured, click Next.
- Click New and choose a name for your server. Click Finish, then click Finish again. Your new server will appear in the Servers view.
- Expand the server in the Servers View and double-click Server Configuration.
- Click Feature Manager, then in the Features pane, click Add... and choose the following features:
- eXtremeScale.server-1.1
- eXtremeScale.webapp-1.1
- eXtremeScale.webgrid-1.1
- localConnector-1.0
- servlet-3.0
- jsp-2.2
- wab-1.0
- Now, right-click the Server Configuration in the left pane, and select IBM WXS server configuration.
- In the Details pane, in the Catalog server field, select true from the dropdown menu.
- Save the changes to server.xml.
-
New | Folder
Name the folder "grids".
-
File menu | Import | General folder | Existing Projects into Workspace | Next
- com.ibm.websphere.xs.sample.airport
- com.ibm.websphere.xs.sample.airport.agent
- com.ibm.websphere.xs.sample.airport.app
- com.ibm.websphere.xs.sample.airport.client
- com.ibm.websphere.xs.sample.airport.grid
Check the box to copy projects into workspace and click Finish.
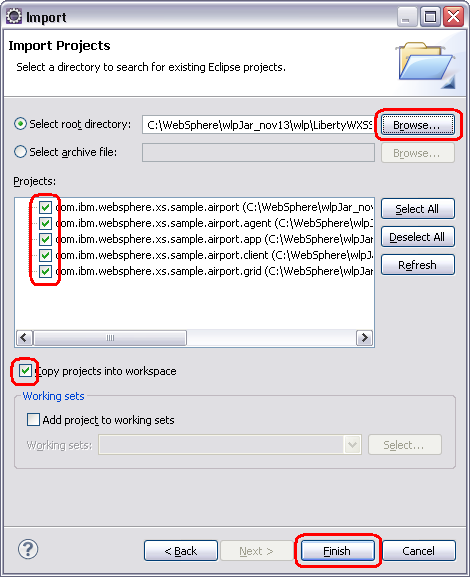
Now we have imported the Airport web project and the necessary Java files. We can see them in the Project Explorer.
Your com.ibm.webpshere.xs.sample.airport project contains these JAR files.

Your src folder in the com.ibm.ws.xs.sample.airport.agent project contains this Java file.

Your src folder in the com.ibm.ws.xs.sample.airport.app project contains this Java file.

Your src folder in the com.ibm.websphere.xs.sample.airport.client project contains these Java files.
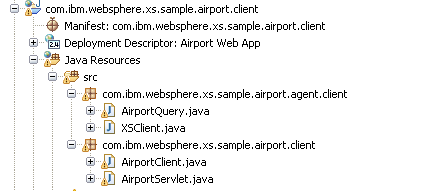
Your src folder in the com.ibm.websphere.xs.sample.airport.grid project contains these Java files.

- com.ibm.websphere.objectgrid
- com.ibm.websphere.objectgrid.plugins
- com.ibm.websphere.objectgrid.plugins.osgi
- org.osgi.framework
Note: You might see an error stating "no available bundle exports package" next to Import-Package, but it does not affect your build.Import-Package: com.ibm.websphere.objectgrid, com.ibm.websphere.objectgrid.plugins, com.ibm.websphere.objectgrid.plugins.osgi, org.osgi.framework
If we switch to the Dependencies tab, you see these imported packages listed.
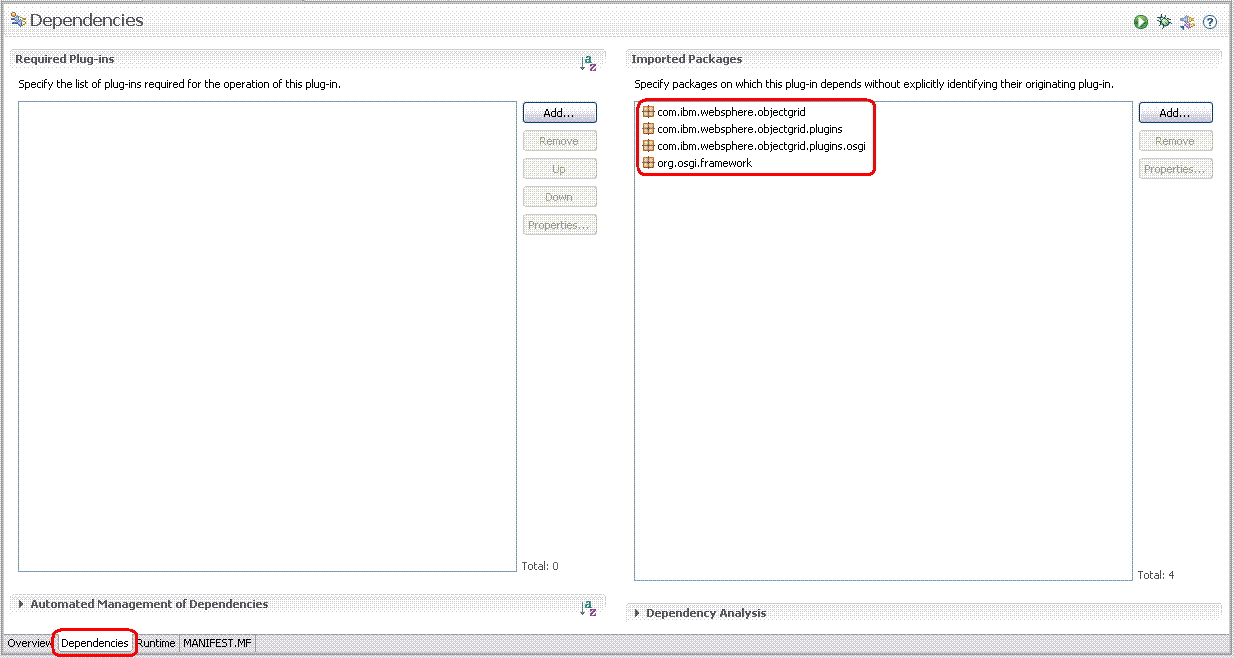
- com.ibm.websphere.xs.blueprint_sample.domain
- com.ibm.websphere.xs.blueprint_sample.loader
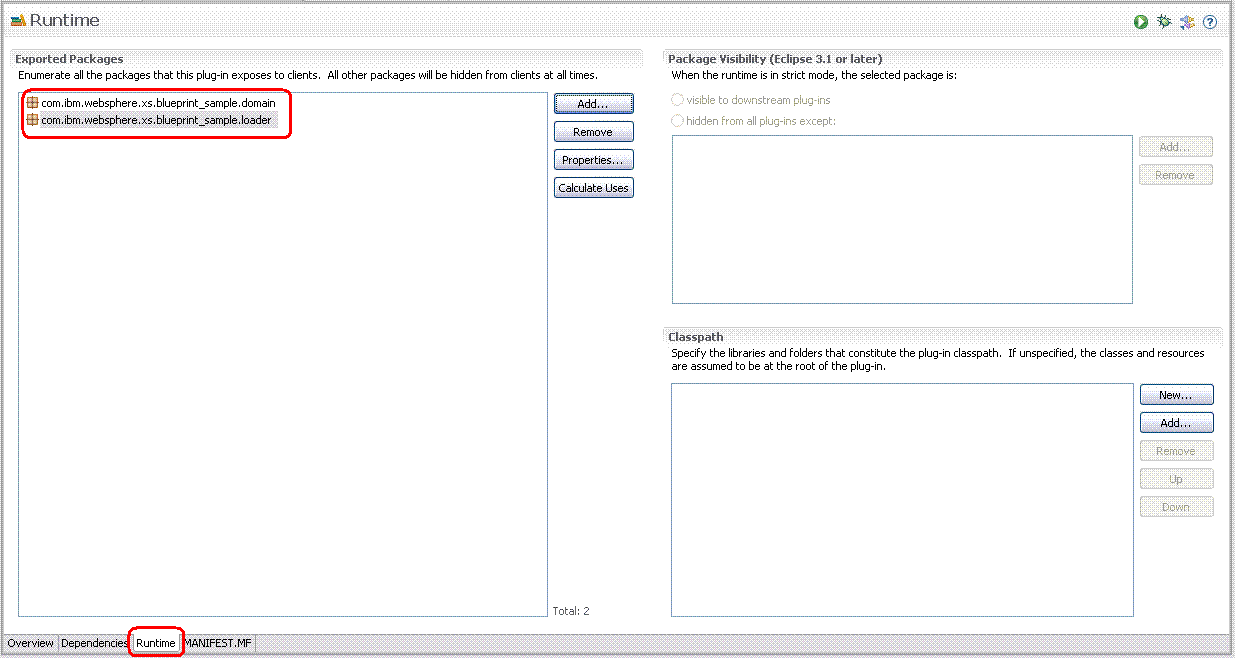 If we switch back to the MANIFEST.MF tab, you see these export packages listed.
Export-Package: com.ibm.websphere.xs.blueprint_sample.domain,
 com.ibm.websphere.xs.blueprint_sample.loader
- Open the MANIFEST.MF file for this project.
- The following import packages should be listed. Add them if they are not.
- com.ibm.websphere.objectgrid
- com.ibm.websphere.objectgrid.datagrid
- com.ibm.websphere.objectgrid.plugins
- com.ibm.websphere.objectgrid.plugins.osgi
- com.ibm.websphere.objectgrid.query
- com.ibm.websphere.xs.sample.airport.domain
Import-Package: com.ibm.websphere.objectgrid, com.ibm.websphere.objectgrid.datagrid, com.ibm.websphere.objectgrid.plugins, com.ibm.websphere.objectgrid.plugins.osgi, com.ibm.websphere.objectgrid.query, com.ibm.websphere.xs.sample.airport.domain - The following export package should be listed. Add it if it is not.
- com.ibm.websphere.xs.sample.airport.agent
Export-Package: com.ibm.websphere.xs.sample.airport.agent
Note: The MANIFEST.MF files for rest of the projects we have imported should already have the correct import and export packages added. These previous few steps have shown you how to edit our own MANIFEST.MF files using the tooling.
-
BundleContent | META-INF | Open
In the right pane, select the check box for objectgrid.xml and objectGridDeployment.xml
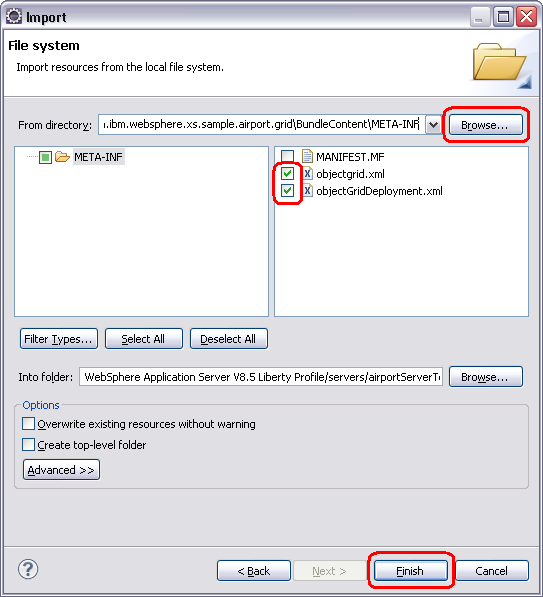
Click Finish
com.ibm.websphere.xs.sample.airport.grid is an existing project we have imported. With our own development projects, if you were to create a new OSGi Project instead of importing an existing project, objectgrid.xml and deployment.xml would be created automatically. You could edit these files accordingly and then include them in the exported OSGi bundle in the grids folder. For convenience and the purposes of this sample, objectgrid.xml and objectGridDeployment.xml have been pre-configured and included in the sample download for you to import.
For more information about these files, see this article
- airport.props
- host.props
- bootstrap.properties
If we have done the quick start steps and the airportAllInOneServer is visible in the Project Explorer, copy the files (ctrl + click and drag) from airportAllInOneServer to your server in the Project Explorer. Otherwise, use Import and select File System again. cd downloaded installableApps folder and select airportAllInOneServer. Select the check boxes for the properties files and click Finish.
Running the Airport sample server
- Right-click the com.ibm.websphere.xs.sample.airport.grid project, select...
-
Export > OSGi Bundle or Fragment
- Browse to <liberty_installation>/usr/servers/server/grids and click Save, then Finish. It is appropriate to give the exported Jar file the same name as the project. Overwrite the existing version of the Jar, if applicable.
- Do the same for the com.ibm.ws.xs.sample.airport.agent project.


Using the sample
After you open the Airport sample in a web browser, we can interact with the grid.
- To perform a read operation on an airport already in the grid, enter an airport code (examples: JFK or LAX).
The dropdown autocomplete feature helps you search for airports already in the grid.
- Click Search. The information corresponding to the airport code is displayed.
- You are able to Update or Delete information for this airport.
- If we do not see the airport you want in the dropdown,
click Insert New to create a grid entry for a new airport.
- Complete the form for airport information and click Insert.
- Time taken for each create, read, update, or delete operation is displayed on the bottom of the page.
- Search or add another airport at any time.
- You are able to search or add an airport the same way as before, or click any airport in the Search History, and then click Search.
Troubleshooting
Problem: The com.ibm.websphere.xs.sample.airport.client JavaScript Resource in the com.ibm.websphere.xs.sample.airport.client project contains an error. Solution: Right-click the com.ibm.websphere.xs.sample.airport.client JavaScript Resource and select Properties. Deselect the checkbox for WebDoclet (XDoclet) and click OK.
Problem: The web application cannot connect to the data grid. The catalog or container servers failed. Solution: Stop the server. Check that you specified the correct host name and port number. Check the logs for the server to debug the issue. Start the server to try again.
Problem: Using the best practice steps, the server does not start. Solution: Right-click the server in the Servers view. Select Clean Server on Next Start, then restart the server.
Problem: Cannot install or compile the application in the IDE. Solution: Follow the instructions to load all required files to install and compile the application.
Problem: The web application experiences Error 404 Not Found. Solution: Follow the instructions to load all required files in the correct locations.
- Problem: Runtime Exception: The ORB that comes with the Sun Java implementation does not work with WXS.
Solution: One option is to edit or create the jvm.options file. Another option is to edit your installed JRE in Eclipse.
- Either your server should contain a jvm.options file,
or your Websphere Liberty profile installation should have an etc directory with the jvm.options file in it.
If not, create the file in one of those locations or use option b.
The jvm.options file must contain the path to the endorsed directory:
- -Djava.endorsed.dirs=<liberty_installation>\wxs\lib\endorsed
- Each time you create a workspace in Eclipse, specify which JRE to use for Java projects.
Go to...
-
Window > Preferences | Java | Installed JREs
- Check which JRE to use. If none are correct, click Add, then select standard vm and Next. Select the check box for the appropriate JRE directory from the list of installed JREs.
- Either your server should contain a jvm.options file,
or your Websphere Liberty profile installation should have an etc directory with the jvm.options file in it.
If not, create the file in one of those locations or use option b.
The jvm.options file must contain the path to the endorsed directory:
More information
- For help and support, see the WXS forum.
- For the latest information, samples, hints, tips, and troubleshooting information, see the WXS community Wiki.
- Use the following links for additional information about WXS: