9.8.11 Setting up a foreign bus link to a service integration bus
To define a foreign bus to the bus from which you want to access it...
1. Select Service integration | Buses.
2. Select the bus from which you want to access the foreign bus.
3. Select Foreign buses in the Topology section.
4. Click New.
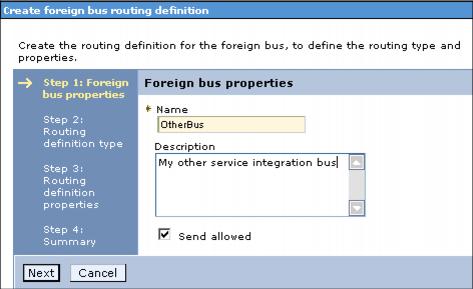
5. Provide the Name of the foreign bus.
Important: When your foreign bus is a bus, then this name must match exactly the name of that bus.
Figure 9-59 Creating a new foreign bus
Checking the Send allowed box allows this bus to send messages to destinations on the foreign bus. This is the default.
You can change this setting at any time. This can be useful if you want to disable a foreign bus for a short time, for example, while configuration changes are being made.
Click Next.
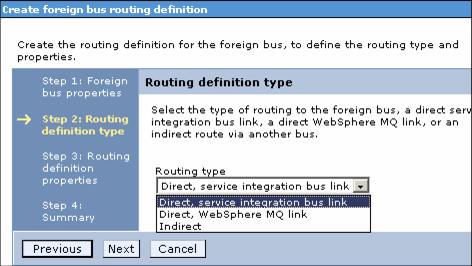
6. Select the appropriate value for the routing type.
Figure 9-60 Selecting the type of foreign bus
To define another bus, select Direct, service integration bus link from the menu. Click Next.
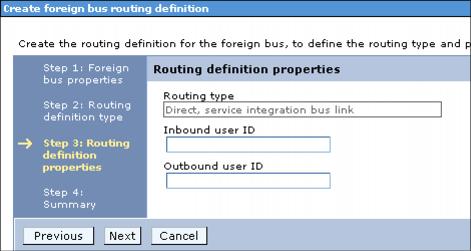
7. Optionally, define outbound and inbound user IDs.
Figure 9-61 Define inbound and outbound user IDs
The inbound user ID authorizes individual messages arriving from the foreign bus to destinations in this bus. When set, this property replaces the user ID in messages entering this bus from the foreign bus. If this is not a secure bus, this property does not affect messages.
The outbound user ID replaces the user ID that identifies the source of a message in all messages being sent to the foreign bus. When set, this property replaces the user ID in messages leaving this bus for the foreign bus. The foreign bus also uses this ID to authorize the message to its destination if both buses are secure buses and the foreign bus has not overridden the user ID with its own inbound user ID.
8. Click Next.
9. Click Finish and save your changes.


