Table 3-1 shows a summary of the options you have for creating a deployment manager. The table shows the options and results you will see depending on which path (typical or advanced) you take.
| Typical settings
| Advanced options
|
| The console is deployed by default.
| You can choose whether to deploy the console. We recommend that you do so.
|
| The profile name is Dmgrxx by default, where xx is 01 for the first deployment manager profile and increments for each one created. The profile is stored in <was_home>/profiles/Dmgrxx.
| You can specify the profile name and its location.
|
| The cell name is <hostname>Cellxx.
The node name is <hostname>CellManagerxx.
The host name is prefilled in with your system's host name.
| You can specify the node, host, and cell names.
|
|
You can enable administrative security (yes or no). If you select yes, you will be asked to specify a user name and password that will be given administrative authority.
|
| TCP/IP ports will default to a set of ports not used by any profiles in this WebSphere installation instance.
| Use the recommended ports (unique to the installation), use the basic defaults, or select port numbers manually.
|
| (Windows) The deployment manager will be run as service.
| (Windows) You can choose whether to the deployment manager will run as a service.
|
Deployment manager profile options
The following steps outline the process of creating a deployment manager.
| 1.
| Start the Profile Management Tool and click Next on the Welcome page.
|
| 2.
| Select the deployment manager profile option. Click Next.
|
| 3.
| Select whether to take the typical settings or to go through the advanced windows. The options you see next depend on the path you take.
|
If Typical is selected, then you will only see one more option (to enable security).
If Advanced is selected, you will continue with the following steps.
| 4.
| Select whether to deploy the console application. This is recommended, but if you choose not to, install it after profile creation.
|
| 5.
| Enter a unique name for the profile or accept the default. The profile name will become the directory name for the profile files (see Figure 3-6). Click the box if you want this to be the default profile for receiving commands. Select the location for the profile and click Next.
|
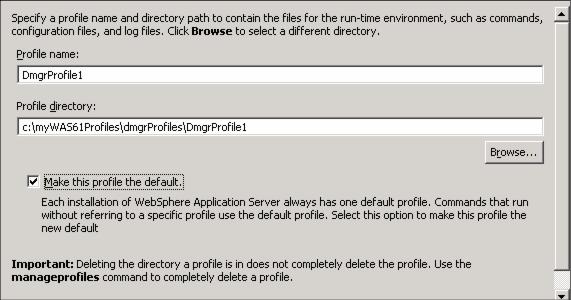
Figure 3-6 Creating a deployment manager profile: Enter name and location
| 6.
| Enter the node, host, and cell names. These default based on the host name of your system. The wizard recognizes if there are existing cells and nodes in the installation and takes this into account when creating the default names
|

Figure 3-7 Creating a deployment manager profile: Enter cell, host, and node names
Click Next.
| 7.
| Choose whether to enable administrative security. If you enable security here, you will be asked for a user ID and password that will be added to a file-based user registry with the Administrative role. Click Next.
|
| 8.
| The wizard presents a list of TCP/IP ports for use by the deployment manager. If you already have existing profiles on the system, this is taken into account when the wizard selects the port assignments. However, you should verify that these ports will be unique on the system.
|
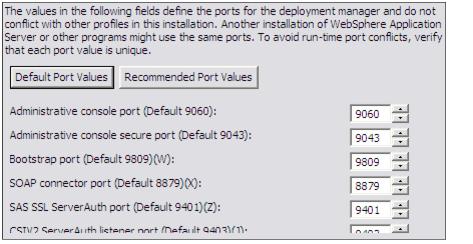
Figure 3-8 Creating a deployment manager profile: Select ports
|
Note two ports: You might want to note the following ports for later use:
| -
| SOAP connector port: If you use the addNode command to federate a node to this deployment manager, know this port number. This is also the port you connect to when using the wsadmin administration scripting interface.
|
| -
| Administrative console port: We need to know this port in order to access the console. When you turn on security, know the Administrative console secure port.
|
|
| 9.
| On Windows systems, you have the option of running the deployment manager as a service. This provides you a simple way of automatically starting the deployment manager when the system starts. If you would like to run the process as a Windows service, check the box and enter the values for the logon and startup type.
|
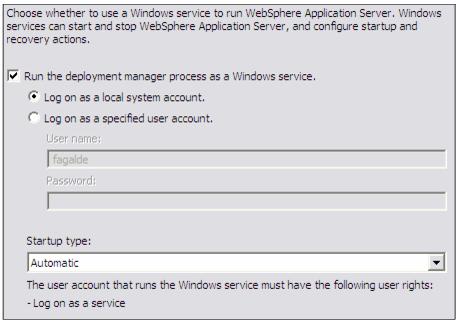
Figure 3-9 Creating a deployment manager profile: Run as a Windows service
Note that the window lists the user rights the user ID you select needs to have. If the user ID does not have these rights, the wizard will automatically add them.
Click Next.
| 10.
| Review the options you have chosen and click Next to create the profile. After the wizard has finished, you will be presented with the window in Figure 3-10.
|
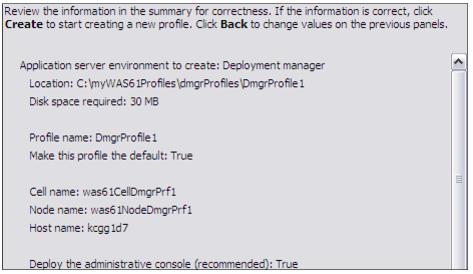
Figure 3-10 Creating a deployment manager profile: Finish
This final window indicates the success or failure of the profile creation. If you have errors, check the log at:
<was_home>/logs/manageprofiles/<profile_home>_create.log
You will also find logs for individual actions stored in:
<profile_home>/logs
| 11.
| Click Finish to close the wizard and start the First Steps application, as shown in Figure 3-11.
|

Figure 3-11 Deployment manager First Steps menu