|
|
In order to replace the hardware, you should first ensure that all processes on the node are stopped:
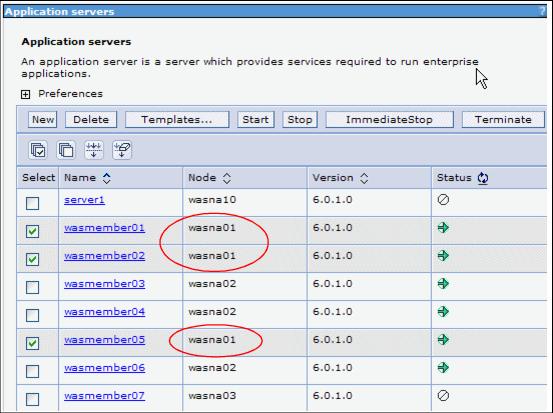
| 1. | Select Servers | Application servers and select all appservers that belong to node wasna01, as shown in Figure 4-4. Then, click Stop. In our example the servers to stop are wasmember01 and wasmember02 (which are part of wascluster01) as well as wasmember05 (which is part of wascluster02). |

Figure 4-4 Select the appservers that belong to node wasna01
Depending on the number of appservers that you have chosen, it might take several minutes to stop all appservers. The Server status feedback panel gives you continuous information about the stop procedure. When all processes have stopped, click OK to proceed.
Attention: When using an application that uses the default messaging provider, such as Trade 6, it is important to drop all tables that were created for the messaging engines (MEs). The MEs have a UUID assigned to them upon creation/instantiation and when creating a new appserver (cluster member), there is a UUID mismatch, and the appserver cannot assign the ME.
You can obtain the schema names used for each of your messaging engines by selecting Service integration | Buses | EJBcluster | Messaging engines. For each messaging engine, click its link, select Additional Properties | Data store, and write down the value of the Schema name field. Connect to the applications' database and list the tables for each of the schemas. Then, drop all tables listed for each schema.
For more information, visit the WAS V6 InfoCenter. Search for the sections Tips for troubleshooting messaging engines or Problems when re-creating a Service Integration Bus.
http://publib.boulder.ibm.com/infocenter/ws60help/index.jsp
| 2. | You can now remove the node from the cell configuration. Click System administration | Nodes. Select wasna01 and click Remove Node. Note that the Node Agent must be active for this procedure to work. |
Click OK on the Remove node confirmation screen. Verify that there is no error on the console. Save your changes.
|
Tip: Alternatively, use the removeNode command from the profiles' \bin directory. |
|
The removeNode command only removes the node-specific configuration from the cell. It does not uninstall any applications that were installed previously as the result of executing an addNode -includeapps command. This is because the application or applications can subsequently deploy on other appservers in the cell. As a consequence, an addNode -includeapps command executed after a removeNode command was done does not move applications into the cell again because they already exist from the first addNode command. Thus, appservers added subsequently to the node do not contain any applications. To deal with this situation, add the node and use the Deployment Manager to manage the applications using the application administration panels or by adding new appservers to a cluster that hosts the application or applications. |
| 3. | On the System administration | Nodes panel, select all remaining nodes in the cell and click Full Resynchronize to make sure that all node's repositories are synchronized with the Deployment Manager. |
| 4. | Now, you can remove the hardware that previously hosted the wasna01 node from the network without impacting the WebSphere system. Remove the machine from the network. |