|
|
We assume that the new hardware or new LPAR has the correct operating system level and any needed maintenance levels or fixpacks installed. (We refer to the new machine or LPAR as the new system for the remainder of this section.)
To see the latest list of IBM WAS ND V6 hardware and software requirements, visit:
http://www.ibm.com/software/webservers/appserv/was/requirements/
We reuse the same configuration as the replaced node (wasna01) had for our new system. Follow these steps to install and configure the new system:
| 1. | Install the WAS ND software. You also need to re-install all refresh packs and fixes that were previously installed. WebSphere reinstallation can be done either manually or using a recent file system backup. |
| 2. | After successful installation of the core product files, create a custom profile and federate the node into the cell. |
Use either the Profile creation wizard or the wasprofile command to do so. Refer to Chapter 4, "Getting started with profiles" of WAS V6 System Management and Configuration Handbook, SG24-6451 for detailed information about profile management.
Consider the following:
|
|
|
|
|
|
| 3. | Federation of the node, using either one of the federation options, starts the Node Agent automatically so that use the Administrative Console for further configuration. |
Open the Administrative Console and verify that the Node Agent has indeed been started (System administration | Node agents). Alternatively use the serverStatus nodeagent command.
| 4. | Recreate the cluster members wasmember01 and wasmember02 in wascluster01 and the cluster member wasmember05 in wascluster02. Cluster member creation is explained in great detail in Chapter 8, "Implementing the sample topology" of IBM WebSphere V6 Scalability and Performance Handbook, SG24-6392. |
In the Administrative Console, go to Servers | Clusters and follow these steps:
| a. On the Server Cluster configuration panel, click wascluster01 | Cluster members | New. Create two cluster members called wasmember01 and wasmember02 to the node wasna01. |
| b. Back on the Server Cluster configuration panel, click wascluster02 | Cluster members | New. Add wasmember05 again to node wasna01. |
| c. Save your changes. |
|
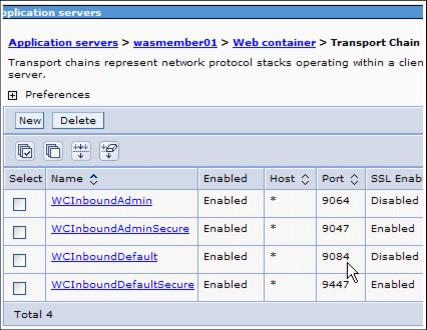
When a cluster member is created, WebSphere assigns new port numbers automatically for two WebContainer Inbound Chains called WCInboundDefault and WCInboundDefaultSecure. This setting is found under Servers | Application servers | App_Server_Name | Web Container Settings | Web container transport chains. If you did not use the default ports in your original configuration and would like to maintain the previously used port numbers for the newly created cluster members, be sure to go to this panel and make the appropriate changes (assuming that the original port numbers do not conflict with other ports on the new system). See Figure 4-5. |

Figure 4-5 Transport Chain ports for cluster member wasmember01
5. Repeat any configuration changes applied to the original cluster members, such as heap size and other individual settings. The new cluster members are created based on the configuration of the first cluster member and take their values from there.
| 6. | Depending on your cell configuration, you might need to regenerate and propagate the Web server plug-in to pickup the new cluster members' configuration. This is needed if automatic generation and propagation of the plug-in is not enabled or if your Web servers are neither on a managed node nor an IBM HTTP Server v6 on an unmanaged node. See 15.3.2, Web server plug-in file (plugin-cfg.xml) management for more information about this topic. |
To regenerate and propagate the Web server plug-in:
| a. Select Servers | Web servers, select your Web server and select Generate Plug-in. |
| b. After regeneration, select the Web server and click Propagate Plug-in to ensure that the Web server has access to the most current copy of the plugin-cfg.xml file. |
| 7. | You are now ready to start the appservers on the new system. Go to Servers | Application Servers, select wasmember01, wasmember02, and wasmember05, and click Start. |
| 8. | Verify that you can indeed access the application on the added appservers by accessing the application directly through the WebContainer Inbound Chain of each cluster member. |