Create a Secure Sockets Layer configuration
Overview
SSL configurations control the behavior of client and server SSL endpoints. Create SSL configurations with unique names within specific management scopes on the inbound and outbound tree in the configuration topology.
You must decide at which scope define an SSL configuration...
- cell
- node group
- node
- server
- cluster
- endpoint
...from the least specific to the most specific scope. When you define an SSL configuration at the node scope, for example, only those processes within that node can load the SSL configuration; however, any processes at the endpoint in the cell can use an SSL configuration at the cell scope, which is higher in the topology.
Decide which scope to associate with the new SSL configuration, according to the processes that the configuration affects.
For example, an SSL configuration for a hardware cryptographic device might require a keystore that is available only on a specific node, or you might need an SSL configuration for a connection to a particular SSL host and port. See Dynamic outbound selection of Secure Sockets Layer configurations.
Complete the following steps in the console:
Procedure
- Click...
Security | SSL certificate and key management | Manage endpoint security configurations
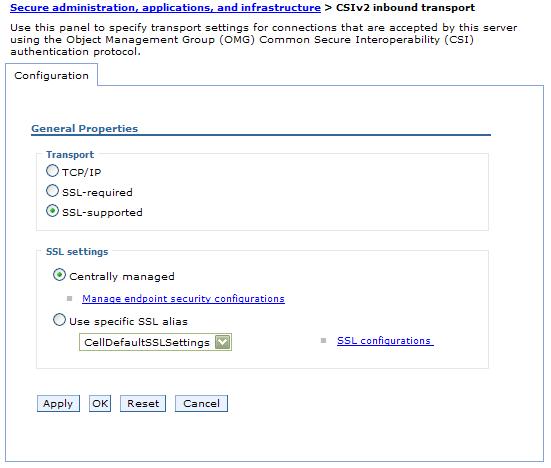
- Select an SSL configuration link on either the Inbound or Outbound tree, depending on the process you are configuring.
- If the scope is already associated with a configuration and alias, the SSL configuration alias and certificate alias are noted in parentheses.
- If the parenthetical information is not included, then the scope is not associated. Instead, the scope inherits the configuration properties of the first scope above it that is associated with an SSL configuration and certificate alias.
The cell scope must be associated with an SSL configuration because it is at the top of the topology and represents the default SSL configuration for the inbound or outbound connection.
- If the scope is already associated with a configuration and alias, the SSL configuration alias and certificate alias are noted in parentheses.
- Click SSL configurations under Related Items.
You can view and select any of the SSL configurations that are configured at this scope. You can also view and select these configuration at every scope that is lower on the topology.
- Click New to display the SSL configuration panel.
You cannot select links under Additional Properties until you type a configuration name and click Apply.
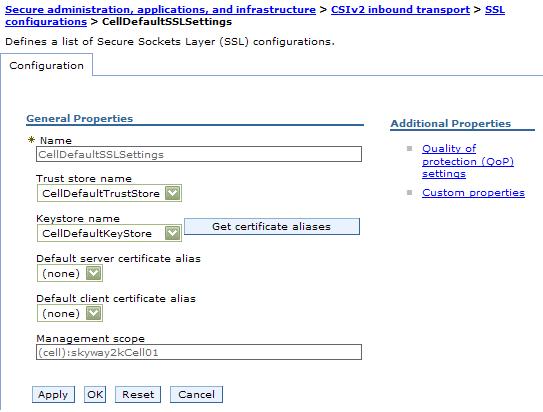
- Type an SSL configuration name.
This field is required. The configuration name is the SSL configuration alias. Make the alias name unique within the list of SSL configuration aliases that are already created at the selected scope. The new SSL configuration uses this alias for other configuration tasks.
- Select a truststore name from the drop-down list.
A truststore name refers to a specific truststore that holds signer certificates that validate the trust of certificates sent by remote connections during an SSL handshake.
- Select a keystore name from the drop-down list.
A keystore contains the personal certificates that represent a signer identity and the private key that WAS uses to encrypt and sign data.
- If you change the keystore name, click...
Get certificate aliases
to refresh the list of certificates from which you can choose a default alias. WAS uses a server alias for inbound connections and a client alias for outbound connections.
- If there is no keystore in the list, see Creating a keystore configuration to create a new keystore.
- If you change the keystore name, click...
- Choose a default server certificate alias for inbound connections.
Select the default only when you have not specified an SSL configuration alias elsewhere and have not selected a certificate alias. A centrally managed SSL configuration tree can override the default alias.
- Choose a default client certificate alias for outbound connections.
Select the default only when the server SSL configuration specifies an SSL client authentication.
- Review the identified management scope for the SSL configuration.
Make the management scope in this field identical to the link you selected in Step 2. To change the scope, click a different link in the topology tree and continue at Step 3.
- Click Apply if you intend to configure Additional Properties. If not, go to Step 24.
- Click Quality of protection (QoP) settings under Additional Properties.
QoP settings define the strength of the SSL encryption, the integrity of the signer, and the authenticity of the certificate.
- Select a client authentication setting to establish an SSL configuration for inbound connections and for clients to send their certificates, if appropriate.
- If you select None, the server does not request that a client send a certificate during the handshake.
- If you select Supported, the server requests that a client send a certificate. However, if the client does not have a certificate, the handshake might still succeed.
- If you select Required, the server requests that a client send a certificate. However, if the client does not have a certificate, the handshake fails.
The signer certificate that represents the client must be in the truststore that you select for the SSL configuration. By default, servers within the same cell trust each other because they use the common truststore, trust.p12, that is located in the cell directory of the configuration repository. However, if you use keystores and truststores that you create, perform a signer exchange before you select either Supported or Required.
- If you select None, the server does not request that a client send a certificate during the handshake.
- Select a protocol for the SSL handshake.
- The default protocol, SSL_TLS, supports client protocols...
- TLSv1
- SSLv3
- SSLv2
- The TLSv1 protocol supports TLS and TLSv1. The SSL server connection must support this protocol for the handshake to proceed.
- The SSLv3 protocol supports SSL and SSLv3. The SSL server connection must support this protocol for the handshake to proceed.
Do not use the SSLv2 protocol for the SSL server connection. Use it only when necessary on the client side.
- The default protocol, SSL_TLS, supports client protocols...
- Select one of the following options:
- A predefined JSSE provider.
The IBMJSSE2 provider is recommended for use on all platforms which support it. It is required for use by the channel framework SSL channel. When FIPS is enabled, IBMJSSE2 is used in combination with the IBMJCEFIPS crypto provider.
- A custom JSSE provider. Type a provider name in the Custom provider field.
- A predefined JSSE provider.
- Select from among the following cipher suite groups:
Strong WAS can perform 128-bit confidentiality algorithms for encryption and support integrity signing algorithms. However, a strong cipher suite can affect the performance of the connection. Medium WAS can perform 40-bit encryption algorithms for encryption and support integrity signing algorithms. Weak WAS can support integrity signing algorithms but not to perform encryption. Select this option with care because passwords and other sensitive information that cross the network are visible to an Internet Protocol (IP) sniffer. Custom you can select specific ciphers. Any time you change the ciphers that are listed from a specific cipher suite group, the group name changes to Custom. - Click Update selected ciphers to view a list of the available ciphers for each cipher strength.
- Click OK to return to the new SSL configuration panel.
- Click Trust and key managers under Additional Properties.
- Select a default trust manager for the primary SSL handshake trust decision.
- Choose IbmPKIX when you require certificate revocation list (CRL) checking using CRL distribution points in the certificates.
- Choose IbmX509 when you do not require CRL checking but do need increased performance. You can configure a custom trust manager to perform CRL checking, if necessary.
- Choose IbmPKIX when you require certificate revocation list (CRL) checking using CRL distribution points in the certificates.
- Define a custom trust manager, if appropriate. You can define a custom trust manager that runs with the default trust manager you select. The custom trust manager must implement the JSSE interface...
javax.net.ssl.X509TrustManager
...and, optionally, the interface...
com.ibm.wsspi.ssl.TrustManagerExtendedInfo
...to obtain product-specific information.
- Click...
Security | SSL certificate and key management | Manage endpoint security configurations | SSL_configuration | Trust and key managers | Trust managers | New
- Type a unique trust manager name.
- Select the Custom option.
- Type a class name.
- Click OK. When you return to the Trust and key managers panel, the new custom trust manager displays in the Additional ordered trust managers field. Use the left and right list boxes to add and remove custom trust managers.
- Click...
- Select a key manager for the SSL configuration.
By default, IbmX509 is the only key manager unless you create a custom key manager.
If you choose to implement your own key manager, you can affect the alias selection behavior because the key manager is responsible for selecting the certificate alias from the keystore. The custom key manager might not interpret the SSL configuration as the WAS key manager IbmX509 does. To define a custom key manager, click...
Security | Secure communications | SSL configurations | SSL_configuration | Trust and key managers | Key managers | New
- Click OK to save the trust and key manager settings and return to the new SSL configuration panel.
- Click Save to save the new SSL configuration.
Results
You can override the default trust manager when you configure at least one custom trust manager and set the property...
com.ibm.ssl.skipDefaultTrustManagerWhenCustomDefined
...to true. Click Custom Property on the SSL configuration panel. However, if you change the default, you leave all the trust decisions to the custom trust manager, which is not recommended for production environments. In test environments, use a dummy trust manager to avoid certificate validation. Remember that these environment are not secure.
What to do next
In this release of WAS, you can associate SSL configurations with protocols using one of the following methods:
- Set the SSL configuration on the thread programmatically
- Associate the SSL configuration with an outbound protocol, and target host and port.
- Associate the SSL configuration directly using the alias.
- Manage the SSL configurations centrally by associating them with SSL configuration groups or zones that are scoped for endpoints.
SSL certificate and key management
SSL configurations for selected scopes
SSL configurations collection
SSL configuration settings
Create a custom trust manager configuration
Create a custom key manager
Associate a SSL configuration dynamically with an outbound protocol and remote secure endpoint
Quality of protection (QoP) settings
ssl.client.props client configuration file
Related tasks
Automate SSL configurations using scripting