Using WAS sample custom advisor
A sample custom advisor for WAS is included in the <install_path>/servers/samples/CustomAdvisors directory.
Two files are used to implement the advisor:
The servlet returns the following string in case of success:
LBAdvisor/0.92 100 Fri Dec 13 16:05:35 EST 2002
The advisor parses the string to get the WebSphere status (100) and informs the Dispatcher monitor.
Notes: We modified the Java file ADV_was.java to reflect our settings. | |
| To reflect the new advisor name, the line: |
static final String ADV_WAS_NAME = "was";
was changed to:
static final String ADV_WAS_NAME = "was5";
static final String HTTP_GOOD = "HTTP/1.1 200 ok";
was changed to:
static final String HTTP_GOOD = "HTTP/1.1 200 OK";
static final String SERVLET_LOCATION ="/servlet/LBAdvisor;
was changed to:
static final String SERVLET_LOCATION ="advisor/servlet/LBAdvisor;
To check whether the appserver was able to serve a servlet request, we installed a simplified version of the advisor servlet on our sample topology, which always returned a status of 100, following these steps:
| Transfer the plug-in configuration file, <WAS_HOME>/config/cells/plugin-cfg.xml, to the corresponding directories on the Web server machines (web1 and web2 in our case). |
We located the original cluster definition in the plugin-cfg.xml file, as shown in Example 4-3.
Example 4-3 Original cluster definition in plugin-cfg.xml

<ServerCluster Name="AdvisorCluster">
<Server CloneID="u85bjrri" LoadBalanceWeight="2" Name="Advisor2">
<Transport Hostname="app2" Port="9083" Protocol="http"/>
<Transport Hostname="app2" Port="9446" Protocol="https">
<Property name="keyring" value="C:\Program Files\WebSphere\AppServer\etc\plugin-key.kdb"/>
<Property name="stashfile" value="C:\Program Files\WebSphere\AppServer\etc\plugin-key.sth"/>
</Transport>
</Server>
<Server CloneID="u85bjt1l" LoadBalanceWeight="2" Name="Advisor1">
<Transport Hostname="app1" Port="9085" Protocol="http"/>
<Transport Hostname="app1" Port="9448" Protocol="https">
<Property name="keyring" value="C:\Program Files\WebSphere\AppServer\etc\plugin-key.kdb"/>
<Property name="stashfile" value="C:\Program Files\WebSphere\AppServer\etc\plugin-key.sth"/>
</Transport>
</Server>
<PrimaryServers>
<Server Name="Advisor2"/>
<Server Name="Advisor1"/>
</PrimaryServers>
</ServerCluster>

We directed all the HTTP requests from web1 to app1:9085 and HTTPS requests to app1:9448, as shown in Example 4-4.
Example 4-4 New cluster definition on server web1

<ServerCluster Name="AdvisorCluster">
<Server CloneID="u85bjt1l" LoadBalanceWeight="2" Name="Advisor1">
<Transport Hostname="app1" Port="9085" Protocol="http"/>
<Transport Hostname="app1" Port="9448" Protocol="https">
<Property name="keyring" value="C:\Program Files\WebSphere\AppServer\etc\plugin-key.kdb"/>
<Property name="stashfile" value="C:\Program Files\WebSphere\AppServer\etc\plugin-key.sth"/>
</Transport>
</Server>
<PrimaryServers>
<Server Name="Advisor1"/>
</PrimaryServers>
</ServerCluster>

We also directed all the HTTP requests from web2 to app2:9083 and HTTPS requests to app2:9446, as shown in Example 4-5.
Example 4-5 New cluster definition on server web2

<ServerCluster Name="AdvisorCluster">
<Server CloneID="u85bjrri" LoadBalanceWeight="2" Name="Advisor2">
<Transport Hostname="app2" Port="9083" Protocol="http"/>
<Transport Hostname="app2" Port="9446" Protocol="https">
<Property name="keyring" value="C:\Program Files\WebSphere\AppServer\etc\plugin-key.kdb"/>
<Property name="stashfile" value="C:\Program Files\WebSphere\AppServer\etc\plugin-key.sth"/>
</Transport>
</Server>
<PrimaryServers>
<Server Name="Advisor2"/>
</PrimaryServers>
</ServerCluster>

dsserver stop
dsserver start
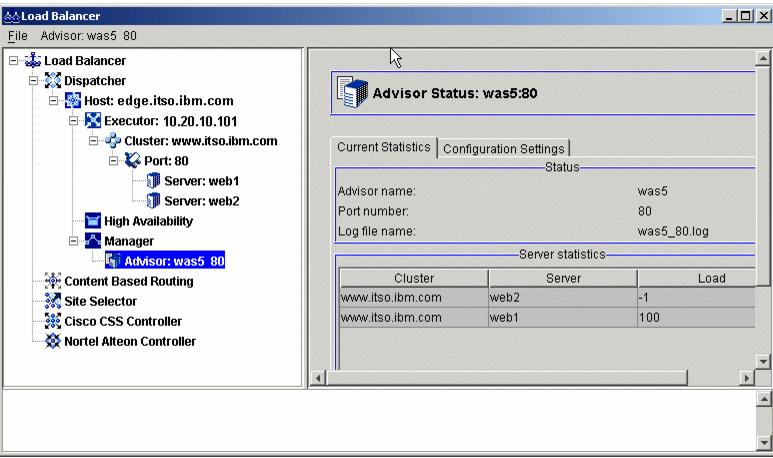
dscontrol advisor start was5 80
where was5 is your custom advisor name and 80 is the port number, where the advisor opens a connection with the target server.

Figure 4-10 WebSphere advisor status
If there is no response, one option is to select the Configuration Settings pane and change the advisor logging level to Advanced, for example, then look at the log file at <install_path>/servers/logs/dispatcher. A lot of detailed information is recorded, showing all requests and responses, which may help to locate where the problem is occurring.
If we simulate a failure by stopping the appserver on host was2 or disconnecting the network cable, we can see how the requests are directed to the available application server (associated to the web1 server). We can see the graphical statistics of the traffic by selecting the Monitor option under the cluster port the advisor is associated with, as shown in Figure 4-11.

Figure 4-11 Request distribution after one appserver becomes unavailable
WebSphere is a trademark of the IBM Corporation in the United States, other countries, or both.
IBM is a trademark of the IBM Corporation in the United States, other countries, or both.