Installing Dynamic Cache Monitor
The Dynamic Cache Monitor (Cache monitor) is an installable Web application that displays simple cache statistics, cache entries and cache policy information. The CacheMonitor.ear file is available in the <install_root>/installableApps directory of your appserver. For security reasons, not use the same host and port as used for your application. Therefore you first need to create virtual hosts and host aliases for the Cache monitor application:
For vertical clustering, this must be repeated on every machine in the cluster.
We are using three clustered appservers in our environment: Trade3Server1 and Trade3Server3 reside on the same machine, so we need different ports for these two application servers. Trade3Server2 resides on a different machine, so we can use the same port number as was used for Trade3Server1. Our configuration is as follows:
| Port 9082 for Trade3Server1 and Trade3Server2 |
| Port 9085 for Trade3Server3 |
Now that these preliminary tasks are done, you can install the Cache monitor application. Here is how to do this:
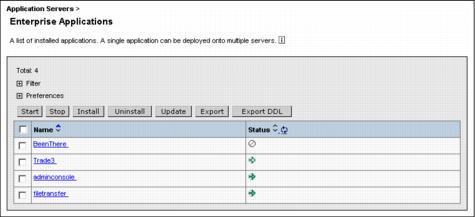
Figure 14-4 Installed Enterprise Applications

Figure 14-5 Cache monitor installation - Select CacheMonitor.ear
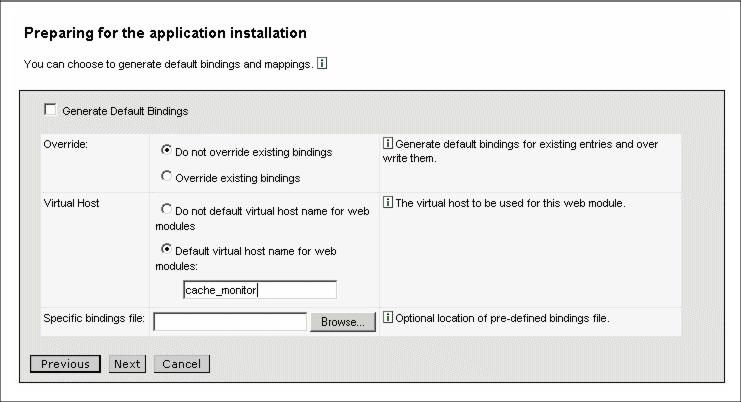
Figure 14-6 Select Virtual Host - cache_monitor

Figure 14-7 Cache monitor installation - Installation options
We have created a virtual host called "cache_monitor" in step 1 which we are now referring to.
Check Dynamic Cache Monitor and select the cache_monitor Virtual Host from the drop-down menu. Then click Next.
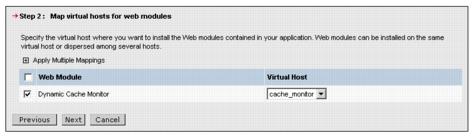
Figure 14-8 Cache monitor installation - Map virtual hosts for Web modules
On this panel, you need to select your appserver and the Dynamic Cache Monitor Module. Click Apply, then click Next.
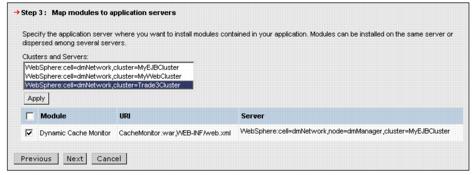
Figure 14-9 Cache monitor installation - Map modules to appservers
Select Administrator and All Authenticated, then click Next once more.

Figure 14-10 Cache monitor installation - Map security roles to users/groups
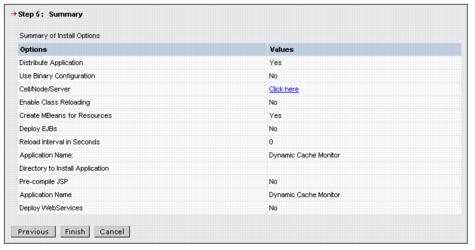
Figure 14-11 Cache monitor installation - Summary
Generally, you can access the Cache monitor using a Web browser and the URL
http://<your hostname>:<your port_number>/cachemonitor
We are using these URLs:
| http://app1.itso.ibm.com:9082/cachemonitor/ for Trade3Server1 |
| http://app2.itso.ibm.com:9082/cachemonitor/ for Trade3Server2 |
| http://app1.itso.ibm.com:9085/cachemonitor/ for Trade3Server3 |
If your appserver is configured for global security, you need to provide a valid user ID and password after invoking the above URL.
Figure 14-12 shows the Cache monitor start page which allows access to the cache statistics and some configurable parameters. These are configured using the Dynamic Cache Administrative Console (see Enabling dynamic cache service).
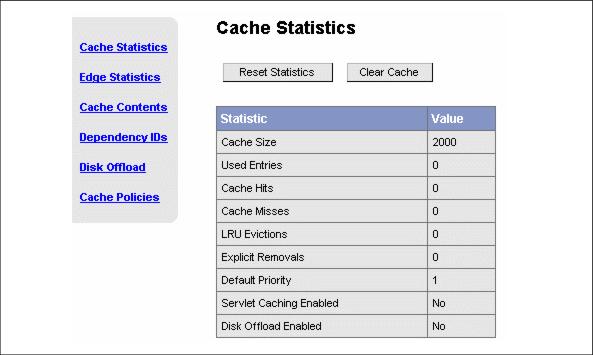
Figure 14-12 WebSphere Cache monitor start page
We explain some functionality of the Cache monitor as we work on our sample scenarios, but please use the WebSphere InfoCenter to fully understand all functionality. The WebSphere Information Center is available at:
http://www.ibm.com/software/webservers/appserv/infocenter.html
The ESI processor's cache is also monitored through the Dynamic Cache Monitor application. In order for the ESI processor's cache to be visible in the Cache monitor, the DynaCacheEsi application must be installed and the esiInvalidationMonitor property must be set to true in the plugin-cfg.xml file. See External caching by Web server plug-in for more information on the ESI processor.
WebSphere is a trademark of the IBM Corporation in the United States, other countries, or both.
IBM is a trademark of the IBM Corporation in the United States, other countries, or both.