Initial WebSphere MQ configuration
In this example the WebSphere MQ configuration underpins both how WAS and WebSphere Business Integration Event Broker operate. WebSphere MQ clustering facilities will be used for workload management of messages, failover and for ease of system administration.
A cluster is a group of queue managers set up in such a way that the queue managers can communicate directly with one another without the need for complex configuration. As well as the WebSphere MQ manuals there is also some good information on configuring WebSphere MQ clusters in chapters 8 and 12 of the redbook Patterns: Self-Service Application Solutions Using WebSphere V5.0, SG24-6591.
Figure 15-17 shows the queues that need to be configured for this example to work.

Figure 15-17 The queues in the WebSphere MQ cluster
The way in which MQ clustering works is to first join a number of queue managers together into a cluster (using commands or the GUI). This now means that each queue manager knows about any queue that has been configured as clustered. For example, WBRK_QM has a queue called TRADE_MAINFRAME defined under it and set as shared in the cluster. From TRADEQM1's perspective it can now see that there is a queue in the cluster called TRADE_MAINFRAME and it lives on WBRK_QM. Any client connecting to TRADEQM1 can simply specify that it wishes to place a message on TRADE_MAINFRAME and the WebSphere MQ cluster will do the work of getting the message to WBRK_QM.
This is also how workload management occurs. WebSphere MQ clustering will only workload manage messages when there is more than one remote destination for the message. If a client connects to WBRK_QM to place a message on TRADE_RESPONSE then WBRK_QM can see two TRADE_RESPONSE queues, one on TRADEQM1 and one on TRADEQM2. The workload management of WebSphere MQ will decide which queue to use. Should one of the queue managers not be available then the message will not be routed there, providing failover too.
However, if a client connects to TRADEQM1 to place a message on TRADE_RESPONSE then that message will not get workload managed and will go to the local queue on TRADEQM1 even though two queues with the name TRADE_RESPONSE are visible. (An exception to this is if the client specifies a different queue manager for the location of the queue, but this will still not be workload managed).
Also, once a message is delivered to a queue manager that is the end of its journey until a client picks it up, even if a failure results in that queue manager. In a cluster there is no central repository of messages, a message either exists on the sending queue manager or the receiving queue manager.
Hopefully from this explanation you can now see why it was necessary to include the back-end process. Without the back-end process in this example no workload management or failover of point-to-point messages would occur and so using WebSphere MQ clustering would not be valid for this application. If the only queue managers that existed were TRADEQM1 and TRADEQM2 then there is no need for WebSphere MQ clustering beyond configuration management.
Create queue manager on machine 1
Follow these steps to setup WebSphere MQ for use in this example:

Figure 15-18 Create a new queue manager in WebSphere MQ
c:\Program Files\IBM\WebSphere MQ\java\bin.
This will create all necessary JMS queues needed for publish/subscribe.
Create queue manager on machine 2
Repeat the steps from Create queue manager on machine 1 for machine 2, changing the queue manager name to TRADEQM2 and remembering to choose a unique port for the listener.
Create cluster
To make the steps simpler the creation of the queue manager on machine 3 will be handled later by the setup of WebSphere Business Integration Event Broker. So the next step is to configure the cluster.
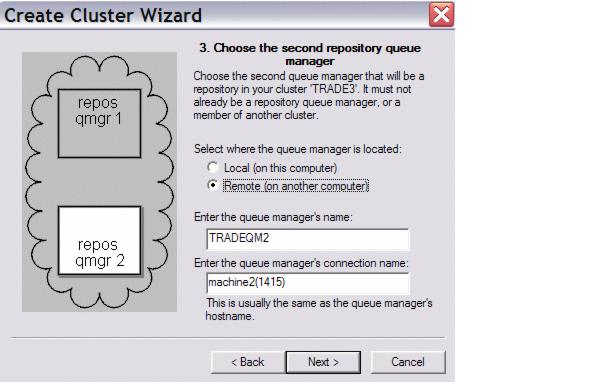
Figure 15-19 Setup second repository queue manager
Create TRADE3_RESPONSE queue on TRADEQM1
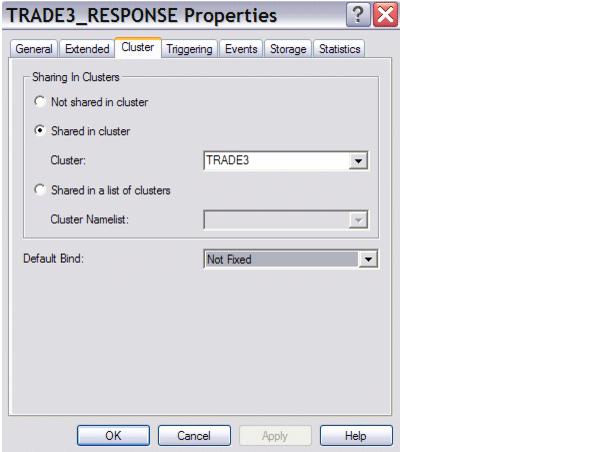
Figure 15-20 Cluster panel of creating a new queue
Under Clusters -> TRADE3 -> Queue Managers in Cluster -> TRADEQM2 -> Queues now see that a new clustered queue is visible on TRADEQM1.
Create TRADE3_RESPONSE queue on TRADEQM2
Repeat the steps you just did in Create TRADE3_RESPONSE queue on TRADEQM1 but define the queue on TRADEQM2.
Once this step is complete the main part of the WebSphere MQ configuration is finished.
WebSphere is a trademark of the IBM Corporation in the United States, other countries, or both.
IBM is a trademark of the IBM Corporation in the United States, other countries, or both.